













How to connect to an SSH server from Windows, macOS or Linux
A remote server without SSH is like a car without a key. Physically it exists, but you cannot get inside. SSH (Secure Shell) is that very key that opens the door to the server's command line from anywhere: home, office, or a coffee shop halfway around the world.
Beginners are often intimidated by the black terminal window with a blinking cursor. It seems like you need a sysadmin degree to connect. In reality, the basic command fits in three words, and the entire login process takes about a minute and a half. The main thing is knowing which tool to use for your operating system.
💡 Quick overview:
- Open Terminal (macOS/Linux) or PowerShell (Windows) and type
ssh user@server, this is the basic command for connecting to an SSH server via port 22 - If the server listens on a non-standard port, add the
-pflag:ssh user@server -p 2222, and you are in - On first connection, the terminal will ask for server fingerprint confirmation, type
yes, this is normal and happens exactly once for each new server - For everyday work, set up SSH key authentication:
ssh-keygengenerates a pair,ssh-copy-iduploads the public key to the server, and no password is needed anymore
What is SSH and when do you need it
SSH is an encrypted protocol that creates a secure tunnel between your computer and a remote server. All traffic inside the tunnel is encrypted: you type a command on your machine, it flies to the server, the server executes it and returns the response. No one in between sees your commands or passwords.
In practice, SSH is needed in three scenarios. First and foremost, server administration: you rented a VPS for a website, logged in via SSH, installed Nginx and MySQL. Second, working with Git: the git push command travels via SSH to GitHub or GitLab. Third, file transfer: the scp and sftp utilities copy data through the same SSH tunnel without requiring a separate FTP server.
Modern web development is impossible without SSH. But you do not need to be a DevOps engineer to use it, just memorize a dozen commands and pick a client for your OS.
Windows: built-in OpenSSH and PuTTY
For a long time, Windows was the only system without SSH "out of the box," which is exactly why PuTTY appeared. The situation changed in 2018: starting with Windows 10 version 1809 and in all Windows 11 releases, the OpenSSH client is built in by default.
Built-in OpenSSH client
Check whether OpenSSH Client is installed. Open Settings → Apps → Optional features, type "OpenSSH" in the search box, and make sure the component is present. If not, click "Add a feature" and select "OpenSSH Client."
Next, PowerShell or Windows Terminal. The command is the same as in Linux:
1 ssh username@server.com
On first connection, the terminal will ask for fingerprint confirmation, type yes. Then enter the server user's password, and you are in. No third-party software, everything works with built-in Windows tools.
PuTTY: when you need a graphical interface
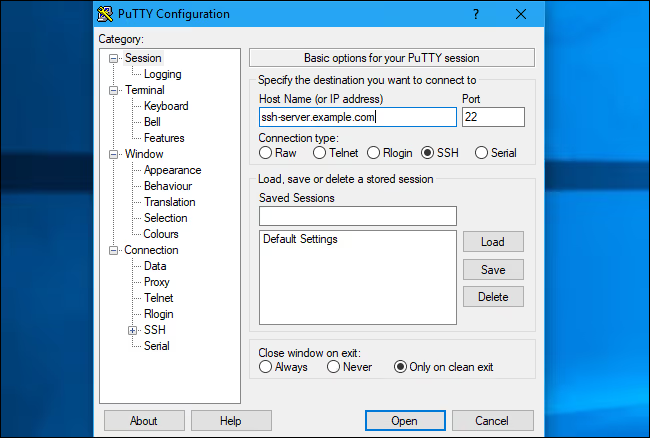
Some developers prefer GUI over command line. PuTTY is a free, open-source client that fills this need. The current version, 0.84 (May 2026), can be downloaded from the official website as a standalone putty.exe (portable launch) or an MSI installer.
The interface is minimalist: in the Host Name field, enter the IP or domain of the server, the default port is 22, and click Open. That is it. For SSH key authentication, go to Connection → SSH → Auth → Credentials and specify the path to the private key file in .ppk format. PuTTY does not understand regular OpenSSH keys, so you need to convert them using the built-in PuTTYgen utility.
What to choose: OpenSSH or PuTTY? If you constantly work with servers through the terminal, use the built-in OpenSSH, it is faster and requires no extra steps. If you connect once a month and want a visual "reminder" with saved sessions, PuTTY is more convenient. Both options work in 2026.
macOS: terminal and built-in ssh command
On macOS, everything is preinstalled. Terminal is located at Finder → Applications → Utilities → Terminal, and the ssh command is available immediately without any additional steps.
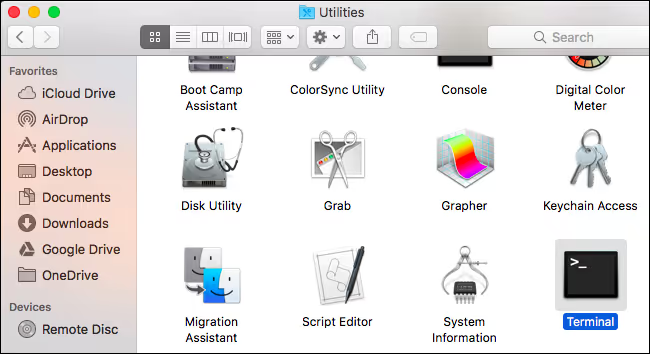
Open Terminal and run:
1 ssh username@server.com
If the SSH server listens on a non-standard port, add the -p flag:
1 ssh username@server.com -p 2222
The system will ask for the server user's password. When typing, characters are not displayed, no asterisks, no dots. This is not a bug but a security feature: no one can glimpse the password length. Type blindly and press Enter.
Linux: no additional tools needed
On any Linux distribution, the OpenSSH client is either preinstalled or can be installed with a single command:
1 sudo apt install openssh-client # Debian/Ubuntu 2 sudo dnf install openssh-clients # RHEL/CentOS/Fedora
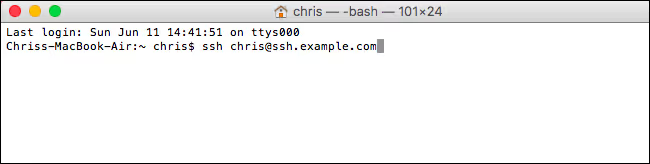
After that, it is exactly the same ssh user@server command. No difference from macOS.
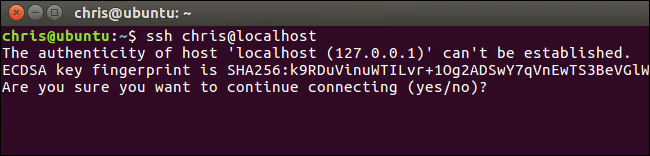
After entering the password, the system authenticates you and opens a session on the server. You see the remote machine's command line prompt, and now you can execute commands just as if you were sitting at it physically.
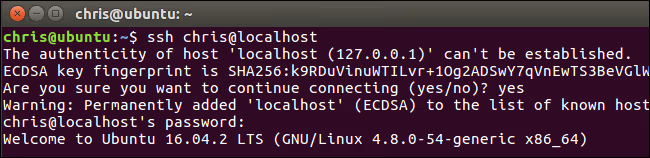
To close the session, type exit or press Ctrl+D. This is universal across all three operating systems.
What to do about the fingerprint warning
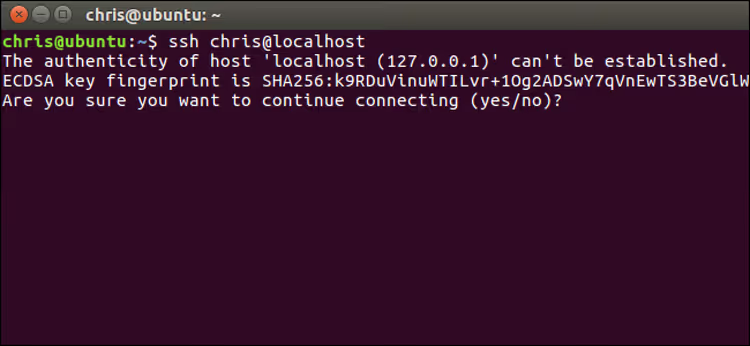
On first connection to any new server, SSH displays a message:
1 The authenticity of host 'server.com (192.168.1.1)' can't be established. 2 ECDSA key fingerprint is SHA256:... 3 Are you sure you want to continue connecting (yes/no)?
This is normal. The client is warning you: "I have never seen this server before, are you sure you are connecting to who you think?" Type yes and press Enter. The fingerprint will be saved to the ~/.ssh/known_hosts file, and the question will not appear on subsequent connections.
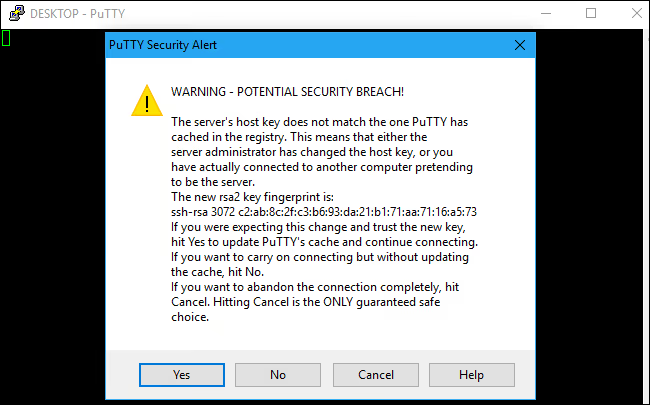
When to raise the alarm. If you have already connected to the server before but now see the warning WARNING: REMOTE HOST IDENTIFICATION HAS CHANGED!, stop. This means one of two things: the server administrator reinstalled SSH and changed the key (legitimate), or someone is trying to intercept your traffic through a man-in-the-middle (MITM) attack. In the first case, contact the administrator and clarify. In the second, do not enter your password and terminate the connection.
Useful tips: keys, config, and timeout
SSH keys instead of password
Password authentication is inconvenient for frequent connections. SSH keys solve the problem: you generate a key pair, upload the public key to the server, and the server recognizes you without asking for a password.
Key generation (on your local machine):
1 ssh-keygen -t ed25519 -C "your_email@example.com"
Copying the public key to the server:
1 ssh-copy-id username@server.com
After this, ssh username@server.com lets you in without a password. Keep the private key (~/.ssh/id_ed25519) secret, it is your digital passport.
The ~/.ssh/config configuration file
If you have multiple servers, create ~/.ssh/config and define short aliases:
1 Host production 2 HostName 203.0.113.5 3 User root 4 Port 2222 5 IdentityFile ~/.ssh/production_key 6 7 Host staging 8 HostName staging.example.com 9 User deploy
With such a config, any connection reduces to a short alias: ssh production will automatically substitute the host, user, port, and key path.
Keeping the session alive
Connection dropping after several minutes of inactivity is a classic problem. Add to ~/.ssh/config:
1 Host * 2 ServerAliveInterval 60
The client will send a keepalive packet every 60 seconds, preventing the server from closing the session.
The video above is a short and clear SSH tutorial for beginners. In 10 minutes, the author shows the full cycle: from client installation to key-based connection on Windows, macOS, and Linux.
⁉️🤔 Frequently asked questions
Can I connect to a server without a password?
Yes, and this is standard practice for production servers. Set up SSH key authentication using the
ssh-copy-idcommand, after which no password is requested at login. Protect the private key with a passphrase in case your laptop gets stolen.
How does PuTTY differ from OpenSSH?
PuTTY is a graphical client with its own key format (
.ppk), session saving, and tabs. OpenSSH is a console utility that works identically in PowerShell, macOS Terminal, and any Linux emulator. For a beginner, PuTTY is more visual; for a professional, OpenSSH is faster and more flexible. Both support port 22, non-standard ports, key authentication, and tunneling.
What port should I specify when connecting?
By default, SSH listens on port 22. If the server administrator changed the port to a different one (a common practice against brute-force attacks), ask them for the number and add the
-pflag to the command:ssh user@server -p 2222. In PuTTY, the port is set in the corresponding field of the main window.
Is it mandatory to confirm the fingerprint on first connection?
Yes, this is a critical security step. SSH shows the server's key fingerprint, you type
yes, and the fingerprint is written toknown_hosts. If you skip this step or blindly pressyeson every warning, you risk giving your password to an attacker who has spoofed the server. The verified fingerprint is usually published by the administrator in the server documentation.
So which client should you choose?
For most everyday tasks, the built-in OpenSSH is enough. It is available on Windows, macOS, and Linux, works the same way, and requires no installation. The scenario is simple: open the terminal, type ssh user@server, and work.
If you administer a dozen servers daily, spend 15 minutes on ~/.ssh/config and key authentication. This is a one-time investment that saves hours per month.
Choose PuTTY in two cases: you work on Windows and fundamentally do not want to deal with the command line, or you need a visual saved session manager with a tree structure. Otherwise, the built-in OpenSSH handles things just as well.
The main thing is to start with your first connection today. The scary black window will become a familiar working tool within half an hour.

A professional team of writers and editors specializing in creating quality content.