













 AIIllustrative image: AI-generated
🔧 Setting up a dynamic WordPress menu for logged-in users
A user registered on your site, and you want to show them a special menu. Without a plugin, WordPress doesn't offer this capability out of the box: guests, logged-in users, and administrators all see the same menu. That's inconvenient.
A guest doesn't need a "My Profile" link, and a logged-in user doesn't need to see the "Login" button. Members of a restricted section need their own menu, and subscribers need another. A solution exists and requires just one free plugin.
Let's figure out how to set up a dynamic WordPress menu in 10 minutes that automatically understands who's visiting and shows each person the relevant items.
💡 Quick overview:
- Install the free User Menus plugin from the WordPress.org catalog.
- Configure item visibility: for all visitors, guests only, or logged-in users only (down to a specific role).
- Add the user's live name and avatar to the menu through placeholders like
{first_name}. - Insert "Login," "Register," and "Logout" links with customizable redirects.
What a dynamic menu offers in practice
Imagine you run a private club with lessons. A guest sees the menu "About, Pricing, Login." After logging in, those items change to "My Courses, Progress, Profile, Logout." No confusion; everyone sees what's relevant to them.
The same approach works for online stores (guests see the catalog and cart, buyers see order history), forums, classifieds boards, and corporate portals. Anywhere users log into the system, a contextual menu improves navigation and reduces bounce rates.
Standard WordPress supports exactly one menu per theme location. To branch the logic between "guest vs user," you need an additional tool. Three options exist: write code in functions.php (flexible but requires a developer), use a full-featured solution like MemberPress (overkill if you only need menus), or use a lightweight specialized plugin. We'll explore the third option.
Free plugin User Menus: what it does and why it's great
User Menus, Nav Menu Visibility is developed by the Code Atlantic team (formerly Jungle Plugins). The plugin is free, hosted in the official WordPress.org catalog, has 80,000+ active installations, and maintains a 5 out of 5 star rating based on 1,275+ reviews. The latest update was released in 2026, with compatibility declared up to WordPress 7.0.
Three main features that make this plugin worth installing:
Visibility control. Each menu item gets assigned a rule: visible to everyone, guests only (logged out), or logged-in users only. For logged-in users, you can further restrict visibility to specific roles (for example, the "Admin Panel" item is visible only to Administrators and Editors).
Live user data in the menu. Dynamic values are inserted into the item text: first name (
{first_name}), last name ({last_name}), username ({username}), display name ({display_name}), nickname ({nickname}), email ({email}), and even avatar ({avatar}) with customizable size. The menu transforms from a static list into a personalized panel: "Hello, Alex" instead of a generic "My Profile."Login, registration, and logout links. Added with a couple of clicks through the built-in "User Links" widget in the menu editor. Redirects can be configured for each link: current page, homepage, or a custom URL.
The plugin is extremely lightweight, requiring minimum WordPress 4.6 and PHP 5.6, with no intrusive upsells. There's no premium version; all functionality is available immediately.
One note: User Menus doesn't create separate menus for different roles. It manages item visibility within a single menu. If you need to switch entire menus (guest sees Menu A, author sees Menu B), look at Conditional Menus or If Menu. But for 90% of "show/hide items" scenarios, User Menus handles the task without overhead.
Installation and setup in 3 steps
The plugin installs through the WordPress admin the standard way.
Installation: Plugins → Add New, search for "User Menus" (author: Daniel Iser, Code Atlantic). Click Install Now, then Activate.
After activation, a new settings block appears for each item in the menu editor (Appearance → Menus). Here are the steps.
Step 1: Configuring menu item visibility
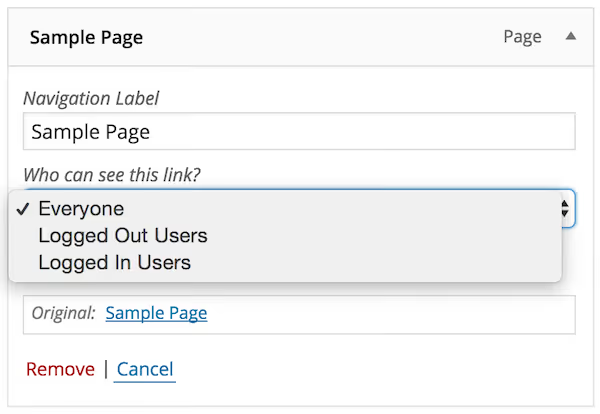
Open any existing menu item or create a new one. In the expanded block, a dropdown labeled "Who can see this link" appears with three options:
- Everyone: the item is visible to all visitors (default).
- Logged Out Users: guests only, those not logged into the system. "Login" and "Register" links go here.
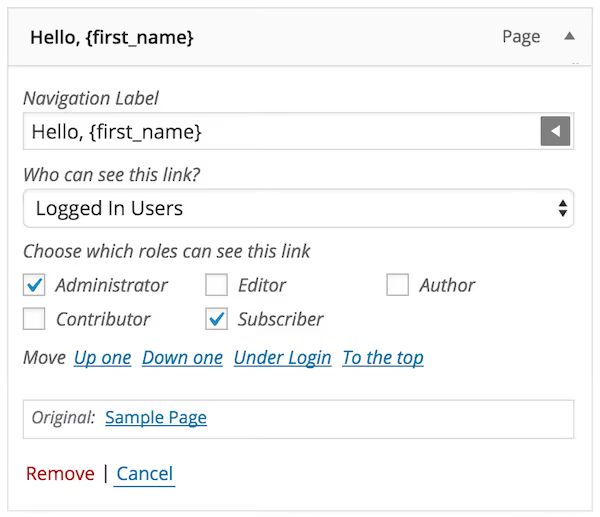
- Logged In Users: logged-in users only. Selecting this option reveals an additional setting: you can check specific roles that can see the item, or conversely, exclude certain roles from visibility.
If no role is selected, all logged-in users see the item. As soon as you check at least one role in the "Choose which roles can see this link" list, the item becomes visible only to those roles.
After configuring, click Save Menu. Verify the result in incognito mode: open the site as a guest and after logging in; the menus should differ.
Step 2: Personalization (username in the menu)
The most noticeable touch for users is when the menu addresses them by name.
Create a menu item available only to "Logged In Users." In the Navigation Label field, click the gray button with an arrow; a list of available placeholders will expand. Select the one you need (for example, {first_name}), and it will be inserted into the item text. You can combine them: "Hello, {first_name} {last_name}" or "{display_name}, Profile."
Available placeholders: first name ({first_name}), last name ({last_name}), username ({username}), display name ({display_name}), nickname ({nickname}), email ({email}), and avatar ({avatar}). For avatars, the size in pixels can be configured.
Save the menu and verify under a test user account; the navigation should display their name.
Step 3: Login and logout links
In the left column of the menu editor, under the Add menu items block, expand the User Links section. Check the links you need:
- Login: the "Login" link.
- Register: the "Register" link.
- Logout: the "Logout" link.
Click Add to Menu. The plugin will automatically add them with the correct URLs.
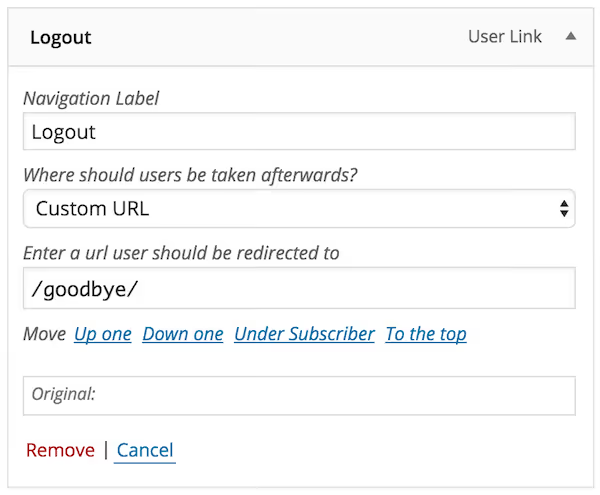
Expand the added item and configure the redirect in the dropdown "Where to redirect users afterward?":
- Current Page: the user stays on the same page (convenient for login: log in and continue from the same place).
- Homepage: redirect to the homepage.
- Custom URL: a custom page, such as a personal dashboard or a thank-you page.
I recommend setting Current Page or Custom URL (to the dashboard) for the "Login" link, and Homepage for "Logout." Registration can lead to a welcome page for new members.
After saving, test both links on the live site as both a guest and a logged-in user. The logic is automatic: guests see "Login / Register," logged-in users see "Logout."
Video tutorial: complete setup in 5 minutes
A visual walkthrough of all three steps on screen in this short guide:
After setup, verify it works on the live site: open a page in incognito mode (guest), then log in with a test account. The menu should change dynamically without reloading the page.
⁉️🤔 Frequently asked questions
Can I create different menus for different roles, not just "guest/user"?
Yes, that's exactly what the role selection in item settings is for. Set visibility to "Logged In Users," then in the "Choose which roles can see this link" block, check the needed roles. Editors see certain items, subscribers see others. If you have many roles, it's convenient to use the exclusion method: check "Choose which roles won't see this link" and remove one or two roles, leaving the menu for everyone else.
Does the plugin conflict with themes and other plugins?
In practice, User Menus works well with most themes, including custom and FSE themes. If the menu doesn't change dynamically after setup, the theme likely uses a hardcoded menu (hardcoded
wp_nav_menuwithout filters). In that case, either switch themes or replace the menu call in the template with the standard one. No conflicts with other plugins have been observed; the plugin works on standard WordPress hooks.
What if the plugin stops being updated?
User Menus is stable and performs exactly one function: managing menu item visibility. Even if the author pauses development, the plugin will continue working because it doesn't depend on external APIs and is built on native WordPress mechanisms (the
wp_nav_menu_objectsfilter). In extreme cases, the same logic can be implemented with code infunctions.php, but for typical sites, it's easier to stick with the plugin.
Do I need a caching plugin for the dynamic menu to work?
If you use aggressive page caching (WP Rocket, LiteSpeed with guest cache), the menu may "stick" in the state the first visitor saw. The solution is to enable the "Separate cache for logged-in users" option in the cache plugin settings. Most modern caching plugins can distinguish between guests and logged-in users automatically.
What to use in 2026 for dynamic WordPress menus
User Menus remains the simplest and most popular solution for the task of showing/hiding menu items based on user status. 80,000+ active installations and a 5-star rating speak for themselves: the plugin works, doesn't break, and doesn't overload your site.
If you need more refined logic (switching entire menus altogether, geo-targeting, A/B variants), look at Conditional Menus or If Menu. But in most cases, three rules ("everyone / guests / logged-in") are sufficient.
Try User Menus on a test WordPress installation. It's free, installation takes a minute, and the result is a professional dynamic menu that automatically adapts to each visitor.

A professional team of writers and editors specializing in creating quality content.