













🔄 How to understand that it's time to change the ventilation filter: 4 sure signs
The air in the house has become stale. A layer of dust on the windowsills a day after cleaning. Allergies flared up for no apparent reason.
Most likely, a clogged ventilation system filter is to blame. It runs continuously, pushing the entire volume of indoor air through itself, and when it clogs, it stops doing its job. Below are four specific signs that tell you it's time to change the filter, plus instructions on how to do it right.
💡 Quick overview:
- What signals a clogged filter sends, from dust to higher electricity bills
- How often to actually change the filter: a universal formula instead of "every six months"
- A step-by-step filter check in 2 minutes without calling a technician
- Original filter or compatible alternative: what to choose without overpaying or risking the system
Signs it's time to change the filter
A clogged filter does not stay silent. It sends signals, you just need to know where to look.
Declining air quality. The first and most noticeable sign. The air becomes heavy and stale, even if the ventilation is running normally. Dust settles faster than usual: run your finger across a horizontal surface a day after cleaning. If your finger comes away gray, the filter is no longer coping.
Worsening allergies. People with sensitive airways are the best indicator. An increase in symptoms without a change of season or other obvious triggers: runny nose, scratchy throat, red eyes, more frequent sneezing. A particle-saturated filter does not capture pollen and allergens but pushes them further around the house.
Reduced airflow. Hold your hand up to the ventilation grille. Is the flow weaker than usual? Is the fan humming louder than before? The system has to overcome the increased resistance of a clogged filter, running under strain and consuming more energy. According to the U.S. Department of Energy, replacing a dirty filter reduces system energy consumption by 5-15%.
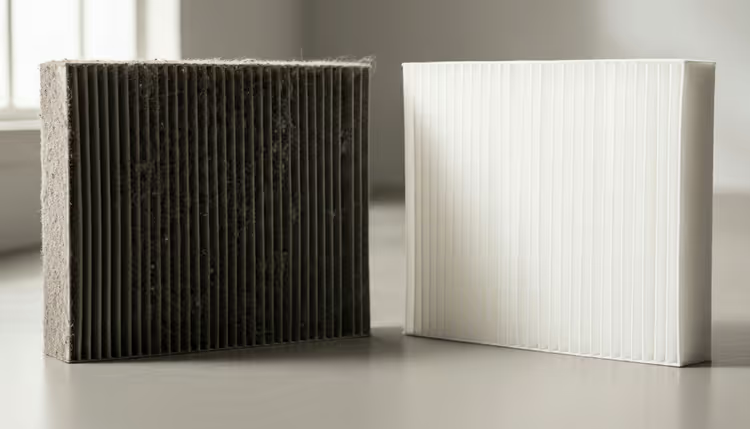
Visible soiling. The most reliable method: simply take the filter out and look. A new filter is light, almost white. A spent one is gray or brown, with a visible layer of dust and particles. If the color has changed noticeably, do not wait for a calendar date, replace it immediately.
How often to change the filter: real intervals
The universal answer "every 3-6 months" is an averaged recommendation that ignores the conditions of a specific home. The real interval depends on four factors.
Dustiness of the environment. An apartment near a busy highway, an industrial zone, a region with sandstorms: the filter clogs 2-3 times faster. In a residential area with plenty of greenery, the interval is closer to the upper limit.
Pets. Fur and dander are powerful contaminants. In a home with a dog or cat, change the filter every 2 months. Two or more pets: every month.
Allergy sufferers in the family. If someone in the household has allergies or asthma, the interval shortens to 30-45 days, regardless of other factors. Saving on replacement frequency ends up costing you in medication.
System usage intensity. Year-round operation at full capacity (a warm climate with constant air conditioning): the filter lasts less. Seasonal use with breaks: longer.
A practical rule: once a month, take the filter out and inspect it visually. If it has turned gray, change it. Calendars are fine, but your eyes are more reliable.
How to check the filter yourself: step-by-step instructions
The procedure takes two minutes and requires no tools. The sequence:
Turn off the ventilation system. Find the switch on the unit or flip the breaker in the panel. A running fan creates negative pressure, which makes filter removal harder and pushes dust into the ducts.
Open the filter compartment. The location depends on the system model. Most often, it is behind the front panel or on the side of the unit. The cover is usually secured with clips or screws.
Remove the filter. Pull it toward you smoothly, without jerking. A dirty filter is a source of dust: do not shake it indoors. Immediately put it in a bag if you plan to throw it away.
Inspect the filter against three criteria:
Color. Light and clean: you can put it back. Gray, brown, with a visible layer of dust: replace it.
Density. Squeeze the material with your fingers. Hard and compacted: clogged. Soft and porous: still working.
Damage. Tears, holes, a deformed frame: the filter is not doing its job even if it looks clean. Replace immediately.
Install the new filter. The arrow on the filter frame shows the direction of airflow; it must point toward the fan. Insert it, snap the cover shut, and turn the system on.
Important: the filter must be selected strictly according to the size and filtration class specified in the system documentation. An incorrectly sized filter leaves gaps through which unfiltered air passes, making the whole exercise pointless.
Original filter or compatible alternative
Ventilation system manufacturers strongly recommend using original filters. The argument: exact compliance with specifications and guaranteed compatibility. The price is 1.5-3 times higher.
In practice, compatible alternatives from reputable suppliers work just as well. The key parameters that must match:
- Filtration class (G4, F7, etc. per EN 779 or ePM1/ePM2.5/ePM10 per ISO 16890). This determines what particle size the filter captures.
- Geometric dimensions: length × width × thickness down to the millimeter.
- Nominal airflow: the filter must allow the same air volume as the original.
If a compatible system air filter is manufactured to the same standards and has the appropriate filtration class, it handles the task no worse than the original. The price difference is significant, especially with regular replacement every 2-3 months.
The bottom line: overpaying for the brand is not necessary. What matters is the standard, size, and class. The rest is marketing.
Video: how to replace an air filter in 5 minutes
If you are changing the filter for the first time, watch this short video guide. All steps are shown on a real system, from shutdown to checking the result.
⁉️🤔 Frequent questions
Can I clean the filter instead of replacing it?
No. Most household ventilation filters are disposable. Their material is a non-woven fabric with an electrostatic charge: particles are attracted to and held on the fibers. Washing removes the charge and destroys the structure, turning the filter into a useless piece of cloth. The exception is reusable filters with a metal mesh (found in range hoods), which can be washed.
What happens if I don't change the filter on time?
Three consequences. First: air quality drops, the same dust and allergens return to the home. Second: the load on the fan increases, it runs under overload, overheats, and wears out faster. Third: the electricity bill goes up, the motor consumes noticeably more energy with a clogged filter. In the worst-case scenario, the motor overheats and fails, and replacement costs dozens of times more than the filter itself.
What filtration class should I choose for an apartment?
For most city apartments, class F7 (per ISO 16890: ePM1) is optimal. It captures pollen, mold spores, fine PM2.5 and PM10 dust. For allergy and asthma sufferers: F9 (ePM1 per the same standard), which captures most particles smaller than 1 micron. Going above F9 for residential ventilation makes no sense: HEPA filters create too much resistance, and the system runs at its limit with them.
The filter is expensive, can I stretch the replacement interval?
The savings are questionable. A clogged filter increases energy consumption; the difference in bills over 2-3 extra months can exceed the cost of the filter. Plus fan wear, whose repair costs an order of magnitude more. It is cheaper to replace the filter on time than to pay for electricity and repairs.
Are filters for supply and exhaust ventilation different?
Yes, fundamentally. A supply filter cleans the air coming in from outside; it captures outdoor dust, pollen, and exhaust fumes. An exhaust filter cleans the air leaving the room, protecting the fan itself and the ducts from internal contamination. Both need regular replacement, but the supply filter clogs faster.
Should you wait for a signal or change the filter on a schedule?
The best strategy is a combination: the calendar as a reminder, a visual check as the deciding factor. Once a month, take the filter out and look: is it gray? Change it, even if the calendar says it's still early. Clean? Put it back and check again in a month.
Original or compatible is a question of budget, not air quality. Matching the filtration class and dimensions gives the same result as a branded consumable at triple the price.
Do not wait until the air becomes stale and allergies remind you. A monthly filter inspection: two minutes that save money, health, and the service life of your ventilation system.

A professional team of writers and editors specializing in creating quality content.