














📸 Beginner's guide to NextGEN Gallery for WordPress
You are a photographer with an archive of thousands of shots. Or a blogger who desperately needs a beautiful image feed in articles. Or perhaps an online store owner tired of the standard WooCommerce grid. The task is the same: display images so visitors don't leave after 3 seconds. Standard WordPress galleries handle this... let's say, barely adequately.
NextGEN Gallery is a plugin that has held the position of the most popular gallery solution for WordPress since 2007. The latest version 4.2.2 (May 2026) adds integration with Google Photos and Dropbox, while the basic functionality remains free. Most importantly, you don't need to be a developer to build a gallery that looks premium.
In this guide, you'll find a step-by-step path from installation to fine-tuning. No fluff, with screenshots of every screen. Let's go.
💡 Quick overview:
- Install NextGEN from the WordPress directory and create your first gallery in 5 minutes.
- Upload images using one of three methods: from your computer, from the media library, or as a folder.
- Choose a gallery display type: thumbnails, slideshow, mosaic, or masonry.
- Configure watermarks (text or logo) to protect images from copying.
- Adjust output settings: number of images per page, pagination, borders, caption overlays.
- Compare the free version with Plus and Pro using the features table.
Why your site needs a photo gallery at all
A photo gallery isn't just for photographers. Virtually any site benefits from thoughtful image presentation: a blog with travel stories, a designer's portfolio, an event landing page, a product catalog, or a community site with user-generated content.
Specific scenarios:
- Selling original photos or digital art directly from your site.
- Showcasing products in a customizable grid that doesn't look like "yet another WooCommerce."
- Sharing photos with subscribers or clients in private albums.
- Creating photo evidence of work (renovation, construction, cleaning) in a "before/after" format.
The built-in "Gallery" block in WordPress offers the minimum: a grid of thumbnails without a lightbox, without a slideshow, without protection. It can't handle serious tasks. This is exactly where NextGEN enters the stage.
Installing and launching NextGEN Gallery for the first time
NextGEN Gallery is a project by Imagely, existing since 2007 and receiving over 1.5 million new downloads annually. The current version 4.2.2 was released in late May 2026 and brought direct integration with Google Photos and Dropbox: you can import images from the cloud without leaving the WordPress admin panel.
The plugin works equally well for beginners and professionals. A beginner can assemble their first gallery in 5 minutes through the visual interface. A professional gets e-Commerce extensions, batch processing, image protection, and payment system integration in the Pro version.
Installation. Go to the WordPress admin panel, open "Plugins → Add New," and type NextGEN Gallery in the search box. Click "Install," then "Activate." A "Gallery" tab will appear in the main menu on the left.
Creating your first gallery
Go to "Gallery → Add Gallery / Images":
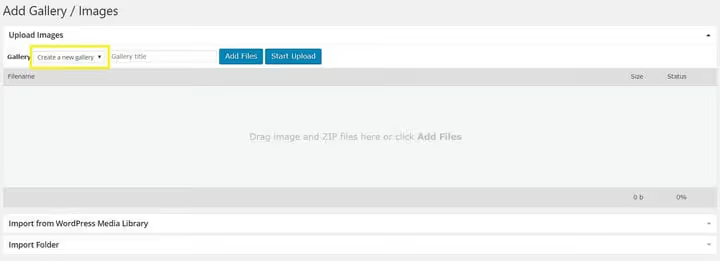
In the "Gallery" dropdown (top left corner), select "Create New Gallery." Give it a name, and you'll see three ways to populate it:
- Upload from computer. Drag files to the upload area or select them through the file browser.
- Import from WordPress Media Library. If images were already uploaded through the standard uploader.
- Add folder. Specify a server folder with photos, and the plugin will pick up all contents at once.
Once files are attached, a popup appears with a direct link to the freshly created gallery:
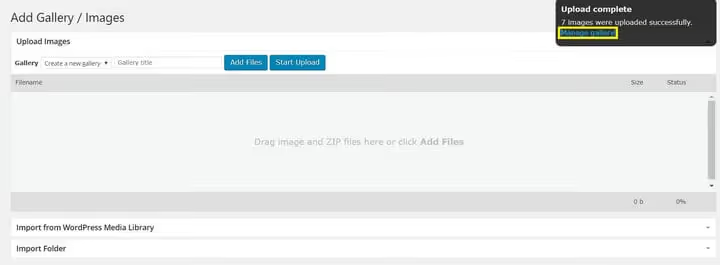
Click "Manage Gallery." From here you can: select an image for the preview, link the gallery to an existing page or create a new one, add alternative titles and alt text to each image, assign tags, and edit thumbnails.
3 ways to fine-tune NextGEN galleries
Once your first gallery is ready, the interesting part begins: adjusting its display to match your site's design and specific task. Let's examine three of the most flexible configuration tools.
1. Choosing a display type
The display type determines exactly how visitors will see your images. NextGEN offers several options: thumbnails (grid), slideshow, mosaic, and masonry. For a photographer, the difference between grid and mosaic is the difference between an "amateur blog" and a "professional portfolio."
There are two ways to set the display type: for one gallery or for all at once.
For an individual gallery. Open the page or post where the gallery is embedded. Next to the "Add Media" button above the editor, you'll see a "Gallery" button. Click it, select the desired gallery, and set the display type, number of images per page, and other parameters:
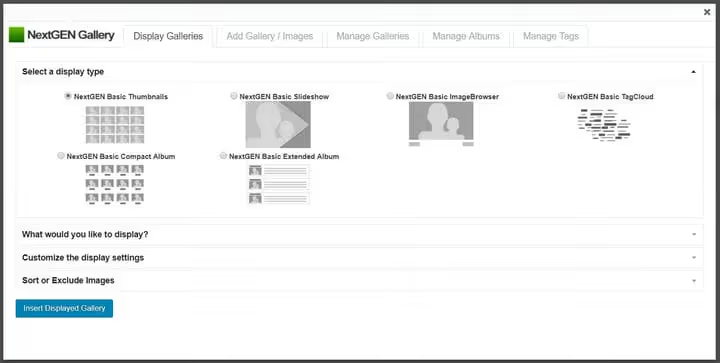
For all galleries at once. Go to "Gallery → Gallery Settings" → select the desired type. All existing and new galleries will adopt this default. This is convenient when your site has dozens of similar galleries and you don't want to configure each one manually.
2. Watermarks for image protection
A watermark is a semi-transparent mark on an image that identifies the author. In the digital age, this is less about aesthetics and more about insurance against theft: another site copying your photo won't be able to pass it off as their own.
NextGEN allows you to apply a watermark to a single image or to an entire gallery in bulk. First, configure the watermark itself: "Gallery → Other Options → Watermarks."
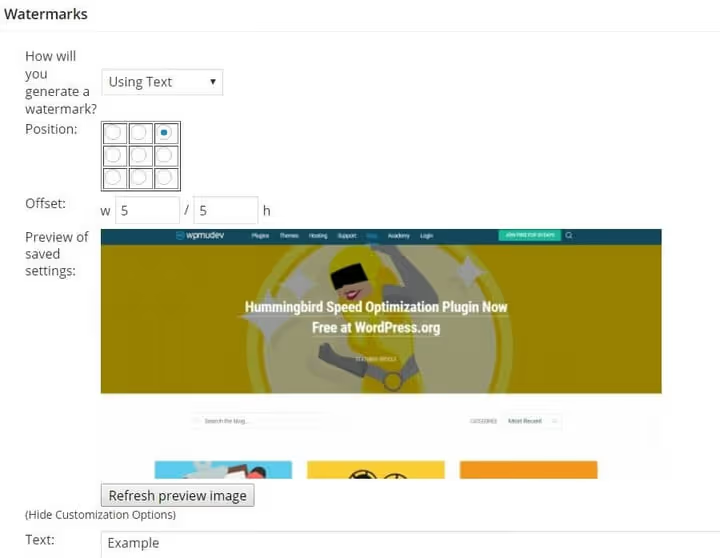
Here you define:
- Type. Text (name, copyright, URL) or graphic (logo, signature).
- Position. One of nine placement options on the image.
To apply a watermark, go to "Gallery → Manage Galleries," select the desired gallery, and in the dropdown menu click "Set Watermark":
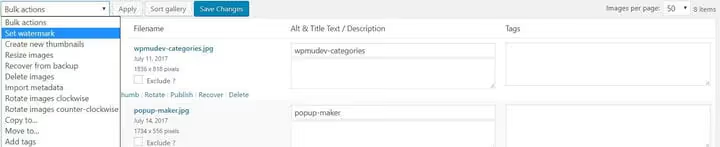
You can apply the mark to all photos in the gallery or selectively (for example, only to images you're selling). Selective protection makes sense: preview thumbnails remain clean for visual impact, while full-size versions are protected.
3. Managing gallery output on the page
This set of settings controls how the gallery embeds into the page: how many images per page, whether to enable pagination, border color, and whether to include caption overlays.
Open the page or post with the gallery, click "Add Gallery" above the editor, and go to the "Customize Display Settings" dropdown on the "Display Galleries" tab:
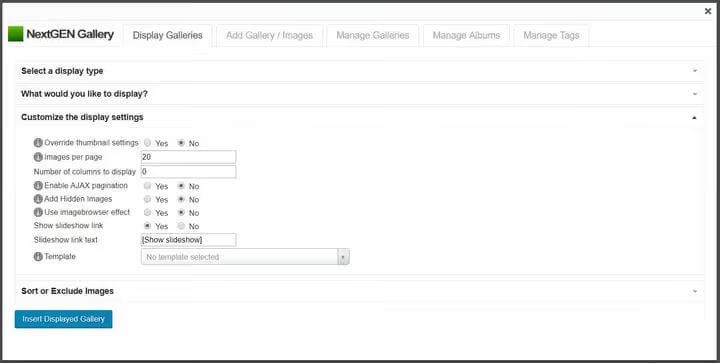
What you can configure here:
- Images per page. From 5 to 100; pagination kicks in after exceeding the threshold.
- Pagination. AJAX loading without page refresh.
- Border color and thickness. Visually separates images from each other.
- Caption overlays. Shows title or description on hover.
- Lightbox triggers. Clicking a thumbnail opens the full-size image in a popup.
Global settings (maximum sizes, triggers) are configured in "Gallery → Gallery Settings." They apply to all new galleries but don't affect already embedded ones. For those, change parameters individually as described above.
Free version versus Plus and Pro: what to choose
Feature | Free | Plus | Pro |
|---|---|---|---|
Display types (thumbnails, slideshow) | ✅ 2 basic | ✅ All | ✅ All |
Album styles (compact, extended) | ✅ | ✅ | ✅ |
Watermarks | ✅ | ✅ | ✅ |
Image protection (right-click disabled) | ❌ | ✅ | ✅ |
Image commenting | ❌ | ✅ | ✅ |
Deep linking to images | ❌ | ✅ | ✅ |
e-Commerce (selling photos and prints) | ❌ | ❌ | ✅ |
Google Photos and Dropbox integration | ❌ | ✅ (from v4.2.2) | ✅ (from v4.2.2) |
Priority support | ❌ | ✅ | ✅ |
Automatic printing through photo labs | ❌ | ❌ | ✅ |
The free version is sufficient for a blog or small portfolio. Plus is justified when you need image protection and cloud import. Pro is a tool for photographers who earn money from their images: a built-in store with payments, print sales, and automatic print ordering.
This short but comprehensive video shows installation, first gallery creation, and display configuration in real time, if you prefer visual instructions.
⁉️🤔 Frequently asked questions
Is the free version of NextGEN a stripped-down plugin or a fully functional tool?
Fully functional. The free version provides two gallery display types (thumbnails and slideshow), two album styles, watermarks, batch uploading, and thumbnail management. Limitations apply to advanced features: copy protection, e-Commerce, and cloud integrations. For a blog, portfolio, or company site, the free functionality is more than enough.
Why does the plugin need access to server folders when adding a gallery "as folder"?
The "add folder" mode scans the specified directory on the server and picks up all images from it at once. This is much faster than uploading hundreds of shots through a browser. Access is limited to the WordPress file system and doesn't extend beyond
wp-content. Before first use, make sure the folder is readable (chmod 755).
Can I insert a NextGEN gallery using a shortcode instead of the visual window?
Yes. NextGEN has a powerful shortcode system. For example,
[ngg src="galleries" ids="1" display="basic_thumbnail"]will display the gallery with ID=1 in thumbnail mode. The full list of parameters is available in the Imagely documentation. The visual "Add Gallery" window covers most everyday tasks and doesn't require memorizing syntax.
What should I do if the gallery stopped displaying after a WordPress update?
Three steps: (1) reset settings in "Gallery → Settings → Reset" (this won't delete the images themselves); (2) clear the site cache (caching plugin + CDN if applicable); (3) check for conflicts with the theme or other plugins by temporarily switching to a default WordPress theme and deactivating other plugins. In most cases, the problem is resolved by the first two steps.
I'm moving my site to another hosting provider. How do I avoid losing NextGEN galleries?
Make a full backup of the
wp-content/gallery/folder and thewp_ngg_*tables in the database. On the new hosting, restore both the folder and the tables. If you're using a migration plugin like All-in-One WP Migration, it will pick up both automatically, and no additional actions are needed.
What to install on your site in 2026: the verdict on NextGEN
NextGEN Gallery hasn't stayed at the top of gallery plugins for nearly 20 years by accident. The reason is simple: it covers the entire spectrum of tasks, from "show 10 vacation photos" to "sell 500 images through an online store." And it does this without a single line of code.
The free version offers more than many paid alternatives. And if your scenario goes beyond its limits, Plus or Pro adds exactly what's missing: protection, cloud storage, or e-Commerce.
Our editorial team at techblog.sdstudio.top uses NextGEN on several projects. The plugin has never broken during WordPress updates, never conflicted with themes like GeneratePress and Kadence, and never created excessive server load. The only nuance is that the settings interface isn't minimalist: it has many tabs and options. But after the first or second use, the logic becomes clear.
If you're looking for a gallery plugin that will grow with your site rather than hit a ceiling after a month, start with NextGEN Gallery.

A professional team of writers and editors specializing in creating quality content.