














🤖 Create a Viber bot in PHP in 6 steps: complete guide
A user writes in Viber, and nobody answers. A familiar scenario for small businesses: one manager, three messengers, and clients leave for those who responded first. A chatbot solves this problem radically: it works around the clock, doesn't get tired, and reacts instantly.
Previously, before February 2024, deploying a simple Viber bot could be done for free in half an hour. Now the rules are different. Viber has fully moved bots to a commercial basis, you can't get a token without an official application and a partner. But if you already have a public account (or you're setting it up right now), the technical part, those same six steps in PHP, has remained the same. We went through this path from token to custom keyboard and show each step.
💡 Quick overview:
- You create a Viber public account and get an authentication token: now it's passed in the HTTP header, not in the JSON body
- You set up a webhook with an HTTPS certificate and write a PHP handler for incoming callback requests
- You implement receiving messages and sending responses through the send message API: text, images, files
- You add a custom keyboard with quick reply and link buttons, the main navigation tool inside the bot
- You write code for the current Viber REST API version 7.3, not for outdated 2017 guides
Step 1. Create a Viber public account
The first step is to get a public account (PA). Since February 5, 2024, bots are created only on a commercial basis through official Rakuten Viber partners. The process looks like this:
- You submit an application on the Viber public accounts page: business type, bot usage scenarios.
- After approval, an invitation arrives. You restart your device, go to the public accounts main screen and press "Create public account".
- You fill in the details: name, description, avatar. Your main Viber account is assigned as administrator.
As a result, a public account and access to settings. This is where the authentication token appears.
Bots are supported on iOS and Android from Viber version 6.5 and higher, and on desktop, from version 6.5.3. If you have an old version of the app, update it before starting development, otherwise keyboards and some API methods won't work.
Step 2. Get the authentication token
The token (application key) is a unique secret identifier for your bot. Without it, no API request will go through.
After creating a public account, the token is available to the administrator in the "Edit info" section of the public account. An alternative way is through the Viber Admin Panel. The token looks something like this:
455a0f2c05b4fe54-cb4e33d3200fbbae-95f29ebc06af09a8
This is a demo key, yours will have unique characters but the same structure.
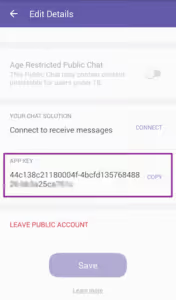
The main change compared to old guides: starting with API version 7.0, the token is passed not in the POST request body, but in the X-Viber-Auth-Token HTTP header. If you send the token the old way, as an auth_token field in JSON, the API will return a missing_auth_token error.
Old format (no longer works):
1 {"auth_token": "your_token", "url": "https://..."}
Modern approach, header:
1 X-Viber-Auth-Token: your_token
Keep the token secret. Anyone who has it can send messages to your subscribers on behalf of the bot.
Step 3. Set up the webhook and write a PHP handler
A webhook is a URL on your server to which Viber sends callback requests: messages from users, subscription notifications and other events.
Webhook URL requirements:
- HTTPS protocol with a valid SSL certificate from a trusted certificate authority. Viber doesn't support self-signed certificates.
- The certificate must be in the Sun Java trusted list, check before setting up.
Setting up the webhook is a POST request to https://chatapi.viber.com/pa/set_webhook. In the X-Viber-Auth-Token header, your token. Request body:
1 { 2 "url": "https://yourdomain.com/viber-webhook.php", 3 "event_types": ["delivered", "seen", "failed", "subscribed", "unsubscribed", "conversation_started"], 4 "send_name": true, 5 "send_photo": true 6 }
Parameters:
url, your webhook URL (required, HTTPS).event_types, events for callback. Mandatory and non-filterable: message, subscribed and unsubscribed. The rest are optional.send_nameandsend_photo, whether to request the user's name and photo. Only works if the user has enabled "Content personalization" in Viber privacy settings.
We send the request via cURL:
1 <?php 2 3 $url = 'https://chatapi.viber.com/pa/set_webhook'; 4 5 $jsonData = json_encode([ 6 'url' => 'https://yourdomain.com/viber-webhook.php', 7 'event_types' => ['delivered', 'seen', 'failed', 'subscribed', 'unsubscribed', 'conversation_started'], 8 'send_name' => true, 9 'send_photo' => true 10 ]); 11 12 $ch = curl_init($url); 13 curl_setopt($ch, CURLOPT_POST, 1); 14 curl_setopt($ch, CURLOPT_POSTFIELDS, $jsonData); 15 curl_setopt($ch, CURLOPT_HTTPHEADER, [ 16 'Content-Type: application/json', 17 'X-Viber-Auth-Token: your_auth_token' 18 ]); 19 curl_setopt($ch, CURLOPT_RETURNTRANSFER, true); 20 $result = curl_exec($ch); 21 curl_close($ch); 22 23 echo $result;
After sending, Viber will send a callback to your webhook URL to verify availability. An HTTP 200 response is expected. Callback data:
1 { 2 "event": "webhook", 3 "timestamp": 1457764197627, 4 "message_token": 241256543215 5 }
Your PHP handler should return a response:
1 { 2 "status": 0, 3 "status_message": "ok", 4 "event_types": ["delivered", "seen", "failed", "subscribed", "unsubscribed", "conversation_started", "message"] 5 }
Full webhook handler code, viber-webhook.php file on the server:
1 <?php 2 3 $request = file_get_contents("php://input"); 4 $input = json_decode($request, true); 5 6 if ($input['event'] == 'webhook') { 7 $webhook_response['status'] = 0; 8 $webhook_response['status_message'] = "ok"; 9 $webhook_response['event_types'] = 'delivered'; 10 echo json_encode($webhook_response); 11 die; 12 } 13 elseif ($input['event'] == "subscribed") { 14 // User subscribed — can send a welcome message 15 } 16 elseif ($input['event'] == "conversation_started") { 17 // User opened chat — can send a menu 18 } 19 elseif ($input['event'] == "message") { 20 $type = $input['message']['type']; 21 $text = $input['message']['text']; 22 $sender_id = $input['sender']['id']; 23 $sender_name = $input['sender']['name']; 24 25 // Form response 26 $data = [ 27 'receiver' => $sender_id, 28 'type' => 'text', 29 'text' => "Hello, $sender_name! You wrote: $text", 30 'sender' => [ 31 'name' => 'My Viber Bot' 32 ] 33 ]; 34 35 $ch = curl_init("https://chatapi.viber.com/pa/send_message"); 36 curl_setopt($ch, CURLOPT_POST, 1); 37 curl_setopt($ch, CURLOPT_POSTFIELDS, json_encode($data)); 38 curl_setopt($ch, CURLOPT_HTTPHEADER, [ 39 'Content-Type: application/json', 40 'X-Viber-Auth-Token: your_auth_token' 41 ]); 42 curl_setopt($ch, CURLOPT_RETURNTRANSFER, true); 43 $result = curl_exec($ch); 44 curl_close($ch); 45 }
After successful webhook setup, a 1-on-1 chat button will appear in the bot, users will be able to start a dialogue. To disable this option, send set_webhook with an empty url.
Step 4. Receive messages from users
When a user writes to the bot, Viber sends a callback to your webhook in this format:
1 { 2 "event": "message", 3 "timestamp": 1457764197627, 4 "message_token": 4912661846655238145, 5 "sender": { 6 "id": "01234567890A=", 7 "name": "yarden", 8 "avatar": "http://avatar_url" 9 }, 10 "message": { 11 "type": "text", 12 "text": "a message to the service", 13 "media": "http://download_url", 14 "location": { 15 "lat": 50.76891, 16 "lon": 6.11499 17 }, 18 "tracking_data": "tracking data" 19 } 20 }
Key fields to parse:
Field | Location | Description |
|---|---|---|
| Root | Value |
|
| Unique Viber ID, save it, you need it to send a response |
|
| User's name (if personalization is allowed) |
|
| Message type: text, picture, video, file, location, contact, sticker or url |
|
| Message text (for |
| Root | Unique message ID, for tracking delivery status |
What's important to do in the handler:
- Save the
sender.id → name/contextlink to the database. Viber API doesn't have a "get all subscribers" method, you accumulate IDs yourself as requests come in. - If the user sent an image (
type: "picture"), the file URL is inmessage.media. - Don't ignore
tracking_data: it links the user's response to your outgoing message, invaluable for dialogue analytics.
Step 5. Send messages to users
The send_message API supports text, images, videos, files, locations, contacts, stickers, carousels and URL previews. Let's cover the main types.
Text message. POST request to https://chatapi.viber.com/pa/send_message with X-Viber-Auth-Token header:
1 { 2 "receiver": "01234567890A=", 3 "type": "text", 4 "text": "Hello! How can I help you?", 5 "sender": { 6 "name": "Support Bot" 7 }, 8 "tracking_data": "welcome_message_001" 9 }
Parameter | Description |
|---|---|
| Unique Viber ID of the recipient (that same |
| Message type: text, picture, video, file, location, contact, sticker, carousel or url |
| Message text, up to 7000 characters |
| Displayed sender name, up to 28 characters |
| Arbitrary string up to 4096 characters, will be returned in callback when user replies |
Sending an image:
1 { 2 "receiver": "01234567890A=", 3 "type": "picture", 4 "text": "March 2026 promotion", 5 "media": "https://yourdomain.com/img/promo.jpg", 6 "thumbnail": "https://yourdomain.com/img/promo_thumb.jpg", 7 "sender": { 8 "name": "Shop Bot" 9 } 10 }
media, image URL (JPEG only).thumbnail, thumbnail URL (also JPEG).text, description, can benull.
PHP function for sending messages, a universal wrapper we use in practice:
1 <?php 2 3 function sendViberMessage($receiverId, $type, $data, $trackingData = '') { 4 $token = 'your_auth_token'; 5 $apiUrl = 'https://chatapi.viber.com/pa/send_message'; 6 7 $payload = array_merge(['receiver' => $receiverId, 'type' => $type], $data); 8 9 if ($trackingData) { 10 $payload['tracking_data'] = $trackingData; 11 } 12 13 $ch = curl_init($apiUrl); 14 curl_setopt($ch, CURLOPT_POST, 1); 15 curl_setopt($ch, CURLOPT_POSTFIELDS, json_encode($payload)); 16 curl_setopt($ch, CURLOPT_HTTPHEADER, [ 17 'Content-Type: application/json', 18 "X-Viber-Auth-Token: $token" 19 ]); 20 curl_setopt($ch, CURLOPT_RETURNTRANSFER, true); 21 $result = curl_exec($ch); 22 curl_close($ch); 23 24 return json_decode($result, true); 25 }
Limitation: maximum JSON request size is 30 KB. Consider this when sending carousels with many elements.
Step 6. Add a custom keyboard with buttons
The keyboard replaces the device's standard keyboard with a set of buttons: quick replies, links to the site, transitions to sections. This is the main navigation tool inside the bot.
The keyboard is attached to any message type through the keyboard field in the send_message request:
1 { 2 "receiver": "01234567890A=", 3 "type": "text", 4 "text": "What are you interested in?", 5 "sender": { 6 "name": "Help Bot" 7 }, 8 "keyboard": { 9 "Type": "keyboard", 10 "BgColor": "#FFFFFF", 11 "Buttons": [ 12 { 13 "Columns": 6, 14 "Rows": 1, 15 "BgColor": "#2db9b9", 16 "ActionType": "reply", 17 "ActionBody": "Services", 18 "Text": "📋 Services", 19 "TextVAlign": "middle", 20 "TextHAlign": "center", 21 "TextSize": "regular" 22 }, 23 { 24 "Columns": 6, 25 "Rows": 1, 26 "BgColor": "#2db9b9", 27 "ActionType": "open-url", 28 "ActionBody": "https://yoursite.com/prices", 29 "Text": "💰 Prices", 30 "TextVAlign": "middle", 31 "TextHAlign": "center", 32 "TextSize": "regular" 33 } 34 ] 35 } 36 }
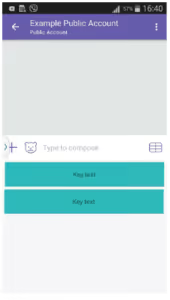
Keyboard parameters:
Parameter | Description |
|---|---|
| Display type. Only |
| HEX background color of the keyboard |
|
|
Parameters for each button:
Parameter | Possible values |
|---|---|
| 1-6, width in columns |
| 1 or 2, height in rows |
|
|
| Reply text or link URL |
| Button label. Supports HTML tags: b, i, u, br and span style |
| HEX button color |
|
|
| URL of background image or GIF |
| URL of image on top of background |
| top, middle or bottom |
| left, center or right |
| small, regular or large |
A few important nuances from practice:
- A button with
ActionType: "open-url"opens the link in an external browser, not inside Viber. - Don't overload the keyboard: 4-6 buttons is optimal for one screen.
- Background GIFs in buttons (
BgMedia) support looping viaBgLoop: true.
From this point on, the bot is ready to work: it receives messages, replies with text and images, shows a menu keyboard.
In this video, a live demonstration of the full cycle: from creating a public account to sending the first message with a keyboard. Useful to watch before running the code on your own server.
⁉️🤔 Frequently asked questions
Is it possible to create a Viber bot for free in 2026?
No. Since February 5, 2024, Viber has moved bot creation exclusively to commercial terms. To get a token, you need to contact Rakuten Viber directly or one of the official partners. Free test accounts are no longer issued. Bots created before this date continue to work.
Is it mandatory to use PHP for a Viber bot?
No, the language doesn't matter. Viber API works through HTTP POST/GET requests, any backend will do: Node.js, Python, Go, Ruby. We show PHP because it's the most common language on WordPress hosting and shared servers, available to most site owners without additional environment setup.
How do I check that the webhook is working?
After calling
set_webhook, Viber immediately sends a callback with"event": "webhook"to your URL. The server returns HTTP 200, the webhook is active. You can check the current status with a repeatset_webhookcall with the same parameters, the API response will show registeredevent_types. For debugging, use logging offile_get_contents("php://input")to a file on the server.
What's the difference between the old authentication method and the new one?
Before API version 7.0, the token was passed in the JSON body of each request as the
auth_tokenfield. The modern API (7.0+) requires passing the token in theX-Viber-Auth-TokenHTTP header. The old format is not supported, requests withauth_tokenin the body return amissing_auth_tokenerror. If you're migrating code from 2017-2023 guides, replace token passing with a header.
What to do if the user doesn't see the keyboard?
Three likely causes: (1) JSON request exceeded the 30 KB limit, reduce the number of buttons or remove background media; (2) the
Typefield contains something other than"keyboard", this is the only supported value; (3) the user is on an old version of Viber, keyboards are supported from version 6.5.
Can I delete the webhook and disable 1-on-1 chat?
Yes, send
set_webhookwith an empty string inurl:
1 {"url": ""}
The chat button will disappear, but the token and public account will be preserved. Useful when moving a bot to another server.
What to choose in 2026: your own PHP bot or a no-code platform
If you've read this far, you have two paths ahead. The first is to write a bot in PHP following the steps above. You get full control over logic, data and hosting. Suitable when the bot is part of a larger project: online store, support service, internal team tool.
The second path is no-code platforms like SendPulse, Infobip or Kommunicate. They handle the webhook infrastructure and provide a visual editor for scenarios. The price is a monthly subscription and free tier limitations. For typical tasks like FAQ auto-responses, promotional mailings, this is more than enough.
In practice, we usually combine: the bot core in PHP for custom logic, and we assemble keyboards and welcome chains in the platform's visual editor, faster and more visual. Choose what's closer to your skills and task. Start with the first step today, a public account is set up in half an hour, and then each next step takes exactly as long as it takes to copy and adapt the code from this guide.

A professional team of writers and editors specializing in creating quality content.