














🎨 How to add custom styles to the WordPress visual editor
The standard set of formatting buttons in the WordPress editor is familiar to everyone: bold, italic, lists, quotes. But when you need to regularly insert a button of a specific color, a warning block, or an image caption in a branded frame, routine kicks in full force. Every time: switch to text mode, write style="", copy classes from a cheat sheet. One button came out blue, another light blue. One block with a shadow, another without.
The problem isn't the absence of tools, but that the "Formats" dropdown menu in TinyMCE is hidden by default. And even if you enable it, it's empty: WordPress doesn't know what styles you need. But you can add them there.
There are three approaches: through code in functions.php, through a plugin with a visual constructor, and through the native block editor mechanism register_block_style(). All three work and cover different scenarios: from manual control over every pixel to "clicked and applied."
💡 Quick overview:
- We enable the "Formats" dropdown menu in the classic editor with the
mce_buttons_1filter and populate it with our own styles throughtiny_mce_before_init, step-by-step code inside. - We create
editor-style.cssfor live preview right in the editor: a button looks like a button even before publication. - We install TinyMCE Custom Styles, a GUI constructor for formats without touching code, with auto-generated CSS files.
- We look at the native path for Gutenberg: register block variations through
register_block_style(), connect styles throughtheme.jsonorwp_add_inline_style().
What custom styles are and why you need them
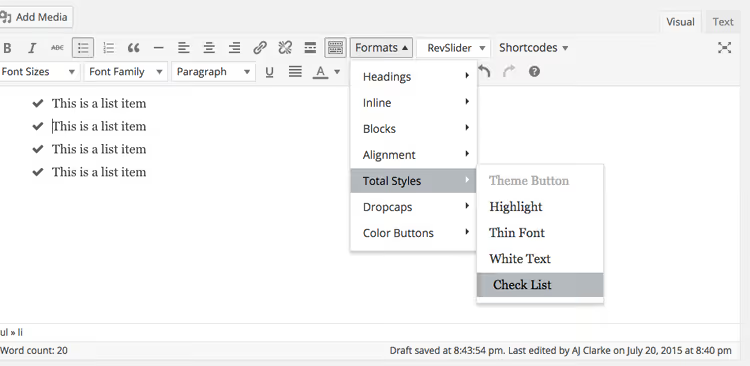
A custom style is a CSS preset that you apply to a selected fragment through the editor's dropdown menu. Instead of wrapping a paragraph in <span style="..."> for the hundredth time, you choose "Highlight" in the "Formats" menu and get yellow highlighting with rounded corners. One click.
Three reasons to set this up once and forget:
- Consistency. All buttons, warnings, and captions look the same from publication to publication. Design doesn't drift.
- Speed. The editor doesn't dig into CSS and doesn't copy magic classes from notepad, just presses one button.
- Security. No one accidentally overwrites the markup through inline styles in text mode.
Typical scenarios: call-to-action button (theme-button), "Important" block with icon and colored border, bulleted list with checkmarks, image caption in branded style, code highlighting inside a paragraph.
Method 1: Code, through functions.php and editor-style.css
The path for those who aren't afraid to open functions.php once. Result: the "Formats" dropdown menu appears in the TinyMCE toolbar, and inside are your own styles. Ten lines of PHP, one CSS file, zero unnecessary plugins.
Step 1. Enable the "Formats" button
By default, the formats dropdown list styleselect is hidden. This filter returns it to the first line of the editor. Place the code in the functions.php of the active theme or, more correctly, child theme:
1 function myprefix_mce_buttons_1( $buttons ) { 2 array_unshift( $buttons, 'styleselect' ); 3 return $buttons; 4 } 5 add_filter( 'mce_buttons_1', 'myprefix_mce_buttons_1' );
The mce_buttons_1 hook adds the button to the first toolbar row. If you prefer the second or third, use mce_buttons_2 or mce_buttons_3.
Saved functions.php, opened any post, a "Formats" dropdown menu appeared in the top row on the left. Still empty for now.
Step 2. Register your own styles
Now let's fill the menu with actual formats. Add a second filter to the same functions.php:
1 function myprefix_add_format_styles( $init_array ) { 2 $style_formats = array( 3 array( 4 'title' => __( 'Theme Button', 'text-domain' ), 5 'selector' => 'a', 6 'classes' => 'theme-button', 7 ), 8 array( 9 'title' => __( 'Highlight', 'text-domain' ), 10 'inline' => 'span', 11 'classes' => 'text-highlight', 12 ), 13 ); 14 $init_array['style_formats'] = json_encode( $style_formats ); 15 return $init_array; 16 } 17 add_filter( 'tiny_mce_before_init', 'myprefix_add_format_styles' );
What each element's parameters mean:
title, the name that the editor will see in the dropdown menu.selector, the HTML tag to which the style is applied.'a'means that "Theme Button" will only work on links.inline, wraps the selected text in a tag (usuallyspan) with the specified class. Perfect for highlighting a word or phrase inside a paragraph.classes, CSS class (or classes separated by space) added to the element.
Add your own items to the array following the same template. The full list of accepted parameters is in the TinyMCE documentation on developer.wordpress.org.

Step 3. Write CSS for the frontend
The menu is filled, but the browser doesn't yet know what .theme-button looks like. Add CSS to the theme's stylesheet (or child theme):
1 .theme-button { 2 display: inline-block; 3 padding: 10px 15px; 4 color: #fff; 5 background: #1796c6; 6 text-decoration: none; 7 } 8 .theme-button:hover { 9 text-decoration: none; 10 opacity: 0.8; 11 } 12 .text-highlight { 13 background: #FFFF00; 14 }
After saving, the button is styled on the frontend. But in the admin, the editor doesn't show it yet.
Step 4. Add editor-style.css for preview in the editor
To display styles directly in the visual editor before publication, you need a separate editor-style.css file. WordPress can pick it up:
1 function myprefix_theme_add_editor_styles() { 2 add_editor_style( 'editor-style.css' ); 3 } 4 add_action( 'init', 'myprefix_theme_add_editor_styles' );
Create an editor-style.css file in the theme root and copy the CSS from step 3 there. If you're working with someone else's theme, create this file in the child theme: WordPress will check the child theme first and, finding editor-style.css there, will load it instead of the parent's.
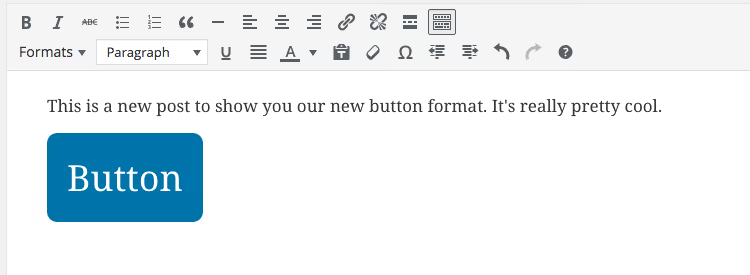
Result: selected text, chose "Highlight", yellow highlighting is visible immediately in the editor. Clicked on a link, chose "Theme Button", it turns into a blue button.
Method 2: TinyMCE Custom Styles plugin, without touching code
If you don't want to mess with functions.php but need styles, there's a ready-made plugin. It does the same thing through a visual interface in the admin.
Install and activate TinyMCE Custom Styles. As of June 2026, the plugin has 8,000+ active installations and supports the classic Gutenberg block starting from version 1.1.1. The latest update (v1.1.5, June 2024) closed vulnerabilities. The author, Tim Reeves, is openly looking for a successor, but the codebase is stable: the plugin doesn't pull external dependencies and doesn't touch the database beyond its own options table.

The plugin appears in the general list of installed plugins. Make sure it's activated before proceeding to configuration.
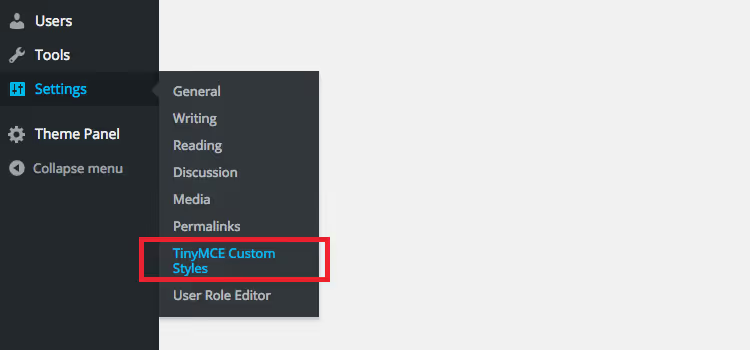
After activation, go to Settings → TinyMCE Custom Styles. The first screen offers to choose where to store CSS files. I recommend the third option: create a separate folder (for example tinymce-styles) in wp-content/uploads. This will protect styles when updating the theme or the plugin itself. Click "Save Settings."

The first screen shows three placement options for CSS. Choose the third one and set a folder name, for example tinymce-styles.
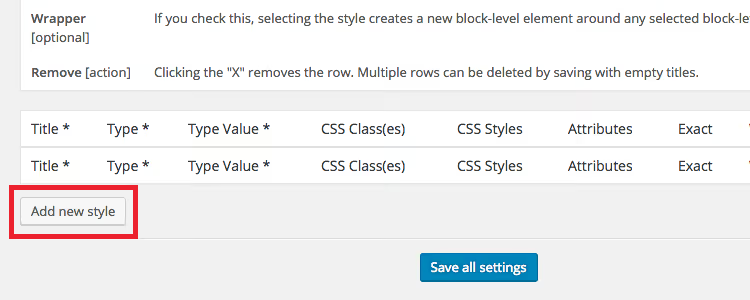
Scroll down the page and click "Add New Style." A constructor will open where you set:
- Title, the name in the dropdown menu (for example "Large Blue Button").
- Type, selector-based (applies to a specific tag), inline (wraps in
span), or block. - Classes and CSS properties, right in the interface, without files.
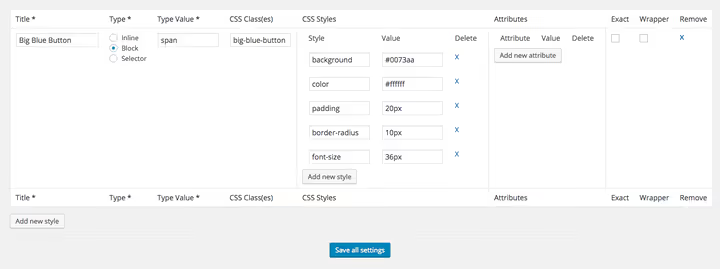
After saving settings, click "Add New Style" at the bottom of the page. A constructor will open with fields for title, type, and CSS properties.

Save, open any post, and find the "Formats" dropdown menu in the second toolbar row. The new style is already there. Selected text, chose it, applies instantly.
The plugin's advantage: CSS files (editor-style.css and editor-style-shared.css) are created automatically in the selected folder. You grab them via FTP, edit in a convenient editor, and upload back, without a single edit to functions.php.
Method 3: register_block_style(), native path for Gutenberg
The two previous methods work in the classic TinyMCE editor and its Classic block inside Gutenberg. But if you live exclusively in the block editor, there's a more direct path: register_block_style().
This function registers a style variation for a specific block, button, heading, quote, group. The variation appears in the block's sidebar panel, and the editor applies it with one click.
Example: let's add a "Fancy" variation to a button with a yellow background and rounded corners:
1 function myprefix_register_block_styles() { 2 register_block_style( 3 'core/button', 4 array( 5 'name' => 'fancy', 6 'label' => __( 'Fancy', 'text-domain' ), 7 ) 8 ); 9 } 10 add_action( 'init', 'myprefix_register_block_styles' );
CSS is connected either through theme.json (for modern block themes) or through wp_add_inline_style():
1 .is-style-fancy .wp-block-button__link { 2 background-color: #f0c040; 3 color: #fff; 4 border: none; 5 border-radius: 15px; 6 padding: 10px 20px; 7 }
This approach doesn't depend on TinyMCE and works natively in Gutenberg. For themes with theme.json (all modern block themes), styles can be described directly in the styles.blocks section, without a single line of PHP.
⁉️🤔 Common questions
Formats don't display in the editor. What's wrong?
First, go to Settings → Advanced Editor Tools and make sure the "Formats" button isn't removed from the toolbar. AET intercepts control of button rows, and your
mce_buttons_1filter may be ignored until you explicitly add the button through the plugin's interface. Also check that themce_buttons_1filter is registered and returns an array with the'styleselect'element. Clear browser cache and server cache, often the problem is only in this.
Can I bind a style to multiple selectors at once?
Yes. Instead of the string
'selector' => 'a', pass an array:'selector' => 'a, button, span'. TinyMCE will apply the style to the first matching parent tag from the list. In practice, this is useful when one visual style should work on both links and<button>buttons. Order in the array matters: if the selected text is inside a link nested in adiv, and the selectors specify'div, a', the style will apply todiv, nota. Put more specific selectors first.
How does editor-style.css differ from editor-style-shared.css?
The TinyMCE Custom Styles plugin creates two files.
editor-style.cssloads only in the TinyMCE editor.editor-style-shared.cssloads both in the editor and on the frontend, styles from it are visible to site visitors. If a style is needed only for editing convenience, put it ineditor-style.css. If the style should work on the site, ineditor-style-shared.css. With the manual approach, the shared file's analog is the theme's main stylesheet, andeditor-style.css(a separate file registered throughadd_editor_style()) only affects the preview inside TinyMCE.
Is it mandatory to create a child theme for these edits?
No, the code works in the main theme's
functions.phptoo. But on the next theme update, all edits will be overwritten. The rule is simple: any customization throughfunctions.phpgoes into a child theme, this is insurance against losing changes. If you don't have a child theme yet, create it in ten minutes following the child theme guide: two files,style.csswith a header andfunctions.phpwith parent styles import, and your custom formats will survive any update.
The plugin hasn't been updated since 2024. Should I install it?
As of June 2026, the TinyMCE Custom Styles plugin remains in the WordPress.org catalog with 8,000+ active installations. The author is openly looking for a successor, but the codebase isn't abandoned: the latest update (v1.1.5, June 2024) closed vulnerabilities. There is risk, but it's manageable: the plugin doesn't pull external dependencies and doesn't dig deeply into the database. If in the future the plugin stops being updated, you can always transfer styles to the manual method (steps 1-4 above) without losing CSS. An alternative with active development, Advanced Editor Tools (AET) from Automattic, but its "Create CSS classes menu" option often clutters the menu with unnecessary classes. TinyMCE Custom Styles gives manual control over each element, so they're not competitors but rather complement each other.
Code, plugin or blocks: what to choose for your scenario
The choice comes down to two questions: which editor you work in and whether you're ready to open functions.php once.
Working in the classic editor or Classic block of Gutenberg and not afraid of code, take method 1. Ten lines of PHP, one CSS file, full control.
Want a visual format constructor without touching code and with automatic CSS generation, install TinyMCE Custom Styles. Remember the long-term support risk, but as of today the plugin delivers what it promises.
Living in the block editor, master register_block_style(). This path is native for Gutenberg, doesn't depend on TinyMCE, and is supported by WordPress core.
In any of the three scenarios, you get the main thing: formatting in one click instead of manual copying of classes and inline styles. And that's an hour or two of saved time per month on any regularly published site.

A professional team of writers and editors specializing in creating quality content.