














🔒 How to install a free SSL certificate from Let's Encrypt in WordPress
A couple of years ago, HTTPS was still considered an optional extra, something to set up "when we get around to it." Today, browsers mark unprotected sites as "not secure" right in the address bar, search engines push them down in rankings, and visitors leave before reaching your content.
The situation has flipped: an SSL certificate has gone from a recommendation to a mandatory minimum. And if your hosting still doesn't offer built-in Let's Encrypt support, that's no reason to pay for a premium certificate or postpone migrating to HTTPS. In 10-15 minutes, you can obtain and install a free certificate manually using three different methods suited to any hosting scenario.
Below is a step-by-step guide tested on live WordPress installations: from choosing a generation method to uploading the certificate to your control panel and finally activating HTTPS on your site.
💡 Quick overview:
- Install WP Encryption from the WordPress directory and activate the certificate in a couple of clicks
- Generate a certificate via Certbot on your VPS with a single terminal command
- Obtain a certificate through the ZeroSSL online tool without installing anything on your server
- Upload the ready certificate to your hosting panel and enable HTTPS in WordPress
Watch a short video showing the entire SSL installation process via the WP Encryption plugin in 2 minutes:
Method 1: WP Encryption, one click from the WordPress admin
The simplest scenario: you're using WordPress and want to get a certificate without leaving the admin panel or accessing your hosting control panel. For this, there's WP Encryption, a free plugin with 50,000+ active installations and a 4.9/5 rating on WordPress.org.
The plugin registers your site with Let's Encrypt servers, verifies the domain, and generates an SSL certificate in just a few clicks. No manual CSR creation, DNS record verification, or fiddling with cert.pem files; the plugin handles everything.
After installing from the WordPress directory, go to WP Encryption settings and register your site:
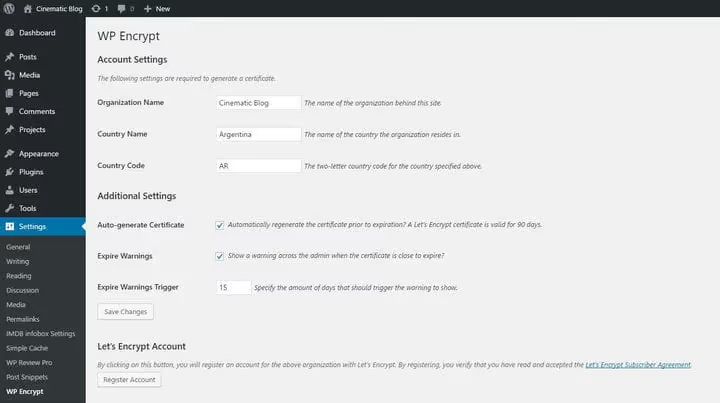
Make sure to enable two options: "Automatic certificate creation" and "Expiration warnings." The first ensures automatic certificate renewal before expiration; the second sends a notification if something goes wrong. After saving, the plugin connects directly to Let's Encrypt servers, generates the certificate, and displays the file paths:
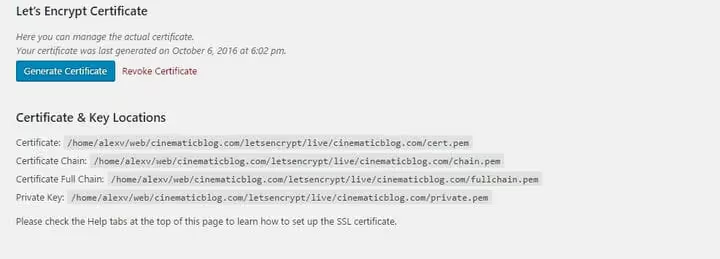
Three certificate files are ready: cert.pem, private.pem, and chain.pem. One caveat: they're stored in the plugin directory rather than public_html, so you'll need to copy them via FTP or file manager to upload them to your hosting panel (more on this in the upload section below).
Pros: completely free, automatic renewal every 90 days, no hosting panel access needed for generation.
Cons: the certificate is generated in the WordPress file system, so you'll need to manually transfer the files to upload them to cPanel or another panel. This takes a couple of minutes the first time; afterward, the plugin renews the certificate on its own, and you won't need to repeat the transfer.
Method 2: Certbot, for those managing a VPS
If you administer your own server (VPS or dedicated) and need full control over the process, use Certbot, the official Let's Encrypt client from the Electronic Frontier Foundation. The instructions below are current for Ubuntu 22.04/24.04 and Debian 12.
Install Certbot with a single command:
1 sudo apt install certbot
At the time of certificate generation, the web server must be stopped so port 80 is free for domain verification:
1 sudo systemctl stop nginx 2 sudo systemctl stop apache2 # or this one, if Apache
Run the interactive wizard:
1 sudo certbot certonly
Certbot will ask for the domain, verification method, and contact email, then generate the certificate in /etc/letsencrypt/live/<your-domain>/. You'll find the same three files there: cert.pem, privkey.pem, and chain.pem.
After obtaining the certificate, don't forget to start the web server again:
1 sudo systemctl start nginx
All that's left is to add the certificate paths to your virtual host configuration and set up automatic renewal via certbot renew in cron. Full documentation is at certbot.eff.org.
Method 3: ZeroSSL, no command line at all
If your site isn't on WordPress but runs a custom CMS or static generator, or you simply don't want to install anything, use ZeroSSL. This is a web tool that generates a Let's Encrypt certificate right in your browser.
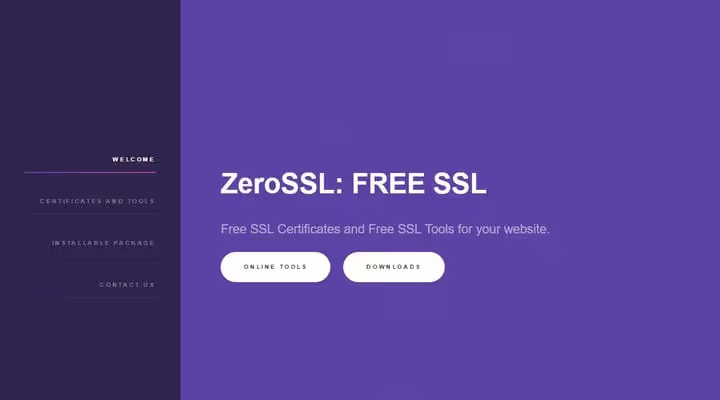
Click the "Create free SSL certificate" button, enter your domain and email:
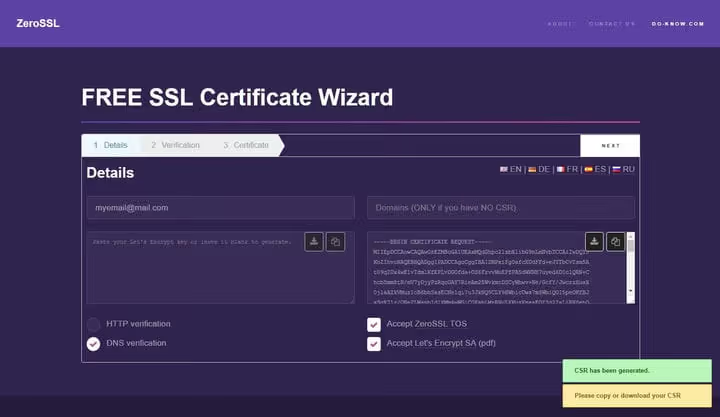
On the next step, choose the domain verification method. The most compatible option with most panels is DNS verification (adding a TXT record). ZeroSSL will generate a CSR and certificate key:
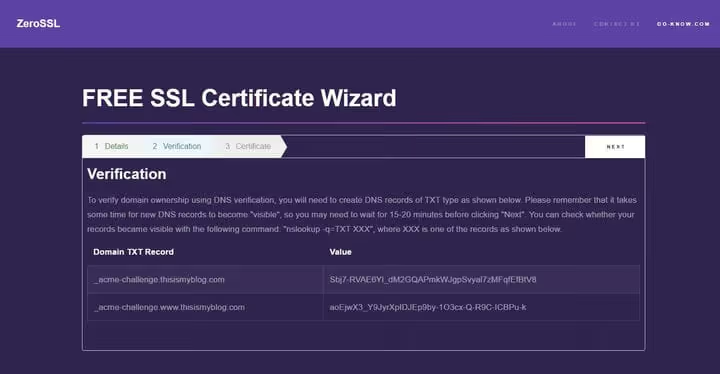
Copy the key and save it as a plain text file. Don't use Word or any other rich-text editor; they add hidden characters that break the certificate code. Plain TXT only, exactly as-is.
Add the TXT record in DNS (hosting panel → DNS editor), wait 5 minutes, and click "Verify." ZeroSSL will provide the ready certificate and CA bundle, which you can download and upload to your hosting panel.
Main advantage: works with any site, not just WordPress.
Downside: the certificate is valid for 90 days, and you'll need to renew it manually. If you have multiple sites, this process gets tedious quickly.
Uploading the certificate to your hosting panel
Regardless of the method, you'll have three files:
cert.pem, the certificate itselfprivate.pem(orprivkey.pem), the private keychain.pem, the certificate chain (CA bundle)
You need to copy their contents into the corresponding fields in your hosting control panel. The file paths after generation via WP Encryption or Certbot are always shown in the interface; copy them via FTP or your panel's file manager.
cPanel
In cPanel, find the "SSL/TLS" section (just type "SSL" in the search bar):
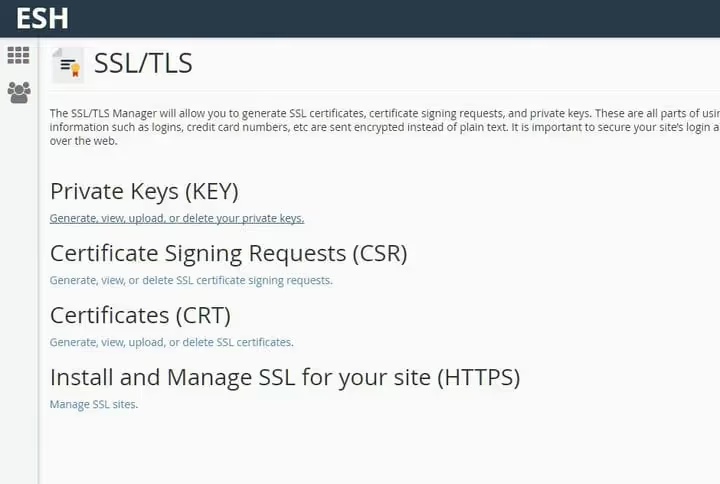
Select "Install and Manage SSL for your site (HTTPS)":
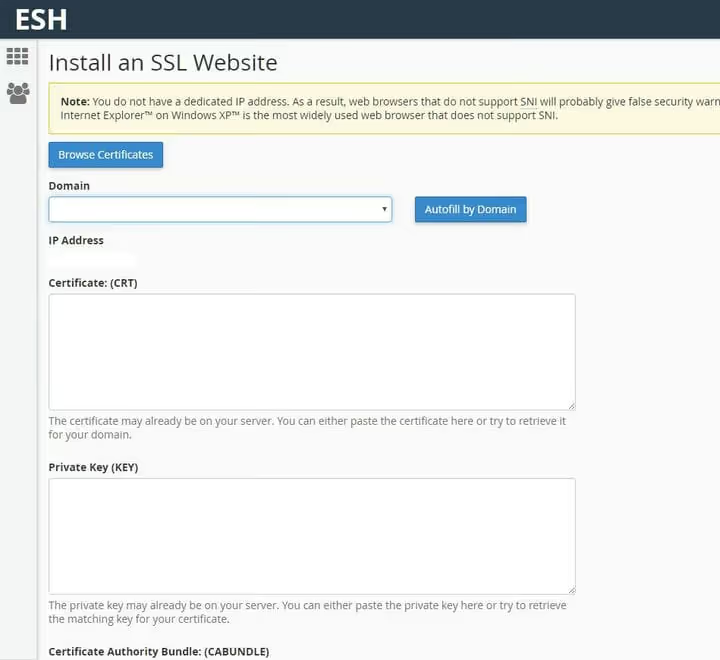
Copy the file contents into the corresponding fields:
cert.pem→ Certificate (CRT)private.pem→ Private Key (KEY)chain.pem→ Certificate Authority Bundle (CABUNDLE)
Click "Install Certificate," and you're done; HTTPS is now active on the server.
HestiaCP and other panels
The old VestaCP panel, familiar to many administrators, hasn't been updated since 2018 and isn't recommended for new servers. The current open-source alternative is HestiaCP, a Vesta fork with modern code and regular updates. The certificate upload process is similar in any panel: you switch the domain from HTTP to HTTPS and paste the file contents into the same fields.
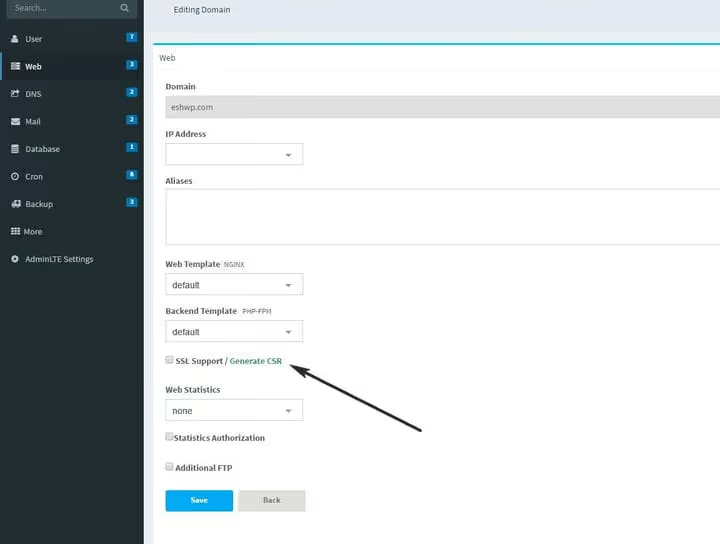
Field order:
cert.pem→ SSL Certificateprivate.pem→ SSL Keychain.pem→ SSL Certificate Authority / Intermediate
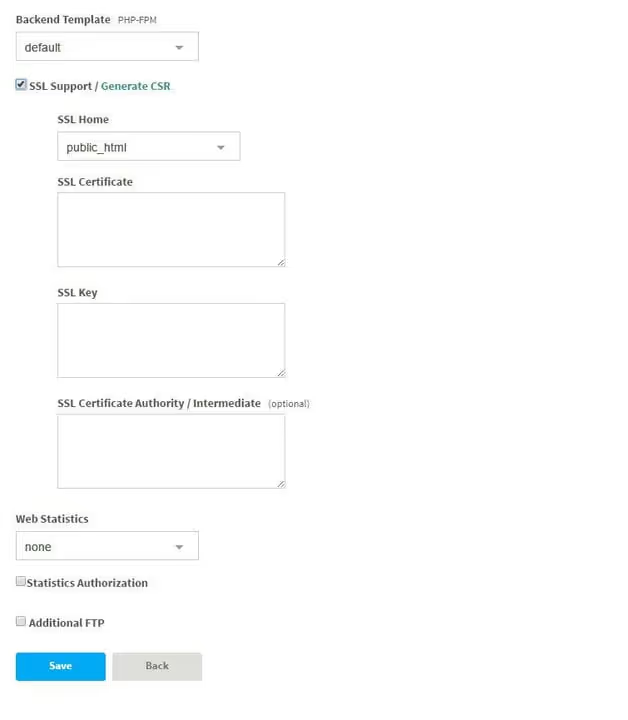
After saving, your site immediately switches to HTTPS. Remember: this is a one-time setup. If you used WP Encryption, the plugin will renew the certificate automatically, so you won't need to repeat this procedure.
Completing the setup: telling WordPress to use HTTPS
The certificate is active on the server; now you need to tell WordPress to work over HTTPS. Go to "Settings → General" and change http:// to https:// in the "WordPress Address (URL)" and "Site Address (URL)" fields:
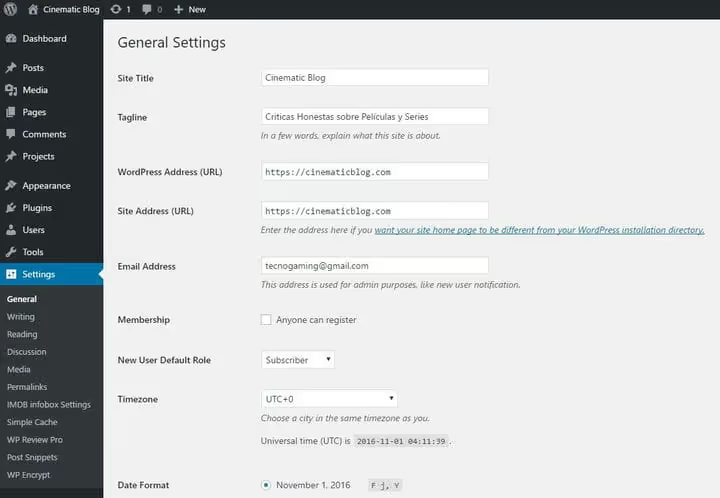
Save the changes. WordPress now runs over HTTPS. To complete the picture, I recommend installing the free Really Simple SSL plugin; it automatically fixes mixed content, sets up a 301 redirect from HTTP to HTTPS, and adds security headers. After activating it, you can update your settings in Google Search Console and your sitemap so search engines see the secure version.
⁉️🤔 Frequently asked questions
Do I need to pay for an SSL certificate in 2026?
For the vast majority of sites, no. Let's Encrypt issues fully trusted certificates recognized by all browsers. Paid certificates make sense for e-commerce stores requiring extended validation (EV SSL with the green bar) or when you need insurance coverage in case of key compromise. For a blog, landing page, or corporate site, a free Let's Encrypt certificate is enough.
How often do I need to renew a Let's Encrypt certificate?
Let's Encrypt certificates are valid for 90 days. When using WP Encryption or Certbot with cron renewal configured, the process is fully automatic, and you can forget about it after the initial setup. With the manual ZeroSSL method, you'll need to renew every 3 months yourself.
What should I do if the site shows "mixed content" after installing the certificate?
Install the Really Simple SSL plugin; it replaces all
http://links in the database withhttps://in one click and sets up automatic redirects. Without a plugin, mixed content occurs when an HTTPS page loads images, scripts, or styles over HTTP. Browsers block such resources, and your site loses the "green padlock."
Can I install Let's Encrypt on shared hosting without server access?
Yes, through the WP Encryption plugin (if your site runs WordPress) or through ZeroSSL (for any site). Neither method requires SSH access or root privileges. The only requirement: you must have access to the DNS editor to add a TXT record (ZeroSSL) or FTP to copy the certificate files to the panel (WP Encryption).
Do I have to stop the web server when using Certbot?
For the
certbot certonlymode, yes, port 80 must be free at the time of verification. Stopping Apache or Nginx for 30 seconds is standard practice. If your site can't have any downtime, use the--webrootmode, which places a temporary file in the site's public directory and doesn't require stopping the server.
Free SSL in 2026: not a question of "should I," but "which method"
HTTPS technology has evolved from a rare option to a baseline standard. Let's Encrypt made certificates free and automatable, and today a site without SSL looks like a store without a sign: it works, but it doesn't inspire trust.
Choosing a method comes down to your context:
- WordPress with minimal effort: WP Encryption, 5 minutes
- Your own VPS with full control: Certbot, one command
- Non-WordPress or a manual scenario: ZeroSSL, no installation
After uploading the certificate to your panel and activating HTTPS in WordPress, the process becomes self-sustaining: the plugin or cron renews the certificate before expiration, and all you need to do is monitor the validity period in the background. Set up SSL today, and tomorrow browsers and search engines will thank you.

A professional team of writers and editors specializing in creating quality content.