














🔒 How to restrict access to WordPress custom post types: a step by step guide
Imagine this: you launched a corporate portal on WordPress, created a custom post type called "Equipment," and filled it with internal documentation. A week later, you discover that all these pages are being indexed by search engines and visible to anyone passing by. Access should be limited to authorized employees, but yours is wide open.
WordPress's built-in tools don't allow you to selectively restrict a specific custom post type from unregistered users. Roles and capabilities exist, but the "guests can't see CPT X" binding is not available out of the box. The solution consists of three components: CPT registration, role configuration, and a read restriction plugin. The fourth (optional) component is social login so employees don't have to enter a password every time.

Below is a step-by-step breakdown of each component with specific plugins and settings. All tools are free, available in the official WordPress.org directory, and require no coding, although a pure code-based approach is covered at the end for those who want to avoid plugins.
💡 Quick overview:
- Register a custom post type through Custom Post Type UI without writing a single line of code
- Create a custom role in PublishPress Capabilities and assign it to employees
- Restrict CPT access from guests using the WP Access Areas plugin: unauthorized visitors get redirected to the login page
- Optionally enable social login through Super Socializer for password-free Google account login
Step 1: Registering a custom post type
The first and simplest stage is creating the CPT itself. You don't need to touch functions.php for this: the Custom Post Type UI plugin on WordPress.org provides a graphical interface for registering any post types and taxonomies.
Installation is standard: "Plugins → Add New," search by name, activate. After activation, a new menu item appears in the sidebar: "CPT UI → Add/Edit Post Types." Fill in the fields: slug (for example, equipment), plural and singular names, labels, and click "Add Post Type."
The plugin calls register_post_type() with the correct parameters automatically. No manual code required: you get a fully functional post type with editor support, archives, and REST API. If you later need to move the registration to functions.php, CPT UI displays the generated PHP code in the "Tools" tab.
During registration, pay attention to two critical security-related options. In the CPT UI "Settings" block, there's a "Publicly Queryable" flag that determines whether posts can be opened via direct links. It defaults to true, and even after restricting reading through a plugin, you should leave this enabled; otherwise WordPress will return a 404 instead of redirecting to the login page, and users won't understand what happened. The second parameter, "Has Archive," enables an archive page listing all CPT posts. If you don't need an archive, disable it so search engines don't index a service page with previews of restricted documents.
Step 2: Creating a custom role
Simply restricting CPT access from guests isn't enough: you need a role that will have access. By default, WordPress provides a fixed set: Administrator, Editor, Author, Contributor, Subscriber. We'll create a new role using the PublishPress Capabilities plugin (formerly called Capability Manager Enhanced, same slug, same functionality, just rebranded).
After activation, go to "Capabilities → Roles." On the right side of the screen, you'll find the "Create New Role" block:
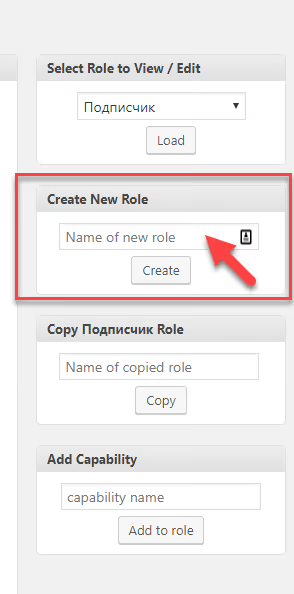
Enter a name (for example, "Equipment Reader"), select a base role to clone from (Subscriber is best, with minimal permissions), and click "Create." The new role now exists, and you can populate it with capabilities. For reading a CPT, the standard combination of read + read_equipment (the capability registered by CPT UI) is sufficient.
Assign the created role to employees who need access to the restricted content. After this, you can deactivate the plugin: roles and capabilities remain in the WordPress database and don't depend on PublishPress Capabilities being active.
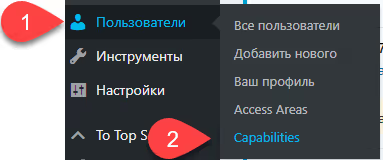
Step 3: Restricting read access to CPT
This is the key step. The WP Access Areas plugin allows you to precisely define who can read, edit, and comment on posts of each type, down to individual pages. It has a modest 400 active installations and hasn't had major updates in a while, but for the task of "restricting CPT from guests," it works predictably and without conflicts.
After installation, go to "Settings → Access Areas." In the "Default Behaviour" section, select:
"If not logged in, redirect to login. Otherwise redirect to the fallback page."
This setting sends unauthorized users to wp-login.php when they try to open any protected CPT page.
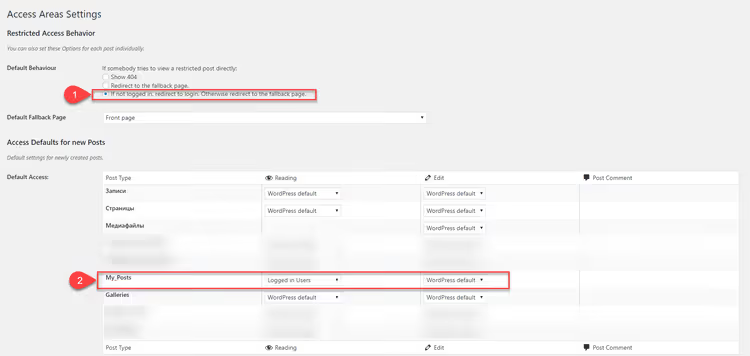
Next, there's a table of all registered post types. For your CPT, in the "Reading" column, select "Logged in Users" from the dropdown. That's it: from this point on, any guest who follows a direct link to a CPT page gets redirected to the authorization form.
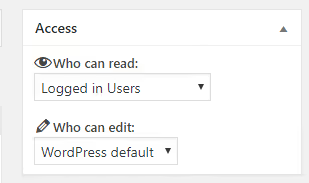
Important note: settings made through the table only apply to new posts. For already created pages, you need to manually set permissions in the editor sidebar, where an "Access Areas" block appears. After configuration, be sure to verify the result in your browser's incognito mode: opening a direct link to a protected CPT page should show you wp-login.php, not the content.
Alternatives to WP Access Areas if you need a more actively maintained solution: PublishPress Permissions (the free version covers CPT and roles) or ContentGate (a lightweight plugin with rules based on login status and roles).
Step 4: Social login (optional)
Constantly entering a username and password on a corporate portal creates unnecessary friction. The logical solution: one-click login via Google account. The Super Socializer plugin handles this task with 20,000+ active installations and support for Google, Facebook, X (Twitter), and a dozen other providers.
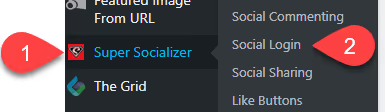
After activation, go to "Super Socializer → Social Login":
Basic settings: enable the "Disable user registration via social networks" checkbox. This is important so that only existing accounts can log in through social networks, rather than creating new ones. Then select the provider (Google) and enter the Client ID and Client Secret. Where to get them:
- Open Google Cloud Console, create a project (or select an existing one)
- In the "APIs & Services → Credentials" section, click "Create Credentials → OAuth client ID"
- Application type is Web application; in Authorized redirect URIs, paste the callback URL from Super Socializer settings
- Save to get your Client ID and Client Secret
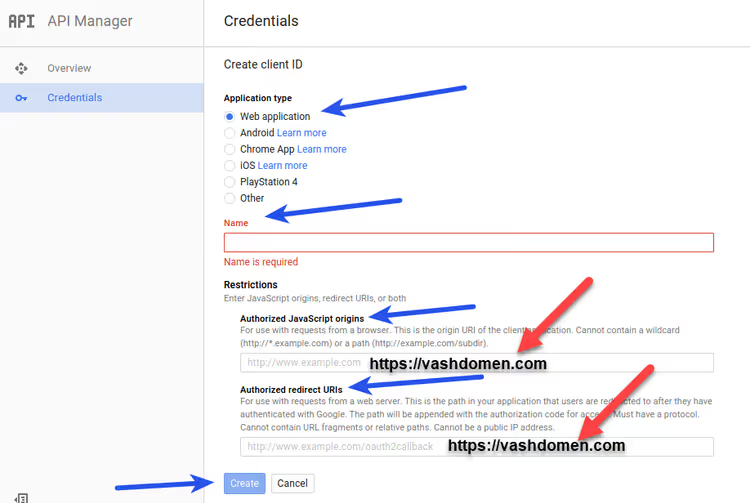
Copy the keys into the plugin fields:
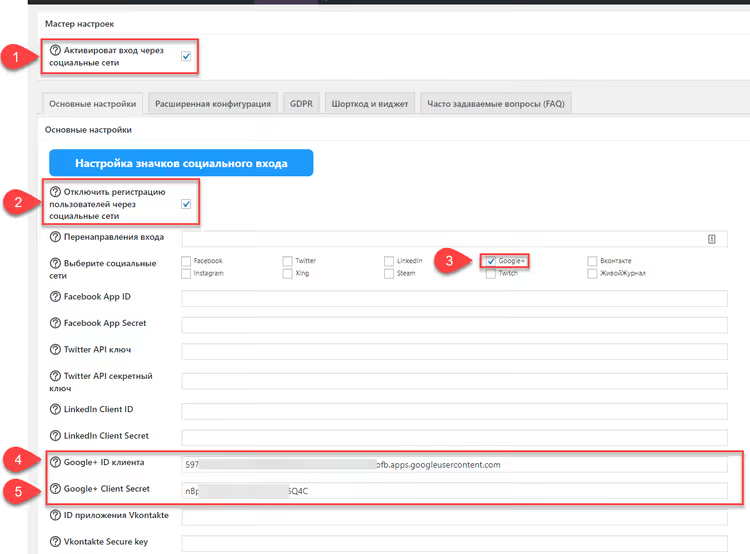
Critical point: the Authorized redirect URIs field must not have a trailing slash, or you'll get a redirect_uri_mismatch error. After saving, a "Sign in with Google" button appears on the login page.
Important: the original version of this post (2020) described integration with Google+, which was shut down in April 2019. Modern Super Socializer uses the standard Google OAuth 2.0 protocol through Google Identity Services. The Google Cloud Console interface has been updated since then, but the logic of the steps (project → Credentials → OAuth client ID → redirect URI) remains the same.
Alternative approach: everything in code
If additional plugins are undesirable, the task can be solved in the theme's functions.php or a child theme. The code registers the CPT, creates a role, and hooks an authorization check to the template:
1 // Registering a custom post type 2 function register_equipment_cpt() { 3 register_post_type('equipment', [ 4 'labels' => ['name' => 'Equipment', 'singular_name' => 'Equipment'], 5 'public' => true, 6 'has_archive' => true, 7 'supports' => ['title', 'editor', 'thumbnail'], 8 'capability_type' => 'equipment', 9 'map_meta_cap' => true, 10 ]); 11 } 12 add_action('init', 'register_equipment_cpt'); 13 14 // Creating a role on theme activation 15 function add_equipment_reader_role() { 16 add_role('equipment_reader', 'Equipment Reader', ['read' => true, 'read_equipment' => true]); 17 } 18 add_action('after_switch_theme', 'add_equipment_reader_role'); 19 20 // Redirecting guests from CPT to login page 21 function restrict_equipment_to_logged_in() { 22 if (is_singular('equipment') && !is_user_logged_in()) { 23 wp_redirect(wp_login_url(get_permalink())); 24 exit; 25 } 26 } 27 add_action('template_redirect', 'restrict_equipment_to_logged_in');
What this code does: the first block registers the CPT equipment with its own capability type (capability_type). The second block creates the Equipment Reader role with permissions to read this CPT when the theme is activated. The third block checks authorization on the template_redirect hook and sends guests to wp-login.php.
The advantage of the code approach: zero additional plugins, full control. The disadvantage: social login will still require a plugin (writing OAuth integration manually is time-consuming and insecure), and every change to roles means editing code.
⁉️🤔 Frequently asked questions
Can I restrict a CPT without plugins, only through functions.php?
Yes. The combination of
register_post_type()+add_role()+ thetemplate_redirecthook with anis_user_logged_in()check is a fully working solution. The code is provided in the section above. Social login without a plugin is significantly harder to implement: manual OAuth integration requires handling tokens, state, and security.
Why WP Access Areas instead of a newer plugin like ContentGate?
WP Access Areas is a minimalist tool for a specific task: "restrict a post type from guests." It doesn't bring along a rule builder, visual editors, or subscriptions. If you need more complex logic (for example, different access levels for different roles on the same CPT), use ContentGate or PublishPress Permissions, which are actively updated. For the basic scenario in this guide, WP Access Areas is sufficient.
What should I do if guests can still see CPT pages after configuration?
Three typical causes. First: the "Logged in Users" setting in the WP Access Areas table only applies to new posts; for existing pages, you need to set permissions manually through the editor sidebar. Second: a caching plugin is serving a cached version of the page to guests; clear the cache and configure exclusions for the protected CPT. Third: the CPT is registered with
'publicly_queryable' => trueand the slug conflicts with a public page; check for collisions.
Can I use Super Socializer only for login, without sharing and comments?
Yes, the plugin's modules are independent. On the "Social Sharing" tab, uncheck all boxes and the "Share" buttons will disappear. On the "Social Commenting" tab, disable the integration. Leave only "Social Login" with the providers you need. The plugin is lightweight, and disabling unnecessary modules doesn't affect performance.
Is it safe to deactivate PublishPress Capabilities after creating a role?
Yes. WordPress roles and capabilities are stored in the
wp_optionstable (thewp_user_rolesoption) and don't depend on the plugin that created them. After deactivating PublishPress Capabilities, all created roles and granted permissions are preserved. You can reactivate the plugin if you need to modify permissions later.
Should you write code or stick with plugins
The choice between plugins and functions.php comes down to two factors: the number of CPTs being protected and how often permissions change.
If you have just one CPT (like the equipment example), roles are stable, and you're willing to write 30 lines of code once, the functions.php approach is cleaner: it doesn't spawn plugins, doesn't depend on third-party updates, and is completely transparent. You can keep Super Socializer for social login, since it solves a narrow task and doesn't conflict with custom code.
If you have multiple CPTs, permissions are frequently revised, or the site is managed by a non-developer, go with the plugin combination. CPT UI + PublishPress Capabilities + WP Access Areas (or ContentGate) can be configured from the admin panel in 15 minutes without touching code. Plus, PublishPress Capabilities automatically backs up roles with every change, allowing rollback in two clicks.
In any scenario, follow the principle: one tool for one task. Don't install a powerful all-in-one solution for a single checkbox, and don't reinvent the wheel if an existing plugin does exactly the same thing faster and more securely.
Version control deserves separate consideration. Code from functions.php lives in the theme repository, changes are tracked through Git, and when migrating the site, roles are automatically recreated on the after_switch_theme hook. The plugin approach doesn't offer this transparency: roles are stored in the database, and when deploying a staging copy or transferring to a new domain, they need to be recreated manually or through a migration script. This factor often becomes decisive in favor of code for teams practicing CI/CD and Git-based deployment.

A professional team of writers and editors specializing in creating quality content.