













📝 WP-Recall: configuring private post publishing by users
Users filled out a form in their personal account, clicked "Submit", and the application ended up in the site's public feed. Along with phone number, address, and passport data.
This happens when a custom post type is configured as public. WordPress by default shows everything created with 'public' => true, whether it was published by an admin or a visitor through a frontend form in WP-Recall.
Below is a step-by-step guide: we'll create a custom post type, assign it a private status on publication, and configure a redirect back to the user account. Without expensive all-in-one plugins: WP-Recall, MB Custom Post Type, and three functions in functions.php.
💡 Quick overview:
- Install WP-Recall and MB Custom Post Type, two free plugins from the WordPress.org catalog.
- Create a custom post type through the MB Custom Post Type interface, without a single line of code.
- Add three functions to
functions.php: CPT registration with code (optional), redirect after publication, and automatic transition toprivatestatus. - Verify: the user publishes an application from their personal account, it's visible only to administrators and editors.
Step 1: Install WP-Recall and MB Custom Post Type
You'll need two plugins. Both are free and available in the official WordPress.org catalog.
WP-Recall creates a user personal account: registration, profile, private messages, and, what's important for our task, publishing posts from the frontend. The user logs into their account, fills out the form, and submits the application. No admin panel, everything happens on the site's pages.
MB Custom Post Types & Custom Taxonomies, an extension of the Meta Box plugin. Provides a visual interface for creating custom post types and taxonomies. At the time of writing, the plugin has 10,000+ active installations and a 4.7 rating on WordPress.org. It's updated regularly, the latest version was released in June 2026.
Both plugins are installed in the standard way: Plugins → Add New, search by name, "Install" → "Activate".
Step 2: Create a custom post type through the MB Custom Post Type interface
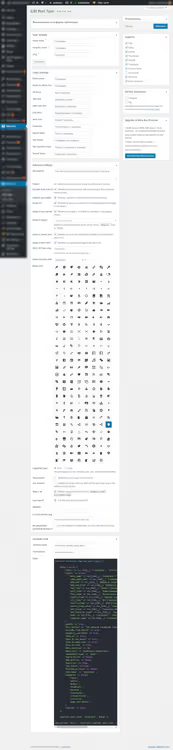
After activating the plugin, a Meta Box → Post Types menu appears in the admin panel. Click "Add New" and fill in the fields:
Main settings worth configuring right away:
- Post type ID, system name in Latin, for example
claimoruser_request. This slug will appear in URLs and code. - Labels, the plugin will auto-fill Russian labels if you enter the name in Russian in the Singular Name field. Manually edit what doesn't work for you.
- Supports, check
title,editor, andcustom-fields. Thumbnail and comments are usually not needed for applications. - Exclude from search, enable. User posts should not be indexed.
- Public,
true(the WP-Recall form needs to see the post type). We'll handle privacy with code in step 4.
Click "Save", the custom post type is registered. The same result can be achieved with code (an alternative for those who prefer functions.php):
1 function sdstudio_register_private_cpt() { 2 $args = array( 3 'label' => 'Applications', 4 'public' => true, 5 'exclude_from_search' => true, 6 'publicly_queryable' => true, 7 'show_ui' => true, 8 'show_in_rest' => false, 9 'menu_icon' => 'dashicons-lock', 10 'capability_type' => 'post', 11 'hierarchical' => false, 12 'has_archive' => false, 13 'supports' => array( 'title', 'editor', 'author', 'custom-fields' ), 14 'rewrite' => array( 'slug' => 'claims' ), 15 ); 16 17 register_post_type( 'user_claim', $args ); 18 } 19 add_action( 'init', 'sdstudio_register_private_cpt' );
Add this code to your child theme's functions.php or through the Code Snippets plugin. After saving, go to the admin panel, an "Applications" section will appear in the sidebar.
Step 3: Configure redirect after publication
By default, WP-Recall shows the user the post itself after submission. For applications, this is pointless, the person needs their personal account, not a page with the form they just submitted.
The function below intercepts the update_post_rcl hook (WP-Recall event after publication) and redirects the user back to their applications section:
1 /** 2 * Redirect to personal account after publishing a post via WP-Recall. 3 * Add to functions.php of the child theme. 4 */ 5 function sdstudio_redirect_after_rcl_publish() { 6 $user_id = get_current_user_id(); 7 wp_redirect( '/account/?user=' . $user_id . '&tab=publics' ); 8 exit; 9 } 10 add_action( 'update_post_rcl', 'sdstudio_redirect_after_rcl_publish' );
Here get_current_user_id() is called inside the function, unlike the common pattern with a variable outside, this is reliable regardless of file loading order. Replace the /account/ path with the URL of your personal account in your WP-Recall installation.
Check: log in as a test user, publish a post from the account, the browser should return to the page with the list of applications.
Step 4: Automatically make the post private
This is the key step. Even if the custom post type is hidden from search, the post itself with post_status = 'publish' is accessible via direct link. And there are enough ways to find this link: from RSS feeds to wp-json REST API.
The transition_post_status hook fires on any post status change. We catch the moment when the status changes to publish and forcibly set it to private:
1 /** 2 * Automatically makes a post private upon publication. 3 * Checks that it is our custom post type — user_claim. 4 * Source: https://stackoverflow.com/questions/54508808/ 5 */ 6 function sdstudio_force_private_status( $new_status, $old_status, $post ) { 7 if ( 'user_claim' === $post->post_type 8 && 'publish' === $new_status 9 && $old_status !== $new_status ) { 10 $post->post_status = 'private'; 11 wp_update_post( $post ); 12 } 13 } 14 add_action( 'transition_post_status', 'sdstudio_force_private_status', 10, 3 );
What's happening here line by line:
transition_post_status, a WordPress hook that's called at each transition of a post from one status to another.- The first condition checks
post_typeto avoid affecting regular posts and pages. - The second condition catches the moment of publication (
publish), not unpublishing. - The third condition (
$old_status !== $new_status) prevents repeated triggering whenwp_update_postitself calls this same hook.
Be sure to replace 'user_claim' with your custom post type ID. Not sure of the ID, check it in the address bar when editing the post type in Meta Box → Post Types.
The video above is a detailed walkthrough of creating custom post types in WordPress: from theory to working code on screen. If you prefer a visual format, the author shows every step with explanation of register_post_type() arguments.
⁉️🤔 Frequently asked questions
Why private status at all if the post is excluded from search?
Excluding from search (
exclude_from_search) removes the post only fromWP_Queryresults on the frontend. Direct URLs, REST API, and RSS feeds still serve the content. Theprivatestatus closes access at the WordPress core level, the post is visible only to users with theread_private_postscapability (administrators and editors).
Can the user change the post status after publication?
Through the standard WP-Recall interface, no. The frontend form doesn't provide access to status selection. But if the user somehow gains access to the admin panel (Author role and above), they can edit their posts. So for sites accepting applications, don't give users a role higher than Subscriber.
What to do if WP-Recall doesn't see my custom post type?
Check two parameters in the post type settings:
publicshould betrue, andshow_ui,true. Then go to WP-Recall settings → "Publication" and make sure your post type is checked in the list of allowed types. After changing settings, flush the permalinks cache: Settings → Permalinks → Save Changes.
Is it mandatory to use specifically MB Custom Post Type?
No. Any method of registering a custom post type will work: code in
functions.php(as in step 2), the Custom Post Type UI plugin, or ACF. MB Custom Post Type was chosen for the combination of visual interface and zero cost. If you're already using ACF Pro, create post types in it, the logic doesn't change.
The code works, but old posts remained public, how to hide them?
The function from step 4 fires only on the publication event. Existing posts need to be processed separately. The safest way is to go to the admin panel, select all posts of the needed type, and through Quick Edit change the status to Private. For hundreds of posts, use WP-CLI:
wp post list --post_type=user_claim --format=ids | xargs -I {} wp post update {} --post_status=private. Before bulk updating, make a database backup.
This approach works on dozens of sites: users submit applications through their personal account, and administrators see them in the admin panel. For the typical "WP-Recall + private posts" setup, nothing else is needed.
If you're going to accept payment data or passport scans through the custom post type, additionally configure SSL and field encryption. But that's a topic for a separate article.
What we got: checklist for launch
- WP-Recall and MB Custom Post Type are installed and activated.
- Custom post type is created, through the plugin interface or with code.
- In WP-Recall settings → "Publication", the needed post type is checked.
- The redirect function from step 3 is added to
functions.php. - The private status function from step 4 is added,
post_typeis replaced with yours. - Permalinks are flushed: Settings → Permalinks → Save Changes.
- A test user submitted an application from their personal account, redirect works, the post is private.
One test application run saves an hour of debugging "why it doesn't work" in production. Don't skip this step.
Start with installing MB Custom Post Type, the visual builder will save you hassle with register_post_type() arguments. And if you're already using another post type builder (ACF, CPT UI), just take the functions from steps 3 and 4: redirect and private status work independently of the CPT registration method.
And what method do you use to accept applications from users on your WordPress sites? Share in the comments, it's interesting to compare approaches.

A professional team of writers and editors specializing in creating quality content.