













 AIIllustrative image: AI-generated
⚡ Learning the basics of Vue 3: from an empty folder to components
You're looking at Vue 3 and seeing a slick frontend framework from the big three. React, Angular, Vue: sounds serious. Then you open the first tutorial, and there waiting for you are vite, create-vue, and .vue files with transpilers... Even though you can actually include Vue with a single <script> line and start writing code right away. No bundlers, no JSX, no configuration hell.
The gap between "I want to try it" and "I wrote a component" is shorter here than anywhere else. But most tutorials don't close that gap; they rehash the documentation in fragments without giving you the full picture. You see scattered bits of syntax and can't figure out how they turn into an application.
This guide is the exact path we ourselves took with Vue: from an empty folder to components with props. You'll write and run every line yourself. No magic, just working code and an understanding of reactivity, Vue's main superpower.
💡 Quick overview:
- Build a Vue app from a CDN and mount it to the DOM: your first working instance in 5 minutes
- Walk through four key directives, v-for, v-if, v-on, and v-bind: the pillars of any Vue template
- Break down computed and methods: when to cache and when to call
- Extract logic into components and pass data via props: a step toward real architecture
Creating a Vue app
Let's start from absolute zero. No create-vue, vite, or vue-cli, just a folder with two files.
Create the directory and files in your terminal:
1 mkdir vue3-intro 2 cd vue3-intro 3 touch index.html app.js
Or do the same thing through your file manager. Now open index.html and write the skeleton:
1 <!DOCTYPE html> 2 <html lang="ru"> 3 <head> 4 <meta charset="UTF-8"> 5 <meta name="viewport" content="width=device-width, initial-scale=1.0"> 6 <script src="https://unpkg.com/vue@3/dist/vue.global.js"></script> 7 <title>Vue 3 — first steps</title> 8 </head> 9 <body> 10 <div id="app"></div> 11 <script src="./app.js"></script> 12 </body> 13 </html>
Three key lines. <script src="https://unpkg.com/vue@3/dist/vue.global.js"> loads Vue 3 from a CDN. This is the fastest way to get started: the library loads like a regular JavaScript file, no build step required. <div id="app"> sets the mount point: the place in the DOM where Vue will "live." The third line imports app.js, where we'll define the logic.
Now let's fill in app.js:
1 const app = Vue.createApp({ 2 data() { 3 return { 4 course: 'Introduction to Vue 3' 5 } 6 } 7 }) 8 9 app.mount('#app')
The Vue.createApp() method creates an application instance. It receives an options object; here we declared a course property via the data() function. Vue makes every property returned from data() reactive: when a value changes, the DOM updates automatically. No manual tree manipulation needed.
But the application needs to be "attached" to an element on the page. That's what app.mount('#app') does. Without this line, Vue won't react to any changes: the instance is created but not started.
All that's left is to display the property in the HTML. Inside <div id="app">, write:
1 <h1>{{ course }}</h1>
Double curly braces {{ }} are interpolation, the primary way to output data in Vue templates. Everything inside {{ }} gets replaced by Vue with the corresponding property value from data().

Open index.html in your browser. The page displays the text. Your first app is ready, and you wrote it yourself rather than generating it through a CLI.
Rendering lists
In a real application, you almost always work with arrays: products, tags, posts. Vue provides the v-for directive for this.
Let's add a tags array to data():
1 const app = Vue.createApp({ 2 data() { 3 return { 4 course: 'Introduction to Vue 3', 5 description: 'Basic guide to Vue 3 for beginners', 6 price: '$19.99', 7 tags: ['Vue', 'Frontend', 'JavaScript'] 8 } 9 } 10 })
And in the HTML, a list:
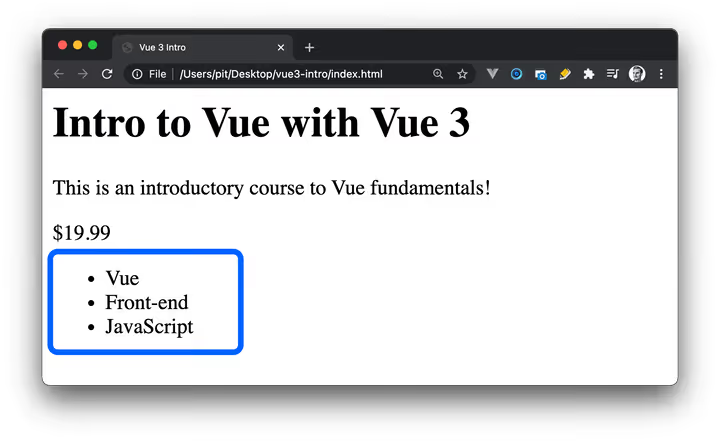
1 <ul> 2 <li v-for="tag in tags">{{ tag }}</li> 3 </ul>
The v-for directive iterates over the tags array and creates its own <li> for each element. The variable tag inside the loop is the current element. The result looks like this:
An important nuance: when iterating over an array, each DOM element needs a unique key. Vue uses it to track node identity during updates, which speeds up re-rendering and prevents state-related bugs.
1 <ul> 2 <li v-for="(tag, index) in tags" :key="index">{{ tag }}</li> 3 </ul>
:key is shorthand for v-bind:key, which binds the key attribute to the index value. If you have an array of objects, for example { id: 1, name: 'Vue' }, use id as the key instead of the index. The index changes on reordering, whereas id is stable, making it more reliable.
Conditional rendering
You often need to show or hide an element based on a condition: a purchase button only if the course is available. Vue handles this with the v-if directive.
Let's add an available flag to data():
1 data() { 2 return { 3 course: 'Introduction to Vue 3', 4 description: 'Basic guide to Vue 3 for beginners', 5 price: '$19.99', 6 available: true, 7 tags: [ 8 { id: 1, name: 'Vue' }, 9 { id: 2, name: 'Frontend' }, 10 { id: 3, name: 'JavaScript' } 11 ] 12 } 13 }
And use it in the markup:
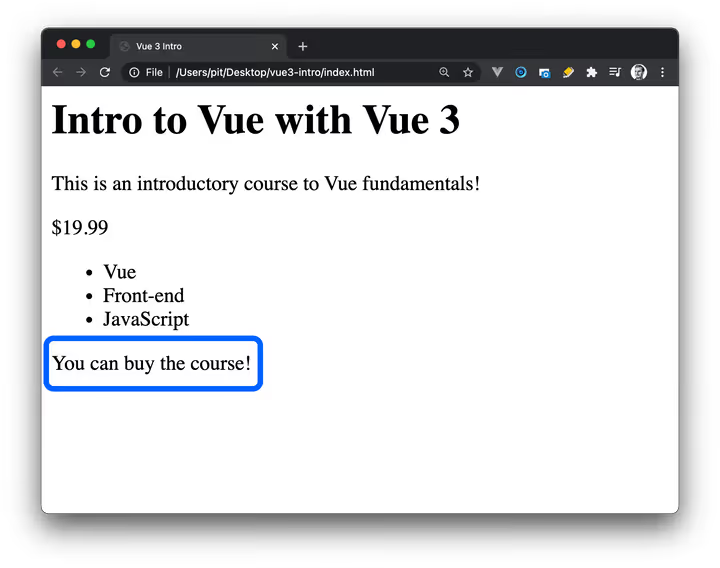
1 <p v-if="available">Course available for purchase!</p> 2 <p v-else>Unfortunately, the course is currently unavailable.</p>
v-if evaluates the expression in quotes. If it's truthy, the first block renders; otherwise, v-else kicks in. Try running app.available = false in the browser console and watch the page react instantly.
Besides v-if / v-else, there's also v-else-if for condition chains and v-show. The difference is fundamental: v-if completely removes the element from the DOM, while v-show only toggles display: none. Choose v-if when the condition changes rarely. Use v-show for frequent toggling like tabs, where performance matters.
Handling events
The v-on directive, or @ for short, listens for DOM events: clicks, input, hover. When an event fires, Vue runs the specified method or expression.
Let's add a purchase method to the app options:
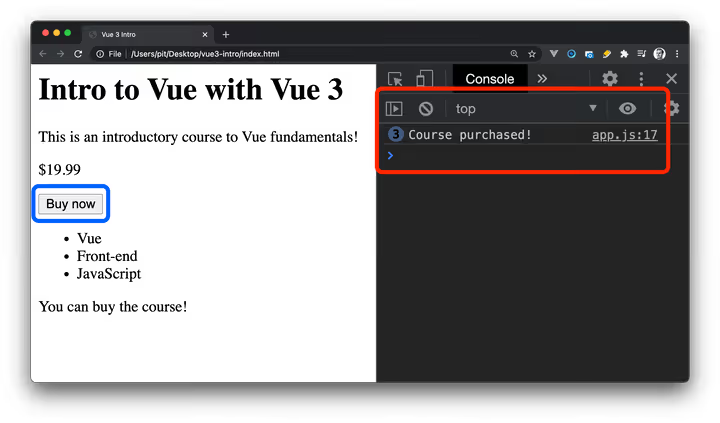
1 const app = Vue.createApp({ 2 data() { 3 return { 4 course: 'Introduction to Vue 3', 5 description: 'Basic guide to Vue 3 for beginners', 6 price: '$19.99', 7 available: true, 8 tags: [ 9 { id: 1, name: 'Vue' }, 10 { id: 2, name: 'Frontend' }, 11 { id: 3, name: 'JavaScript' } 12 ] 13 } 14 }, 15 methods: { 16 purchase() { 17 console.log('Course purchased!') 18 } 19 } 20 })
The methods section contains functions accessible in the template and other methods via this. Now let's attach the call to a button:
1 <button @click="purchase">Buy</button>
For simple actions, you can write code directly in @click:
1 <button @click="available = !available">Toggle availability</button>
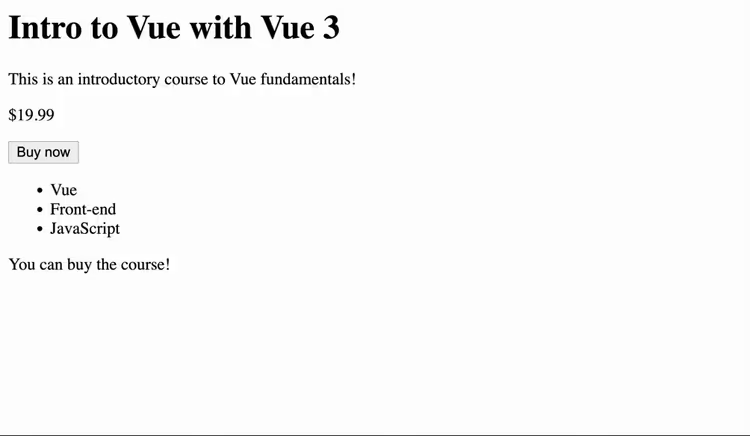
Inline code like this is convenient for short operations such as toggling a flag. But always move complex logic into methods; the template should remain readable. A simple rule: counter += 1 is fine in the template, but ten lines of purchase logic belongs in a method.
Binding attributes
Attributes like src, href, or alt often need to be dynamic. The v-bind directive, or : for short, binds an attribute value to a Vue expression.
Let's add data for an image:
1 data() { 2 return { 3 // ...other properties 4 imgURL: 'https://catalins.tech/img', 5 imgDescription: 'Photo of a desk with a computer' 6 } 7 }
In the template, bind them to an <img>:
1 <img :src="imgURL" :alt="imgDescription" width="500" height="350">
The full form would be v-bind:src="imgURL"; the colon is simply syntactic sugar. Vue now tracks imgURL and imgDescription: change them in data(), and the image on the page updates automatically. That's reactivity in action.
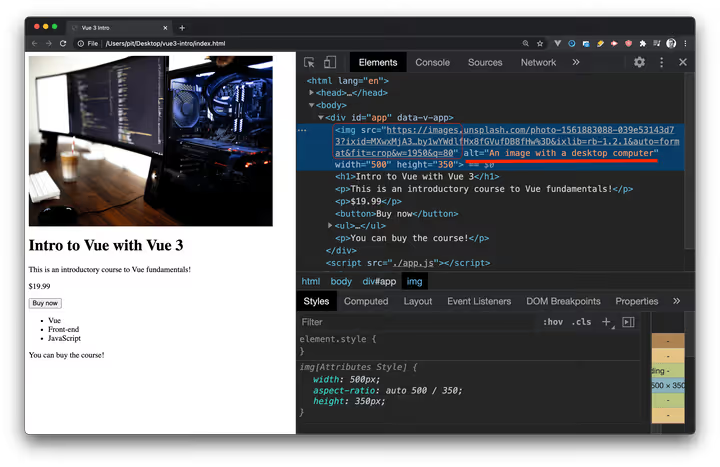
The same principle applies to attributes like :href, :disabled, and :class, as well as any others. Try it yourself: add a link with a dynamic href from data() and confirm it works without a single extra line.
Computed properties
Sometimes data needs to be transformed before display: format a price, concatenate a first and last name, check a condition. Vue provides computed properties for this.
Imagine you always want to have an image description, even if the imgDescription field is empty. Let's write a computed property:
1 const app = Vue.createApp({ 2 data() { 3 return { 4 course: 'Introduction to Vue 3', 5 description: 'Basic guide to Vue 3 for beginners', 6 price: '$19.99', 7 available: true, 8 imgURL: 'https://catalins.tech/img', 9 imgDescription: 'Photo of a desk with a computer', 10 tags: [ 11 { id: 1, name: 'Vue' }, 12 { id: 2, name: 'Frontend' }, 13 { id: 3, name: 'JavaScript' } 14 ] 15 } 16 }, 17 computed: { 18 hasImageDescription() { 19 return this.imgDescription.length > 0 20 ? this.imgDescription 21 : 'Automatic image description' 22 } 23 } 24 })
Now use the computed property in the template instead of the raw data:
1 <img :src="imgURL" :alt="hasImageDescription" width="500" height="350">
Vue caches the result of a computed property and recalculates it only when its dependencies change, in our case imgDescription. This is more efficient than calling a function on every render.
An important rule: computed properties are meant for displaying data, not for changing it. Don't modify application state inside computed; use methods for that.
Methods vs. computed properties
The difference between methods and computed comes down to one question: are you changing data or displaying a derived value?
Computed properties are for the presentation layer. Formatting, filtering, condition checks, string concatenation. They are cached and have no side effects.
Methods are for actions. Changing a value in data(), sending a request, toggling a flag. They are called explicitly and can do anything.
A typical anti-pattern is modifying this.course inside a computed property. A computed property reacts to changes in course but should not change it itself. Always use a method for modifying data. Let the template describe "what to show," not "how to compute it."
Components and props
As an application grows, keeping everything in a single file becomes unmanageable. Vue lets you break the interface into components: isolated blocks with their own logic, template, and styles.
Let's create our first component, CourseCard:
1 mkdir components 2 touch components/CourseCard.js
In components/CourseCard.js, define the component:
1 app.component('coursedisplay', { 2 data() { 3 return { 4 course: 'Introduction to Vue 3', 5 description: 'Basic guide to Vue 3 for beginners', 6 price: '$19.99', 7 available: true, 8 imgURL: 'https://catalins.tech/img', 9 imgDescription: 'Photo of a desk with a computer', 10 tags: [ 11 { id: 1, name: 'Vue' }, 12 { id: 2, name: 'Frontend' }, 13 { id: 3, name: 'JavaScript' } 14 ] 15 } 16 }, 17 computed: { 18 hasImageDescription() { 19 return this.imgDescription.length > 0 20 ? this.imgDescription 21 : 'Automatic image description' 22 } 23 }, 24 template: ` 25 <img :src="imgURL" :alt="hasImageDescription" width="500" height="350"> 26 <h1>{{ course }}</h1> 27 <p>{{ description }}</p> 28 <p>{{ price }}</p> 29 <button @click="available = !available">Buy</button> 30 <ul> 31 <li v-for="tag in tags" :key="tag.id">{{ tag.name }}</li> 32 </ul> 33 <p v-if="available">Course available for purchase!</p> 34 <p v-else>Unfortunately, the course is currently unavailable.</p> 35 ` 36 })
The first argument to app.component() is the name we'll use in HTML as a tag: <coursedisplay></coursedisplay>. The second is an object with data(), computed, and template, the component's "internals."
Now let's include the component in index.html and use it:
1 <div id="app"> 2 <coursedisplay></coursedisplay> 3 </div> 4 <script src="./app.js"></script> 5 <script src="./components/CourseCard.js"></script> 6 <script> 7 const mountedApp = app.mount('#app') 8 </script>
We imported the component file, used it as a custom tag, and mounted the application right in the HTML. The course logic is now encapsulated inside CourseCard, while app.js is only responsible for creating the instance.
Props: passing data between components
Props (short for properties) are the mechanism for passing data from a parent component to a child. The child component declares which props it accepts, and the parent passes them as attributes.
Let's add a paid prop to CourseCard that indicates whether the course is paid or free:
1 app.component('coursedisplay', { 2 props: { 3 paid: { 4 type: Boolean 5 } 6 }, 7 // ...rest of the configuration 8 })
The parent, in our case app.js, passes the value:
1 const app = Vue.createApp({ 2 data() { 3 return { 4 allCourses: 1, 5 paid: true 6 } 7 } 8 })
And in index.html, we pass the prop through:
1 <coursedisplay :paid="paid"></coursedisplay>
Vue automatically validates the type of the passed value. If a Boolean is expected but a string is received, the framework will issue a warning in the console. This saves you from silly mistakes as the codebase grows.
To make a prop required, add required: true to its definition. Vue will then complain if the parent doesn't pass a value, so you'll learn about the problem before it breaks the interface.
You can find the complete code for this guide in the vue3-intro repository on GitHub, which contains the finished index.html, app.js, and components/CourseCard.js files. Fork it and experiment.
Related video
To reinforce the material through practice, watch the first lesson from the Net Ninja Vue 3 course; it complements this guide nicely with a live code walkthrough:
⁉️🤔 Frequently asked questions
Can I use Vue 3 without a bundler in production?
Yes, including it via CDN (
unpkg.com/vue@3/dist/vue.global.js) works in production too. But for real projects we recommend switching to Vite: you get tree-shaking, code-splitting, and Single-File Components, which dramatically simplify development as the application grows. The starter templatenpm create vue@latestsets all of this up in a minute.
How does v-if differ from v-show?
v-ifcompletely removes the element from the DOM when the condition is false.v-showkeeps the element in the DOM but toggles the CSS propertydisplay: none. Usev-ifwhen the condition changes rarely, for example, user role. Usev-showfor frequent toggling like tabs, where rendering speed matters and you want to avoid recreating nodes.
Is:key required in v-for?
Technically
v-forworks without:key, but Vue will issue a warning in the console. Without a key, the framework cannot track which DOM element corresponds to which data element, leading to bugs during reordering and deletion. Always specify:keywith a unique identifier,idfrom your data rather than the array index.
What is the difference between data() and computed?
data()stores the original state, the "raw" data.computedderives a value from it for display: a formatted string, a filtered array, a validation result. A computed property automatically updates when its dependencies change and is cached between renders. Methods, on the other hand, are called fresh every time and are meant for actions, not for display.
Can you mix Options API and Composition API?
Yes, you can use both styles in a single project. Vue 3 fully supports the Options API, while the Composition API is an additional tool for complex scenarios. For learning, we recommend starting with the Options API: it's more structured and closer to the mental model of "a component is an object with options."
What to do next: your next step with Vue 3
You've built your first app, explored directives, computed properties, and components. This is the foundation on which any project is built, from a landing page to an admin panel.
There are three paths forward. First, solidify through practice: grab a public API like JSONPlaceholder and display a list of posts with filtering via computed. Second, move to Vite and .vue files: the official Vue 3 documentation will walk you from create-vue to your first SFC in an hour. Third, learn Vue Router and Pinia for building a full-fledged SPA.
If you want to try Vue with no installation at all, check out the article on including Vue via CDN. And the starter code from this guide is in the vue3-intro repository; fork it and experiment.

A professional team of writers and editors specializing in creating quality content.