














🔗 Google Drive: how to insert a direct link to an image for your website
You uploaded an image to Google Drive, copied the link from the "Share" button, and pasted it into <img src="...">. The site shows a broken icon. Sound familiar?
Google Drive doesn't serve images directly via the sharing link. You get a Google HTML page with a preview, not the file itself. The browser honestly tries to render that page as an image and fails. There's a solution, and it's simpler than it seems: you need to build a direct link by inserting the file ID into a special URL. No third-party services, pure Google Drive.
Let's walk through the entire process step by step: from publishing an image to a working tag on your site.
💡 Quick overview:
- Open sharing access to the image in Google Drive ("Share" button, "Anyone with the link" permission level)
- Copy the file ID from the sharing link (the long string after
d/and before/view) - Insert the ID into the direct link template
https://drive.google.com/uc?export=view&id=YOUR_ID - Paste the ready link into the
srcattribute of an HTMLimgtag on your site
Why use Google Drive for image hosting at all
Google Drive gives 15 GB of free space to every account. For a small site, test environment, or CodePen page, that's more than enough.
Unlike third-party CDN, images live in your account and you have full control over access. Close sharing access, and the image stops displaying on all sites instantly. No external servers, no registration with additional services.
Google's serving speed is consistently high. Files are distributed through the same infrastructure that serves YouTube and Google Photos. For prototypes and personal projects, this is a solid free CDN.
Step 1: opening access to the image
Upload an image to Google Drive by dragging the file into the browser window or clicking "New" → "File upload".
After uploading, right-click the file and select "Share" → "Share". In the window that opens, switch the access level from "Restricted" to "Anyone with the link". Click "Copy link".
Without this step, the direct URL won't work. Even a correctly constructed link for a private file will return a 403 error. Access must be public.
Step 2: extracting the file ID
The copied sharing link looks something like this:
1 https://drive.google.com/file/d/1NowYy86nUZVaCMYSXPVI4wiunm4NGU5w/view?usp=sharing
The file ID is the long string between d/ and /view. In the example above, it's 1NowYy86nUZVaCMYSXPVI4wiunm4NGU5w. Select and copy it.
Here's what the ID looks like in the link (highlighted in red):
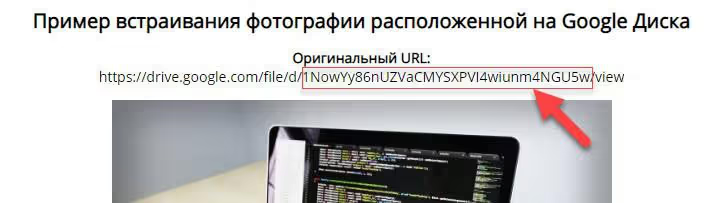
The ID is unique for each file in Google Drive. It's not a random string, but an internal identifier that Google uses to locate your file on its servers. It cannot be changed.
Step 3: building the direct link
Insert the copied ID into the template:
1 https://drive.google.com/uc?export=view&id=YOUR_ID
For our example, the finished link will look like this:
1 https://drive.google.com/uc?export=view&id=1NowYy86nUZVaCMYSXPVI4wiunm4NGU5w
The export=view parameter tells Google to serve the file as is, without HTML wrapper. This is not a preview page, but a pure byte stream of the image. Works for JPEG, PNG, WebP, GIF, and SVG.
Test the link: paste it into the browser's address bar. If the image itself opens instead of a Google page, the link is constructed correctly.
If you need a direct file download instead of an image (for example, a PDF or archive), replace view with download:
1 https://drive.google.com/uc?export=download&id=YOUR_ID
The browser won't open the file, but will immediately prompt to save it to disk.
Step 4: inserting the image on the site
Insert the constructed link into the src attribute of an <img> tag:
1 <img 2 src="https://drive.google.com/uc?export=view&id=1NowYy86nUZVaCMYSXPVI4wiunm4NGU5w" 3 alt="Image description" 4 width="800" 5 height="600" 6 >
Don't forget the alt attribute with a meaningful description, it's important for both accessibility and SEO.
For WordPress in the Gutenberg editor, select the "Image" block → "Insert from URL" and paste the direct link. For the classic editor, "Add Media" button → "Insert from URL".
In background mode (CSS), the link works exactly the same way:
1 .hero { 2 background-image: url('https://drive.google.com/uc?export=view&id=YOUR_ID'); 3 }
Ready example on CodePen
On CodePen, you can test the method without deploying a site. Create a new Pen, insert an <img> tag with the direct link from the previous step, and the image will appear in the preview panel.
Works with any public images from Google Drive. Change the original image in Drive (same ID, new file), and the fresh version automatically pulls through on the site.
Method limitations
Direct Google Drive links have a traffic ceiling. Google doesn't publish exact numbers, but in practice, with several thousand views per day, an image may stop loading. For a high-traffic production site, this is not a solution, use a specialized CDN (Cloudinary, Bunny CDN) or object storage (Amazon S3).
The image must be public. "Invite only" or "Specific users" access won't activate the direct URL.
The link format may change. Google doesn't guarantee the stability of the uc?export=view endpoint as a public API. Over 10+ years of use it hasn't broken, but formally the method is not documented for external use. For long-term projects, it's more reliable to set up your own storage.
Nevertheless, for a prototype, weekend landing page, portfolio page, or Codepen example, this method is fully justified. Fast, free, and without registration with third-party services.
⁉️🤔 Frequently asked questions
The image doesn't load, even though the link is constructed correctly. What's wrong?
Check the access level for the file in Google Drive. Even a correctly constructed
uc?export=view&id=...link will return nothing or a 403 error if the file is not published publicly. Open the access settings and make sure "Anyone with the link" is selected, not "Restricted access". The second common case is the file was deleted from Drive or moved to trash. The ID remains the same, but there's nothing to serve.
Can I insert SVG images using this same method?
Yes, SVG works exactly the same way. Google Drive correctly serves vector files via
export=view, and the browser displays them in<img>without problems. However, remember security: SVG can contain scripts, so don't insert third-party SVG files on your site without verification. For your own icons and illustrations, the method is fully applicable.
How many images can be served from one Google account?
There's no hard limit on the number of files, everything depends on storage volume (15 GB free) and the unofficial traffic ceiling. In practice, 50-100 images on a personal portfolio site work without complaints for years. For a commercial site with heavy traffic, better rent a CDN.
What's the difference between export=view and export=download?
export=viewserves the file as content for display in the browser, an image opens in a tab, video starts playing.export=downloadforces a download: the browser doesn't show the file but saves it to disk. For<img src="">useview. For a "Download PDF" link on a button, usedownload.
Can I generate previews of different sizes?
Yes, add the
sz=wNUMBERparameter to the link. For example,&sz=w320will limit the image width to 320 pixels. Google will scale the image on the fly, and you'll save traffic for the mobile version of the site. Full template:https://drive.google.com/uc?export=view&id=YOUR_ID&sz=w320.
Is it worth using Google Drive as a CDN for images
For a personal blog, pet project, or quick prototype, yes, this is a working and justified option. Zero cost, full access control, and minimal effort.
For a site with traffic from a couple thousand people per day, look at Cloudinary with its free tier (25 GB traffic per month) or Bunny CDN with per-second billing. They cost pennies, and images load stably under any load.
Keep the Google Drive method in your bookmarks as an emergency option. When you need to quickly share a screenshot on a forum, show a layout to a client, or bring an image to life in Codepen, this is the shortest path from file upload to working link. No registrations, no SMS, no quotas.

A professional team of writers and editors specializing in creating quality content.