














🖼 Cropping an image in GIMP for a WordPress post thumbnail
An image for a WordPress post is not just decoration. The thumbnail determines whether users will click on your snippet in the feed or scroll past. Images also affect loading speed: a three-megabyte "raw" screenshot from a camera guarantees the page will load forever.
But buying Photoshop just to crop a couple of images per week is like using a sledgehammer to crack a nut.
GIMP solves this task for free, legally, and without compromises. It's a full-featured open-source editor with version 3.2.4 (April 2026) that lets you prepare a post thumbnail in 5 minutes, exactly the size and format required by your WordPress theme. Below is a step-by-step guide from launch to compressed PNG on your disk.
💡 Quick overview:
- Open an image in GIMP ("File" → "Open" menu)
- Crop to 4:3 aspect ratio using the "Crop" tool
- Change resolution to thumbnail size ("Image" → "Scale Image")
- Export to PNG ("File" → "Export As")
- Compress through an online optimizer and upload to WordPress
What you'll need
Download GIMP from the official website, gimp.org/downloads. The version doesn't matter much: the interface for basic tools changes little from release to release, so the screenshots below are relevant for both GIMP 3.x and older builds. Installation is standard, the wizard will guide you through in a couple of clicks.
Also keep handy an image you're going to use as a thumbnail. Any JPEG or PNG from a camera, screenshot, or downloaded image will work.
Step 1: Open the image
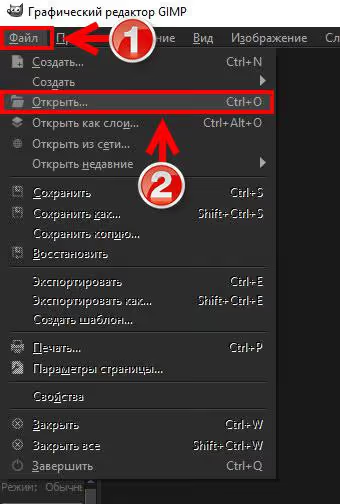
Launch GIMP. In the top menu, click "File", then "Open".
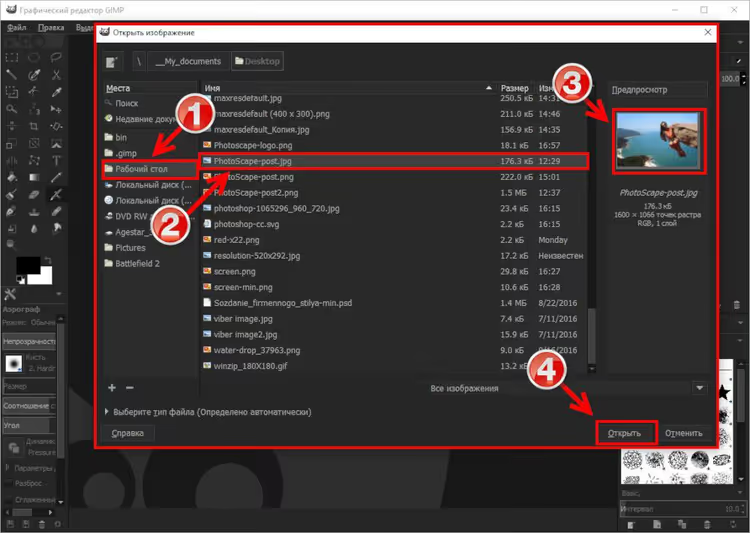
A file selection dialog will appear. On the left is the folder tree (1), on the right is the content of the selected folder (2). The built-in preview (3) shows a thumbnail of the selected file, use it for orientation. When you've found the right image, click "Open" (4).
The image will expand across the entire canvas. Let's move on to cropping.
Step 2: Crop to 4:3 aspect ratio
For a WordPress post thumbnail, the most common resolution is 400 pixels wide by 300 pixels high (4:3 ratio). But before changing the size, you need to crop the excess and set the correct proportions.
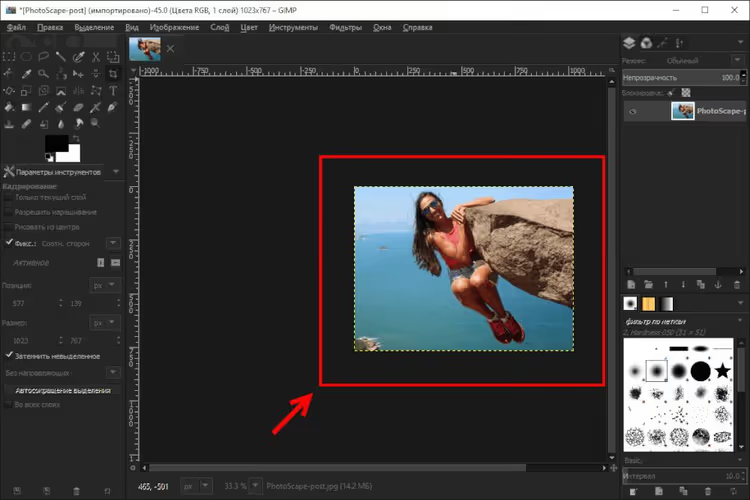
On the toolbox, click "Crop" (1). In the settings that appear, enter width 400 (2) and height 300 (3), then lock the aspect ratio by clicking the chain icon (4). At this stage we're not cutting pixels, just setting a proportional frame.
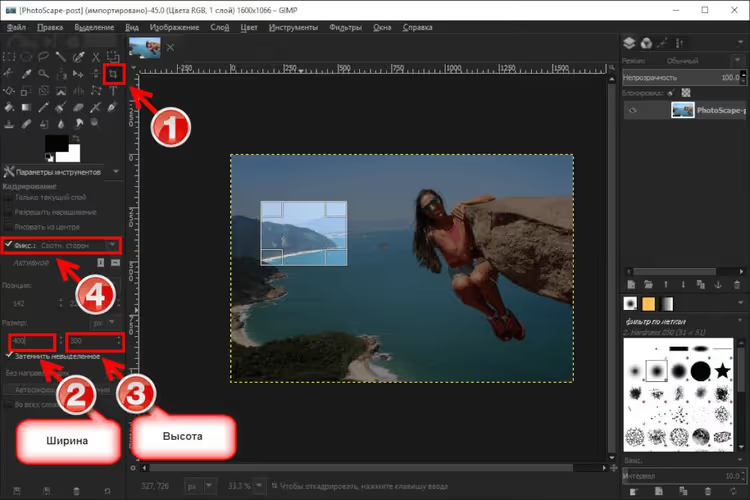
Now select with your mouse the area of the image you want to keep. The frame will automatically maintain 4:3 proportions.
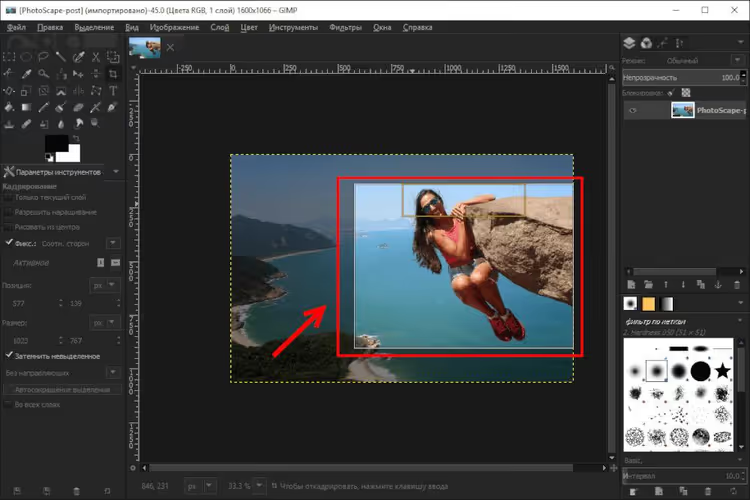
Press Enter. Everything outside the frame disappears. The proportions are ready, but the physical size is still large, let's move on to pixel compression.
Step 3: Change resolution to 400×300 px
Open the "Image" menu (1) and select "Scale Image" (2). In the window that appears, set width to 400 px (3) and height to 300 px (4). The chain between the fields should be active, then the proportions won't break. Click "Scale".
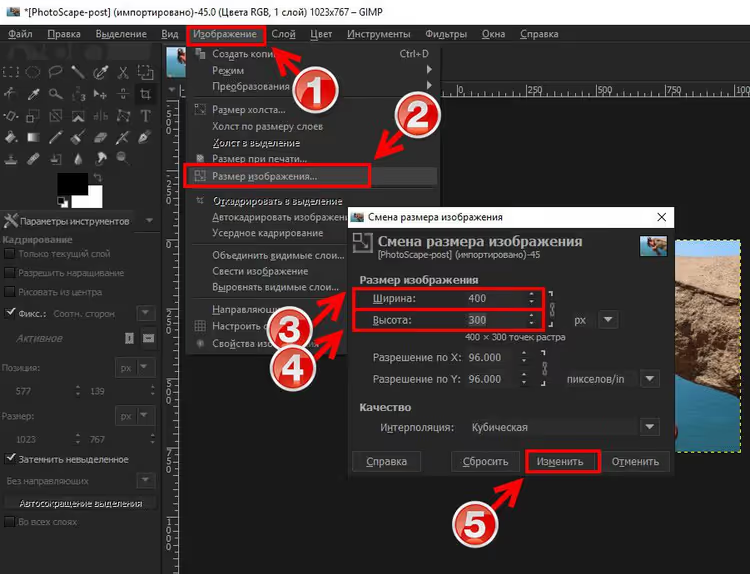
The image has become small, exactly as WordPress will see it in the post feed. All that's left is to save the result correctly.
Step 4: Export to PNG
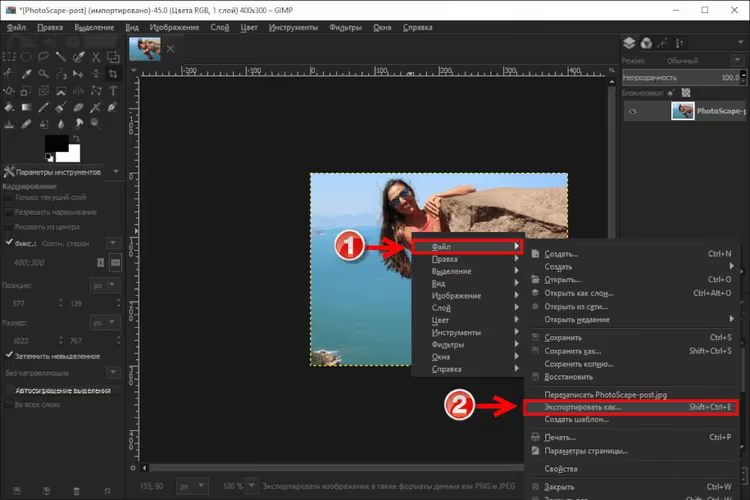
Right-click on the image on the canvas. In the dropdown menu, hover over "File" (1), then select "Export As" (2).
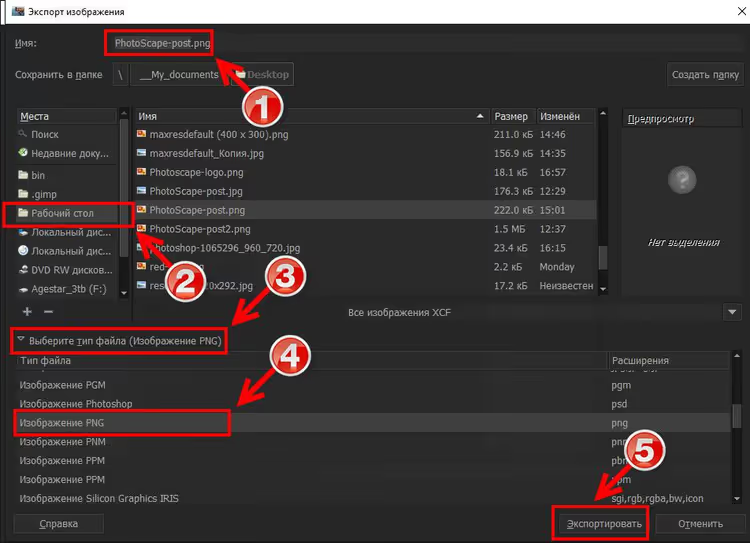
In the dialog that opens, choose a folder to save to, give the file a name, and be sure to switch the format to PNG (4). For post thumbnails, PNG is preferable to JPEG: it preserves sharpness of text and small details in screenshots, and at this resolution the difference in file size is not critical.
Click "Export" (5).
GIMP may show a window with additional PNG settings. Leave the default values and confirm.
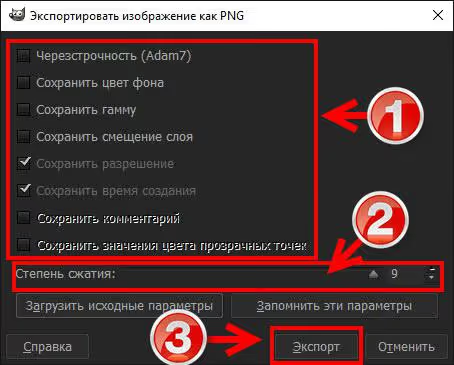
Step 5: Compress before uploading to the site
Even a small PNG thumbnail can weigh quite a lot for an image that loads on every feed page.
Run the file through an online optimizer. TinyPNG compresses JPEG, PNG, and WebP without visible quality loss: you upload an image and get a compressed result in seconds. Typically a PNG thumbnail file compresses 2-3 times, from 150 to 50-60 KB.
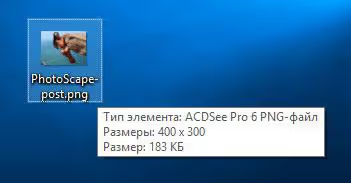
Upload the resulting file to WordPress as a post thumbnail, in the "Featured Image" block of the editor. Done.
See also: video tutorial on cropping in GIMP
This 5-minute video in English visually shows the entire process, from opening a file to final export. If any step in the screenshots above seemed unclear, the video will clear everything up.
⁉️🤔 Common questions
Why crop the image at all if WordPress generates thumbnails itself?
WordPress does indeed generate several thumbnail sizes on upload. But it crops "from center", which can cut off an important part of the composition. Manual preparation in GIMP gives you control over composition and eliminates surprises in the feed: you decide what stays in frame.
How does GIMP differ from Photoshop for this task?
For cropping and exporting thumbnails, not at all. The "Crop" and "Scale Image" tools work identically. The difference is in price: Photoshop is a paid subscription, GIMP is free and open-source. Paying for an editor just to crop images for five minutes makes no sense.
Why PNG and not JPEG for post thumbnails?
PNG uses lossless compression, so text, icons, and borders in screenshots remain sharp. JPEG produces artifacts on small details, "blur" around letters. For photos without text, JPEG works, but thumbnails with screenshots or text win with PNG.
Can you automate cropping dozens of images?
Yes, GIMP has batch mode through Script-Fu scripts. But for individual post thumbnails, the manual method is faster: by the time you write a script, you'll have already cropped three images by hand. If you need mass processing, look into the BIMP (Batch Image Manipulation Plugin) for GIMP.
What thumbnail resolution is optimal for WordPress in 2026?
Most WordPress themes use thumbnails around 300-400 px wide, this is the standard range set in media settings. The 400×300 value is a safe default that fits the grid of virtually any modern theme. Before preparing, check your theme settings: the customizer usually specifies exact thumbnail dimensions.
Is it worth learning GIMP just for post thumbnails?
If you run a blog on WordPress and prepare 2-3 images per week, GIMP covers the task completely. Five minutes for cropping, a minute for compression through TinyPNG, and the thumbnail is ready.
For more complex tasks, retouching, collages, multi-layer editing, GIMP also handles it, but the learning curve is steeper than paid alternatives. However, for our task (open → crop → compress → upload), the interface is intuitive from the first launch.
Try it right now: download GIMP from the official website, take any of your images, and go through the five steps from this guide. In 10 minutes you'll have a perfectly prepared thumbnail and an understanding that Photoshop is not needed for this task.

A professional team of writers and editors specializing in creating quality content.