














🚀 Git for beginners: first guide to working with GitHub
You wrote code, but you're afraid to break the working version. Or you work in a team and lose track of who made changes and when. Or maybe you just want to roll back a failed experiment with one command.
All of this is solved by Git, a version control system that no modern project can do without. But the barrier to entry scares many people: terminal, SSH keys, branches, pull requests.
In reality, the basic workflow can be learned in an hour. This guide is exactly about that: from installation to your first push, without fluff and unnecessary theory.
💡 Quick overview:
- Install Git for your OS and set your username with one command
- Generate an Ed25519 SSH key and link it to your GitHub account
- Create a repository, link it to a local folder, and perform your first push
- Clone an existing repository via HTTPS or SSH for local work
- Master the modern git switch and git restore commands instead of git checkout
1. Installing Git
Git works on Windows, macOS, and Linux. The most reliable way is to download the installer from the official site git-scm.com.
For Windows, download the 64-bit version. During installation, the wizard will offer to choose a default editor, line ending handling strategy, and terminal. For a beginner, the default values work fine, except for the editor: instead of Vim, it's more convenient to choose Nano or VS Code.
A detailed guide for installing Git on Windows (with screenshots of every wizard step) is already available on our blog: how to install Git on Windows.
Check that Git installed correctly:
1 git --version
If the terminal shows a version (for example, git version 2.48.0), installation was successful.
2. Initial Git configuration
Before your first commit, Git needs an introduction. The name and email will appear in the history of every change, allowing colleagues to understand who authored the edit.
1 git config --global user.name "Your Name" 2 git config --global user.email "your@email.com"
The --global flag writes settings globally, they'll be picked up for all repositories on the machine. If a specific project needs different data, repeat the command without --global while in the project folder.
Two more useful flags:
1 git config --global core.editor "code --wait" # editor for commit messages 2 git config --global init.defaultBranch main # default branch is main, not master
Since 2020, GitHub creates repositories with a main branch instead of master. The line init.defaultBranch main synchronizes your local installation with this standard, avoiding future confusion.
Check everything at once:
1 git config --list
3. SSH key and GitHub connection
GitHub disabled password support for Git operations in 2021. Today's standard is SSH keys, and the algorithm is Ed25519 (more compact and secure than outdated RSA).
Generate a key:
1 ssh-keygen -t ed25519 -C "your@email.com"
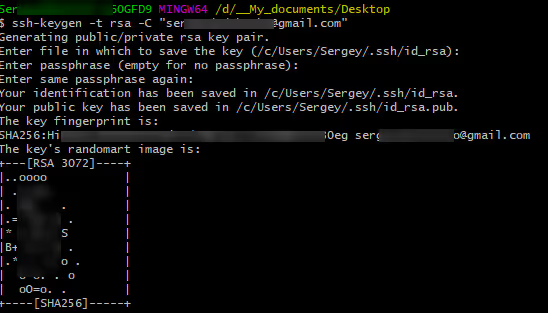
Press Enter three times: empty passphrase is okay for local development. The terminal will show the fingerprint and path to the key:
Now copy the public key to the clipboard. The command depends on the OS:
macOS:
1 pbcopy < ~/.ssh/id_ed25519.pub
Linux (Ubuntu):
1 cat ~/.ssh/id_ed25519.pub
Windows (Git Bash):
1 clip < ~/.ssh/id_ed25519.pub
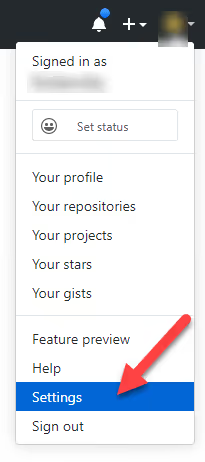
All that's left is to add the key to GitHub. Log into your account, click your avatar in the upper right corner and select Settings:
In the sidebar, go to the SSH and GPG keys tab:
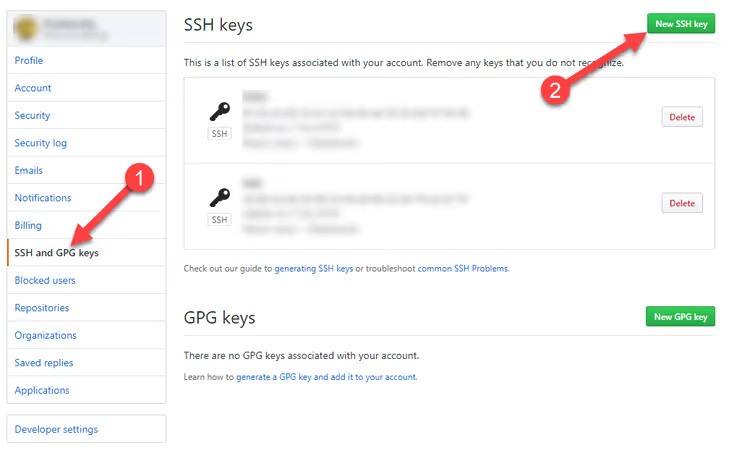
Click the green New SSH Key button. In the Title field, give the key a meaningful name (for example, "Asus Laptop"), in the Key field paste the clipboard contents and click Add SSH Key.
Check the connection:
1 ssh -T git@github.com
A response Hi username! You've successfully authenticated... means everything is configured.
4. Creating a repository and first synchronization
On github.com/new create a new repository: set a name, leave Public or choose Private, do NOT check "Add a README file" (otherwise there'll be a conflict on first push).
Now in the terminal, navigate to the project folder and execute the chain:
1 git init # Git initialization in folder 2 git add . # index all files 3 git commit -m "First commit" # fix state
Link the local folder to the remote repository and push changes:
1 git remote add origin git@github.com:yourname/yourproject.git 2 git push -u origin main
The -u flag remembers the "local branch → remote" link. Next time a simple git push will suffice.
Don't forget .gitignore, it lists files that shouldn't end up in the repository (logs, temporary IDE files, dependency folders like node_modules/). Ready-made templates for any stack can be found at gitignore.io.
5. Cloning a repository
Cloning is downloading someone else's (or your own, but from GitHub) repository to a local machine with full change history.
On the repository page, click the green Code button:

A window with three options will open. Choose SSH (if you configured a key in step 3) or HTTPS:
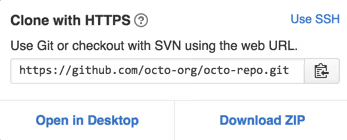
Copy the URL and execute in the terminal:
1 git clone git@github.com:username/repository.git
Git will create a folder with the repository name and download all files plus history. After cloning, you can immediately start working.
For everyday branch navigation, use modern commands:
1 git switch feature-branch # switch to existing branch 2 git switch -c new-feature # create new branch and switch 3 git restore file.txt # roll back changes in file
They replaced the overloaded git checkout in Git 2.23 and have since become the standard. git checkout hasn't gone anywhere, but switch and restore are safer and more intuitive.
If you prefer a graphical interface, GitHub Desktop provides visual management of cloning, commits, and branches without the terminal.
Video: complete Git and GitHub course in 2 hours
To reinforce the material, watch a comprehensive video tutorial in English, from installation to advanced team collaboration scenarios:
⁉️🤔 Frequently asked questions
How is Git different from GitHub?
Git is a version control program that runs on your computer. GitHub is a web service that stores Git repositories in the cloud and adds collaboration tools: pull requests, code review, issues. Alternatives are GitLab and Bitbucket. Git can work without GitHub at all, but GitHub cannot exist without Git.
Do I need to learn the command line if there's GitHub Desktop?
GitHub Desktop covers most everyday tasks, but the terminal gives full control. Commands like
git rebase,git stash, andgit cherry-pickaren't always obvious in the GUI. CI/CD, servers, and DevOps scenarios only work through CLI. Our advice: start with Desktop, and learn the command line in parallel, 2-3 commands at a time.
Can I rename the master branch to main in an existing project?
Yes, and this is standard practice. Execute:
git branch -m master main, thengit push -u origin mainandgit push origin --delete master. After that, in the repository settings on GitHub, change the default branch to main.
What to do if Git rejects a push with the error "failed to push some refs"?
Almost always the reason is that the remote repository has commits that you don't have locally. First do
git pull --rebase origin main, resolve conflicts if any, then repeatgit push. The--rebaseflag puts your commits on top of the remote ones, keeping history linear.
How to undo the last commit that hasn't been pushed to GitHub yet?
git reset --soft HEAD~1, the commit will disappear, but changes will remain in the index (staged). You can fix and recommit. If changes aren't needed at all, applygit reset --hard HEAD~1, but be careful: hard reset discards files irreversibly.
What's next: your first workflow
The overall picture after this guide: Git is installed, SSH key is linked, repository is created and synchronized. You've gone from zero to a ready-to-work environment.
Next is practice. Start small: make three meaningful commits to a test project, open a branch via git switch -c, add a file and send a pull request to merge into main. This exact cycle (commit → branch → PR → merge) repeats daily in any team.
And when you get comfortable, come back to us for advanced topics: git rebase, interactive stash, resolving merge conflicts, and setting up CI/CD with GitHub Actions.

A professional team of writers and editors specializing in creating quality content.