














🗜️ What happened to Optimizilla and what to replace it with in 2026
You opened optimizilla.com, but the page won't load? You're not alone. The old service address no longer responds: the server is unavailable, the tool won't open at the familiar link.
But you still need to compress images. Images are the heaviest part of a web page: according to HTTP Archive data, they account for about 42% of desktop page weight. Don't optimize, the site loads slowly, visitors leave.
Good news: the Optimizilla engine hasn't disappeared. Below we'll cover what happened to the service, where the same compressor moved to, and five working alternatives for 2026.
💡 Quick overview:
The optimizilla.com domain no longer opens: the service at the old address is unavailable.
The same compressor with an identical interface works at imagecompressor.com under the name Image Compressor.
Need a quick replacement without registration: TinyPNG, Squoosh from Google, or Compressor.io.
For WordPress, install the ShortPixel plugin: it compresses the media library automatically on upload.
What happened to Optimizilla
In short: the domain optimizilla.com stopped responding. The server doesn't open from desktop or mobile, the page simply won't load. The address itself, under which the service was known since 2016, no longer leads to a working tool.
At the same time, the compression engine is alive. The same compressor, with the same drag-and-drop interface, quality slider, and ZIP download, works at imagecompressor.com under the name Image Compressor. This isn't a different product: the working logic, the "before/after" comparison window, and batch upload replicate classic Optimizilla exactly.

On top of that, the successor removed the main drawback. Old Optimizilla only accepted JPEG, PNG, and GIF. Image Compressor at the new address also works with WebP and SVG, and processing happens right in the browser: files don't go to the server. So the service relocation also fixed its long-standing issue with modern formats.
Uploading images: two methods
The tool logic hasn't changed, so a quick walkthrough will be useful at the new address and when working with alternatives. You can add files for compression in two ways. First, drag them with the mouse into the central area with the text "Drag files here". This is fastest if the images are already open in the file manager.
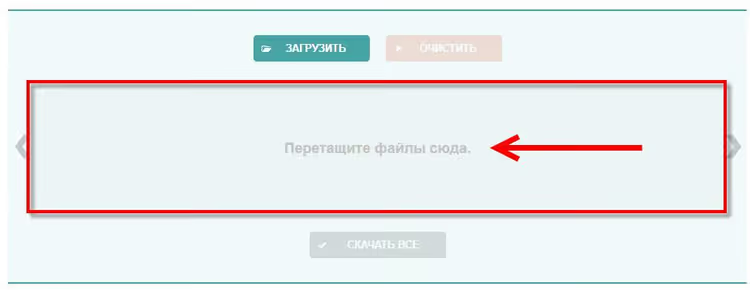
Second method, the upload button through the browser dialog. It opens the file manager where you can select one or several files in the familiar way. Convenient when the needed images are scattered across different folders.

Both methods work equally fast. In one session the service takes up to 20 images, and for preparing screenshots for an article that's more than enough.
Compression and results
As soon as files are uploaded, processing starts without extra clicks. Images up to 1 MB compress almost instantly. The result is visible right on the thumbnail: each file gets a label with the compression percentage, and you immediately understand how much space you saved.

The spread of numbers is typical. Screenshots and simple PNGs compress more, photos with texture and gradients get less compression while preserving quality. The specific percentage depends on file content, not a fixed setting.
Fine tuning: quality slider
Automatic mode gives a good result by default. But sometimes you want to squeeze out a bit more. The tool lets you manually adjust the balance between size and quality for each image separately.
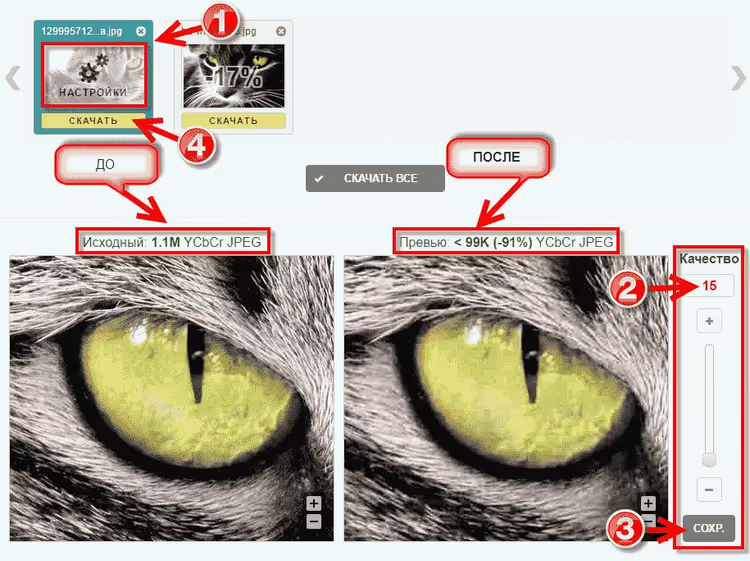
Open the settings on the processed file thumbnail, and a window appears with parallel preview: original on the left, compressed version on the right. The slider changes the number of colors in the final file. Fewer colors, stronger compression and lower visual quality. Adjusted the balance, saved, file is ready to download. Note: the setting works for each image separately, there's no batch adjustment for the entire group.
Downloading the result
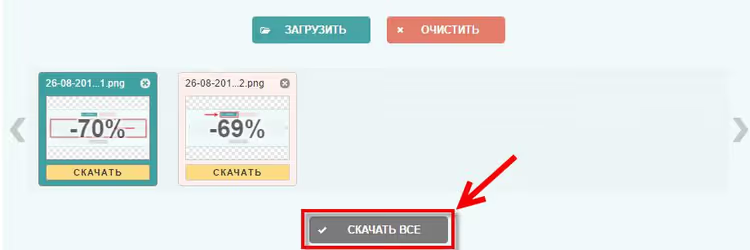
You can grab ready files in two ways. First, one by one: under each thumbnail there's a download button that delivers a specific file.

The second method is more convenient when there are many files. The service packs all processed images into one ZIP archive, and you get them in a single download. The archive is named by date and time, so different batches don't overwrite each other.
What to replace Optimizilla with: 5 working alternatives for 2026
You can update the bookmark in a minute. All services below are verified for availability, work free and without registration for basic tasks. First, a summary table, then a breakdown of each.
Service | What for | WebP and AVIF | Price |
|---|---|---|---|
Image Compressor | batch up to 20 files | WebP | Free |
TinyPNG | stable photo compression | WebP | Free, API available |
Squoosh | conversion to new formats | WebP, AVIF | Free |
ShortPixel | WordPress media library auto-compression | WebP, AVIF | Free plus Pro |
Compressor.io | one-time file compression | WebP | Free |
1. Image Compressor

Direct successor to Optimizilla and the closest replacement. Same interface, same batch upload up to 20 files, same quality slider with "before/after" window. Difference for the better: added WebP and SVG support, and all processing happens in the browser, files don't go to the server.
If you're used to the Optimizilla workflow, you won't need to relearn. Only the bookmark address changes.
- Pros: identical familiar interface, batch up to 20 files, added WebP and SVG, browser compression.
- Cons: no public API, manual upload through browser.
- Price: Free.
- Open: 🔗 Image Compressor
2. TinyPNG

The most famous compressor for photos. TinyPNG gives consistently predictable quality on shots with gradients and texture, supports JPEG, PNG, and WebP. For those who automate the process, there's a paid API and official plugins, including for WordPress.
In the free version there's a limit on file number and size, for one-time tasks it's enough.
- Pros: even quality on photos, WebP support, API and plugins available.
- Cons: no manual quality slider, limits on volume in free version.
- Price: Free, paid plans and API on site.
- Open: 🔗 TinyPNG
3. Squoosh

Open tool from the Google team. Squoosh works completely in the browser and even offline, as an installable application. Main trump card, support for modern formats: WebP, AVIF, and even JPEG XL, plus a visual slider comparison of original and result.
Files aren't uploaded anywhere, all processing happens on your device. This is convenient for closed layouts and confidential materials.
- Pros: WebP, AVIF, and JPEG XL, offline work, compression without sending data to server.
- Cons: one file at a time, no batch mode.
- Price: Free, open source.
- Open: 🔗 Squoosh
4. ShortPixel

Option for those tired of compressing manually. ShortPixel is a plugin and cloud service that optimizes the entire WordPress media library automatically on file upload. Supports WebP and AVIF, can convert formats on the fly and compress already uploaded images in bulk.
For a content site, this is one-time setup instead of daily manual work.
- Pros: media library auto-compression, conversion to WebP and AVIF, old image processing.
- Cons: free limit per month, large sites need paid plan.
- Price: Free plus Pro.
- Open: 🔗 ShortPixel on WordPress.org | 🔗 Official site
5. Compressor.io

Simple compressor for one-time tasks. Compressor.io processes one file at a time, but supports JPEG, PNG, GIF, SVG, and WebP, plus two modes: lossy and lossless. Clean interface without extra settings will work when you need to quickly compress one image.
There's no batch upload here, so for a dozen screenshots at once it's better to take Image Compressor.
- Pros: lossless and lossy modes, SVG and WebP support, minimalist interface.
- Cons: one file at a time, no batch ZIP.
- Price: Free.
- Open: 🔗 Compressor.io
Video: how to compress images for the web
Short practical guide on compressing and converting images, a convenient addition to the article if you want to see the process in action.
⁉️🤔 Frequently asked questions
What happened to optimizilla.com and why won't it open?
The optimizilla.com domain stopped responding: server unavailable, page won't load. The service itself didn't disappear. The same compressor with an identical interface now works at imagecompressor.com under the name Image Compressor. If your bookmark leads to the old address, simply replace it with the new one.
Is Image Compressor at imagecompressor.com the same Optimizilla?
By interface and logic, yes. Batch upload up to 20 files, quality slider, "before/after" comparison window, and ZIP download replicate classic Optimizilla. Difference for the better: added WebP and SVG support, and processing happens right in the browser. This removes the main minus of the old service.
Which alternative is best for a batch of screenshots for an article?
For the "20 images at a time" scenario, take Image Compressor: it preserves the familiar batch mode of Optimizilla and delivers everything in one ZIP. If even quality on photos is more important, TinyPNG will work. And for conversion to WebP or AVIF without sending files to a server, use Squoosh.
Do the alternatives support WebP and AVIF?
Yes, and that's their advantage over old Optimizilla. Image Compressor and TinyPNG work with WebP. Squoosh adds AVIF and even JPEG XL. ShortPixel converts the WordPress media library to WebP and AVIF automatically. If you've already moved your site to modern formats, choose a service from this list, not the old JPEG, PNG, GIF triad.
Is it safe to upload images to an online compressor?
Depends on the tool. Squoosh and Image Compressor process files right in the browser, data doesn't go to the server, this is a safe option for closed layouts. Services with server-side processing usually delete files after download, but for medical images or commercial materials before release, offline Squoosh is more reliable.
Can you automate compression without manual upload?
Yes. For WordPress, install the ShortPixel or
EWWW Image Optimizerplugin: they compress the media library on upload. In project code, useSharpfor Node.js orImageMagick, they optimize images at build time. TinyPNG has a paid API for this.
Which compressor to choose in 2026
Optimizilla at the old address no longer works, but that's no reason to look for something radically new. The engine moved, and nearby are services for any task.
- If you need the familiar batch mode like in Optimizilla, take Image Compressor at imagecompressor.com.
- If even photo quality is important, choose TinyPNG.
- If you need WebP, AVIF, and offline work, install Squoosh.
- If you want to forget about manual compression on the site, connect ShortPixel to WordPress.
Update the bookmark to the working address and run the nearest batch of images through the new service. And which compressor do you use and how many percent compression do you get on your files, write in the comments.

A professional team of writers and editors specializing in creating quality content.