














📸 7 image optimization plugins for WordPress in 2026
Uploaded a 4 MB photo from your phone and the site started crawling? Every WordPress owner goes through this. Images account for more than half the weight of an average page, and every extra kilobyte eats into speed, conversions, and Google rankings.
According to HTTP Archive data for 2025, the median desktop page weight exceeded 2.5 MB, and 60% of that volume is images. The fastest theme and most expensive hosting won't help if you're uploading unoptimized source files to the media library.
Below are seven plugins that solve the problem automatically: they compress JPEG and PNG, convert to WebP, resize giant resolutions, and serve images through a CDN. All have been tested on real sites, and all work in 2026.
💡 Quick overview:
- 🧹 Prepare your source files: format, size, and resolution are the three parameters worth checking before upload.
- ⚙️ Master built-in tools: the media file editor and size settings in WordPress cover basic scenarios.
- 📊 Consult the comparison table: compare seven plugins by compression type, limits, and key features.
- 🔧 Choose based on your needs: EWWW for unlimited server-side compression, ShortPixel for maximum compression, Optimole for autopilot with CDN.
- 🧪 Verify the results: bulk optimization, WebP conversion, and lazy load are the three features that should be enabled at the end.
🏗️ Foundation: preparing images before upload
Before installing plugins, understand the basics. The WordPress Codex identifies four parameters that determine how heavy an image will be. Ignore one, and even the best optimizer won't save your speed.
Parameter | What it is | Why it matters |
|---|---|---|
Physical size | Width and height in pixels | A 4000px photo in an 800px block is a waste of resources |
File weight | Volume in kilobytes or megabytes | The lighter the file, the faster it reaches the browser |
Resolution | Pixel density (DPI / PPI) | For web, 72 DPI; print-quality 300 DPI is excessive |
File type | Save format (JPEG, PNG, WebP, SVG) | The wrong format increases weight by 5-10x |
A rule that saves gigabytes: don't rely on automation alone. Uploading a 10 MB source file from a DSLR hoping the plugin will fix everything is a poor strategy. Garbage in = garbage out.
📏 Physical size

The space an image occupies on screen should match its actual role. There's no point loading Full HD for a sidebar thumbnail. Modern responsive WordPress themes automatically create technical copies of various sizes; you just need to avoid uploading source files wider than 2500px without artistic necessity.
⚖️ File weight
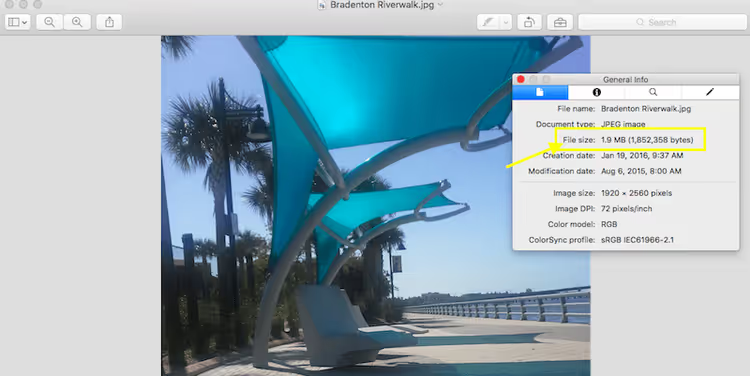
The critical metric for speed. The WordPress community recommends keeping large images within 60-100 KB, and small elements under 30 KB. Files exceeding these values are compressed with special algorithms, either manually before upload or by a plugin on the fly.
👁️ Resolution
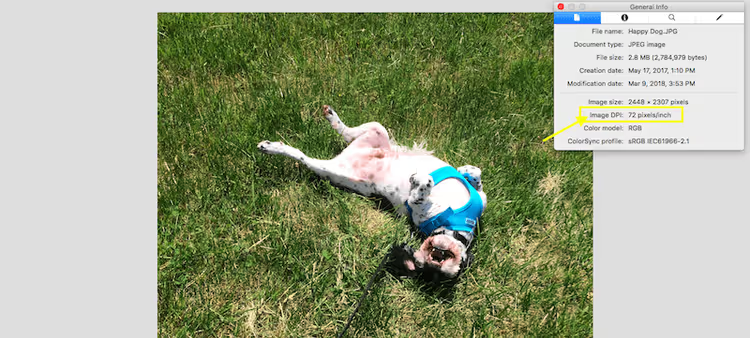
Confusion about DPI is everywhere. The screen standard is 72 dots per inch (a historical standard that became established in web since the first Macintosh). Stock photos often come with print-quality 300 DPI; uploading such files to the media library wastes server resources. Browsers don't display the additional density: according to the CSS specification (W3C), the px unit is tied to angular size on the display, not to the physical inch (MDN: CSS resolution). The exception is Retina displays, which use separate techniques like @2x files.
📂 File type
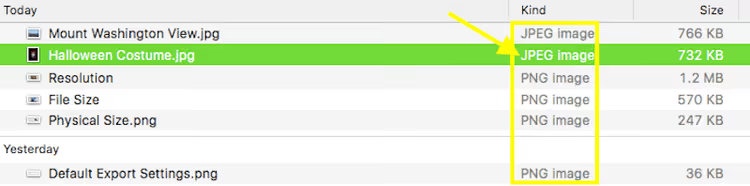
Choosing a format is a strategic decision:
JPEG: the king of photographs. Lossy compression, ideal for shots with many colors and gradients. Use progressive JPEG: unlike baseline, it appears immediately as a whole, gradually gaining clarity.
PNG: the choice for graphics, logos, screenshots with text, and images with transparent backgrounds. Lossless compression, but weighs more than JPEG.
SVG: a vector format. Scales without quality loss, ideal for icons and logos. It's essentially code, not pixels, so weight is minimal.
GIF: animation. Heavy and outdated for video, but irreplaceable for simple looped animations.
🛠️ Built-in WordPress tools
Before installing plugins, see what the platform itself can do. Two built-in functions are often enough for basic scenarios.
📐 Media file editing
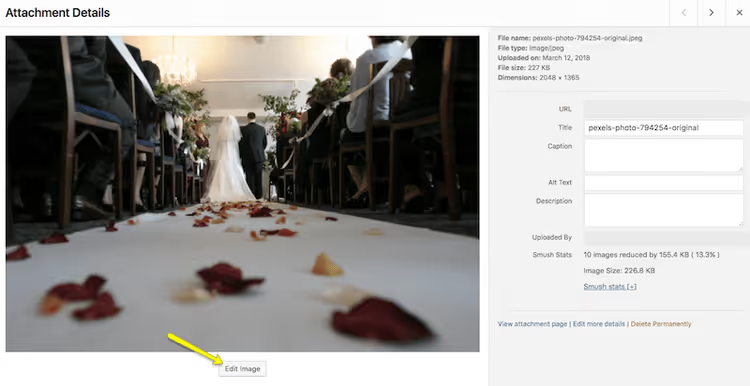
Open any image in the library and click Edit. The simple built-in editor lets you crop, rotate, or scale the photo.
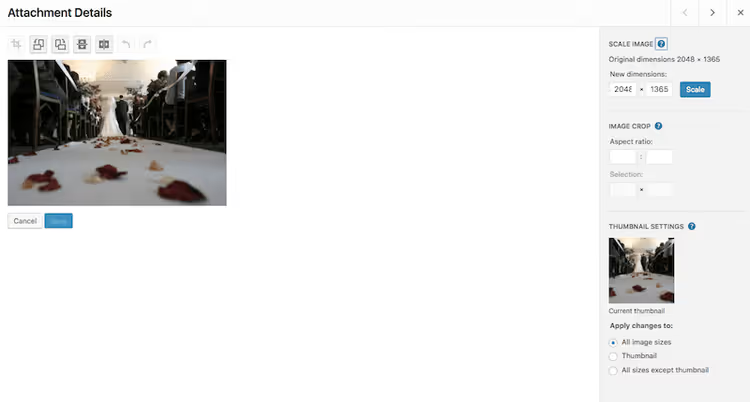
Useful for quick fixes: forgot to resize an image before uploading? Enter new width and height values, click Scale. Done.
⚙️ Media settings
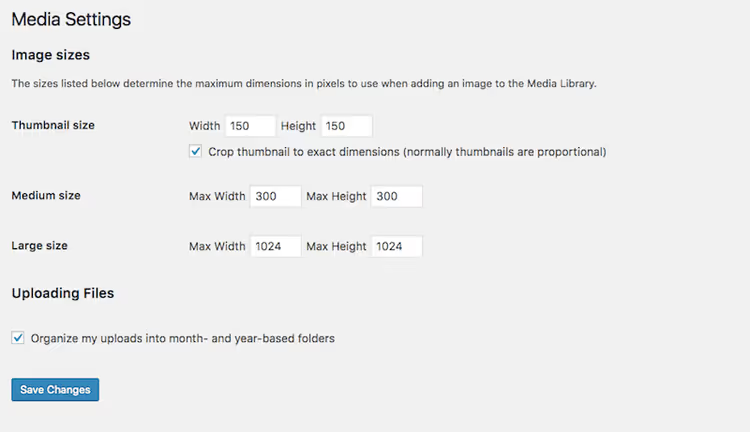
Go to Settings → Media. Here you set the dimensions for thumbnails, medium, and large images that WordPress generates automatically with each upload. Adjust the values to match your theme design; this eliminates unnecessary files and prevents stretching of small images, which blurs the layout.
📊 Plugin comparison table
Before the detailed breakdown, here's the big picture. Seven plugins and their key differences in one table.
Plugin | Compression type | WebP | Backup | Free limit | Key feature |
|---|---|---|---|---|---|
EWWW IO | Server-side | ✅ | ✅ | Unlimited on your server | Privacy: files don't leave for the cloud |
ShortPixel | Cloud API | ✅ | ✅ | 100 credits / month | Aggressive compression up to 90% |
Smush | Server-side | ❌ (Free) | ❌ (Free) | Unlimited, files up to 5 MB | Maximum simplicity |
TinyPNG | Cloud API | ❌ | ❌ | ~500 compressions / month | Best algorithm for PNG |
Imagify | Cloud API | ✅ | ✅ | 20 MB / month | Visual before/after comparison |
Imsanity | Resize only | ❌ | ❌ | Unlimited | Protection from giant photos |
Optimole | Cloud CDN | ✅ | Cloud | 5,000 visits / month | Adaptive delivery + CDN |
1. EWWW Image Optimizer

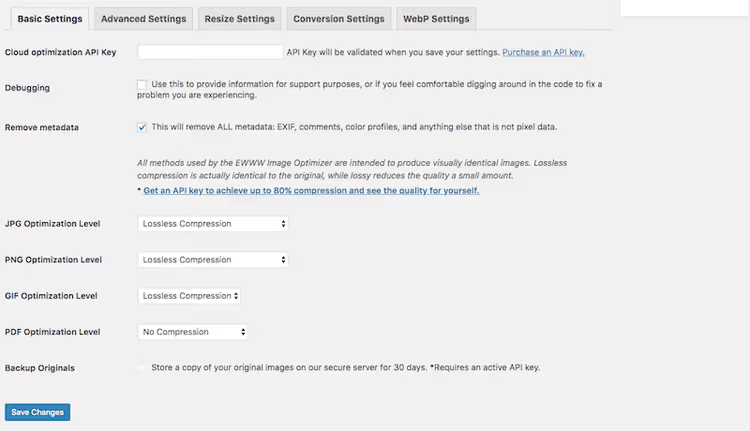
EWWW is a veteran with a unique architecture: compression happens directly on your server, without sending files to the cloud. For those who care about privacy or work with confidential content, this is a decisive argument. The plugin processes not only the media library but also theme graphics, avatars, and images outside the standard Uploads folder.
- Pros: unlimited compression on your server; background processing without admin slowdowns; Bulk Optimize skips already compressed files; smart resize of giant photos on upload.
- Cons: server-side compression taxes the CPU on weak hosting; fine-tuning takes time.
- Price: free (server-side compression); cloud plans from $7/month (source).
2. ShortPixel Image Optimizer

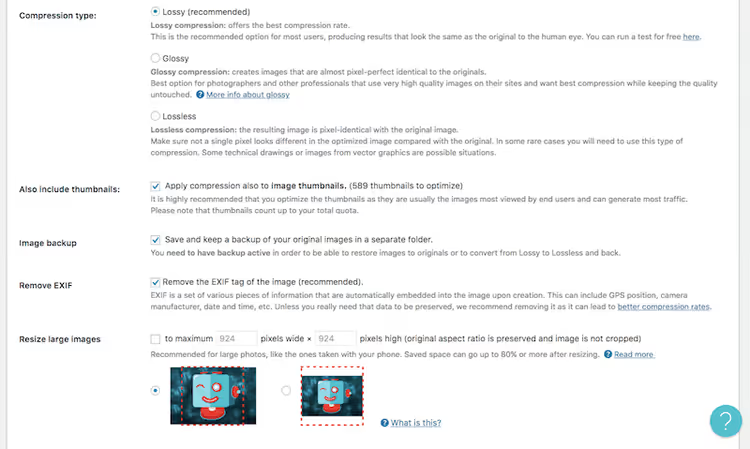
ShortPixel delivers one of the most aggressive compressions on the market: up to 90% off the original weight with virtually no noticeable difference in quality (according to the developer on the plugin page). It works via cloud API, so your server isn't loaded. The free tier is 100 credits per month. Keep in mind: WordPress creates multiple thumbnails for each photo, so a single upload can use 3-5 credits. For a small blog or business card site, this is plenty.
- Pros: three compression levels (Lossy / Glossy / Lossless); support for JPEG, PNG, GIF, and PDF; automatic WebP; detailed savings statistics.
- Cons: the credit model is inconvenient for sites with frequent publications; the free limit runs out quickly for stores.
- Price: free (100 credits/month); Pro from $4.99/month (source).
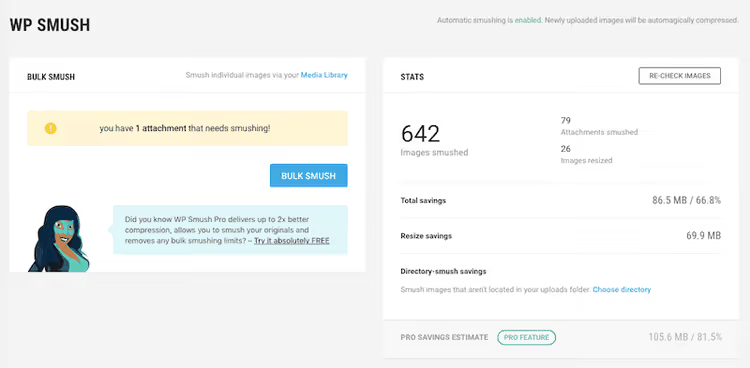
3. Smush Image Compression

Smush from the WPMU DEV team is a veteran with millions of installations and the friendliest interface among competitors. The free version uses lossless compression: it removes hidden EXIF metadata without touching pixels. Built-in lazy load and a size mismatch detector are two features rarely found in free versions.
- Pros: extremely simple interface; built-in lazy load; real-time optimization on upload; scanning of images outside the Uploads folder.
- Cons: 5 MB file limit in the free version; no WebP conversion without Pro; bulk optimization requires manual restart every 50 images.
- Price: free; Pro from $3/month (source).
4. Compress JPEG & PNG Images (TinyPNG)

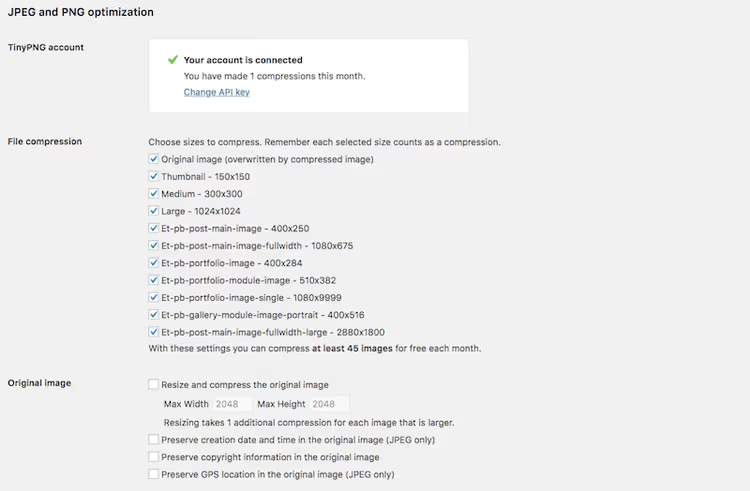
The famous service with the panda now offers direct WordPress integration. TinyPNG's algorithms are considered among the best in the world for the quality-to-weight ratio for PNG. The plugin automatically optimizes new uploads and lets you run bulk processing on old files. In settings, you can specify which thumbnail sizes to compress, saving API limits: approximately 500 compressions per month are free.
- Pros: best-in-class algorithm for PNG; auto-conversion from CMYK to RGB; no file size limit; savings chart in the console.
- Cons: no WebP conversion; 500 compressions/month is not enough for an active site; no built-in backup.
- Price: free (~500/month); Pro from $19/month for 2,500 compressions (source).
5. Imagify

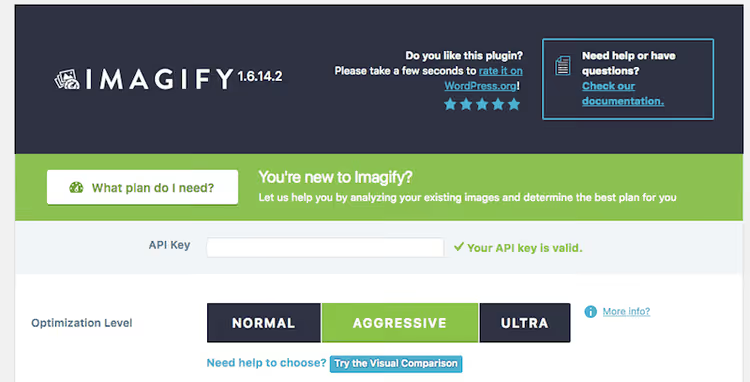
Imagify is developed by the WP Rocket team, and it shows: the interface is aesthetic, the setup is intuitive. Three aggressiveness levels: Normal (lossless), Aggressive (significant compression), and Ultra (maximum). The visual comparison feature lets you drag a slider across the image to see the difference before and after processing, useful when you're worried about artifacts.
- Pros: visual before/after comparison; auto-conversion to WebP; original backup with one-click restore; auto-resize of giant photos.
- Cons: the free limit is 20 MB per month (by volume, not quantity); cloud processing requires a stable internet connection.
- Price: free (20 MB/month); Pro from $4.99/month for 500 MB (source).
6. Imsanity

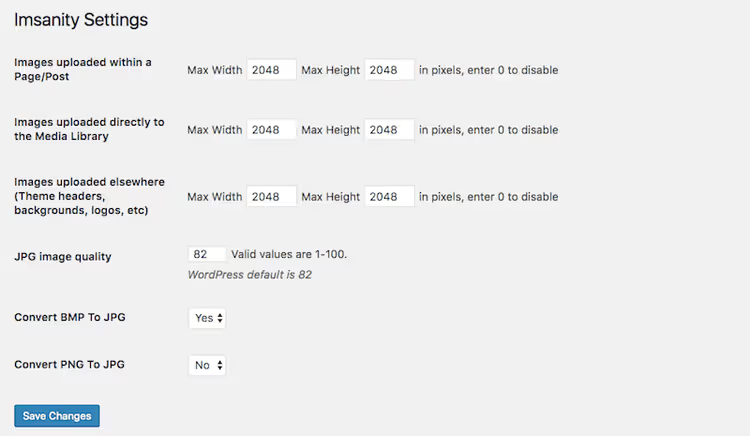
Imsanity solves one task and does it without compromise: it automatically resizes giant photos to reasonable limits. When a content manager or client uploads an iPhone photo at 4000×3000 resolution (the standard resolution of modern smartphone main cameras, according to Apple specifications), the plugin intercepts the upload, scales it to the set limit (for example, 1920px wide), and deletes the original. Disk space doesn't get clogged with gigabytes of "raw" source files.
- Pros: completely free; setup in 2 minutes; separate limits for posts, library, and theme; conversion of BMP and PNG to lighter JPEG.
- Cons: doesn't compress files, only cuts dimensions; no WebP; no backup.
- Price: free.
7. Optimole
Optimole is the most ambitious of the seven. It's not just a compressor but a full-fledged cloud image delivery platform. The plugin detects the visitor's screen size and device type, generates an image of the ideal size, and serves it through a fast CDN. If someone visits from a phone, they get a small version; from a 4K monitor, a large one. Everything is automatic, with zero configuration after activation.
- Pros: full automation; adaptive delivery + CDN out of the box; smart cropping focused on the main object; watermark overlay; advanced lazy load with low-quality placeholders.
- Cons: the free limit is tied to visits (5,000/month), not files; cloud processing means files leave your server.
- Price: free (5,000 visits/month); Pro from $22.52/month (source).
💻 Code: disabling unnecessary image sizes
Plugins sometimes generate too many technical copies. If you know for certain that specific sizes aren't used by your theme, disable them. Add this code to your child theme's functions.php or via the Code Snippets plugin.
Be sure to make a full backup before editing. An error in functions.php will cause the white screen of death, and the site will be down until you restore the file via FTP.
1 /** 2 * Disable generation of unnecessary image sizes. 3 * Add to functions.php of the child theme. 4 */ 5 function sdstudio_remove_unused_image_sizes( $sizes ) { 6 unset( $sizes['medium_large'] ); // 768px — rarely used by themes 7 unset( $sizes['1536x1536'] ); // 2x medium_large 8 unset( $sizes['2048x2048'] ); // 2x large 9 return $sizes; 10 } 11 add_filter( 'intermediate_image_sizes_advanced', 'sdstudio_remove_unused_image_sizes' );
What's happening here: the intermediate_image_sizes_advanced hook is called with each image upload. The function receives an array of sizes that WordPress is about to generate and removes the three specified ones. The remaining sizes (thumbnail, medium, large) are generated as usual. Check your media settings to see which sizes are actually used by your theme before disabling them.
📺 Video: optimization plugins in action
One of the best video reviews on the topic, from the Elegant Themes team: eight plugins compared, from installation to measuring results.
⁉️🤔 Frequently asked questions
Does image compression affect Google rankings?
Yes, directly. Page load speed and Core Web Vitals are confirmed ranking factors. According to Google, bounce probability increases by 32% when load time goes from 1 to 3 seconds. Optimized images are the fastest way to improve PageSpeed scores.
Lossy or lossless: which should I choose?
Lossless only removes metadata: pixel quality remains unchanged, savings are modest. Lossy removes color information that the eye barely distinguishes: savings of up to 80-90% (according to Google Developers, Web Fundamentals). For website photos, choose lossy; for screenshots with text and logos, choose lossless.
Is switching to WebP mandatory?
In 2026, yes. WebP weighs 25-30% less than JPEG at the same visual quality (according to Google, Comparative Study of WebP, JPEG, and JPEG 2000). All modern browsers support it. Six of the seven plugins in this review can convert to WebP automatically.
I have thousands of old images. What should I do?
Run Bulk Optimize in any of the compression plugins. On average hosting, processing a couple thousand files takes 30-60 minutes. Make a backup before starting, in case of a conflict with another plugin.
Can compression damage photos?
With aggressive lossy compression, artifacts sometimes appear in areas with smooth gradients. That's why you should always check the results on a couple of test files. Imagify with its visual before/after comparison is the safest option for perfectionists.
Is it better to compress manually or with a plugin?
The ideal workflow is both. Export the image from your editor with reasonable quality (Save for Web in Photoshop with a sensible compression level for JPEG), then let the plugin squeeze out metadata and convert to WebP on upload. Automation doesn't replace thoughtful preparation, but it eliminates routine work.
Which image optimization plugin should you choose in 2026?
Image optimization is not a one-time action but site hygiene. Ignore it, and you lose speed, rankings, and visitors. Build a regular process, and you get a fast site that both Google and people appreciate.
Here's a quick breakdown for typical scenarios:
- Privacy matters and no cloud is acceptable: go with EWWW IO. Server-side compression without external APIs, unlimited on your own hardware.
- You need to squeeze the maximum from every kilobyte: install ShortPixel. Three compression levels, PDF support, best weight savings in class.
- You want to click one button and forget: Optimole. Cloud CDN, adaptive delivery based on device, zero configuration after activation.
- Zero budget, small site: Smush for simplicity or Imsanity for protection from giant photos.
- You work with graphics and screenshots: TinyPNG or Imagify. The first is best for PNG, the second is for visual quality control.
In practice, a combination works well: Imsanity cuts giant resolutions on upload, while ShortPixel or EWWW compresses the weight. An hour of setup today means months of fast loading tomorrow.

A professional team of writers and editors specializing in creating quality content.