













 AIIllustrative image: AI-generated
🛠 Contact Form 7: universal form with a hidden field and dynamic popup
💡 How to set up a universal CF7 form with a hidden field
- Install the Dynamic Text Extension plugin and activate it in the Plugins section
- Add a dynamic hidden tag with the identifier id:HIDDENINPUT to your form to pass the block title
- Create a popup in Popup Maker, insert the form shortcode, and configure the Click Open trigger
- Connect a jQuery script that captures the block title and inserts it into the hidden field
- Add [dynamichidden-120] to the email template so you can see which block the submission came from
- Test the submission: error popup on an empty form and success popup after successful submission
Step 1: plugin for hidden field, Dynamic Text Extension
The basic Contact Form 7 cannot add hidden fields out of the box. Until recently, the Contact Form 7** Modules** plugin handled this task, but it hasn't been updated since 2017 and hasn't been tested with recent WordPress versions.
The current replacement is Contact Form 7 - Dynamic Text Extension (DTX). This plugin is actively maintained (last updated June 2026), works with WordPress 7.0, and does much more than just hidden fields: dynamic values from URLs, cookies, post meta fields, current user data, and custom shortcodes.

Install the plugin via Plugins → Add New Plugin, search for "Dynamic Text Extension", click "Install Now" and activate. Two new buttons will appear in the Contact Form 7 form editor's tag generator dropdown: dynamic text and dynamic hidden.

For our scenario, we need dynamic hidden. Create a hidden field with an identifier through which the jQuery script will pass the block title:
1 [dynamichidden dynamichidden-120 id:HIDDENINPUT]
If DTX doesn't suit your needs for some reason, you can still use the old Contact Form 7 Modules: it remains functional for basic hidden fields, but it hasn't been tested with recent WordPress versions and hasn't been updated since 2017. The shortcode would look like this: [hidden hidden-120 id:HIDDENINPUT].
Step 2: form and email template
The form is built from standard CF7 fields plus our hidden field. Here's a working template; copy it into the form editor:
1 [text* text-59 placeholder "Your Name*"] 2 [tel* tel-116 placeholder "Phone*"] 3 [email Email placeholder "Email"] 4 [recaptcha] 5 [submit "Send"] 6 [dynamichidden dynamichidden-120 id:HIDDENINPUT]
The fields text-59, tel-116, and Email are required (asterisk after the type). reCAPTCHA protects against spam. The submit button and hidden field complete the form.
Now configure the email template in the "Mail" tab of the form editor. The key point is to add [dynamichidden-120] (or [hidden-120] for CF7 Modules) to the email body so you can see which block the submission came from:
To: moc.niamodruoy@liame-ruoy
From: [Email]
Subject: Website inquiry, [dynamichidden-120]
Email body:
1 Selected product/service: [dynamichidden-120] 2 --- 3 Name: [text-59] 4 Phone: [tel-116] 5 Email: [Email] 6 --- 7 Message sent from page: [_url]
Be sure to check the "Use HTML content type" checkbox, otherwise the formatting will break. For reliable email delivery, configure SMTP (through any SMTP plugin: Post SMTP, WP Mail SMTP, or Google Gmail API); without this, emails from CF7 often end up in spam.
Step 3: creating a popup in Popup Maker
The old Popups - WordPress Popup plugin was closed in July 2022 due to a vulnerability and is unavailable for installation. The modern replacement is Popup Maker: 780,000+ active installations, CF7 integration out of the box, and dozens of triggers and targeting rules.

Install Popup Maker via Plugins → Add New Plugin, then go to Popup Maker → Create Popup. Give the popup a name and insert the form shortcode in the content editor:
1 [contact-form-7 id="123" title="Universal Form"]
Find the form ID in the CF7 forms list ("Shortcode" column). In the popup settings on the right, in the Triggers block, select Click Open and specify the CSS selector of the button that will open the popup (for example, .jet-button-order). This is analogous to "Manual Triggering" from the old Popups plugin.
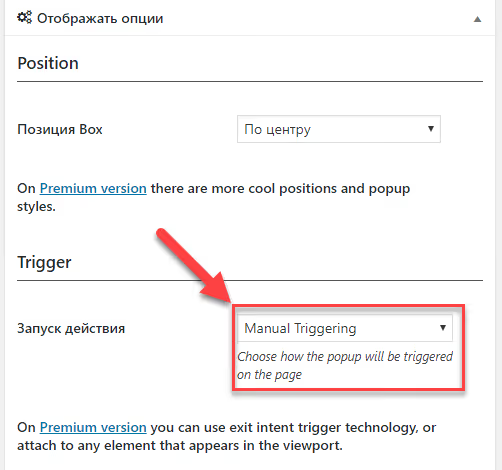
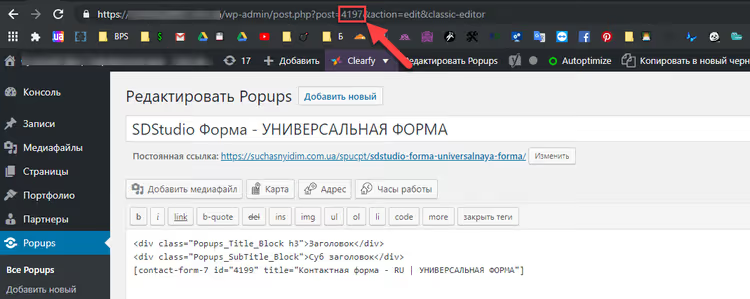
Now find the ID of the popup you created. Open the popup in the editor and look at the browser URL: post.php?post=4197&action=edit; the number after post= is the ID (4197 in this example). You'll need it for the script in the next step.
Step 4: jQuery script for capturing the block title
The script solves the main task: when clicking a button inside a block, it captures the text of that block's title and inserts it into both the popup title and the form's hidden field. Let's break it down.
First, assign a common CSS class to all blocks where you need to find the title (for example, ForContactForm7HiddenInput). In Elementor, this is done via "Advanced → CSS Classes" for the wrapper section.
The script itself is connected through the child theme's functions.php or the Code Snippets plugin (safer, won't be lost when the theme updates):
1 add_action('wp_enqueue_scripts', function () { 2 wp_enqueue_script( 3 'cf7-universal-form', 4 get_stylesheet_directory_uri() . '/cf7-universal-form.js', 5 ['jquery'], 6 '1.0', 7 true 8 ); 9 });
Contents of the cf7-universal-form.js file:
1 jQuery(document).ready(function ($) { 2 3 // Variable for storing the block title 4 var blockTitle = ''; 5 6 // Capture the title text on button click 7 $('.ForContactForm7HiddenInput .jet-button-order').on('click', function () { 8 blockTitle = $(this) 9 .closest('.ForContactForm7HiddenInput') 10 .find('h3.elementor-heading-title') 11 .text() 12 .trim(); 13 }); 14 15 // Wait for popup to open via MutationObserver 16 var popupId = '4197'; // Your popup ID from Popup Maker 17 var observer = new MutationObserver(function (mutations) { 18 mutations.forEach(function (mutation) { 19 if (mutation.type === 'attributes' && mutation.attributeName === 'class') { 20 var $popup = $('#popmake-' + popupId); 21 if ($popup.hasClass('active') && blockTitle) { 22 // Insert the title into the popup 23 $popup.find('.popup-title').text(blockTitle); 24 // Insert the title into the form's hidden field 25 $('#HIDDENINPUT').val(blockTitle); 26 } 27 } 28 }); 29 }); 30 31 // Start observing the popup 32 var $popupContainer = $('#popmake-' + popupId); 33 if ($popupContainer.length) { 34 observer.observe($popupContainer[0], { 35 attributes: true, 36 attributeFilter: ['class'] 37 }); 38 } 39 40 });
What's happening here:
- Capturing the title: when clicking the button with class
.jet-button-order, the script traverses up the DOM to the parent block.ForContactForm7HiddenInput, findsh3.elementor-heading-titleinside it, and stores its text in theblockTitlevariable. - Tracking the popup: instead of the outdated
attrchange.js(whose CDN rawgit.com is shut down), the script uses the native MutationObserver, which watches for class changes on the Popup Maker container. When theactiveclass appears (popup is open), the script inserts the saved title into the popup heading and into the hidden field#HIDDENINPUT. - Selectors:
.jet-button-orderis the Elementor JetElements button class; replace it with your button class. Popup Maker renders with ID#popmake-{ID}, so the code uses#popmake-4197; replace 4197 with your popup's ID.
Below the jQuery block is a visual example of what a page looks like with multiple blocks and "Order Now" buttons:
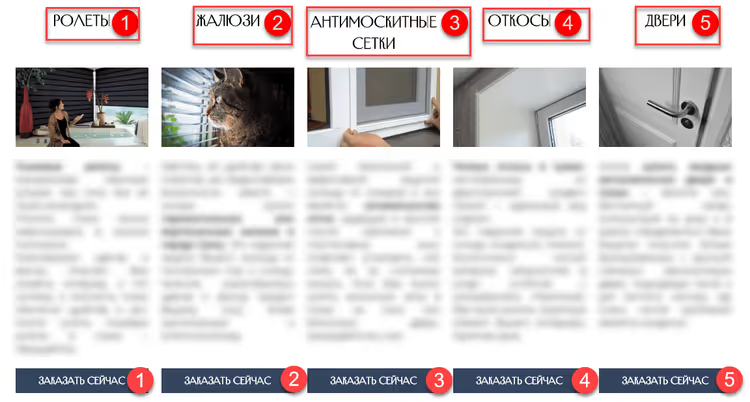
After clicking the button on the first block, the script captures the text "Roller Blinds", inserts it into the popup title and into the form's hidden field:
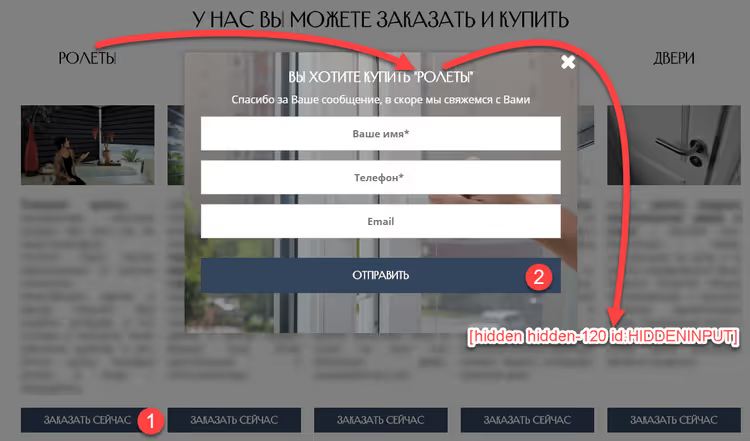
The same applies to all five blocks: the title changes dynamically while the form stays the same.
Step 5: popups for successful submission and error
Popup Maker allows you to create as many popups as you need. For status messages (success / error), create two more popups similar to step 3. You don't need to manually bind them to triggers; CF7 controls them through JavaScript events.
Error popup shows when the form fails validation. Content:
1 <p style="text-align: center;"> 2 <img src="/wp-content/uploads/2019/02/flag.svg" alt="Error icon" width="177" height="161"> 3 </p> 4 <p style="text-align: center;"> 5 The form has errors. Check the messages under the input fields and try again. 6 </p>
Success popup shows after successful submission. Content:
1 <p style="text-align: center;"> 2 <img src="/wp-content/uploads/2019/02/like.svg" alt="Successful submission icon" width="177" height="161"> 3 </p> 4 <p style="text-align: center; padding-top: 15px;"> 5 Done! Your message has been sent successfully. We will contact you shortly. 6 </p>

These SVG icons were used in the old popup to indicate submission status. You can replace them with your own or leave them as is; they're neutral and not tied to any specific plugin.

Connect the status popups via CF7 events. Add this code to the same JS file cf7-universal-form.js after the main script:
1 // Show popup on CF7 validation error 2 document.addEventListener('wpcf7invalid', function () { 3 $('#popmake-1065').popmake('open'); 4 }, false); 5 6 // Show popup on successful submission 7 document.addEventListener('wpcf7mailsent', function () { 8 $('#popmake-1068').popmake('open'); 9 }, false);
Replace 1065 and 1068 with the actual IDs of your status popups from Popup Maker.
Basic CSS styles for status popups are connected via Appearance → Customize → Additional CSS or in the theme file:
1 /* Error popup */ 2 div#popmake-1065 { 3 z-index: 99999999; 4 } 5 div#popmake-1065 .popmake-close { 6 font-size: 30px; 7 color: #9e9e9e; 8 } 9 10 /* Success popup */ 11 div#popmake-1068 { 12 z-index: 99999999; 13 } 14 div#popmake-1068 .popmake-close { 15 font-size: 30px; 16 color: #9e9e9e; 17 }
Step 6: testing and debugging
Before launching on a production site, check each scenario:
- Clicking different blocks: the title in the popup and hidden field changes correctly for each block.
- Empty form: submitting without filling required fields shows the error popup.
- Complete submission: the email arrives, and the hidden field contains the correct block title.
- Reopening: after closing and reopening the popup, the title updates.
If the title isn't being inserted, check in the browser console (F12 → Console) that:
- The jQuery selector
.ForContactForm7HiddenInput h3.elementor-heading-titlefinds an element on the page; - The
popupIdvariable matches the actual popup ID in the admin; - The button class (
.jet-button-order) matches the actual class on the page.
The selectors in the code are tied to Elementor + JetElements. If you use a different builder (Gutenberg, Bricks, Oxygen), substitute your own classes and title structure. The principle remains the same: button → parent block → title → hidden field.
Watch this video for a visual demonstration of setting up a popup form with Contact Form 7:
⁉️🤔 Frequently asked questions
Can I do without an additional plugin for the hidden field?
Basic CF7 doesn't support hidden fields. DTX is a minimal and actively maintained solution. In theory, you could add
<input type="hidden">directly to the form DOM via JavaScript, but this is less reliable: the script might not execute before submission, and the value won't appear in the email if it's not tied to a specific CF7 tag. Use DTX or the old Contact Form 7 Modules; both add hidden field support at the tag level, and the value is guaranteed to appear in the email.
Why is Popup Maker better than the old Popups plugin?
Popup Maker is actively updated (last version April 2026), has built-in integration with CF7 and other forms, and supports dozens of triggers and targeting rules. The old Popups was officially closed by WordPress.org in July 2022 due to an unpatched vulnerability and should not be used on live sites. Popup Maker is its direct and secure successor with 780,000+ active installations. Key advantage: built-in CF7 integration (
wpcf7mailsent/wpcf7invalidevents work without additional code) and a visual popup editor.
Why use MutationObserver instead of attrchange.js?
The attrchange.js library was distributed via rawgit.com, which shut down in 2020. The GitHub repository itself is still alive, but connecting the script from there is inconvenient. MutationObserver is a native browser API, supported by all modern browsers since 2014, requires no external dependencies, and solves the same task: tracking attribute changes in the DOM. Fewer HTTP requests, no dependency updates needed.
What should I do if the title in the hidden field appears as garbled Cyrillic characters in the email?
Check the encoding in CF7 and SMTP plugin settings; it should be UTF-8. Make sure the email subject doesn't contain corrupted characters. If you're using SMTP via Gmail API, the problem might be with the email header encoding; check the Post SMTP or WP Mail SMTP plugin settings. Usually, the source of the problem is the mail server, not the script. Check: (1)
wp-config.php, the linedefine('DB_CHARSET', 'utf8');without extra spaces before<?php; (2) SMTP plugin settings, email encoding UTF-8; (3) CF7 email subject, remove non-standard characters, leave only[dynamichidden-120]without extra brackets or quotes.
Can I use this approach for multiple different forms on one site?
Yes. Create a separate form in CF7 for each block type and a separate popup in Popup Maker. In the script, duplicate the logic for each pair "block selector → popup ID → hidden field ID". Alternatively, use one popup and one form with different block classes; the hidden field will receive the title of whichever block was clicked, without additional configuration.
A universal form for all blocks on the page is the main point of this solution. For completely different block types (products vs services), create two sets: product_form + product_popup and service_form + service_popup. In the script, simply duplicate the code block with different selectors.
Which plugin stack to use in 2026
A universal form with a hidden field is a proven solution for landing pages with dozens of similar blocks. Instead of 30 separate forms, you configure one, and the script automatically inserts the block title. Here's the stack we recommend in 2026:
- Contact Form 7: 10+ million installations, lightweight, free.
- Dynamic Text Extension (DTX): hidden and dynamic fields, active support.
- Popup Maker: popups with click triggers and built-in CF7 integration.
- MutationObserver (native JS): tracking popup opening without external libraries.
If you need to capture a block title and pass it to a form, use this stack. In practice, it works without issues, and setup takes about an hour even with basic WordPress knowledge.
🔗 Dynamic Text Extension on WordPress.org | 🔗 Popup Maker on WordPress.org

A professional team of writers and editors specializing in creating quality content.