













 AIIllustrative image: AI-generated
🔧 How to fix the image upload error in WordPress
An image upload error in WordPress strikes at the worst possible moment. You're preparing a post, selecting an image, clicking "Upload," and WordPress silently shows "HTTP Error" or refuses to save the file without explanation. If it happened just once that would be fine, but for some admins uploads fail consistently every few days.
The cause is rarely obvious. The culprit could be anything: permissions that broke after migration, a security plugin conflict, a restricted memory limit on cheap shared hosting, or ModSecurity treating your image as an attack. The good news: almost all causes can be fixed without a developer and without calling hosting support.
In this guide you'll find the complete diagnostic and fix chain for image upload errors. From simple (switching browsers, renaming files) to server-level (editing php.ini, .htaccess, and wp-config.php). Take it and fix it; most cases are resolved in 5-10 minutes.
💡 Quick overview:
- Check permissions on the
/wp-content/uploads/folder via FTP or cPanel File Manager: 744 for folders and 644 for files. - For HTTP errors, follow the chain: clear browser cache → rename the file → compress it → deactivate plugins → increase PHP memory → change PHP version.
- For "Missing a temporary folder" errors and file size limit issues, a couple of lines in
wp-config.phpand.htaccesswill help. - GoDaddy and DreamHost users will find specific solutions at the end.
Why image upload errors occur in the first place
WordPress stores all media files in /wp-content/uploads/. To write an image there, the PHP process needs write permissions. If permissions are broken (this happens during server updates, migrations, host changes, or even after automatic PHP patches), uploads fail silently.

The second group of causes involves PHP configuration: memory limit, upload_max_filesize and post_max_size parameters, and the temporary folder path. If any of these parameters falls short, WordPress won't accept the file. On cheap shared plans, hosts often cut buffers more aggressively than shown in phpinfo(), and you see "HTTP Error" with no hint of the actual cause.

Finally, there are conflicts. A security plugin intercepts the POST request, a theme overrides media handling, or ModSecurity at the web server level considers the upload a threat. Diagnostics are covered in the next section.
1. Check permissions on the uploads folder
The most common cause is incorrect permissions on /wp-content/uploads/. WordPress cannot write to the folder and silently refuses the upload. The solution: set the correct CHMOD via FTP.
Connect to your site via an FTP client such as FileZilla. Navigate to /wp-content/, find the uploads folder, right-click, and select "File permissions":

In the dialog that opens, enter 744 in the numeric value field. Check "Recurse into subdirectories" and "Apply to directories only." Click OK.

If 744 doesn't solve the problem, try 755: the owner gets read, write, and execute, while the group and others get read and execute.
Now set permissions for files inside uploads. Right-click the uploads folder again → "File permissions." Enter 644, check "Recurse into subdirectories" and "Apply to files only." Click OK.

Try uploading an image again. In most cases, the error disappears immediately after this procedure. If it doesn't help, continue to the next step.
2. Follow the HTTP error solution chain
HTTP errors during upload are the most frustrating because WordPress leaves no traces in the logs. Just "HTTP Error" and nothing else. You have to work through potential fixes by process of elimination. Below is a chain from simple to complex: go through them in order until uploads start working.
2.1. Refresh the page or switch browsers
It sounds obvious, but it works more often than you'd think. Sometimes the WordPress session expires, and after logging in again the error disappears. Refresh the page with a hard cache reset: Ctrl+F5 on Windows, Cmd+Shift+R on Mac. If that doesn't help, open the site in a different browser. If there's an error in Chrome but not in Firefox, the problem lies in extensions or cache specific to that browser.
2.2. Clear browser cache
Cache stores outdated scripts and styles that can conflict with the WordPress media uploader. Keyboard shortcuts for a full reset:

- Windows (Chrome, Firefox, Edge):
Ctrl + Shift + Delete→ "Clear browsing data" - Mac (Chrome, Firefox):
Cmd + Shift + Delete - Safari:
Shift + click the reload button
Alternatively, go to browser settings and delete the cache manually. The path varies by browser but is always found in the "History" or "Privacy" section.
2.3. Rename the image file
WordPress automatically adds numbers to duplicate names (image-1.png, image-2.png), but sometimes this mechanism glitches. Rename the file before uploading: avoid special characters, spaces, and non-ASCII characters in the name. A good format: product-banner-01.jpg.
2.4. Compress the image
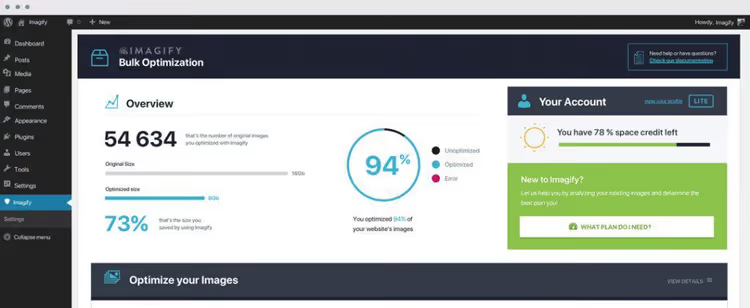
File size may be hitting the host's limit. Even if upload_max_filesize is set generously, some hosts cut buffers at lower values. Compress the image: for JPEG, use Imagify or TinyPNG; for PNG, use Squoosh.
Also check the format: if you're uploading .png, try converting to .jpg, and vice versa. Sometimes the problem is tied to a specific format and PHP library version (GD or Imagick).
2.5. Deactivate plugins and switch themes
Security plugins (Wordfence, Solid Security, Sucuri) and image optimization plugins can intercept uploads and cause conflicts. Temporarily disable ALL plugins and switch to a default theme (Twenty Twenty-Five or any other default theme). Test the upload. If it works, enable plugins one by one to find the culprit.
2.6. Increase PHP memory limit
The PHP image processing process consumes memory. A Full HD screenshot in JPEG format might not have enough with even 64 MB. Add the following to wp-config.php before the line /* That's all, stop editing! */:
1 define( 'WP_MEMORY_LIMIT', '256M' );
2.7. Update PHP version
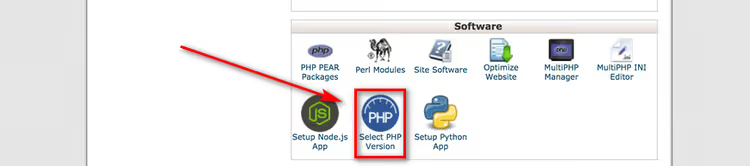
As of 2026, WordPress recommends PHP 8.3 as the minimum version, with PHP 8.4 or 8.5 being optimal. On versions 7.4 and below, media uploader functionality is not guaranteed. The path in cPanel: "Software" section → "Select PHP Version" → switch to 8.4 or 8.5.
2.8. Disable ModSecurity
ModSecurity is a web server level firewall that sometimes treats image uploads as attacks. Add the following to .htaccess (in the site root):
1 <IfModule mod_security.c> 2 SecFilterEngine Off 3 SecFilterScanPOST Off 4 </IfModule>
If this doesn't help, remove these lines: the problem isn't ModSecurity.
2.9. Switch WordPress from Imagick to GD Library
WordPress uses Imagick (if the module is installed on the server) or GD Library for image processing. Imagick offers higher quality but consumes more memory. If WP_MEMORY_LIMIT didn't help, force WordPress to use GD. Add the following to functions.php of your active theme:
1 function wpb_image_editor_default_to_gd( $editors ) { 2 $gd_editor = 'WP_Image_Editor_GD'; 3 $editors = array_diff( $editors, array( $gd_editor ) ); 4 array_unshift( $editors, $gd_editor ); 5 return $editors; 6 } 7 add_filter( 'wp_image_editors', 'wpb_image_editor_default_to_gd' );
After this, WordPress puts GD Library first in the chain and uses Imagick as a fallback.
2.10. Install Add From Server as an alternative upload method
If the HTTP error persists and you need to upload a file urgently, upload it to the server via FTP into any folder and import it into the media library using Add From Server. The plugin picks up files directly from the file system, bypassing the standard WordPress uploader. Files of any size work, limited only by the disk space of your plan.
2.11. Contact your hosting provider
If you've tried everything, write to hosting support. Describe the error, attach a screenshot, and specify your PHP and WordPress versions. Often the problem is resolved on the server side: support can edit php.ini, remove a ModSecurity block, or restart PHP-FPM.
3. Fix the "Missing a temporary folder" error
The "Missing a temporary folder" error blocks not only image uploads but also plugin installation and WordPress updates. The cause: PHP cannot find or write to the temporary directory.
The solution is to explicitly tell WordPress the path to the temp folder. Open wp-config.php and add before the final line:
1 define( 'WP_TEMP_DIR', dirname( __FILE__ ) . '/wp-content/temp/' );
Save the file. Then via FTP or cPanel File Manager, create a temp folder inside /wp-content/ (if it doesn't exist). Set folder permissions to 755. Return to the admin panel and try uploading again.
4. Increase the upload file size limit
The "Uploaded file exceeds the upload_max_filesize directive" error means the file is too large for the current PHP settings. Three ways to fix it, from simple to server-level.
4.1. Via.htaccess
Add the following to .htaccess (site root):
1 php_value upload_max_filesize 256M
If the error repeats, add the following lines:
1 php_value post_max_size 256M 2 php_value memory_limit 512M 3 php_value max_input_time 180 4 php_value max_execution_time 180
4.2. Via wp-config.php
Add the following to wp-config.php before the final line:
1 @ini_set( 'upload_max_filesize', '256M' ); 2 @ini_set( 'post_max_size', '256M' );
4.3. Via php.ini
Find php.ini on the server. The path depends on the host; typically /etc/php/8.4/cli/php.ini or configurable in cPanel ("Select PHP Version" → "Switch to PHP Options"). Open it, find the upload_max_filesize directive, and change the value:
1 upload_max_filesize = 256M 2 post_max_size = 256M
Save and restart PHP via cPanel or with an SSH command. If you don't have access to php.ini, contact hosting support.
5. Specific solutions for GoDaddy and DreamHost
GoDaddy
On GoDaddy shared hosting, HTTP errors are often related to the order of image processing libraries. Add the following to functions.php of your active theme:
1 add_filter( 'wp_image_editors', 'change_graphic_lib' ); 2 function change_graphic_lib( $array ) { 3 return array( 'WP_Image_Editor_GD', 'WP_Image_Editor_Imagick' ); 4 }
This code forces GD Library to be first, which resolves most HTTP error cases specifically on GoDaddy.
DreamHost
On DreamHost, errors are usually related to plugin or theme conflicts. First, deactivate all plugins and switch to a default theme. Delete unused themes and plugins, as they can leave dead hooks that interfere with the uploader. If that doesn't help, contact DreamHost support: they have custom server configurations, and their support team knows the specifics.
What to do if the error keeps recurring
If you've gone through the entire chain and uploads still fail once a week, the problem is deeper than permissions or PHP limits. Most likely the culprit is hosting with strict server restrictions (cheap shared plan) or a poorly written plugin that overwrites media uploader settings with every update.
First, rule out plugins: disable everything for 24 hours and monitor uploader behavior. If there are no failures over 24 hours, enable plugins one by one with a day interval until you find the culprit.
If you can't find it, change your hosting. Seriously. Cheap shared plans save on PHP memory and cut buffers so aggressively that no .htaccess edits will help. For stable WordPress media file handling, you need a VPS or quality managed hosting with memory_limit of at least 256M and max_execution_time of at least 120 seconds.
An alternative workaround: upload images via FTP and import them through Add From Server. Slower than the native uploader, but works on any hosting and doesn't depend on PHP limits.
⁉️🤔 Frequently asked questions
Why do upload errors occur for no apparent reason?
Hosting providers regularly update server software: minor PHP patches, Apache updates, ModSecurity configuration changes. Paths, versions, and settings change, and permissions on
/wp-content/uploads/break. You didn't touch anything, but uploads stopped working. The solution: reset permissions to 744/755 for the folder and 644 for files inside/wp-content/uploads/, and check PHP limits.
What should I do if nothing in this article helped?
Enable
WP_DEBUGinwp-config.php:define( 'WP_DEBUG', true );and repeat the upload. WordPress will write the specific error to/wp-content/debug.log. You'll see the exact PHP fatal error or warning: most often it's memory exhaustion (allowed memory size exhausted), inaccessible temporary folder (failed to open dir), or a specific plugin conflict. With this information, hosting support can resolve the issue much faster.
How do I upload a very large file if my hosting won't let me raise the limit?
Use FTP + the Add From Server plugin. Upload the file to the server manually via FTP to
/wp-content/uploads/import/(or any other folder), then import it into the media library through the plugin. Add From Server picks up files directly from the server's file system, bypassing the HTTP uploader and all its limits. It works for files of any size; the only limitation is your plan's disk space. For batch uploads, create a/wp-content/uploads/bulk-import/folder and upload everything there via FTP at once.
Can image upload errors be prevented permanently?
They can't be completely eliminated, but risk can be minimized. Keep PHP on the current version (8.4 or 8.5 in 2026), with
memory_limitno lower than 256M. Don't install security plugins with aggressive default settings. Check permissions on/wp-content/uploads/every six months. After every WordPress core or PHP update, do a test image upload. If you have automatic backups configured, rollback takes 5 minutes. And keep FTP access handy: without it, half the solutions in this article are unavailable.
Is FTP required to fix permissions?
No. The alternative is File Manager in cPanel (or your host's equivalent). Go to File Manager →
/wp-content/→ right-click theuploadsfolder → Change Permissions → set 744. The logic is the same; the interface is slightly different. cPanel File Manager works with permissions exactly like an FTP client: everything is done in the browser with no separate software needed. For users who find FTP clients complicated, this is the most accessible way to fix permissions in two minutes.
Upload error fixed, what's next?
You've gone through the chain and uploads are working. Now it's time for prevention, so you don't return to this problem in a month. Three things worth doing right away:
- Record your working settings. Those permissions (744/755), PHP limits (256M), PHP version (8.4+): save them in your notes. During the next migration or server update, you'll restore them in a minute instead of an hour of trial and error.
- Set up disk space monitoring. Half of "sudden" upload errors are caused by running out of disk space. WordPress silently refuses to write, and you're left guessing. Free plugins like WP Health check available space and send a notification to your email before the disk fills up.
- Check logs once a month.
/wp-content/debug.log(if you enabledWP_DEBUG) will show an emerging problem long before it becomes blocking. A few minutes a month saves hours of unplanned repairs.
Still have questions or encountered an unusual case? Describe the situation in the comments and we'll figure it out.

A professional team of writers and editors specializing in creating quality content.