














🔒 How to password protect a WordPress site: 6 methods for pages, categories, and content
Your WordPress site isn't ready for launch yet, but random visitors are already seeing test content. Or you've set up a private section for clients and don't want outsiders reading your work.
Adding a password is the most direct solution. No registrations, no complex access rights. One password, and only those you've shared it with get in.
Below are six working methods to password-protect your site, individual pages, categories, WooCommerce products, and even text fragments. From a one-click free plugin to fine-tuning through.htaccess.
💡 Quick overview:
- Install Password Protected and lock down your entire site with a single password, no registrations or access rights needed.
- Set up protection through cPanel Directory Privacy, a plugin-free method for Apache-based hosting.
- Restrict access to WooCommerce categories and products using built-in features or plugins.
- Hide text fragments with Passster, visitors see the public portion while the rest stays password-protected.
- Use.htaccess and.htpasswd for full server-level control for advanced users.
Why you need password protection on WordPress
The most common scenario is a site under development. You're changing themes, testing plugins, fixing layouts, and search engines are already indexing your drafts. A password on the entire site solves this in a minute: set it up, and only you see the result.
The second scenario is restricted content. Training courses, paid guides, client portfolios, internal team documentation. WordPress supports password protection at the individual post level out of the box, and plugins extend this to categories, products, and custom fragments.
Third, an intermediate state. The site is live, but some sections aren't ready yet. You give the password to your client, they view the finished pages, and only see the unfinished ones after entering the password.
Method 1: Password Protected plugin for whole-site protection
The simplest and fastest approach. The Password Protected plugin places a single password on the entire frontend: visitors open any page and see a login form. Enter the password, and the site works as usual. Don't enter it, and they see nothing.

Install the plugin via Plugins → Add New, activate it, and go to Settings → Password Protected. Check "Password Protected Status" and set a password in the "New Password" field. Be sure to enable "Allow Administrators" and "Allow Logged In Users," otherwise you won't be able to access the site without a password yourself.
Additional settings include:
- IP whitelist, IP addresses that won't be prompted for a password (office, home);
- Password expiration, the password stops working after N days;
- reCAPTCHA, brute-force protection on the login form.
The plugin is regularly updated: as of June 2026, version 2.8.1, with 200,000+ active installations.
Maintenance mode: Coming Soon
If instead of a password you want to show visitors a "Site coming soon" placeholder, install the Coming Soon plugin. It also works for maintenance mode with "Technical work in progress."
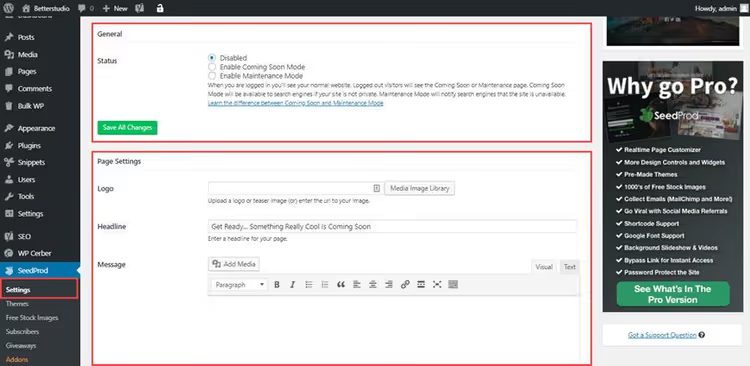
After activation, go to Settings → Coming Soon. Here you can choose a logo, title, message text, and favicon. You can connect Google Analytics, and traffic to the placeholder will be tracked. Important point: in "Coming Soon" mode Google indexes the placeholder (title and description), while in "Maintenance" mode it does not.
Method 2: protection through cPanel without plugins
If your hosting uses Apache and provides cPanel access, you can set a password at the server level without any plugins.
- Log into cPanel and find the Security → Directory Privacy section.
- Select the site folder (usually
public_html) and click on it. - In the window that opens, check "Password protect this directory," give the protected area a name, and save.
- Below, in the "Create User" block, enter a username and password, then click "Add or modify authorized user."
After this, when accessing the site, the browser will show the standard HTTP Basic Auth dialog. This method doesn't depend on WordPress: protection works before PHP loads, so the site is "invisible" even to search engines.
The downside is one username/password pair for everyone. Sharing a password with dozens of clients is inconvenient. For scenarios with multiple users, you're better off returning to the plugins from Method 1.
Method 3: protecting WordPress categories
Categories are a convenient way to group content by topic. It makes sense to protect them as a whole rather than one post at a time.
Standard WordPress can't set a password on a category. Plugins solve this task.
Free option: Password Protected. The same plugin from Method 1 in its Pro version can protect individual categories: set a password for the "For Clients" category, and all posts within it become inaccessible without a password. Configuration is in the familiar Settings → Password Protected → Category Protection interface.
Dedicated tool: Password Protected Categories. If you have many categories and each needs its own password, check out the Password Protected Categories plugin from Barn2. It's designed specifically for this task: separate passwords per category, password expiration dates, hiding posts from public listings. The plugin is premium, but for commercial sites with paid access it's justified.
After installing either plugin, the workflow is the same: create a category in Posts → Categories, select "Password protected" in the "Visibility" block, and set a password. That's it, posts in this category are only visible to those who know the password.
Method 4: password for WooCommerce products
WooCommerce lets you set a password on a product using built-in features, no plugins needed.
Open the product editor and find the "Visibility" block in the sidebar (eye icon). Click "Edit," select "Password protected," enter a password, and confirm.

After publishing, the product will appear in the catalog, but instead of the price and "Add to Cart" button, the buyer will see a password entry form.
Tip: use the same password for all protected products and categories. The client remembers one password and gains access to all restricted content at once, resulting in fewer support emails asking "what's the password?"
Method 5: protecting content fragments with Passster
Sometimes you don't need to lock down an entire page, just a couple of paragraphs or one block. The Passster (Content Protector) plugin solves exactly this task.
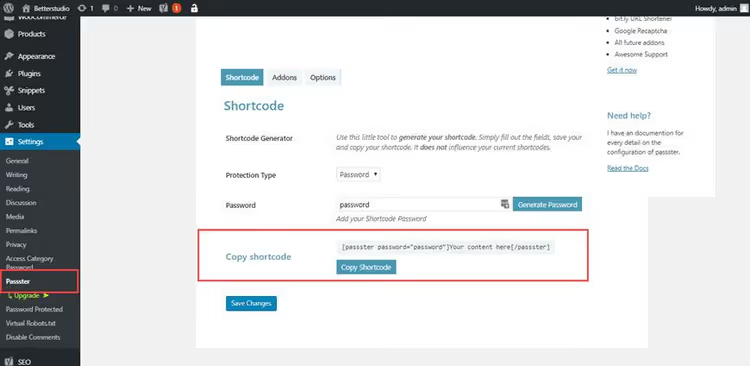
Install the plugin, and an "Add Content Protector Shortcode" button will appear in the editor. Select the text you want to hide, click the button, and set a password. On the page, visitors see everything except the protected fragment, which shows a password entry form instead.
The plugin is actively maintained: as of June 2026, version 4.3.5. It's suitable for posts with a "free preview": the introduction is open, while conclusions or data are password-protected.
Method 6: protection through.htaccess and.htpasswd
The most flexible and most "technical" method. It works at the Apache level, where you protect a server folder rather than a WordPress page. Suitable when access is needed for a limited group of people and you don't want to install plugins.
Step 1. Create a 401.html file that visitors will see when they enter a wrong password:
1 AUTHENTICATION REQUIRED 2 You need a username and password to access this area.

Upload 401.html to your site's root. Without it, Apache will show a blank page with a 401 code, which looks unprofessional and uninformative.
Step 2. Add rules to the.htaccess of the folder you want to protect:
1 ErrorDocument 401 /401.html 2 AuthName "Password Protected Area" 3 AuthType Basic 4 AuthUserFile /home/user/public_html/.htpasswd 5 Require valid-user

Replace /home/user/public_html/ with the actual path to your folder on the server. You can find the path in cPanel (the "Files" section) or via the SSH command pwd.
Step 3. Create.htpasswd with usernames and passwords. Passwords are stored in encrypted form. You can generate an entry using an online htpasswd generator or a terminal command:
1 htpasswd -c .htpasswd username
Upload .htpasswd to the same folder you're protecting. Each line in the file represents a separate user. You can add a dozen clients with different passwords, and the method scales well.
Done. When attempting to open the site (or folder), the browser will request a username and password from .htpasswd.
Important: do NOT place .htpasswd in public_html and do not make it accessible via URL. Store it one level up, where Apache can read it but browsers cannot reach the file.
Watch this video tutorial on password-protecting WordPress pages, from installing a plugin to configuring visibility for individual posts.
Other plugins for access control
The methods described above cover most scenarios. However, if you're building a full-fledged membership site with subscriptions and access levels, look into membership plugins:
Simple Membership. A free and simple plugin for protecting posts and pages by membership level. The free version restricts content from unregistered users, while paid tiers add recurring payments and PayPal integration. As of June 2026, version 4.7.5, with active installations on tens of thousands of sites.

🔗 Simple Membership on WordPress.org
s2Member. A veteran among membership plugins: operating since 2010 and still being updated. Protects posts, pages, downloads, and images. The Pro version includes payment gateway integration. As of May 2026, the current version is 260508.

WP-Members is another free plugin for restricting content access. It locks down posts, pages, and custom post types. Suitable for those who need a lightweight tool without extra bells and whistles.
For protecting categories with different access levels, the previously mentioned Password Protected Categories plugin.
⁉️🤔 Frequently asked questions
Can I password-protect just one page instead of the entire site?
Yes. Open the page editor, find the "Visibility" block in the sidebar, click "Edit," and select "Password protected." This is a built-in WordPress feature, no plugins needed. The same method works for posts. Single-page protection is convenient for client portfolios, private landing pages, and collaboration terms pages.
Which method should I choose if my site is on Nginx rather than Apache?
Methods 1, 4, and 5 work regardless of the web server since they operate at the WordPress level. Method 2 (cPanel Directory Privacy) and Method 6 (.htaccess) are Apache-only. On Nginx hosting, similar protection is configured through
auth_basicandauth_basic_user_filedirectives in the server config, typically done through hosting support.
Does password protection affect SEO?
Yes. If the entire site or page is password-protected, search engines won't index the content. For a site under development this is a plus: drafts don't appear in search results. If only part of a page is password-protected (Passster), the remaining text is indexed as usual. "Coming Soon" mode with filled SEO fields allows the placeholder to be indexed before launch.
What's more secure, a plugin or.htaccess?
.htaccess works at the server level before PHP loads, so a vulnerability in a plugin or WordPress won't bypass it. A plugin is easier to configure but adds code that needs updating. For non-critical tasks (site under development) use a plugin. For sensitive data (client database, internal documents) use.htaccess.
Can I set different passwords for different users?
Yes. In Method 6 (.htpasswd) each line is a separate user with their own password. In membership plugins (Simple Membership, s2Member) each user registers and logs in with their own account, and the plugin determines which content they can access. For simple "one password for everyone" scenarios, the Password Protected plugin is sufficient.
Which protection method should you choose?
There's no single "right" approach; everything depends on your scenario:
Site under development: install Password Protected and forget about it. One password, complete frontend lockdown, admin panel remains open.
Need a placeholder instead of a password: Coming Soon. Display your logo, project description, and "we're opening soon."
A few clients with different passwords, your own server:.htaccess +.htpasswd. No plugins, full control at the Apache level.
WooCommerce store with some products for insiders: built-in password protection for each product. One click in the editor.
Private section for subscribers: Simple Membership or s2Member. Users register and see content matching their level.
Paid category with a dozen articles: Password Protected Categories from Barn2. One password for the entire category.
Start simple: install Password Protected, lock down the site during development, and see how well its features meet your needs. Add complexity as requirements grow, not the other way around.

A professional team of writers and editors specializing in creating quality content.