













 AIIllustrative image: AI-generated
📤 Submitting forms in headless WordPress: REST API for Contact Form 7 and Gravity Forms
You're building a site on WordPress, and a contact form is already sorted. Plugins like Contact Form 7 give you ready-made HTML, validation, submission storage, and dozens of integrations. Click "Install," paste the shortcode, and you're done in two minutes.
But everything changes when WordPress becomes a headless CMS. You're responsible for the entire frontend: React, Vue, plain HTML/JS. And the form plugin that used to render markup for you no longer controls the client side. Its REST API, however, is still there. Just send a POST to the right endpoint, and all the plugin's power (field validation, storage, integrations) remains at your disposal.
In practice, you can also cover purely "traditional" cases through the form plugins' REST API. Say you're building a custom theme with Tailwind, and CF7's fixed markup with its rigid class structure looks out of place. Submitting through the API lets you control every pixel of the form without abandoning the plugin's established ecosystem.
💡 Quick overview:
- Which endpoints Contact Form 7 and Gravity Forms provide and how to activate them in a headless environment.
- What format to use when sending fields so the plugin correctly accepts the data and returns a result.
- How to build an HTML form, attach a fetch request, and show the user a success message or validation errors.
- How to unify the differing response formats from CF7 and Gravity Forms into a single convenient structure.
What you need to know about endpoints
Sending data through the REST API is the technically simple part. Both plugins expect a POST to an endpoint where the dynamic URL segment is the identifier of the specific form.
Contact Form 7 provides a REST API immediately after activation. The endpoint looks like this:
1 https://your-site.tld/wp-json/contact-form-7/v1/contact-forms/<FORM_ID>/feedback
Starting with version 5.8 (August 2023), Contact Form 7 switched to SHA-1 hashed form identifiers. Old numeric IDs still work, but for new forms you need to grab the identifier from the URL of the form editing page in the admin panel (the last segment after post=). As of April 2026, the plugin has over 10 million active installations and is tested up to WordPress 7.0.
Gravity Forms uses REST API v2 (available since version 2.4):
1 https://your-site.tld/wp-json/gf/v2/forms/<FORM_ID>/submissions
Important note: the Gravity Forms REST API is disabled by default. To activate it, go to the plugin settings → REST API tab → check "Enable access to the API." An API key isn't required for the form submission endpoint; it's public by design. The form identifier in Gravity Forms is numeric and visible in the admin panel when editing.
Request body structure
Let's take a sample form with five fields: required text, email, and date (before October 4, 1957), an optional textarea, and a required checkbox.
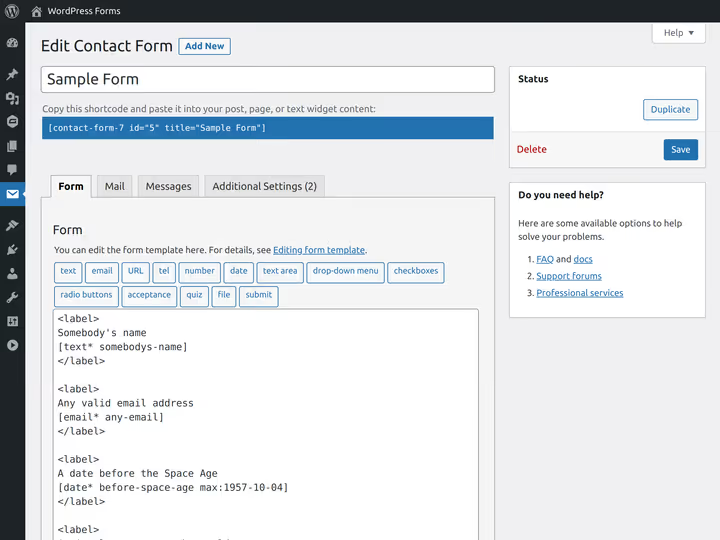
Contact Form 7 expects keys in the format defined through form tag syntax. The key matches the name of the corresponding field in HTML:
1 { 2 "somebodys-name": "Marian Kenney", 3 "any-email": "marian2210@geocities.com", 4 "before-space-age": "1922-03-11", 5 "optional-message": "", 6 "fake-terms": "1" 7 }
Gravity Forms uses a different approach: automatically generated incremental identifiers with the input_ prefix. The field ID is visible right in the admin panel when editing a specific field.
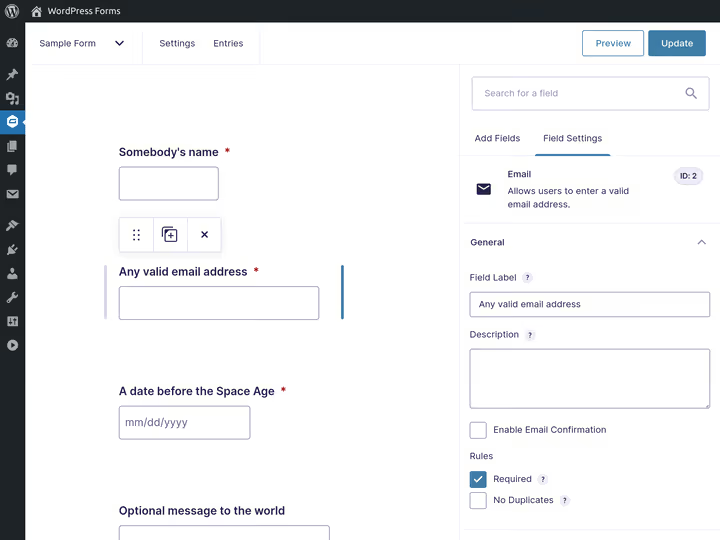
For the same form, the request body for Gravity Forms looks different:
1 { 2 "input_1": "Marian Kenney", 3 "input_2": "marian2210@geocities.com", 4 "input_3": "1922-03-11", 5 "input_4": "", 6 "input_5_1": "1" 7 }
Key takeaway: if you give your HTML inputs name attributes that match the plugin's expected keys, the mapping happens automatically, and FormData will collect the data in the correct format without manual mapping.
Building the HTML and sending the request
For Contact Form 7, the HTML markup looks like this (note that action is the endpoint, and field name attributes match the keys above):
1 <form action="https://your-site.tld/wp-json/contact-form-7/v1/contact-forms/<FORM_ID>/feedback" method="post"> 2 <label for="somebodys-name">Your name</label> 3 <input id="somebodys-name" type="text" name="somebodys-name" required> 4 5 <label for="any-email">Email</label> 6 <input id="any-email" type="email" name="any-email" required> 7 8 <label for="before-space-age">Date</label> 9 <input id="before-space-age" type="date" name="before-space-age" max="1957-10-04" required> 10 11 <label for="optional-message">Message</label> 12 <textarea id="optional-message" name="optional-message"></textarea> 13 14 <label> 15 <input type="checkbox" name="fake-terms" value="1" required> 16 I accept the terms 17 </label> 18 19 <button type="submit">Submit</button> 20 </form>
For Gravity Forms, only action and the name attributes change:
1 <form action="https://your-site.tld/wp-json/gf/v2/forms/<FORM_ID>/submissions" method="post"> 2 <label for="input_1">Your name</label> 3 <input id="input_1" type="text" name="input_1" required> 4 <!-- ... --> 5 </form>
Now for submission via JavaScript: FormData collects values by name automatically, so no mapping is needed:
1 const formSubmissionHandler = (event) => { 2 event.preventDefault(); 3 4 const formElement = event.target; 5 const { action, method } = formElement; 6 const body = new FormData(formElement); 7 8 fetch(action, { method, body }) 9 .then((response) => response.json()) 10 .then((response) => { 11 if (isFormSubmissionError(response)) { 12 // Handle validation errors 13 handleValidationErrors(response); 14 return; 15 } 16 // Successful submission 17 handleSuccess(response); 18 }) 19 .catch((error) => { 20 // Network error or server unavailable 21 handleNetworkError(error); 22 }); 23 }; 24 25 const formElement = document.querySelector("form"); 26 formElement.addEventListener("submit", formSubmissionHandler);
The data is sent. But that's not enough for the user; they need feedback: a success message, highlighting fields with errors, a global notification. Fortunately, both plugins return this information in the response.
Validation: the server decides, the client displays
Beyond built-in HTML5 validation (attributes like required, type="email", and max), it makes sense to rely on the server-side rule checking that plugins provide. Why: the rules are configured centrally in the WordPress admin, and duplicating them on the client means double work and a source of inconsistencies.
Both Contact Form 7 and Gravity Forms return validation errors directly in the response body. For complex scenarios (conditional fields, dependent validation), relying on server-side validation is especially advantageous: you don't need to synchronize logic between the frontend and plugin settings.
The task boils down to three steps: parse the JSON response, extract error messages, and insert them into the DOM next to the corresponding fields.
Response formats and normalization
Contact Form 7 response on validation error:
1 { 2 "into": "#", 3 "status": "validation_failed", 4 "message": "One or more fields have an error. Please check and try again.", 5 "posted_data_hash": "", 6 "invalid_fields": [ 7 { 8 "into": "span.wpcf7-form-control-wrap.somebodys-name", 9 "message": "The field is required.", 10 "idref": null, 11 "error_id": "-ve-somebodys-name" 12 } 13 ] 14 }
On success, the response is more compact:
1 { 2 "into": "#", 3 "status": "mail_sent", 4 "message": "Thank you for your message. It has been sent.", 5 "posted_data_hash": "d52f9f9de995287195409fe6dcde0c50" 6 }
Gravity Forms response on validation error is structured differently:
1 { 2 "is_valid": false, 3 "validation_messages": { 4 "1": "This field is required.", 5 "2": "This field is required.", 6 "3": "This field is required.", 7 "5": "This field is required." 8 }, 9 "page_number": 1, 10 "source_page_number": 1 11 }
And a successful response contains confirmation inside HTML:
1 { 2 "is_valid": true, 3 "page_number": 0, 4 "source_page_number": 1, 5 "confirmation_message": "<div>Thanks for contacting us! We will get in touch with you shortly.</div>", 6 "confirmation_type": "message" 7 }
The difference in approaches is obvious: CF7 embeds errors in an array of objects with CSS selectors, while Gravity Forms uses a flat object with numeric keys without the input_ prefix. The success message from Gravity Forms comes wrapped in HTML. Field keys in CF7 responses are embedded in selectors (e.g., span.wpcf7-form-control-wrap.somebodys-name) and require extraction via regex.
Instead of branching logic for each plugin, it's more convenient to normalize both responses to a unified format:
1 { 2 "isSuccess": false, 3 "message": "One or more fields have an error. Please check and try again.", 4 "validationError": { 5 "somebodys-name": "The field is required.", 6 "any-email": "The field is required.", 7 "input_3": "The field is required.", 8 "input_5": "This field is required." 9 } 10 }
On success, isSuccess is set to true, and validationError is an empty object.
Normalization code for Contact Form 7:
1 const normalizeContactForm7Response = (response) => { 2 const isSuccess = response.status === 'mail_sent'; 3 const message = isSuccess 4 ? response.message 5 : response.message || 'One or more fields have an error.'; 6 7 const validationError = isSuccess 8 ? {} 9 : Object.fromEntries( 10 response.invalid_fields.map((error) => { 11 const key = /cf7[-a-z]*.(.*)/.exec(error.into)[1]; 12 return [key, error.message]; 13 }) 14 ); 15 16 return { isSuccess, message, validationError }; 17 };
Normalization code for Gravity Forms (note: error keys get the input_ prefix added so they match the request keys):
1 const normalizeGravityFormsResponse = (response) => { 2 const isSuccess = response.is_valid; 3 const message = isSuccess 4 ? stripHtml(response.confirmation_message) 5 : 'There was a problem with your submission.'; 6 7 const validationError = isSuccess 8 ? {} 9 : Object.fromEntries( 10 Object.entries(response.validation_messages).map(([key, value]) => [ 11 `input_${key}`, 12 value, 13 ]) 14 ); 15 16 return { isSuccess, message, validationError }; 17 };
Now you have a unified response object regardless of the plugin. All that's left is to write the error display and class toggling on DOM elements, and the form is ready for action.
From normalization to a live interface
Once the response is converted to a unified structure, displaying feedback comes down to DOM manipulation. Adding an error message next to a field, toggling a class on a wrapper, and showing a global notification: these three actions are enough for the vast majority of scenarios.
For reactive interface updates, lightweight declarative libraries like Alpine.js are convenient. Minimal syntax, no build step, and natural integration with server responses make it a practical choice for forms in a headless environment. The Alpine.js approach was covered in detail on CSS-Tricks; the code from that material works almost unchanged with the normalized response we obtained above.
The bottom line
Replicating the client-side functionality that form plugins provide "out of the box" is a couple of hours of work for simple forms. A nice bonus: by abstracting the response through a normalizer function, you get a swappable backend. Switching from Contact Form 7 to Gravity Forms (or vice versa) can be done without frontend changes; just replace the endpoint and the normalizer function.
Multi-page forms, uploaded image previews, price calculators: yes, that's serious development. But the more unique a project's requirements, the stronger the case for a custom frontend on top of the REST API: you're not fighting someone else's markup or working around the limitations of pre-built rendering.
The headless approach to forms isn't a hypothetical future. Today, plugins like Contact Form 7 and Gravity Forms provide full-featured REST APIs, and frontend frameworks let you build a form in hours rather than days. Try it on your next project where form appearance is critical: use CF7 or GF as the backend and build the interface from scratch. You'll likely be surprised at how straightforward it is.
⁉️🤔 Frequently asked questions
Does the Contact Form 7 REST API work with the free version?
Yes, the REST API is available immediately after activating the free plugin; no additional configuration is required. As of April 2026, Contact Form 7 has over 10 million active installations, and the REST API has been a stable part of the plugin core since version 4.8.
What's different about hashed form IDs in newer versions of Contact Form 7?
Starting with version 5.8 (August 2023), CF7 generates a SHA-1 hash as the form identifier instead of a numeric ID. Old numeric IDs still work. You can find the hash in the URL of the form editing page in the admin panel:
/wp-admin/admin.php?page=wpcf7&post=<HASH>&action=edit. It's substituted in the endpoint the same way as a numeric ID.
Is an API key required for submitting forms through the Gravity Forms REST API?
No, the
/gf/v2/forms/<ID>/submissionsendpoint doesn't require authentication for submission. However, the Gravity Forms REST API itself is disabled by default; you need to enable it in the plugin settings (Forms → Settings → REST API → Enable access to the API).
Can the same JavaScript code be used for both Contact Form 7 and Gravity Forms?
Yes, that's exactly what response normalization is for. Both normalizer functions (for CF7 and GF) return an object with the same structure:
isSuccess,message, andvalidationErrorfields. Hook up the appropriate function depending on the plugin, and all the remaining code (error display, field highlighting, global notification) will work without changes.
What should I do if the form won't submit and the server returns a 404?
Check three things: whether the plugin's REST API is enabled (especially relevant for Gravity Forms), whether the form identifier in the endpoint URL is correct, and whether the REST API is being blocked at the server level or by a security plugin. For Contact Form 7, also make sure that the WordPress REST API is globally active; without it, CF7 won't be able to process AJAX submissions.

A professional team of writers and editors specializing in creating quality content.