














🎨 Contact Form 7 starter CSS styles and form export file 2026
The default styles of Contact Form 7 are the first thing you notice after installing the plugin. Narrow input fields, a plain submit button, and error messages with no design effort whatsoever. After setting up a dozen sites, you lose count of how many times you manually edited style.css, and it is always the same routine.
A prepared form export file solves this problem. You import a ready-made form with pre-configured styles: the fields, button, validation, and reCAPTCHA look decent right after activation. All that remains is to replace the email addresses and the logo path for your specific project.
Below is a complete breakdown of the CSS rules we use on our projects, plus an export file for a quick start. The styles have been tested on Contact Form 7 version 6.x and are current as of 2026.
💡 Quick overview:
- Download the form export file and import it into WordPress using the standard method
- Replace the email addresses in the email template and the logo path
- Copy the CSS styles into your theme's
style.cssor into Additional CSS - Adapt colors and fonts to your project's brand if needed
1. Export file: import and initial setup
The export file contains a ready-made contact form with fields: name, email, phone, text area, and Google reCAPTCHA. The form is created in four language versions: Russian, Ukrainian, English, and German.
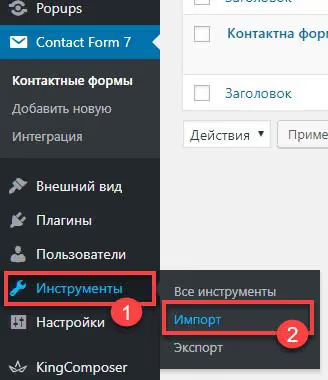
Import is performed using the standard WordPress tool: Tools → Import → Contact Form 7 → Run Importer. Select the downloaded XML file, and the forms will appear in the "Forms" section.
Immediately after import, go to the email template of each form under the Mail tab. Replace three things:
- The "To" field: enter your actual email;
- The "From" field: the address must be on the site's domain (for example,
info@your-domain.com), otherwise emails will end up in spam; - The logo path: find the
<img src="/Logo-150x150.png">tag in the email body and replace it with the full URL of the logo from your site.
Without replacing the email addresses, the form will not send emails. This is a common reason why CF7 "doesn't work" after import.
2. CSS styles: complete breakdown
Below is the style set we apply to every new project. Copy it into the active theme's style.css or into Additional CSS (Appearance → Customize → Additional CSS). The second option is preferable: the styles will not be lost when the theme updates.
2.1. Response messages and validation
1 /* Form response — top margin */ 2 div.wpcf7-response-output { 3 margin-top: -30px; 4 } 5 6 /* Validation hint — centering and spacing */ 7 span.wpcf7-not-valid-tip { 8 margin-top: -14px; 9 margin-bottom: -10px; 10 text-align: center; 11 color: #a01414; 12 font-size: 1em; 13 display: block; 14 font-weight: 700; 15 }
.wpcf7-response-output is the block that appears after submission (success or error). By default it disrupts the flow; the negative margin-top pulls it closer to the form. .wpcf7-not-valid-tip is the red hint below an unfilled field; here the text is centered and bold for visibility.
2.2. Input fields and text areas
1 /* Unified font for all form elements */ 2 input.wpcf7-form-control, 3 textarea#TextareaJA, 4 input.wpcf7-form-control.wpcf7-submit { 5 font-family: "Open Sans", sans-serif; 6 font-size: 15px; 7 line-height: 30px; 8 font-weight: 700; 9 } 10 11 /* Text area height */ 12 textarea { 13 height: 150px !important; 14 } 15 16 /* Border highlight on focus */ 17 form.wpcf7-form input:focus, 18 form.wpcf7-form textarea:focus, 19 form.wpcf7-form input[type="text"]:focus { 20 border-color: #709242; 21 }
The selector input.wpcf7-form-control targets all CF7 text fields. textarea#TextareaJA is a custom identifier from our form; if your form has a different ID, replace it with the correct one. The focus border color #709242 is an olive green that is calm and easy on the eyes.
2.3. Submit button
1 /* Submit button — main style */ 2 input.wpcf7-form-control.wpcf7-submit { 3 color: #ffffff; 4 background: #5a8f2b; 5 font-weight: 600; 6 border: 2px dashed #ffffff; 7 margin-top: -25px; 8 font-family: FuturaDemiC, sans-serif; 9 padding: 10px 30px; 10 border-radius: 0; 11 transition: all .3s ease 0s; 12 } 13 14 /* Hover — color inversion */ 15 input.wpcf7-form-control.wpcf7-submit:hover { 16 background: #ffffff; 17 color: #5a8f2b; 18 border: 2px dashed #5a8f2b; 19 }
The button has a green background #5a8f2b with a white dashed border. On hover, the colors invert: white background, green text and border. If green is not in your brand's palette, replace #5a8f2b with your accent color in both rules (default and hover).
2.4. Preloader and loading indicator
1 /* Centering the ajax loader */ 2 span.ajax-loader { 3 margin-left: auto !important; 4 margin-right: auto !important; 5 float: inherit !important; 6 width: 15px !important; 7 display: block !important; 8 margin-top: 10px !important; 9 margin-bottom: -15px !important; 10 }
The spinning CF7 submission indicator sticks to the edge by default. Here it is forcibly centered via margin-left/right: auto and display: block. The !important declarations are necessary because the plugin itself applies inline styles to the loader.
2.5. Google reCAPTCHA alignment
1 /* Centering the reCAPTCHA block */ 2 .wpcf7-form-control-wrap { 3 width: 100%; 4 } 5 6 .wpcf7-form-control.g-recaptcha.wpcf7-recaptcha { 7 margin-top: -28px; 8 margin-left: auto; 9 margin-right: auto; 10 width: 300px; 11 }
The reCAPTCHA block aligns left by default. Using margin-left/right: auto with a fixed width of 300px centers it within the form.
2.6. Mobile responsiveness
1 @media screen and (max-width: 768px) { 2 span.wpcf7-not-valid-tip { 3 margin-bottom: 15px; 4 } 5 6 input.wpcf7-form-control.wpcf7-text { 7 max-height: 30px; 8 } 9 }
On screens smaller than 768px, the validation hint gets extra bottom margin to avoid colliding with the next field. Text fields are limited in height, which prevents excessive stretching on mobile devices.
2.7. Hiding service elements
1 /* Hide list markers in error messages */ 2 .screen-reader-response ul { 3 display: none; 4 } 5 6 /* Hide the green success message */ 7 .wpcf7-response-output.wpcf7-display-none.wpcf7-mail-sent-ok { 8 display: none !important; 9 } 10 11 /* Hide the duplicate validation error message */ 12 .wpcf7-response-output.wpcf7-display-none.wpcf7-validation-errors { 13 display: none !important; 14 } 15 16 /* Text color for screen-reader block on dark backgrounds */ 17 .screen-reader-response { 18 color: white; 19 margin-bottom: 10px; 20 }
CF7 duplicates validation errors by default: both in the tooltip and in the general block below the form. We hide the general block (.wpcf7-validation-errors) and the success message (.wpcf7-mail-sent-ok), since the .wpcf7-not-valid-tip hints are sufficient. The styles for .screen-reader-response are relevant when the form is placed on a dark background.
2.8. Centering placeholders
1 /* Centering placeholder in textarea field for different browsers */ 2 textarea#TextareaJA::-webkit-input-placeholder { 3 text-align: center; 4 } 5 6 textarea#TextareaJA:-moz-placeholder { 7 text-align: center; 8 } 9 10 textarea#TextareaJA::-moz-placeholder { 11 text-align: center; 12 } 13 14 textarea#TextareaJA:-ms-input-placeholder { 15 text-align: center; 16 }
The placeholder text inside the field is centered only while the field is empty. Once the user starts typing, the text follows normal alignment. #TextareaJA is the identifier from our form; replace it with the correct one for your form.
2.9. Bonus: styles for dark backgrounds
1 /* Error styles for forms on dark background */ 2 .wpcf7-response-output.wpcf7-display-none.wpcf7-validation-errors { 3 color: aliceblue; 4 font-weight: 800; 5 } 6 7 span.wpcf7-not-valid-tip { 8 font-weight: 900; 9 background-color: antiquewhite; 10 }
If the form is placed in a block with a dark fill, error messages must remain readable. The error text becomes white (aliceblue), and the tooltip gets a light background.
2.10. Additional improvements
1 /* Bottom error message margin */ 2 .wpcf7-response-output.wpcf7-display-none.wpcf7-validation-errors { 3 margin-top: -60px; 4 } 5 6 /* Centering text fields */ 7 span.wpcf7-form-control-wrap input#Email, 8 span.wpcf7-form-control-wrap input#PhoneJA, 9 input.wpcf7-form-control.wpcf7-text.wpcf7-validates-as-required { 10 text-align: center; 11 } 12 13 /* reCAPTCHA in popups — additional spacing */ 14 div#recapcha-popups .wpcf7-form-control-wrap { 15 padding-top: 25px; 16 margin-left: -11px; 17 padding-bottom: 38px; 18 }
Text fields for email and phone are centered, which looks neater when the form consists of 3-4 fields. The block div#recapcha-popups is a specific selector for cases when the form is embedded in a popup window.
3. Configuring the email template
After importing forms, be sure to check the Mail tab in each form editor. CF7 uses these settings to send email notifications:
- To: the address where submissions arrive. By default it contains a placeholder from the export; replace it with yours;
- From: the email header. The sender address must be on the site's domain, otherwise emails go to spam or are not delivered at all;
- Subject: you can keep the default or add the site name;
- Message Body: an HTML template with the logo. Replace
src="/Logo-150x150.png"with the full URL of your logo.
If you need additional tags for the template, the full list is available in the official documentation at contactform7.com.
4. Optimizing CF7 script loading
By default, Contact Form 7 loads CSS and JavaScript on every page of the site, even where there is no form. These are unnecessary requests that slow down loading.
Starting with version 5.9, the developer added a native option for controlling loading: in wp-config.php you can set the constants WPCF7_LOAD_JS and WPCF7_LOAD_CSS to false, and scripts will only load on pages with a form. More details in the CF7 documentation.
For finer control (only specific pages), use a snippet in functions.php:
1 add_action('wp_enqueue_scripts', 'cf7_dequeue_scripts', 99); 2 function cf7_dequeue_scripts() { 3 if (!is_page(array('contact', 'order'))) { 4 wp_dequeue_script('contact-form-7'); 5 wp_dequeue_style('contact-form-7'); 6 } 7 }
This snippet removes CF7 scripts from all pages except those specified in the is_page() array. Replace 'contact' and 'order' with the slugs of your pages containing forms.
⁉️🤔 Frequently asked questions
Forms don't send after import. What should I do?
First, check the "Mail" tab: the "To" and "From" fields. The export file contains placeholders there. "To" must contain an actual email, and "From" must be an address on the site's domain. If the domain does not match, the recipient's mail server will reject the email as spam.
Where is it better to place CSS styles: in the theme's style.css or in Additional CSS?
Additional CSS is preferable. When the theme updates,
style.cssgets overwritten, but Additional CSS does not. The downside: styles in Additional CSS are loaded inline in<head>rather than as an external file, but for 100-150 lines of CSS the speed difference is negligible.
How do I change button colors to match the client's brand?
Find the two rules for
input.wpcf7-form-control.wpcf7-submitin the styles (default and hover). Replace#5a8f2bwith the brand's accent color in thebackgroundproperty of the main rule and in thecolorandborderproperties of the hover rule. Nothing else needs to be changed.
Why does reCAPTCHA shift left on mobile?
The
.g-recaptchablock in our styles has a fixed standard width. On very narrow screens it may not fit. Add a rule withtransform: scale()andtransform-origin: leftto the media query, and reCAPTCHA will proportionally shrink to fit any screen.
Styles are not being applied. What's the cause?
Three common causes: (1) browser cache (open the site in incognito mode); (2) cache from a performance plugin (WP Rocket, LiteSpeed) that needs to be cleared; (3) load order, since CF7 loads its CSS last. Add
!importantto the conflicting rule or increase selector specificity by adding a parent class.
How do I verify that the form actually works after configuration?
Send a test email through the form on the site itself. If the email does not arrive, check your spam folder. If it is not there either, set up an SMTP plugin (for example, FluentSMTP or Post SMTP). Without SMTP, WordPress sends via
wp_mail(), and many hosts block such emails.
Styling CF7: fast, once, and for all projects
A prepared export file and a refined style set save 15 to 30 minutes on each new project. Instead of manually picking margin-top: -14px through trial and error, you get a form with fields, button, and validation already arranged. All that remains is to insert the email and logo.
If the green palette #5a8f2b does not fit the design, replace the accent color with your own. If the form is embedded in a popup, add a selector with the popup's ID as shown in section 2.10. If the site is multilingual, use the language duplicates from the export (RU/UK/EN/DE).
On projects without a designer, this style set covers the vast majority of needs for a decent-looking contact form. On projects with a designer, it serves as a foundation for finer customization.
Save the styles as a snippet, and your next CF7 setup will take exactly two minutes.

A professional team of writers and editors specializing in creating quality content.