













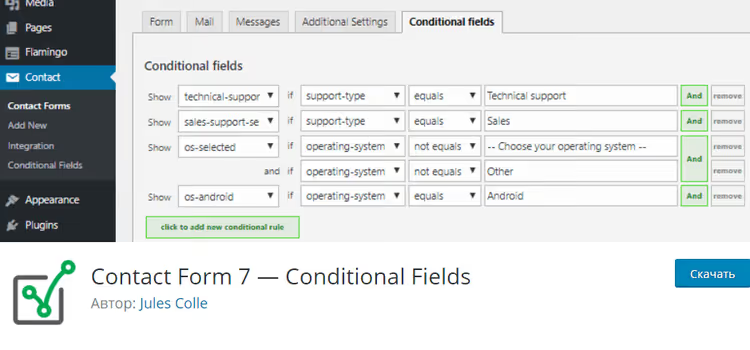
🧩 Conditional fields in Contact Form 7: a step-by-step setup guide
You need a contact form that adapts to user choices: technical support shows one set of fields, sales shows a completely different set. Standard Contact Form 7 cannot do this. Without conditional logic, the page displays a wall of all fields at once, half of which the visitor does not need. It looks messy and causes confusion.
The Conditional Fields** for Contact Form 7** plugin solves this problem: fields appear and disappear based on what the user selects. Below is a step-by-step guide to building a real support form, from plugin installation to personalized email responses. The same approach scales to calculators, surveys, and multi-step applications.
💡 Quick overview:
- Install CF7 and Conditional Fields, create a basic form with a request type
- Wrap field groups in
[group]…[/group], configure display conditions through the "Conditional fields" tab - Build the final form with nested groups, dynamic labels, and a custom "Other" branch
- Set up personalized email: different text and different field sets for technical support and sales
What conditional fields provide
Contact Form 7 is the most popular form builder for WordPress: 10+ million active installations, minimal overhead. But out of the box it is static: all fields are visible all the time. If the form has three logic branches (technical support, sales, partnerships), the visitor sees nine extra fields that have nothing to do with their request.
Conditional Fields for Contact Form 7 adds "if-then" logic directly to the form editor. The plugin is free, has a 4.8 rating on WordPress.org, and 100,000+ active installations. The author, Jules Colle, also develops the Pro version with repeating fields, multi-step forms, and calculated values.
Important: the plugin does not remove hidden fields from the markup; it only hides them via JavaScript. Therefore, all fields inside hidden groups are still sent to the server. Field names must be unique even across different groups, otherwise values will be overwritten. This is rule number one, and in practice it is the most common stumbling block.
Installation and initial form
Install both plugins through Plugins → Add New:
- Contact Form 7, the form builder itself
- Conditional Fields for Contact Form 7, the conditional logic engine
After activation, go to Contact → Add New and paste the form template. No conditional groups yet, just all fields at once:
1 Your name: [text your-name] 2 Your email address: [email your-email] 3 4 What kind of support do you want? 5 [select support-type first_as_label "-- Choose support type --" "Technical support" "Sales"] 6 7 Your operating system: [select operating-system first_as_label "-- Choose your operating system --" "Android" "iOS" "Linux" "Windows"] 8 9 In case you selected Technical support: 10 Please specify your OS version: [text version] 11 12 In case you selected Sales: 13 Where is your business located? [select continent first_as_label "-- Choose your continent --" "Europe" "America" "Africa" "Asia" "Oceania" "Antarctica"] 14 15 [textarea comments] 16 17 [submit "Send"]
This is how the form looks without logic: the operating system selection and technical support fields are always visible, even if the visitor selected "Sales". There is no "Other OS" option at all, and the version field label does not change based on the selected system. We fix this with groups.
Creating field groups
A group is a pair of tags [group group-name] ... [/group]. Everything between them is hidden by default and only appears when a condition is triggered. Groups can be nested inside each other, which comes in handy for cascading logic.
In the form editor, click the Conditional group button above the text area; it adds the tags automatically.
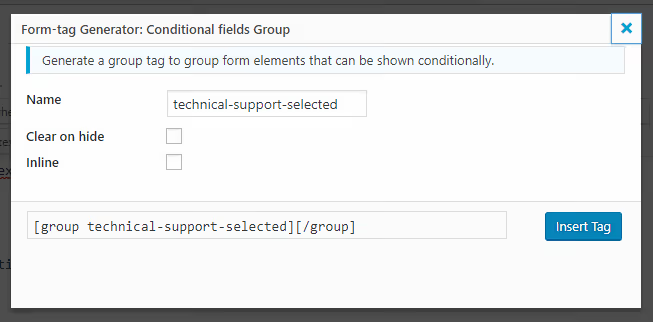
In the window that appears, set the group name and options:
- Clear on hide clears all fields inside the group when it becomes hidden. Useful so that values from invisible fields are not sent in the email.
- Inline displays the group as an inline element. Helpful when you need to embed a piece of text directly into a sentence (I will show this later).
Create the first group technical-support-selected and move the operating system and version fields into it:
1 [group technical-support-selected] 2 Your operating system: [select operating-system first_as_label "-- Choose your operating system --" "Android" "iOS" "Linux" "Windows"] 3 [group os-selected] 4 Please specify your OS version: [text version] 5 [/group] 6 [/group]
There are already two groups here, one inside the other. The outer one (technical-support-selected) represents the fact that technical support was selected. The inner one (os-selected) is the OS version clarification, which will appear ONLY when the user selects a specific operating system. Without a condition, both groups remain invisible for now.
The same for the sales department:
1 [group sales-support-selected] 2 Where is your business located? 3 [select continent first_as_label "-- Choose your continent --" "Europe" "America" "Africa" "Asia" "Oceania" "Antarctica"] 4 [/group]
Save the form, and the groups will disappear from the frontend. This is normal: there are no conditions yet.
Setting up conditional logic
After saving the form, go to the Conditional fields tab. There are two modes: visual (dropdowns) and text (you write rules manually). Text mode is faster for complex forms, so we will use that.
Click Add new conditional rule and enter the first rule:
1 show [technical-support-selected] if [support-type] equals "Technical support"
The syntax is straightforward: show <group> if <field> equals "<value>". After saving the rule, the technical-support-selected group will become visible as soon as the user selects "Technical support" from the dropdown.
Add the rule for sales:
1 show [sales-support-selected] if [support-type] equals "Sales"
Now the form switches between two branches, but inside technical support the version field still shows all the time. We need it to appear only after selecting a specific OS:
1 show [os-selected] if [operating-system] not equals ""
The not equals "" check works because we use first_as_label; the value -- Choose your operating system -- is not considered selected. The operating-system field is empty until the visitor actually clicks on an option.
Moving on: we should add an "Other" option to the OS dropdown. If the user selects "Other", we do not know what OS they have, so we give them two text fields: the system name and version. We need a new group os-other-selected and a rule with the AND operator:
1 show [os-selected] if [operating-system] not equals "" 2 and if [operating-system] not equals "Other" 3 show [os-other-selected] if [operating-system] equals "Other"
Two rules for one group: the first shows os-selected for any OS except "Other", the second shows os-other-selected only for "Other". The logic is mutually exclusive, so there will be no conflicts.
Final form: dynamic labels and the "Other" branch
Now let us put it all together. We will add inline groups that change the version field label depending on the selected OS (Android, iOS, Linux, or Windows). The label text is "embedded" directly in the group and appears only when the condition matches:
1 Your name: [text your-name] 2 Your email address: [email your-email] 3 4 What kind of support do you want? 5 [select support-type first_as_label "-- Choose support type --" "Technical support" "Sales"] 6 7 [group technical-support-selected] 8 Your operating system: [select operating-system first_as_label "-- Choose your operating system --" "Android" "iOS" "Linux" "Windows" "Other"] 9 10 [group os-selected] 11 Please specify your [group os-android inline]Android[/group][group os-ios inline]iOS[/group][group os-linux inline]Linux[/group][group os-windows inline]Windows[/group] version: 12 [text version] 13 [/group] 14 15 [group os-other-selected] 16 Please specify your OS and version. 17 [text other-os "Operating System"][text other-version "Version"] 18 [/group] 19 [/group] 20 21 [group sales-support-selected] 22 Where is your business located? 23 [select continent first_as_label "-- Choose your continent --" "Europe" "America" "Africa" "Asia" "Oceania" "Antarctica"] 24 [/group] 25 26 [textarea comments] 27 28 [submit "Send"]
The key point: inline groups with OS names ([group os-android inline]Android[/group]). The inline attribute makes the group an inline element, so the label text does not break into paragraphs. The conditions for these groups on the Conditional fields tab:
1 show [technical-support-selected] if [support-type] equals "Technical support" 2 show [sales-support-selected] if [support-type] equals "Sales" 3 show [os-selected] if [operating-system] not equals "" 4 and if [operating-system] not equals "Other" 5 show [os-android] if [operating-system] equals "Android" 6 show [os-ios] if [operating-system] equals "iOS" 7 show [os-linux] if [operating-system] equals "Linux" 8 show [os-windows] if [operating-system] equals "Windows" 9 show [os-other-selected] if [operating-system] equals "Other"
Click Save conditions, then save the form. Copy the shortcode [contact-form-7 id="..." title="..."] to a page and test it on the frontend. Switching between branches should work instantly, without page reload.
Personalizing the email response
Conditional groups work not only in the form but also in the email template. This means the user can receive a different email depending on what they selected.
Open the Mail tab in the form editor. In the Message body field, wrap the text in the same groups you used in the form:
1 [technical-support-selected] 2 Thank you for submitting your technical support question 3 [/technical-support-selected][sales-support-selected] 4 Thank you for your sales question 5 [/sales-support-selected]
The closing tag [/technical-support-selected] and the opening tag [sales-support-selected] go right next to each other, with no space; otherwise an extra line break will appear in the email.
Now let us add a table with the filled-in fields. Inside each group, we list ONLY the relevant fields:
1 <table> 2 <tr><td>your-name</td><td>[your-name]</td></tr> 3 <tr><td>your-email</td><td>[your-email]</td></tr> 4 <tr><td>support-type</td><td>[support-type]</td></tr> 5 [technical-support-selected] 6 <tr><td>operating-system</td><td>[operating-system]</td></tr> 7 [os-selected] 8 <tr><td>version</td><td>[version]</td></tr> 9 [/os-selected] 10 [os-other-selected] 11 <tr><td>other-os</td><td>[other-os]</td></tr> 12 <tr><td>other-version</td><td>[other-version]</td></tr> 13 [/os-other-selected] 14 [/technical-support-selected] 15 [sales-support-selected] 16 <tr><td>continent</td><td>[continent]</td></tr> 17 [/sales-support-selected] 18 <tr><td>comments</td><td>[comments]</td></tr> 19 </table>
When the form is submitted, the plugin will strip everything from the email that belongs to hidden groups. Technical support will receive the rows with OS and version; sales will receive only the continent. Clean and clear.
If you need to build emails manually and edit the markup, the plugin author created a web converter for CF7 code to email body. Paste the form code and get a table template for the email.
⁉️🤔 Frequently asked questions
Why are all groups visible? The conditions are not working.
First, check the browser console (F12) for JavaScript errors. Conditional Fields loads its script last, and any JS error before it breaks all the logic. Second, your theme must call
wp_footer()in footer.php. Without this hook, the script will not load. Most often the culprit is a plugin conflict: deactivate everything except CF7 and Conditional Fields and test the form. If it works, enable plugins one by one until you find the culprit.
Fields in the email arrive with incorrect or empty values.
The names of ALL fields in the form must be unique, even if the fields are in different groups and are never visible at the same time. The plugin does NOT remove hidden fields on submission; it only hides them visually. Two fields named
ain different groups = two values for the same key, and one of them will win. Make sure each field has its own name.
How do I create a form with steps and repeating fields?
The free version cannot do this; you need Conditional Fields Pro. It adds multi-step (breaking the form into steps with "Next" buttons), repeating field blocks (repeater), and calculated fields. The cost, on the developer's website, depends on the number of sites. If your form is simple and has no repeaters, the free version is more than enough.
What should I do if the plugin conflicts with my theme?
Enable a standard WordPress theme (Twenty Twenty-Five) and test the form on it. If it works, the problem is with your theme. Usually, manually calling
wp_footer()or moving the form to a different page without heavy theme scripts helps. If the theme is custom, ask the developer to make sure thewp_footer()hook is called on all pages with forms.
Can I use conditional fields for a price calculator?
Yes, and this is one of the most common scenarios. A set of dropdowns (service type, volume, urgency) with conditional groups for each option. The Pro version adds full-fledged calculated fields; if you need to multiply and sum values directly in the form, look in that direction.
What to do next: from prototype to production form
We built a support form with two logic branches, nested groups, and personalized email. The same approach works for any scenario with conditions: branching surveys, calculators, registrations with different roles.
What to pay attention to before going live:
- Check the uniqueness of ALL field names; again, this is rule number one.
- Test the form on mobile: long option lists and nested groups can slow down weak devices.
- Set up spam protection; Contact Form 7 works well with reCAPTCHA v3, Akismet, and Turnstile.
If your form logic goes beyond "show/hide" and you need repeaters, calculations, or multiple steps, take a look at Conditional Fields Pro. But for most tasks, the free version is sufficient: it is stable, updated every few weeks, and works with Contact Form 7 version 6.1.6 and WordPress 7.0.
Watch the video demonstration of the entire process from installation to the finished form; it will reinforce each step with a live example:

A professional team of writers and editors specializing in creating quality content.