














🚀 How to install WordPress on AWS: a step by step guide
Launching WordPress in 10 minutes without renting a server, configuring Linux, or digging through Apache configs sounds like science fiction. But that's exactly what the combination of AWS and Bitnami delivers.
Cloud platforms have long stopped being enterprise-only tools. Today anyone can deploy a WordPress site on Amazon's infrastructure; all you need is an account, a browser, and 15 minutes of free time. And the first year of hosting will cost you nothing thanks to the AWS free tier.
In this guide, a step-by-step path from registering with Amazon Web Services to a fully functional WordPress site. No terminal, no SSH, and no manual LAMP stack installation.
💡 Quick overview:
- Register a free AWS account and understand Free Tier limitations
- Find the ready-made WordPress image from Bitnami and Automattic in AWS Marketplace
- Launch an EC2 instance with WordPress, the operating system and software are already inside the AMI
- Retrieve the administrator password from the system log and access the admin panel
What is AWS and why cloud isn't scary
AWS is the largest cloud platform in the world. Netflix, NASA, Airbnb, and millions of smaller projects run on its infrastructure. To put the scale in perspective: when a Mars rover transmits data to Earth, part of that information is processed by Amazon's cloud.
But we don't need a Mars rover. We need a small virtual server for WordPress, and AWS provides it free for an entire year.
Two key concepts you'll need to know:
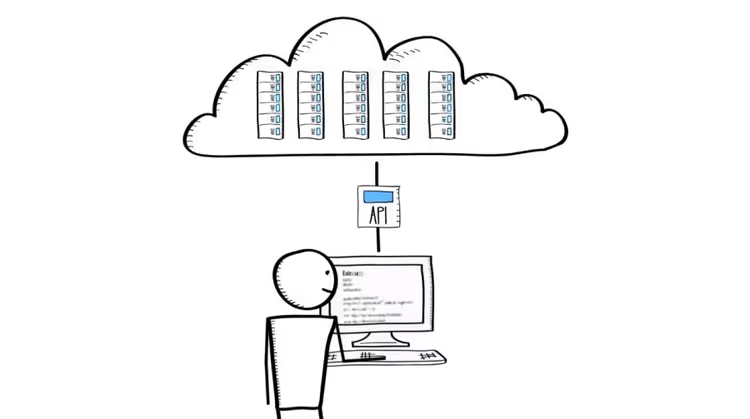
Amazon EC2 (Elastic Cloud Compute) is a virtual computer in the cloud. You choose the processor, memory, and disk, and Amazon handles everything else: hardware, electricity, cooling, networking. For you, an EC2 instance is simply a server where you can "install" WordPress.
Amazon Machine Image (AMI) is a virtual machine image with pre-installed OS and software. Instead of manually installing Ubuntu, Apache, MySQL, PHP, and WordPress (and then configuring all of it), you take a ready-made AMI where everything is already done for you. The Bitnami AMI saves you an hour of routine work.
What changed in 2025
Starting July 2025, AWS updated the free tier model. Now instead of the outdated t1.micro you get access to t2.micro or t3.micro (the same 750 hours per month but on more modern hardware). The 5 GB S3 storage limit and 12 months of free usage remained unchanged.
Additionally, Bitnami and Automattic (the company that develops WordPress) released an official certified AMI that replaces the old WordPress powered by Bitnami image and is available directly from the EC2 console.
Free AWS account: what you get and how to avoid charges
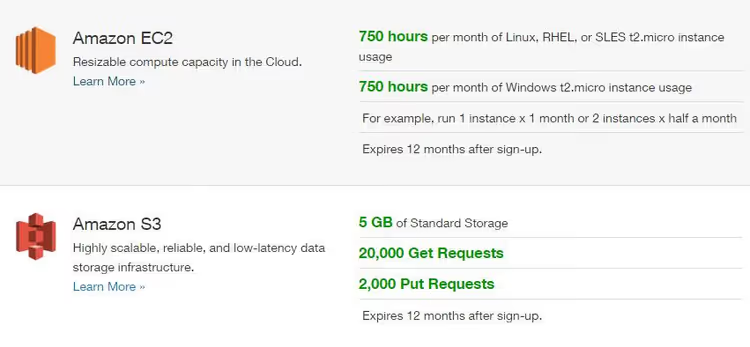
AWS Free Tier is one of the most generous free tiers among cloud providers. As of 2026, you get:
- EC2 (t2.micro or t3.micro): 750 hours per month, enough to run one site around the clock (according to AWS Free Tier);
- S3 storage: 5 GB for backups and static files;
- RDS (optional): 750 hours of
db.t2.microfor a managed database.
Important note: the free tier is valid for 12 months from the registration date, not the calendar year. After expiration, the instance will start incurring charges (from $7.59/month for t3.micro as of June 2026). Set a calendar reminder.
Registration requires three things: a new email, a valid bank card (not virtual; prepaid cards and services like Entropay are blocked), and a phone number for call verification. After confirmation, the account activates within a couple of minutes.
Before moving on to setup, here's a visual demonstration of the entire process from start to finish. This video shows the complete WordPress deployment cycle on AWS EC2 using an AMI:
Step 1. Launching WordPress AMI from AWS Marketplace
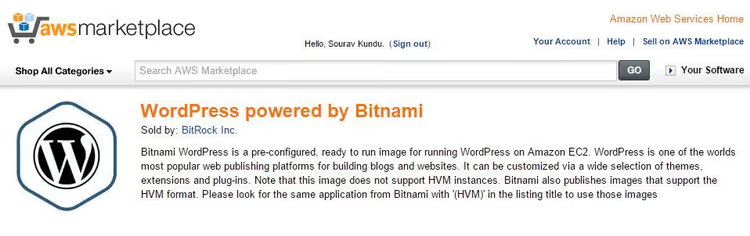
The shortest path to a working WordPress is launching a ready-made AMI directly from the catalog. Go to the AWS console, open the EC2 section, and navigate to:
AMI Catalog → search for "WordPress Certified by Bitnami and Automattic"
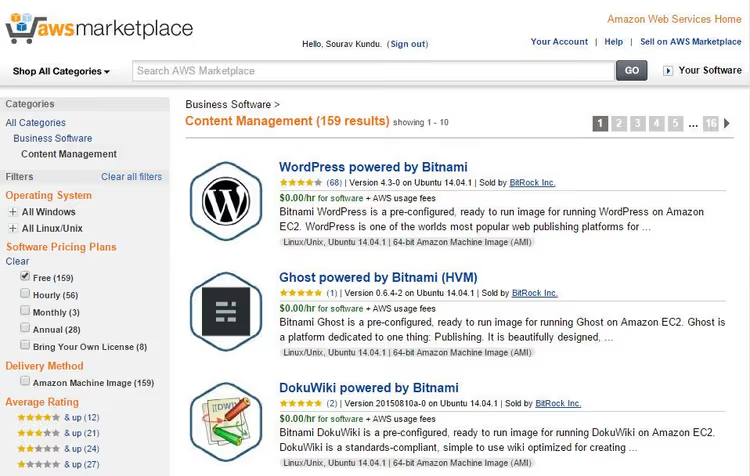
In the Marketplace catalog, select the "Content Management" category; inside you'll find the ready-made WordPress image.
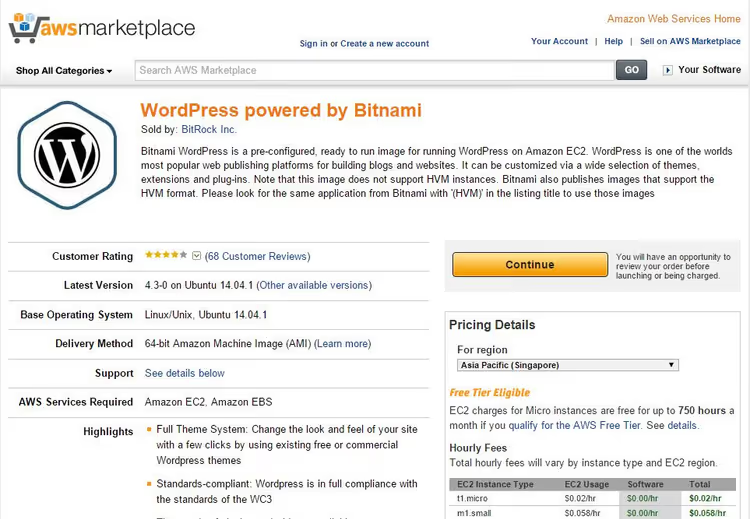
This is the official image jointly maintained by Bitnami and Automattic. Inside is an optimized WordPress build on Ubuntu with SSL already configured and automatic updates enabled.
1.1. Instance configuration
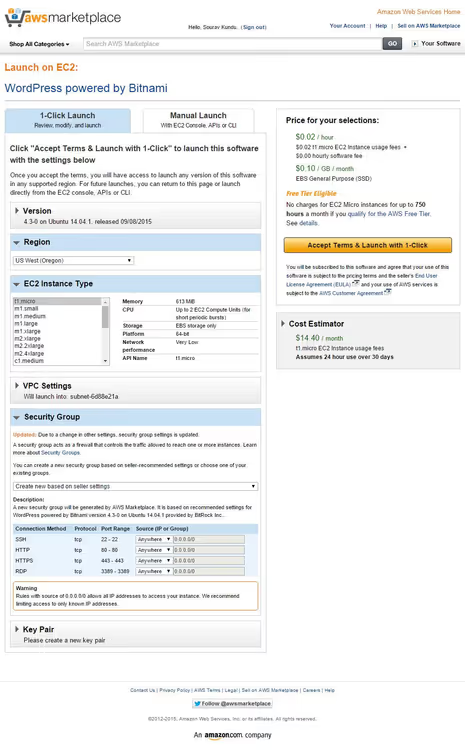
When launching the AMI, you'll be asked to specify several parameters. Here's what matters:
- AMI ID: leave the suggested one (latest stable version);
- Instance type:
t2.microort3.micro(any other option will exceed the Free Tier and you'll receive a bill); - Key pair: create a new one; this will allow you to connect via SSH if needed;
- Network settings: leave as default; AWS will automatically select the VPC and subnet for your chosen region;
- Security Group: choose "Create new based on seller settings"; Bitnami has already specified the necessary rules for HTTP/HTTPS.
1.2. Creating a key pair
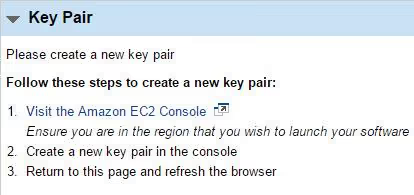
A key pair is your pass to the server via SSH. It's created once and downloaded as a .pem file. Make sure the region in the console matches the instance launch region, otherwise the key won't attach.
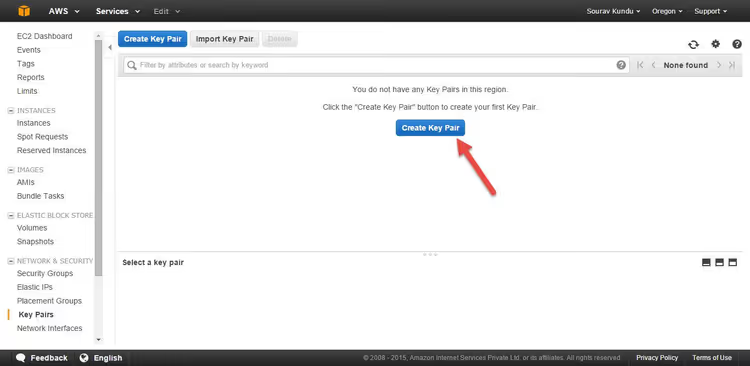
In the EC2 → Key Pairs section, click Create key pair.
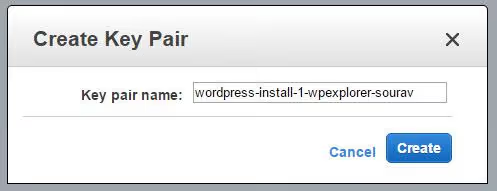
Give the key a clear name, for example, wordpress-aws-key. Leave the format as .pem.
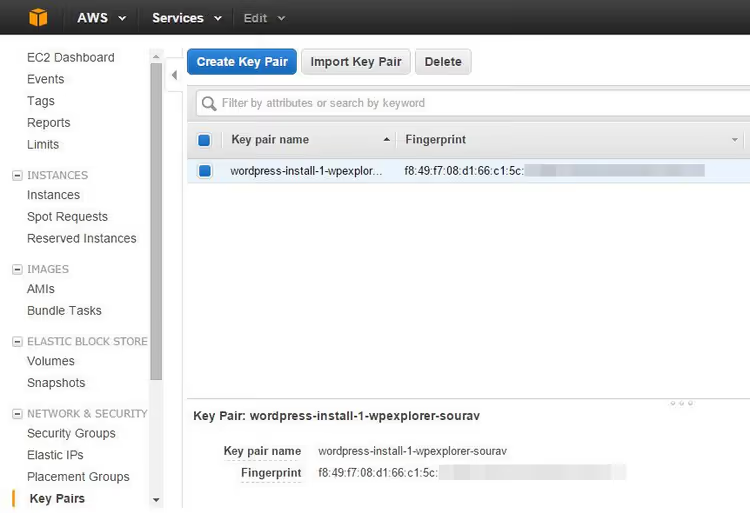
The key will be created and automatically downloaded. Store it in a safe place; recovering a private key is impossible.
1.3. Launch
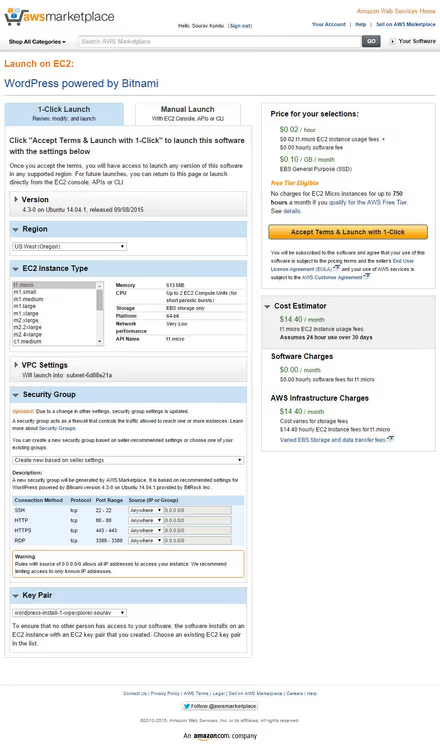
Return to the instance configuration, refresh the page, and select the key you just created from the dropdown. Verify that the instance type is t2.micro or t3.micro, and click Launch instance.
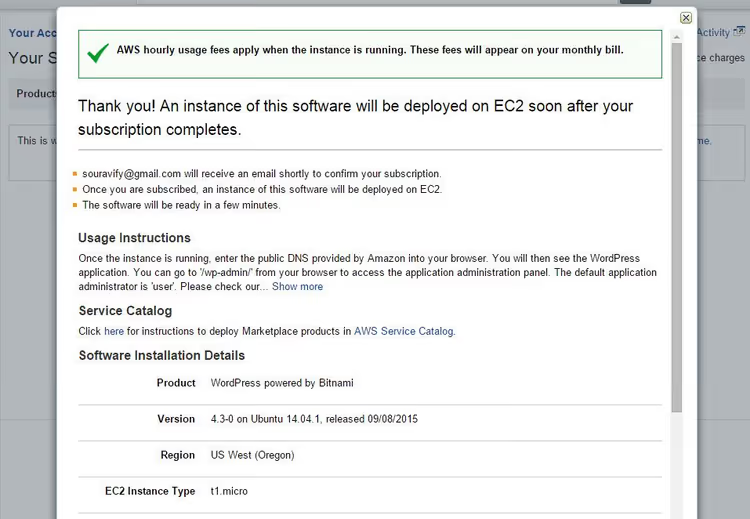
Within 20-30 seconds, the instance will transition to Running status. WordPress is deployed. Now you just need to "see" it.
Step 2. First login and retrieving the administrator password
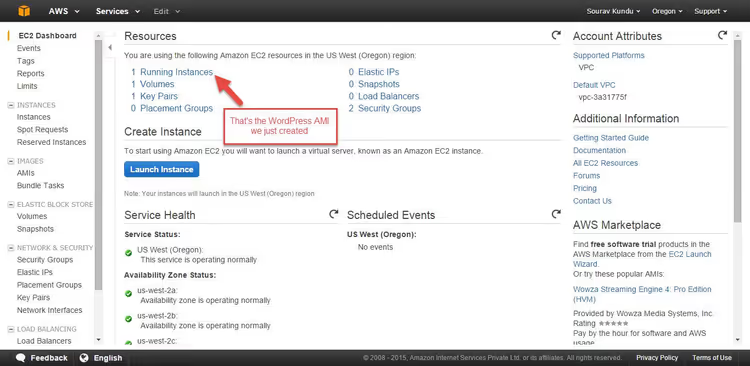
Open the AWS console and go to the EC2 section. At the top of the dashboard you'll see Instances (1 running); click on it.
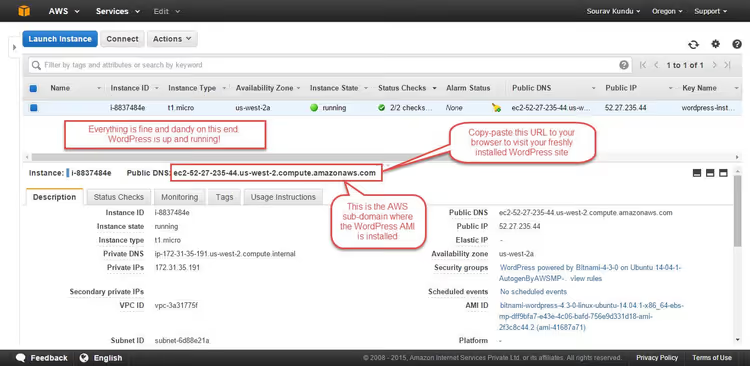
In the table that opens, there will be exactly one instance. Copy the value from the Public IPv4 DNS column; this is your server's public address. Paste it into your browser's address bar, and you'll see the WordPress start page.
2.1. Where to find the password
Bitnami fully automates the WordPress installation, including admin account creation. The default username is user. The password is randomly generated on the first AMI launch and written to the system log.
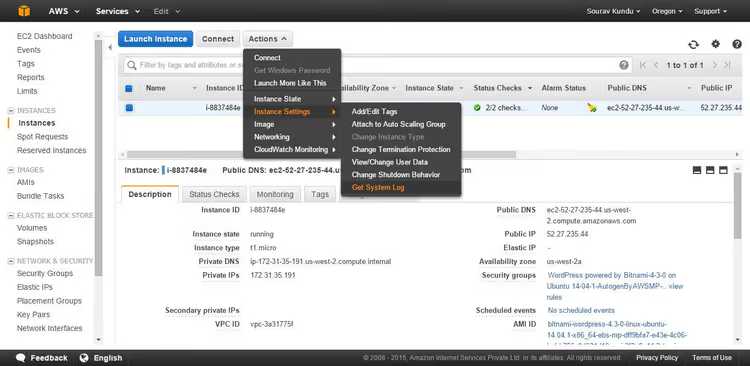
On the instance page, click Actions → Monitor and troubleshoot → Get system log.
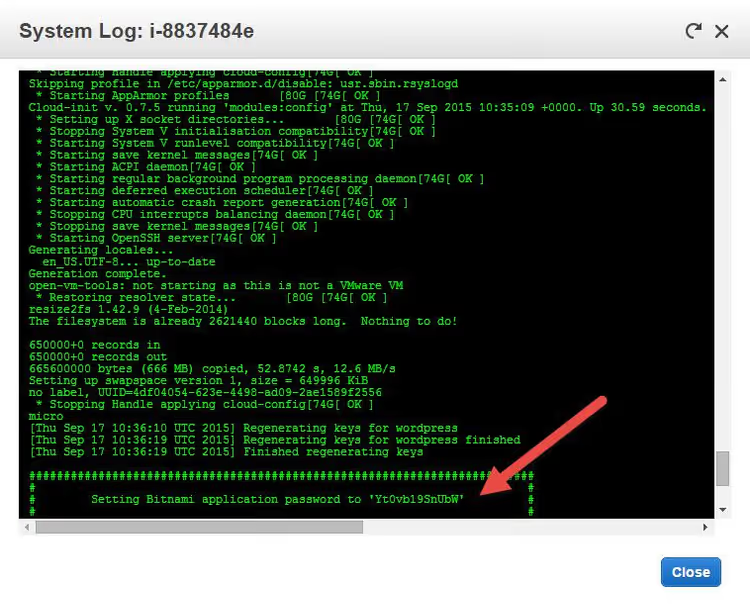
A text log of the system boot will open. Scroll down about halfway and find the block starting with Setting Bitnami application credentials. Right below it is the line with the password. Copy it and use it to log in at /wp-admin.
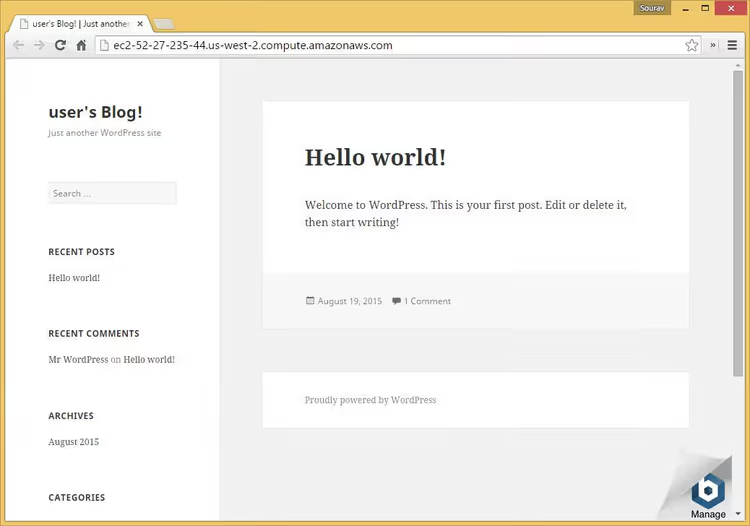
Done; you're now in the WordPress admin panel on your own cloud server.
Step 3. Domain binding and HTTPS
When your site runs on a public DNS like ec2-xx-xx-xx-xx.compute.amazonaws.com, it's already usable. But for a real project you need your own domain.
Go to your domain registrar's control panel and create an A record pointing to the Public IPv4 address of your EC2 instance (not the DNS name, the IP address specifically). DNS propagation takes anywhere from a few minutes to 48 hours; usually an hour is enough.
After binding the domain, install a free SSL certificate. The Bitnami image includes lego, a Let's Encrypt CLI client. Connect via SSH and run:
1 sudo /opt/bitnami/letsencrypt/scripts/generate-certificate.sh -m your@email.com -d yourdomain.com -d www.yourdomain.com
The certificate will be issued and added to the web server configuration in a single command.
⁉️🤔 Frequently asked questions
How much does WordPress on AWS cost after the free year ends?
After 12 months of free usage, an EC2
t3.microinstance costs approximately $7.59/month (June 2026 data). Add to that charges for traffic, snapshots, and additional services if you've enabled them. The total for a small site rarely exceeds $12-15 per month. For comparison: shared hosting with comparable specs costs several times less but doesn't give you control over the server and doesn't scale.
What's better: Bitnami AMI or manual LAMP stack installation?
Bitnami AMI is the choice for those who want results, not process. The image is already tested, optimized, and updated. Manual LAMP installation gives you full control over versions and configuration but requires Linux administration knowledge and takes 40-60 minutes even for an experienced user. In the vast majority of cases, Bitnami fully meets WordPress site needs. Manual setup is only justified if you need specific PHP/MySQL versions or a non-standard file structure.
AWS, Google Cloud, or Azure: which is cheaper for WordPress?
At the free tier level, AWS wins: 12 months versus 90 days for Google Cloud and 30 days for Azure. At the paid level, prices are comparable: a minimum WordPress instance costs $5-8/month across all three providers. The difference is in the ecosystem: AWS has the largest selection of additional services, Google Cloud has better Kubernetes integration, and Azure is more convenient for companies on the Microsoft stack.
Can I migrate an existing WordPress site to AWS?
Yes. Install the All-in-One WP Migration or Duplicator plugin, create a backup of your current site (files + database), deploy the Bitnami WordPress AMI, connect via SSH, and import the archive through the migration plugin. Don't forget to update the site URL in the database after migration.
Do I need to clear the password from the system log?
No. The EC2 system log is an internal boot journal that's not accessible from outside. The password is only displayed to you in the AWS console. Nevertheless, after logging into the admin panel, change the generated password to your own through the user profile in
/wp-admin.
WordPress on AWS in 15 minutes: what's next?
The combination of AWS + Bitnami WordPress AMI is the fastest way to get cloud hosting without server hassle. In 15 minutes you go from an empty account to a working site with your own domain and SSL. And it's all free for a year.
After launch, you should immediately take care of three things: set up automatic backups (at least through AWS Backup for the EBS volume), connect monitoring via CloudWatch, and install a caching plugin (the free t3.micro instance is responsive but not unlimited).
If you want to go further, try AWS Lightsail. This is a managed service from Amazon that offers pre-configured WordPress servers for a fixed fee (starting at $3.50/month on the starter plan) without needing to deal with EC2, AMI, and security groups. Perfect for those who value results over process.

A professional team of writers and editors specializing in creating quality content.