














🧭 Complete guide to DNS in WordPress
DNS scares beginners. Numbers, names, abbreviations like A, MX, CNAME make it seem impossible to figure out without a sysadmin degree. But the truth is that DNS for WordPress comes down to about ten operations you can master in half an hour.
Misconfigured DNS breaks websites and kills email faster than any virus. But properly configured DNS works for years without any intervention. Below we break down DNS from the phone book analogy to the hosts file: no fluff, with real-world examples and screenshots of every step.
💡 Quick overview:
- Understand A records, nameservers, and how DNS works
- Learn to point domains to hosting and set up redirects
- Master changing nameservers without losing email
- Preview changes through SkipDNS before applying them
What is DNS: the phone book of the internet
Imagine a phone book. You look up someone's name and get their number. DNS does the same thing: you enter the domain your-site.com, the domain name system converts it to the IP address of the server where the site lives. The browser goes to that address and displays the page.
In the context of WordPress, DNS handles three main tasks. The A record determines which server physically hosts the site. MX records manage the domain's email. Nameservers (NS) specify who is responsible for DNS in the first place: the registrar, hosting provider, or a CDN like Cloudflare.
Technically the setup is simple. You bought a domain from Namecheap and hosting from a provider. You create an A record with the server's IP. Nameservers can point to the registrar (DNS managed there), to the hosting (via cPanel), or to Cloudflare (via their dashboard). All three approaches work. The difference is in convenience and extra features: CDN, DDoS protection.
Domain registration: the foundation for DNS
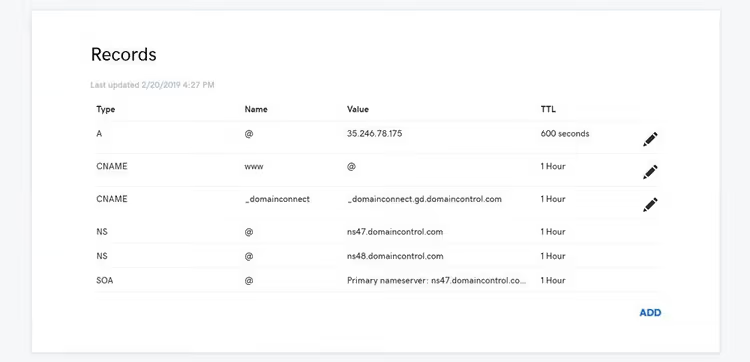
Without a domain there is no DNS, so we start with the purchase. Registration takes five minutes: choose a name, pay, confirm your email. The domain is yours for a year or longer depending on the term you paid for.
The main strategic question: where to keep the domain. There are two approaches.
First: domain at the registrar (Namecheap, GoDaddy, Google Domains), hosting separately. The advantage is security: it is harder for an attacker to gain simultaneous control over the domain and server. Second: domain and hosting in one place. More convenient: one dashboard, one support team. What to choose depends on how many people have access to the accounts and how critical the site is to you.
Make sure the registrar gives you full access to DNS management. Budget providers sometimes limit functionality: they do not let you change individual records, they do not allow switching nameservers. Clarify this before paying if the website lacks clear information.
How to point a domain to hosting
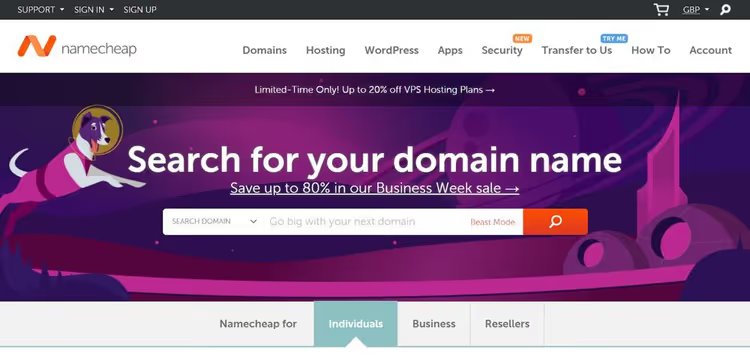
Pointing a domain is the most common DNS operation. You change the A record to the IP of the desired server, and the site loads from there.
Typical scenarios:
- Domain purchased at a registrar, hosting at another provider
- Moving a site to a new server
- Multiple domains need to display the same site
Step-by-step instructions
Before you begin it is important to understand: after changing the A record the old site will stop displaying. When propagation (DNS update) completes, visitors will see the site from the new IP. There is no going back, so prepare the new server in advance.
- Get the new hosting IP address. Log into cPanel of the target account and find the Shared IP Address. Usually it is in the left column of the statistics section.
- Set up WordPress on the new server. Site files should be in
public_html(if the domain is the only one) or in a subfolder named after the domain. The database should be imported andwp-config.phpconfigured. - Access the domain's DNS. Where exactly depends on where the nameservers are located. If you have not changed them, at the domain registrar.
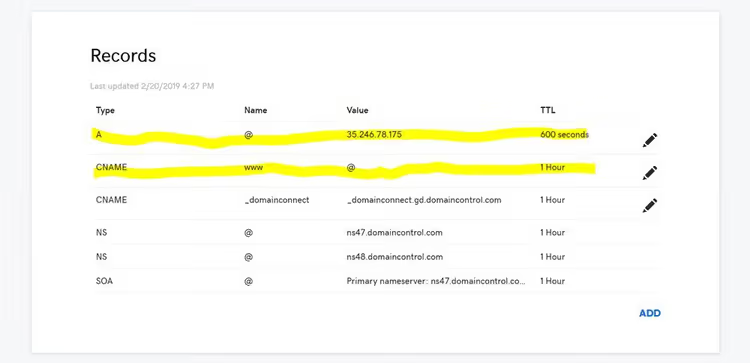
- Change the A record for
@andwww. Set the value to the Shared IP from step 1. If a CNAME alias with the value@exists forwww, changing only the@record is sufficient:wwwwill follow automatically. - Wait for propagation. Usually takes from a few minutes to an hour. You can check the status via What's My DNS service: enter the domain, select A record type and click Search.
Domain redirect
Redirect does not equal pointing. With pointing you change the IP where the domain looks. With a redirect the domain stays in the old place, but the server returns an HTTP 301 status and sends the visitor to a new address.
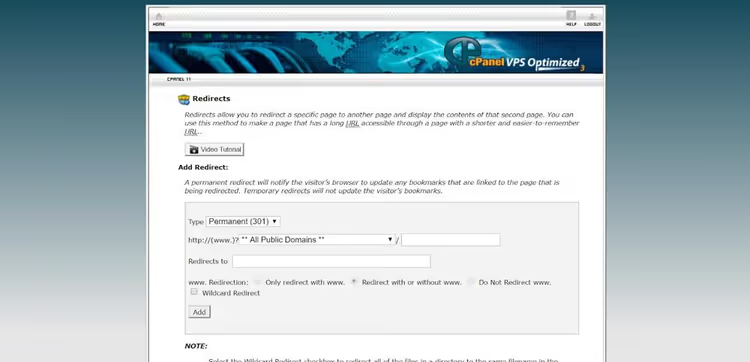
In practice, redirects are configured through cPanel in the Redirects section. You select the domain, specify the target URL, check "301 Permanent". Result: a visitor to old-domain.com ends up at new-domain.com. Different mechanism, similar outcome.
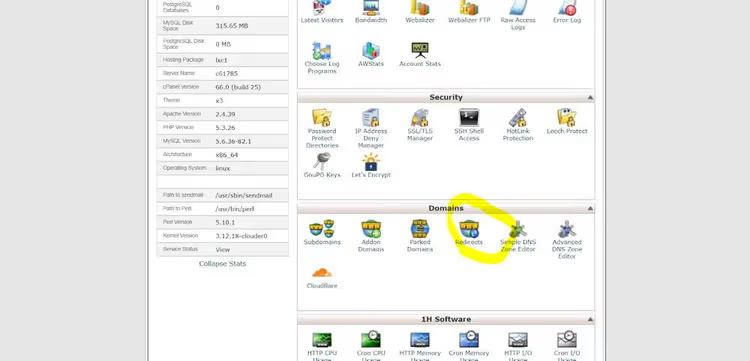
For SEO it is critical to use a 301 (permanent) redirect, not 302 (temporary). Google only passes link equity with 301. If search rankings matter to you, discuss redirect strategy with an SEO specialist.
Addon domains
One hosting plan can serve multiple independent sites. Technically this works through addon domains.
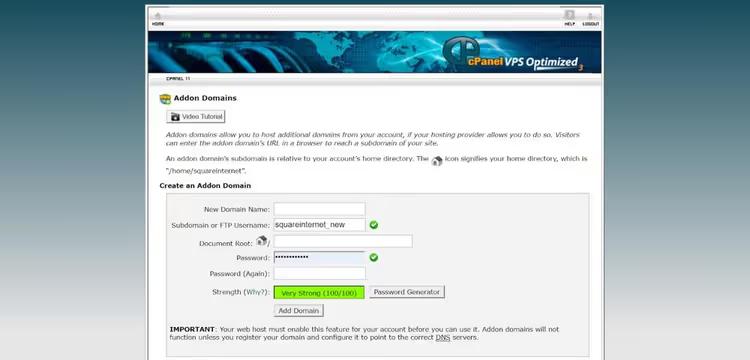
An addon domain is any domain added to a hosting account besides the primary one. Each gets its own subfolder within the account and exists independently: its own WordPress, its own database, its own files.
How to add an addon domain:
- In cPanel open the Addon Domains section.
- Enter the domain name. For the subdomain (technically required) specify something neutral like
testif you do not plan to use it. - Create an A record for the addon domain pointing to your plan's Shared IP. For
wwwcreate a CNAME record or a separate A record with the same IP.
Now two independent sites with separate DNS management run on one hosting account.
Changing nameservers: transferring DNS control
Nameservers determine who manages the domain's DNS. Changing nameservers transfers control from one provider to another. Unlike changing an A record (one parameter changes), changing NS affects all records at once.
When to change NS
- Switching to DNS management through the hosting provider
- Connecting Cloudflare (it needs NS control)
- Transferring the domain to another registrar and wanting centralized management
Step-by-step instructions
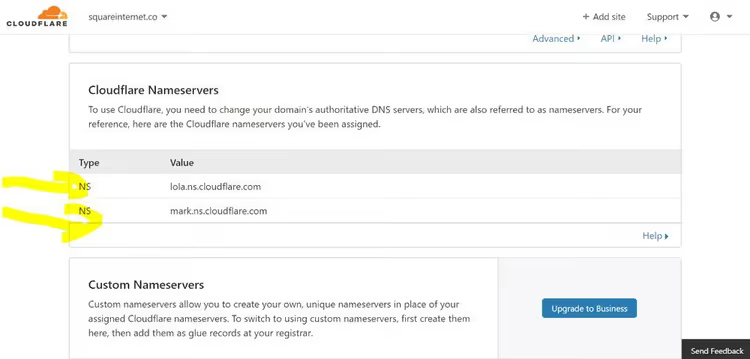
- Log into the domain control panel (where it is registered). Open the DNS or Nameservers section.
- Replace the current nameservers with the target ones (provided by the new provider). Usually these are 2-4 addresses like
ns1.newhost.comandns2.newhost.com. - Click Update. The change may take up to 24 hours, rarely 48. In practice it usually happens within an hour.
Critically important: when changing NS, DNS may reset to default values. The A record goes to parking, MX goes to a local mail server instead of G Suite. How to avoid this: take a screenshot of all DNS records in advance. If the provider allows, select "keep current DNS records". After switching, compare and restore anything lost.
DNS propagation: how long to actually wait
Propagation is the technical term for "updating". When you change DNS, the change must reach internet providers worldwide. They cache the old version, and time is needed for the cache to update.
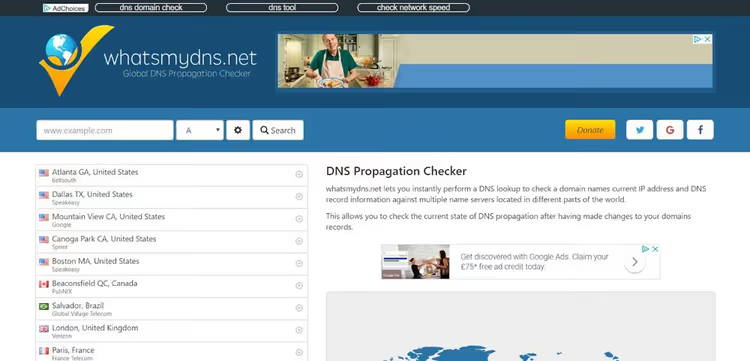
Hosts warn: "propagation up to 48 hours". In practice, in 2026 this almost never takes more than an hour. If nothing has changed after an hour, double-check your settings and contact the provider. For monitoring use WhatsMyDNS tool: select the record type (A, MX, NS) and watch status across different countries in real time.
How to avoid losing email when changing NS
MX records determine where the domain's email goes. When changing nameservers or transferring a domain, they often get overwritten. Emails stop arriving, senders receive bounce notifications.
Example from practice: domain registered at GoDaddy, nameservers managed through hosting. We needed to switch NS back to GoDaddy. We knew DNS would reset to GoDaddy defaults: the A record would go to parking, MX would go to a local mail server instead of G Suite. So we copied the A and MX records in advance and restored them manually right after switching. Three minutes, and email was not interrupted for a second.
The rule: always take a screenshot of DNS before changing nameservers or transferring a domain. Restoring from a screenshot takes minutes. Searching blindly takes hours.
Caching: why DNS changes are not visible immediately
Cache speeds up site loading but prevents seeing the fresh version after DNS changes. Typical situation: you changed the A record, open the site, it looks the same as before. You think nothing worked. But actually you are looking at a cached copy. A new visitor already sees the site from a different server or an error.
In a WordPress environment there are three levels of cache:
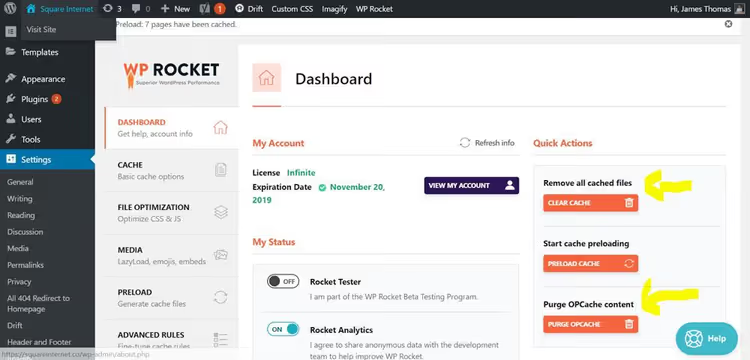
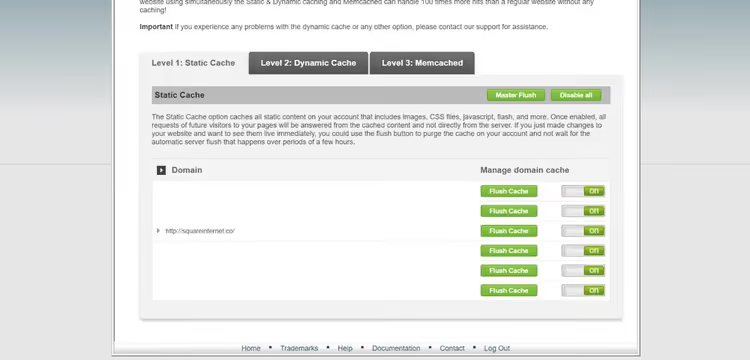
First level: a caching plugin right in the WordPress admin. Second: server-level cache at the hosting, cleared through cPanel.
- Caching plugin (WP Rocket, W3 Total Cache, LiteSpeed Cache). Cleared in WordPress admin: plugin settings tab or the top admin bar.
- Server cache (hosting level, often Varnish or LiteSpeed based). Cleared through cPanel in the Cache Manager section.
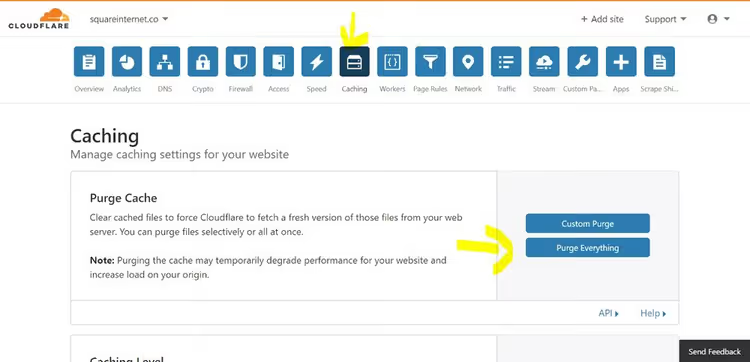
- CDN cache (Cloudflare, BunnyCDN). Cleared in the CDN provider's dashboard, usually under Caching → Purge Cache.
After clearing all three levels, do a hard refresh in the browser: in Chrome this is Ctrl + click on the refresh button or Ctrl+F5. The browser will load the site without using its cache. For especially important changes, additionally open the site in incognito mode or on a device where it was never opened.
The topic is covered in more detail in our guide on clearing WordPress cache.
Cloudflare and DNS: what changes
A CDN distributes copies of the site across servers in different parts of the world. A visitor from the US receives data from a data center in the US, not from London where the server is physically located. Cloudflare is the most popular CDN with a free tier.
How Cloudflare changes the rules
For Cloudflare to work, you must transfer nameserver control to it. The key point: after switching NS to Cloudflare, all DNS changes are made only through its dashboard. Whatever you change in the registrar or hosting panel will have no effect as long as NS points to Cloudflare.
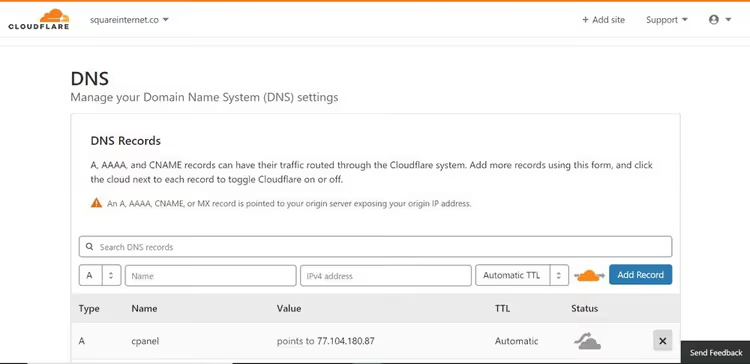
This is the cause of a good half of "mysterious" DNS problems: the site owner changes a record at the registrar, refreshes, waits, and nothing happens. Because the nameservers have been pointing to Cloudflare for a month already, and it knows nothing about the changes.
If you are not sure where the nameservers currently point, open online NS check, select NS record type and enter the domain. The tool will show which nameservers are visible from different parts of the world.
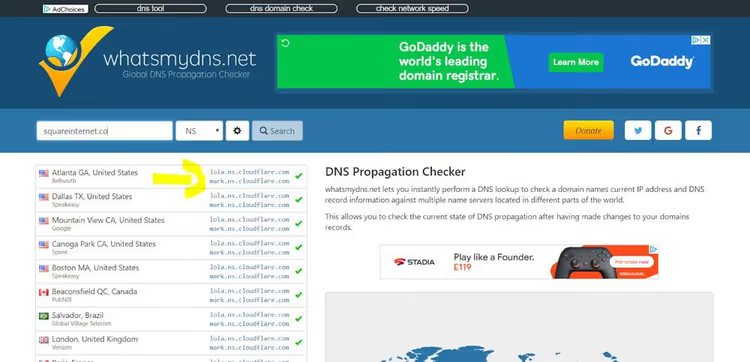
To stop using Cloudflare, simply switch nameservers back to the registrar or hosting. Cloudflare will stop working, and DNS control will return to the previous provider.
Previewing DNS changes before applying them
You are moving a site to new hosting and want to verify everything works before changing the A record and risking the live site. Developers and sysadmins solve this through the hosts file. There is an easier tool.
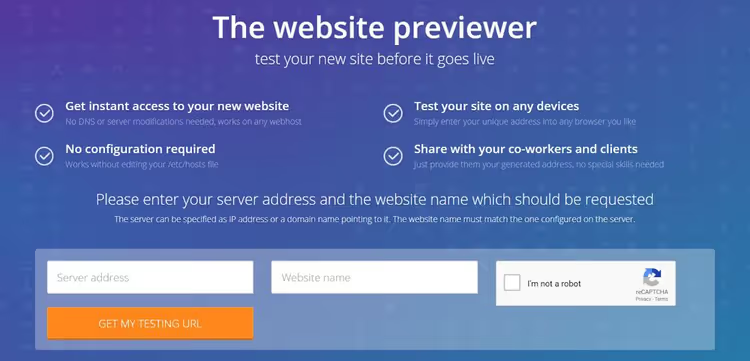
SkipDNS is an online tool that solves the same problem as the previously popular hosts.cx (now unavailable). It emulates an A record change without actually editing DNS. You tell it: "show domain X as if its A record points to IP Y", and you get a temporary URL for preview.
How to use SkipDNS for WordPress migration:
- Prepare a copy of the site on the new hosting. Export files and database, configure
wp-config.php, verify the site opens via the host's temporary URL. - Copy the Shared IP of the new server from cPanel.
- Open SkipDNS, paste the IP in the "Server address" field, enter the domain in the "Website name" field.
- Click "Get my test URL". You will get a temporary link where the site displays exactly as it will after the real A record change.
Then you can log into the WordPress admin through this temporary URL, edit content, test plugin functionality. All changes are saved directly to the new server's database. When you finish debugging, change the A record and disable SkipDNS.
For complex migrations this is an indispensable tool. We use it regularly.
Related video
A short and clear video on setting up DNS for WordPress. In English, and the visuals speak for themselves:
⁉️🤔 Frequently asked questions
DNS has not updated for 12 hours. What should I do?
Do not wait 48 hours. With 99% probability the problem is not propagation but cache. Clear the plugin cache, server cache (through cPanel), and CDN cache if connected. Then open the site in incognito mode or check via this service. If different countries see different IPs, propagation is indeed ongoing. If everywhere shows the old IP, you are changing the record in the wrong place (check where the nameservers point).
I changed the A record but the site does not open. What is wrong?
Three likely causes. First: the site is not set up on the new hosting, WordPress is not installed, the database is not imported. Second: you are viewing a cached version. Clear cache and open in incognito. Third: nameservers point somewhere other than you think, and changing the A record in the current panel has no effect. Check NS via What's My DNS.
What is the difference between an A record and CNAME?
An A record links a domain to an IP address (a number). CNAME links a domain to another domain (an alias). For example, you create a CNAME for
wwwpointing to@(the main domain), and thenwwwautomatically goes wherever the main A record points. CNAME cannot be used for the root domain (@), only for subdomains.
Can I change hosting without losing email?
Yes. Before switching, take a screenshot of all DNS records, especially MX. On the new hosting, first restore the MX records exactly as they were on the old one. If you use G Suite or Microsoft 365, check their documentation: it lists current MX record values. Email will continue without interruption.
What happens if I switch nameservers from Cloudflare back to hosting?
Cloudflare will stop working: CDN, DDoS protection, and proxying will be disabled. DNS will again be managed where you took it from earlier (registrar or hosting). The site itself will stay on the same server, the A record will not change. But make sure all needed records exist in the hosting DNS before switching NS.
DNS for WordPress: do's and don'ts
The most important things to remember after reading:
- The A record specifies where the site lives. You change it, you change the server. This is the most common operation.
- Nameservers determine where you edit DNS. If you change the record in the wrong place, nothing will happen.
- Before any NS change, take a screenshot of all records. Three minutes on a screenshot saves hours of recovery.
- After DNS changes, clear cache at three levels: plugin, server, CDN. And check in incognito mode.
- Before migration, preview the site through SkipDNS. Free and eliminates the risk of bringing down a live site.
DNS seems complicated only until you perform these operations yourself. After the first time, everything falls into place. If you have questions or your own story of a battle migration, write in the comments and we will work through it.

A professional team of writers and editors specializing in creating quality content.