














How to configure WordPress caching with W3 Total Cache
A WordPress site that takes four seconds to load (or longer) loses visitors who leave before the page appears. Google pushes it down in search results, and every lost percentage point of conversion hits the budget. The cause is almost always the same: caching is not configured.
W3 Total Cache solves this problem completely. The plugin has a million active installations, was built by Mashable's CTO, and is used by Smashing Magazine, Yoast, and hundreds of thousands of other high-traffic sites. Following this guide, you can set it up in 20 minutes and get a 1.5 to 2x speed improvement without editing code or paying for new hosting.
💡 Quick overview:
- Install W3 Total Cache from the WordPress repository and deactivate other caching plugins
- Enable five key modules: Page Cache, Minify, Database Cache, Object Cache, and Browser Cache
- Choose a caching method for your hosting: Disk Enhanced for shared, OpCache/APC for VPS
- Set up cache preloading with a safe interval of 3600 seconds
- Verify the plugin works by checking the page source and running a GTmetrix benchmark before and after
Installing W3 Total Cache
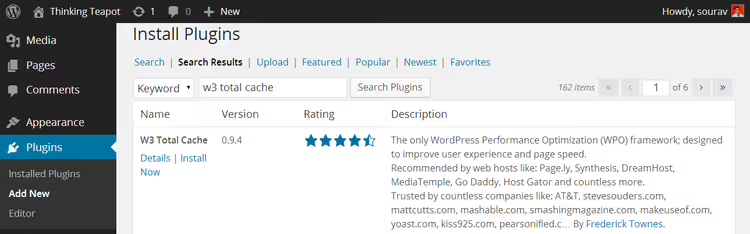
W3 Total Cache is available for free in the official WordPress repository. Installation is standard: go to "Plugins → Add New," type w3 total cache in the search box, and click "Install" on the first result.
If another caching plugin is already active on your site (for example, WP Super Cache), you must deactivate it before activating W3TC. Two caching plugins running simultaneously create conflicts: pages load with errors, and load times increase rather than decrease. This rule applies to all caching plugins: only one should ever be active on a site.
After activation, a new menu item called "Performance" appears in the dashboard sidebar. All further settings are located there.
W3 Total Cache general settings
The "Performance → General Settings" section is the plugin's command center. Each feature is packaged into a separate module with an enable checkbox. The interface is dense with dozens of options, but five modules are enough to get started.
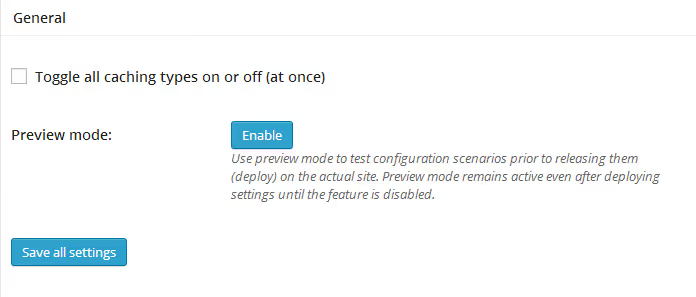
Do not enable everything at once using the master toggle at the very top. Some options may not be supported by your hosting, and instead of speeding things up, you will get the opposite effect. Enable modules one by one, following the instructions below.
Page caching module
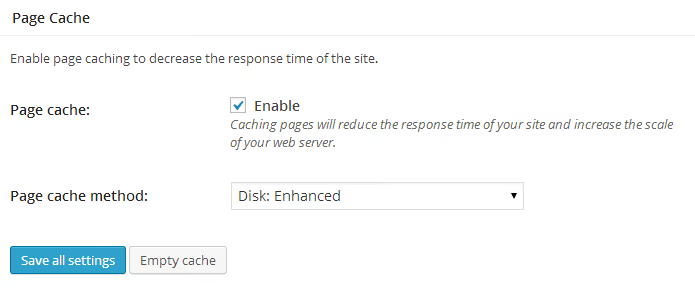
Page Cache is the heart of the plugin. It saves ready-made HTML copies of pages and serves them to visitors, bypassing the full WordPress generation cycle (database queries, theme assembly, PHP execution). The caching method is chosen based on your hosting type:
- Shared hosting:
Disk: Enhanced. The fastest disk-based method that requires no server modules. - VPS or dedicated server with OpCache:
OpCacheorAPC. The cache lives in RAM, minimizing response time. - Nginx server:
Disk: Enhancedalso works, but if FastCGI Cache is configured at the server level, you may not need to enable this module.
The free version of W3 Total Cache covers the needs of 90% of sites. A Pro license at $99 per year adds fragment caching, Google PageSpeed integration, and priority support, but for a typical site the difference is negligible.
Minify module
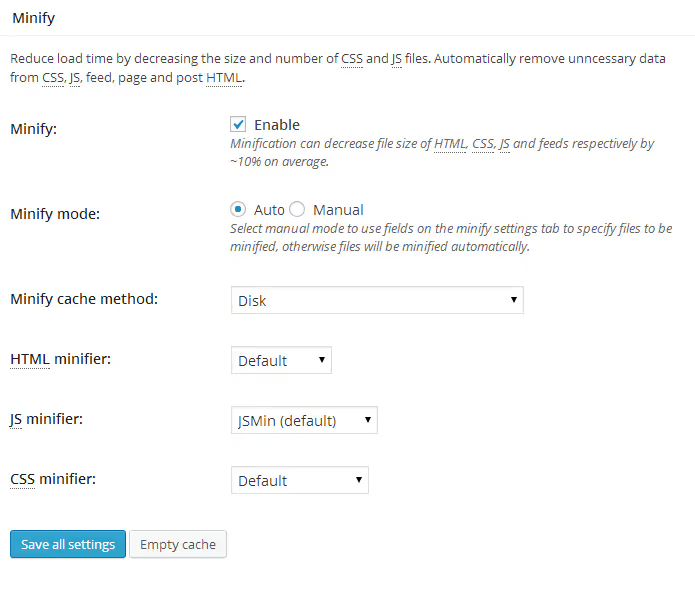
Minify compresses CSS and JavaScript by removing comments, spaces, and line breaks. File sizes shrink, and the number of HTTP requests decreases because multiple files are combined into one. Use the same caching method you chose for Page Cache.
On shared hosting, choose Disk. On a VPS with available RAM, choose OpCache. Manual mode (Manual) lets you specify particular files for compression, while automatic mode (Auto) works with minimal intervention. Start with Auto.
Database and object cache
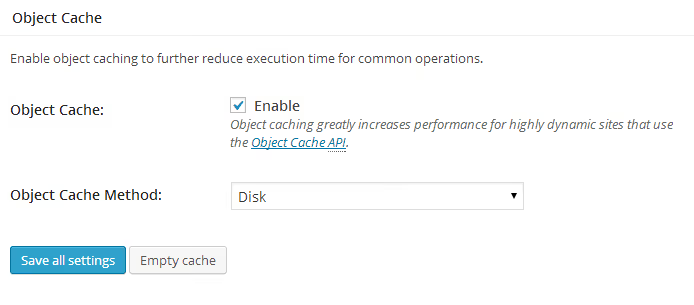
Database Cache stores the results of frequent database queries (for example, lists of posts or categories). Object Cache caches intermediate WordPress objects (site options, plugin settings). Enable both, using the same method as the previous modules.
On weak shared hosting, Database Cache can sometimes have the opposite effect: writing the cache to disk puts more load on the processor than a direct database query. If speed drops after enabling it, disable this module and keep only Page Cache.
Browser cache
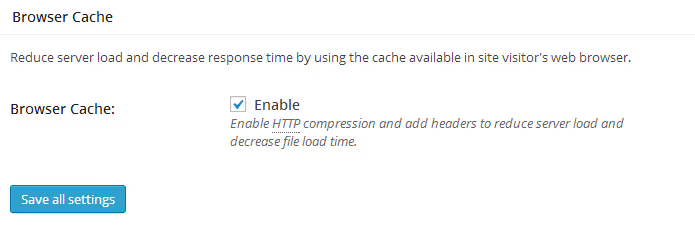
Browser Cache tells the visitor's browser to save static files (CSS, JS, images, fonts) locally. On a return visit, the page loads almost instantly because the browser does not download what it has already saved. The storage duration is configurable; typical values are 30 days for images and 7 days for CSS/JS.
Enable the module and click "Save all settings." The basic configuration is now complete. Let's dive deeper into the two most important modules: Page Cache and Browser Cache.
Page cache settings
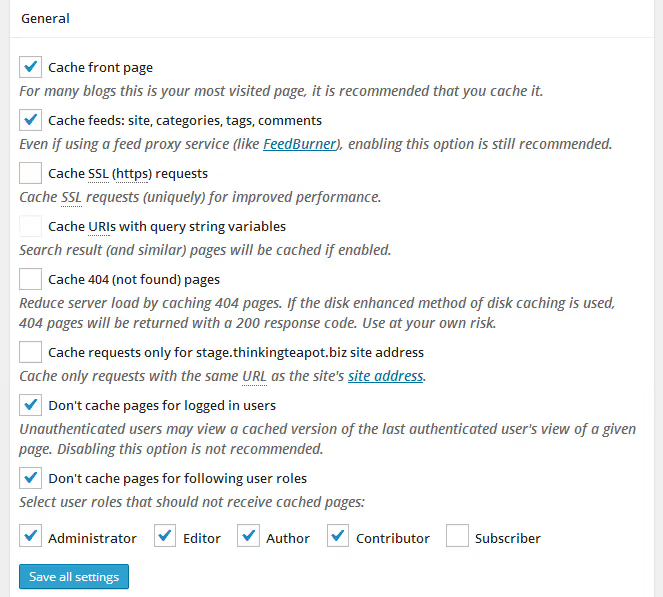
Go to "Performance → Page Cache." There are three key options:
"Don't cache pages for the following user roles": check Administrator and Editor. When an author edits a post, they need to see the fresh version, not a cached copy. Without this setting, the editing process becomes guesswork.
"Cache pages for requests with query string variables": leave this disabled. Query strings (?utm_source=..., ?fbclid=...) generate an endless number of URL variations. Caching them fills disk space with duplicates.
Cache lifetime: 3600 seconds (one hour) works for most sites. Blogs with infrequent updates can set 86400 (one day). Stores with changing prices should use 1800 (30 minutes).
Cache preloading

By default, W3TC caches a page only when someone requests it. The first visitor gets a slow load because the plugin is creating the cache at that moment. Preload solves this problem: the plugin crawls the site using the sitemap and generates the cache in advance. Every visitor, even the first one, gets a fast page.
Three parameters to configure:
- Update interval: directly affects server load. The smaller the interval (more frequent updates), the more resources are consumed. On shared hosting, the safe minimum is 3600 seconds. Set 7200 and monitor the load.
- Sitemap** URL:** the plugin uses an XML Sitemap for crawling. If you do not have a sitemap yet, install Google XML Sitemaps; it generates the map automatically and serves it at
/sitemap.xml. - "Trigger preload on publish": enable this. When you publish a new post, the cache for it is generated immediately.
Browser cache settings
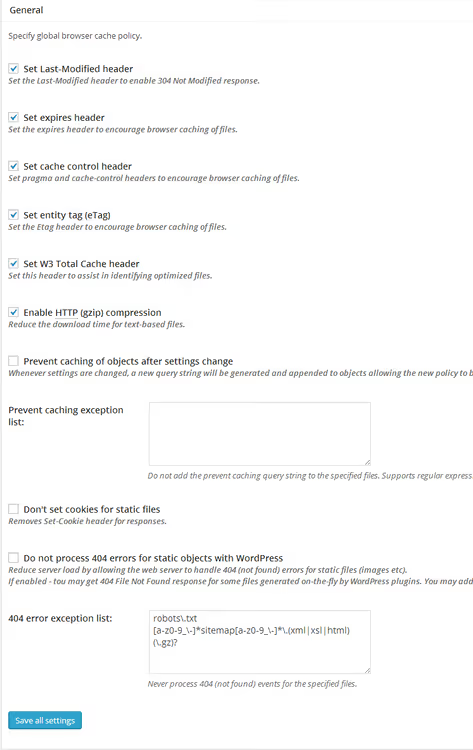
The "Performance → Browser Cache" section manages the Expires and Cache-Control headers that the server sends to the browser. The default settings work well, but two are worth adjusting:
- Lifetime for CSS and JS: set to 7 days (604800 seconds). If you update the design more often, reduce to 1 day.
- Lifetime for images and media: 30 days (2592000 seconds). Images change rarely, so a long cache is safe here.
- "Set cache control header": enable this. The browser will know exactly when to request a fresh file and when to use the local copy.
Bandwidth savings from these settings are substantial on repeat visits. The server handles fewer requests, and the user sees the page almost instantly.
How to verify the plugin is working
You have enabled and configured everything. Now make sure W3TC is actually caching. There are two ways.
Method one. Open any page on the site, press Ctrl+U (view source), and look for a W3 Total Cache comment:

A line like <!-- Performance optimized by W3 Total Cache. ... --> means the plugin is active and caching. If there is no such line, go back to the general settings and verify that all five modules are enabled.
Method two, for those who want to see the effect visually. Here is a video covering the complete W3 Total Cache setup process from installation to result verification:
Performance test: before and after

Numbers speak louder than words. Let's run the site through GTmetrix, a free tool that measures load speed and assigns a grade from A to F.
Results without a caching plugin:

The same site one hour after configuring W3 Total Cache:

The difference: a few percentage points improvement in both PageSpeed and YSlow scores. Modest? Only at first glance. On a site with a thousand visitors per day, each percentage point saves dozens of hours of server processing time per month. More importantly, pages start loading faster on every device, and users notice the difference.
One important note: do not test speed immediately after enabling the plugin. During the first few minutes, the plugin is generating the cache, which puts load on the server. Wait an hour before running GTmetrix.
Troubleshooting
Sometimes after installing W3 Total Cache, speed drops instead of improving. Here are three typical causes and how to fix them.
Testing during preload. Cache generation is a resource-intensive operation. If you run GTmetrix at the same time as preloading, results will be worse than without the plugin. Solution: wait an hour, let the cache generate, and run the test again.
Incorrect caching method. APC and OpCache on shared hosting perform worse than Disk: Enhanced because process memory is limited by the hosting provider. Switch back to the disk method and compare the numbers. On shared hosting, disk almost always wins.
Conflict with another optimization plugin. Plugins like Autoptimize, WP Rocket, or LiteSpeed Cache do the same thing as the W3TC Minify module. Double-compressing JS and CSS breaks the layout. Keep one or the other: either W3TC with its built-in Minify, or a separate optimization plugin.
.htaccess access error
When saving settings, W3TC may display a warning that the .htaccess file is not writable. The plugin wants to add browser caching rules there but lacks permissions.
Two solutions, from safe to simple:
- Manual rule addition. W3TC displays the text that needs to be inserted into
.htaccess. Copy it, open the file via FTP or your hosting file manager, and paste it at the end. This method is safer because you control the changes. - Change file permissions. Set
.htaccesspermissions to775via FTP or cPanel. After saving the W3TC settings, **be sure to change them back to **644. An.htaccessfile with write permissions is a security hole.
⁉️🤔 Frequently asked questions
W3 Total Cache or WP Super Cache: which should I choose?
W3 Total Cache offers finer control: five separate modules, cache preloading, CSS/JS compression, CDN integration. WP Super Cache is simpler: one checkbox to enable and minimal settings. For shared hosting without the desire to dig in, go with WP Super Cache. For VPS and sites with traffic of 10,000 visitors per month or more, W3 Total Cache with manual configuration will yield better results.
Do I need to enable all five modules?
Page Cache and Browser Cache are mandatory. Minify is recommended, but skip it if you already have Autoptimize installed. Database Cache and Object Cache are optional: on weak shared hosting they sometimes slow the site down instead of speeding it up. Enable them, measure speed after an hour, compare, and decide whether to keep or disable them.
What cache lifetime should I set?
For blogs, 3600 seconds (one hour). For news sites, 1800 (30 minutes). For corporate sites with rare updates, 86400 (one day). A shorter interval means more frequent cache updates and higher server load. Find the balance that fits your publishing schedule.
W3 Total Cache conflicts with other plugins: what should I do?
Disable ALL caching and optimization plugins, leaving only W3TC. Re-enable them one by one, checking the site in GTmetrix after each. The plugin that causes metrics to drop is the conflicting one; leave it disabled.
Can I use W3 Total Cache with a CDN?
Yes, the plugin integrates with dozens of CDNs: Cloudflare, StackPath, KeyCDN, BunnyCDN, and others. Configuration is in the "Performance → CDN" section. If you have reached the CDN setup stage, check out our roundup of free CDN services for WordPress.
What to install on your hosting: the bottom line
On shared hosting with a minimal budget, WP Super Cache is the answer: one checkbox and you get immediate results. On a VPS or cloud server with plenty of memory, W3 Total Cache with manual setup is the way to go: Page Cache via OpCache, Minify in automatic mode, cache preloading with a 3600-second interval. This approach has been tested on hundreds of sites and requires not a single line of code. Set it up today, and GTmetrix will show the difference in an hour.

A professional team of writers and editors specializing in creating quality content.