














⚡ How to install and configure WP Super Cache for WordPress
A WordPress site takes 4 seconds to open while competitors load in one and a half. Google lowers rankings, visitors leave without waiting for the page to load. A familiar picture for anyone running a site on shared hosting.
Caching is the most direct way to speed up WordPress without changing hosting or rewriting code. The plugin generates static HTML copies of pages, and the server delivers them directly, bypassing the heavy PHP handler. The speed difference ranges from two to five times on typical shared hosting.
WP Super Cache is a free plugin from Automattic that does exactly this. It has been around for over 15 years, is installed on a million sites, and version 2.0 with a redesigned interface was released in 2025. This guide provides step-by-step configuration from installation to verifying the result. No three pages of theory: only what you need to click and where to go.
💡 Quick overview:
- Install WP Super Cache through the WordPress admin panel (Plugins → Add New)
- Enable caching on the Advanced tab and add rules to.htaccess
- Configure cache preloading to match your publishing schedule
- Verify cache operation using the plugin's built-in test
Step 1: Installing WP Super Cache
You can install the plugin in two ways. The slow way is to download the ZIP from WordPress.org, extract it, and upload via an FTP client like FileZilla. In practice, this method is only needed if the admin panel won't load.
The usual way is installation directly from the WordPress panel. It takes a couple of minutes.
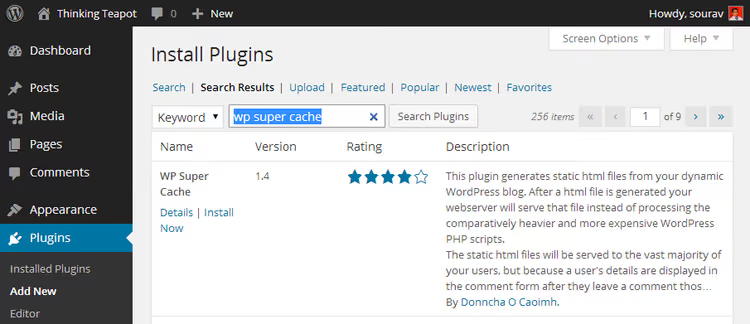
Open Plugins → Add New, type "wp super cache" in the search box, click Install Now, then Activate. Done, the plugin is active.
Step 2: Initial setup, enabling caching
Immediately after activation, WP Super Cache displays a yellow notification:

Click the link in the notification, it leads to the plugin settings page (Settings → WP Super Cache). If the plugin asks you to change the permalink structure, go to Settings → Permalinks and select any option except the first one ("Plain"). For most sites, "Post name" works well.

The plugin warns that standard links like ?p=123 are incompatible with caching. Here are the available options:

Now open Settings → WP Super Cache. The first thing you notice is the yellow block:

This is normal. The plugin is reporting that mod_rewrite rules need to be updated in .htaccess, we'll do this in the next step. For now, caching is disabled:
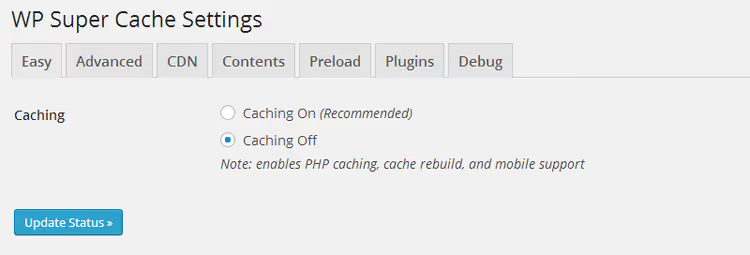
Step 3: Advanced tab, main configuration
Go to the Advanced tab. Here you'll find three groups of settings: Caching, Miscellaneous, and Advanced. The screenshots below show optimal values for a typical shared hosting, VPS, or dedicated server.
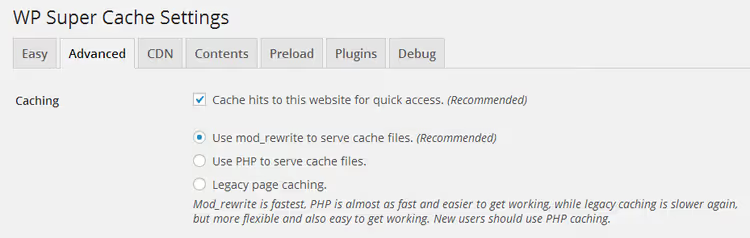
The Caching group is where you enable the main mechanism and cache delivery method:
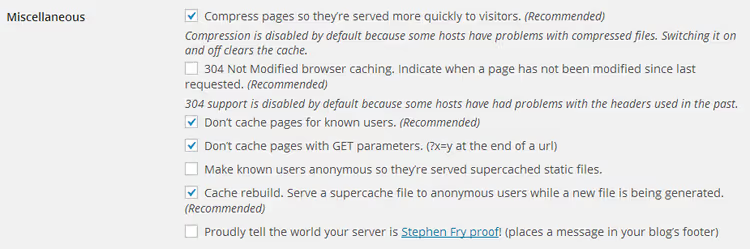
The Miscellaneous section contains additional options like compression and mobile version:
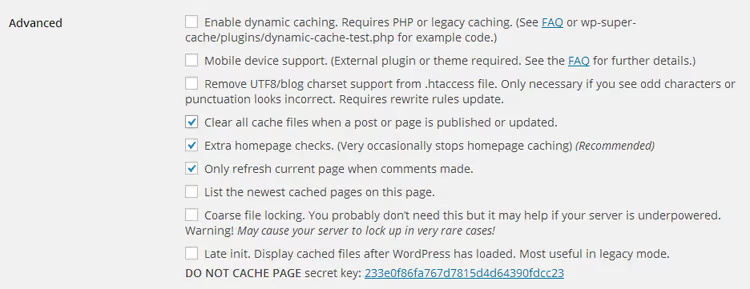
Brief breakdown of key options:
- Cache hits to this website for quick access: main caching, always enabled
- Use mod_rewrite to serve cache files: the fastest method, recommended
- Compress pages: GZIP compression, saves bandwidth
- Don't cache pages for known users: disables caching for logged-in users (convenient during development)
- Cache rebuild: serves the saved copy while a new cache is generated in the background
Check the options you need and click Update Status. Immediately after saving, a long yellow block with code for .htaccess will appear:
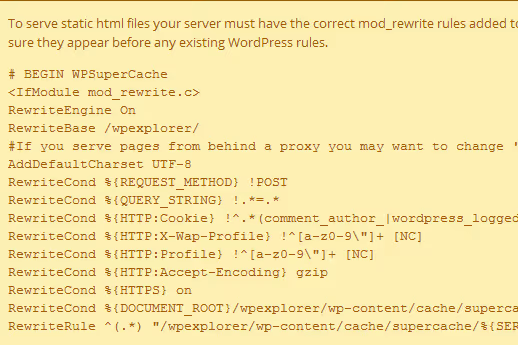
Scroll down and click Update Mod_Rewrite Rules:

If .htaccess is writable, you'll see a green block with confirmation:
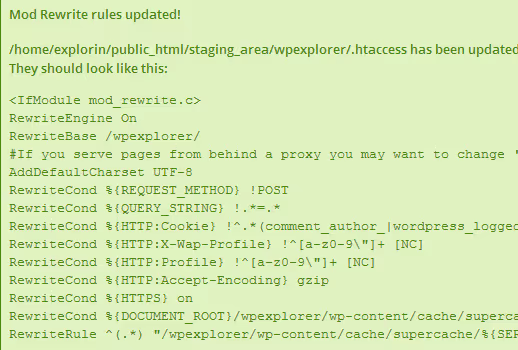
Red block instead of green? Check the permissions on .htaccess (usually 644) or add the rules manually. The plugin displays the ready-made text, which you can copy and paste into the file via FTP or your hosting file manager.
Step 4: Cache preloading, the Preload tab
Preloading makes the plugin crawl all site pages and generate the cache in advance, without waiting for the first visitor. This is important: without preloading, the first load of each page bypasses the cache, and the visitor gets a slow response.
Settings on the Preload tab:
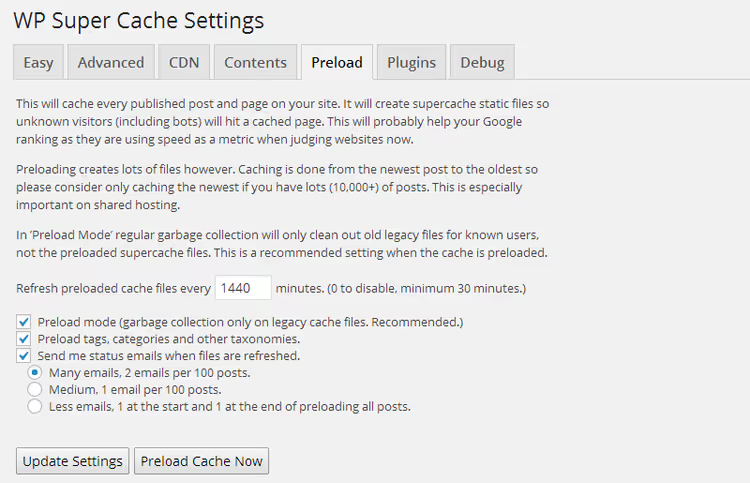
The main parameter is the refresh interval. It determines how often the plugin regenerates the cache for all pages:
- 1440 minutes (once per day): optimal for shared hosting. Sufficient for a site with one or two updates per day.
- 720 minutes (twice per day): for more active sites. Adds server load.
- 60-120 minutes: an option for VPS or dedicated servers with high traffic.
On shared hosting, we don't recommend setting an interval shorter than 720 minutes: the hosting provider may consider frequent preloading as excessive resource consumption and temporarily block your site.
Set the interval and click Update Settings. To start the process immediately, click Preload Cache Now. This operation is resource-intensive, and the time depends on the number of pages. For a hundred posts, wait about 10 minutes, then proceed to the next step.
Step 5: Contents tab, cache monitoring
Here you can see how many pages are cached and their age in seconds. The age should not exceed the preload interval set in the previous step (1440 minutes = 86,400 seconds).
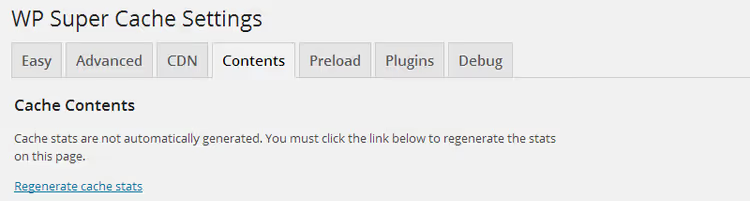
Data may not appear immediately. Click Regenerate Cache Stats for the current picture:
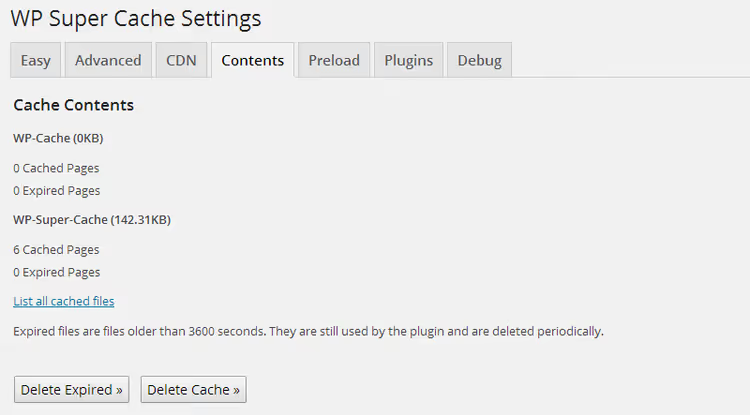
The List All Cached Files option shows the complete list of cached URLs:

This is useful for targeted clearing. Updated one post and want the cache to reflect the changes? Find the file in the list, delete it, and on the next visit the page will be regenerated and cached. Faster than restarting the preload for the entire site.
Step 6: Verifying cache operation
The final step. Return to the Easy tab (the main one) and click Test Cache. If everything is configured correctly, the test will show two identical timestamps, indicating that the page is being served from the cache rather than being generated fresh.

If they match, the cache is working. Here's what this looks like in practice. Test results for a demo site before and after enabling caching:

And here's the result after enabling WP Super Cache:

The difference is visible to the naked eye. In practice, after configuring WP Super Cache, a typical site on shared hosting speeds up two to three times in server response metrics.
Below is a short video with a visual demonstration of the complete setup process, from installation to verifying the result:
⁉️🤔 Frequently asked questions
Do I need to enable caching on managed hosting like WPEngine or Kinsta?
No, and in most cases it's harmful. Managed hosting uses its own server-level caching systems (EverCache on WPEngine, server cache on Kinsta). Installing WP Super Cache on top of them creates a conflict: two caching systems compete for control over static files. The result is unpredictable behavior and speed drops. If you're on managed hosting, caching already works out of the box, and you don't need to install anything.
What should I do if the Mod_Rewrite Rules button is unavailable after updating status?
Most likely, the plugin cannot write to
.htaccess. Check the file permissions, which should be 644 or 664. An alternative approach: copy the rule block generated by the plugin (it's displayed in the yellow field) and paste it into.htaccessmanually via FTP or your hosting file manager. The rules should go after the# END WordPressline.
Why does the Contents tab not show all pages?
Cache preloading is not an instant process. If you just clicked Preload Cache Now, wait 5-10 minutes and refresh the page. The number of cached pages depends on the preload interval and the total number of URLs on the site. Also check that all needed content types (posts, pages) are selected on the Preload tab.
How do I clear the cache for one specific page?
Go to the Contents tab, click List All Cached Files, find the URL you need in the list, and delete the corresponding file. On the next visitor request, the page will be regenerated. This is the most resource-efficient way to clear cache.
WP Super Cache or W3 Total Cache: which should I choose in 2026?
WP Super Cache is the choice for those who need simple and reliable caching without hundreds of settings. W3 Total Cache offers more control (object caching, database caching, CDN integration) but also more chances to break something. For a typical site on shared hosting, WP Super Cache covers the basic needs and requires exactly one visit to settings. W3 Total Cache makes sense for high-traffic projects with a dedicated server.
Will WP Super Cache work with other caching plugins?
No, and this is important. Running two caching plugins simultaneously almost always leads to conflicts: duplicate cache files, 404 errors on live pages, incorrect clearing. Before installing WP Super Cache, disable and remove any other caching plugin.
Summary: what to check after launching the cache
Caching is enabled, the test passed, the site is flying. Three things you should do right after setup:
- Check the site in incognito mode. Log out of the admin panel or open the browser in private mode, so you'll see the site through the eyes of a regular visitor, without cache bypass for logged-in users.
- Set up regular preloading. One manual run is not enough: the cache should update on a schedule. Set the interval to 1440 minutes (one day) and forget about it.
- Monitor the Contents tab. Check in once a week, and if you see anomalies (zero cache, extremely old files), restart the preload.
Start with the free WP Super Cache: for most sites it's more than enough. And if speed still lags after setup, the problem is more likely a heavy theme or conflicting plugins rather than a lack of caching.

A professional team of writers and editors specializing in creating quality content.