














📧 How to install and configure SMTP in WordPress: a step by step guide
Emails from your site not reaching users? Recipients complaining that order notifications or password resets end up in spam? Almost every WordPress site owner faces this problem in the first months after launch.
The reason is the default method of sending emails. WordPress uses the built-in mail() function from PHP, and most hosting providers do not configure it properly. Emails leave with incorrect headers, without DKIM signatures, and mail services like Gmail or Mail.ru send them straight to the "Spam" folder. Worse still, some emails simply get lost, and you will not even know about it.
The proper solution is SMTP. You configure it once, and emails from your site start arriving reliably. I will show you two methods: the simple one (using a plugin) and the manual one (using code), so you can choose based on your situation.
💡 Quick overview:
- You will learn why WordPress PHP mail is unreliable and how SMTP solves the deliverability problem
- You will set up sending through the Easy WP SMTP plugin in 5 minutes, with no code editing
- You will master the manual method through wp-config.php for those who prefer to avoid extra plugins
- You will test SMTP with a test email and learn what to look for when choosing an email provider
What is SMTP and why your site loses emails
SMTP stands for Simple Mail Transfer Protocol. Put simply, it is a dedicated protocol for sending email that works differently from PHP mail().
When WordPress sends an email through the standard function, it simply "dumps" it to the server's operating system. After that, it is down to luck: the email may leave from a host without an SPF record, without DKIM, with someone else's From address. The recipient's mail service sees a suspicious email and sends it to spam. Or it simply discards it, and you receive no error notification.
An SMTP server, on the other hand, establishes a direct connection with the recipient's mail service. It authenticates, transmits your domain's DKIM signature, and ensures that the email headers are correct. The result: your emails land in "Inbox," not spam.
An additional benefit is logging. Most SMTP plugins for WordPress keep a log of sent emails: you can see what was sent, to whom, and when. If an email was not delivered, you know about it immediately, not a week later from a client.
Method 1: Setting up SMTP through the Easy WP SMTP plugin
The simplest and most reliable method for the vast majority of sites is to install a plugin. I recommend Easy WP SMTP: over half a million active installations on WordPress.org, a rating of 4.6 out of 5, and stable updates. The plugin is free and supports not only any external SMTP server but also direct integrations with Gmail, Outlook, Brevo, SendGrid, Mailgun, and SendLayer, allowing you to connect via API without entering ports and encryption settings.
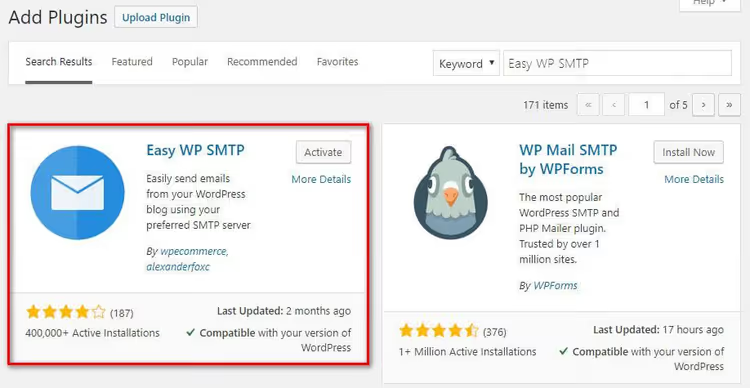
Step 1. Install the plugin. Go to your WordPress admin: Plugins → Add New. In the search bar, type "Easy WP SMTP." Click "Install," then "Activate."
Step 2. Go to settings. A new menu item Easy WP SMTP will appear in the admin sidebar. Open it, and you will land on the "General" tab.
Step 3. Fill in the SMTP server details. Here is what you need to enter:
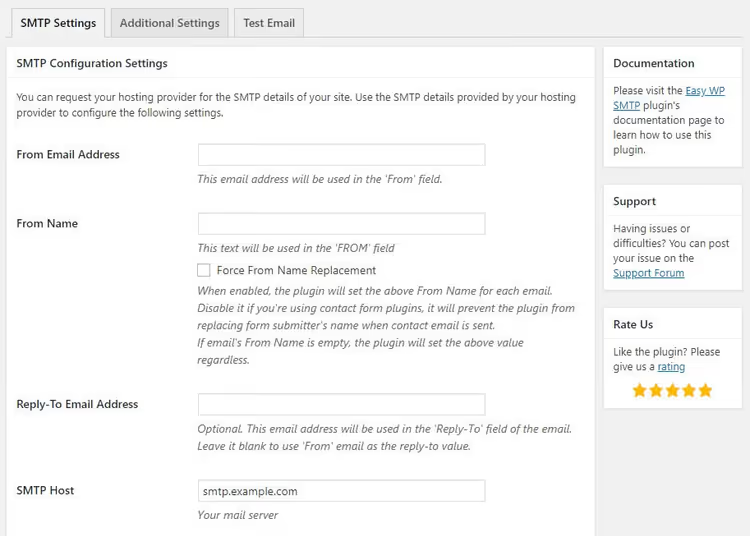
From Email Address: the address from which emails will be sent. Use the same email specified in your WordPress settings (under Settings → General). Most hosts block sending from external addresses, so it is safer not to risk it.
From Name: the sender name that recipients will see. Usually this is your site name, for example "SiteName Support."
Mailer: choose "Other SMTP" if you are connecting an email account from your own domain or hosting. If you are using Gmail / Outlook / Brevo / SendGrid, select the corresponding option, and the plugin will guide you through OAuth authorization without manual parameter entry.
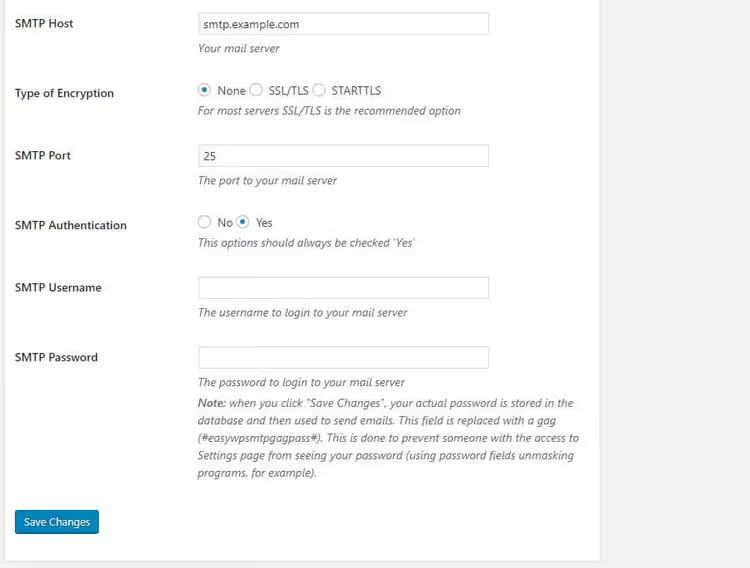
For the "Other SMTP" option, fill in:
SMTP Host: your mail server address. For hosting, this is usually
mail.your-domain.com. For third-party services, the provider supplies the host when you create the mailbox.Encryption: choose
SSL(port 465) orTLS(port 587). Modern servers prefer TLS on port 587, but check with your email provider.SMTP Port: 465 for SSL, 587 for TLS. These are standard values, but your host may use a non-standard port, so verify their documentation.
Authentication: enable the "Yes" toggle. Without authentication, SMTP will not work.
SMTP Username and SMTP Password: the login and password for your mailbox. Usually the login matches the full email address.
Step 4. Send a test email. Scroll down the page to the "Test Email" section. In the "Send To" field, enter an address you have access to (your own works). Fill in the "Subject" and "Message" fields with anything, for example "SMTP Test" and "Sending check." Click "Send Test Email."
If everything is configured correctly, a green success notification will appear at the top of the screen. The email will arrive at the specified address within a few seconds. If it does not arrive, check your "Spam" folder; if it is not there either, double-check the host, port, and password settings.
Step 5. Enable logging. In the Easy WP SMTP submenu, open the "Email Log" tab and activate log recording. Now every sent email will be saved in the log with date, recipient, and status. If a month later a client says "I never received the code email," you can open the log and see: the email was sent and delivered, the problem is on the client's end.
Method 2: Manual SMTP configuration through wp-config.php
This method is for those who fundamentally do not want to install a plugin for a single function. The downside is obvious: no interface, no logging, and no testing from the admin panel. All changes are made only by editing files.
Important: before editing wp-config.php, be sure to make a backup of your site. An error in this file will cause the "white screen of death," and you will only be able to restore access through FTP or your hosting's file manager.
Step 1: Add SMTP constants to wp-config.php
Connect to your server via FTP or through your hosting's file manager. Find the wp-config.php file in the site root and add the following code BEFORE the line /* That's all, stop editing! Happy publishing. */:
1 // SMTP configuration for sending WordPress mail 2 define( 'SMTP_HOST', 'mail.your-domain.com' ); // SMTP server address 3 define( 'SMTP_AUTH', true ); // Enable authentication 4 define( 'SMTP_PORT', '587' ); // Port: 587 (TLS) or 465 (SSL) 5 define( 'SMTP_SECURE', 'tls' ); // Encryption: tls or ssl 6 define( 'SMTP_USERNAME', 'user@your-domain.com' ); // Mailbox login 7 define( 'SMTP_PASSWORD', 'your-password' ); // Password 8 define( 'SMTP_FROM', 'user@your-domain.com' ); // Sender address 9 define( 'SMTP_FROMNAME', 'SiteName Support' ); // Sender name
Replace the data with your own: host, port, login, password. If your email provider uses SSL on port 465, change SMTP_PORT to '465' and SMTP_SECURE to 'ssl'.
Step 2: Connect the constants to PHPMailer
The constants in wp-config.php do nothing by themselves: WordPress does not know what to do with them. You need to pass them to the PHPMailer object through the phpmailer_init hook. Add this code to your child theme's functions.php file or through the Code Snippets plugin (recommended, as it will not be lost when the theme updates):
1 /** 2 * SMTP configuration via constants from wp-config.php 3 */ 4 add_action( 'phpmailer_init', 'sdstudio_smtp_configure' ); 5 function sdstudio_smtp_configure( $phpmailer ) { 6 $phpmailer->isSMTP(); 7 $phpmailer->Host = SMTP_HOST; 8 $phpmailer->SMTPAuth = SMTP_AUTH; 9 $phpmailer->Port = SMTP_PORT; 10 $phpmailer->SMTPSecure = SMTP_SECURE; 11 $phpmailer->Username = SMTP_USERNAME; 12 $phpmailer->Password = SMTP_PASSWORD; 13 $phpmailer->From = SMTP_FROM; 14 $phpmailer->FromName = SMTP_FROMNAME; 15 }
Here is what is happening: WordPress calls the phpmailer_init hook before each email is sent and passes an instance of the PHPMailer class to it. The sdstudio_smtp_configure function configures this object with values from the constants, and the email is sent via SMTP rather than PHP mail().
If you are using a mailbox on your own domain (for example admin@your-site.com, created in your hosting's cPanel), get the SMTP host details from your hosting control panel. Usually there is a section called "Mail Connections" or "Email Accounts," where host, port, and encryption settings are specified for each mailbox.
Step 3: Test the sending
The simplest way to test is to trigger a WordPress system email. For example, request a password reset through the login form (/wp-login.php → "Lost your password?"). If the email arrives, SMTP is working.
For a more precise test, temporarily add this code to functions.php (remove it after testing):
1 add_action( 'init', function() { 2 wp_mail( 'your@email.com', 'SMTP Test', 'Message sent via SMTP!' ); 3 } );
Refresh any page on your site, and a test email will be sent to your address. Do not forget to remove the code after testing, otherwise an email will be sent every time a page is loaded.
Method 3: Alternative SMTP plugins
Easy WP SMTP is not the only option. If for some reason it did not suit you, here are three more proven free plugins with active installations on 200,000+ sites:
WP Mail SMTP: the most popular SMTP plugin in the WordPress repository (3 million+ installations). The free version connects any SMTP server. The paid version adds integrations with SendLayer, Amazon SES, Microsoft 365, and Zoho Mail, as well as detailed logs and error reports.
Post SMTP: completely free, with open source code. Can send emails through SMTP, Gmail API, Microsoft 365 API, SendGrid, Mailgun, Brevo. Built-in Email Log with filtering and resend capability. A good choice if you need maximum features without paying.
FluentSMTP: a minimalist and fast plugin from the creators of FluentCRM. Supports Amazon SES, Mailgun, SendGrid, SparkPost, Elastic Email, and any SMTP server. The interface is simpler than competitors, and the plugin has virtually no impact on admin panel performance.
All three options have a 4.5+ rating and are regularly updated. The setup principle is the same everywhere: install the plugin → enter mail server details → send a test email → enable logging.
Unlike the manual method through wp-config.php, any of these plugins provides at least a log of sent emails and the ability to test the connection from the admin panel. For a site that sends more than a couple of emails per week, these features quickly become a necessity rather than just a convenience.
Testing SMTP: how to make sure everything works
You configured the plugin or code, now verify the result. Here is a three-point checklist that covers all possible issues:
1. Test email from the plugin. If you used Easy WP SMTP, send a test through the built-in function (the "Test Email" tab). The email was sent and arrived in "Inbox": excellent. It arrived in "Spam": check that the "From Email Address" specifies a real address on your domain (not @gmail.com if your site is on your-domain.com).
2. Check the email headers. Open the received test email and view the "original" / "source code" of the message (in Gmail: three dots → "Show original"). Find the lines SPF, DKIM, and DMARC. At least SPF: PASS should be present. If all three show PASS, your deliverability is at maximum.
3. Check through a form on your site. Go through a user scenario: fill out a contact form, request a password reset, place a test order in WooCommerce. Each of these actions should generate an email: make sure they all arrive. If any email was not sent, the specific plugin (Forms / WooCommerce) is likely using its own sending method that bypasses the general SMTP. This is rare, but check that plugin's settings, usually there is a "Use WordPress mail" option or a choice of email provider.
If you prefer video format, this tutorial shows the complete SMTP setup through the WP Mail SMTP plugin from scratch to the first sent email. The principle is the same for any of the reviewed plugins.
⁉️🤔 Frequently asked questions
Why do emails from my site get sent but arrive in spam?
The main reason is missing DKIM and SPF records for the domain. The PHP
mail()function does not sign emails, and mail services see "anonymous" sending. An SMTP plugin sends emails on behalf of your mail server, which already has these records configured. Most hosts add a basic SPF record automatically through cPanel; DKIM and DMARC are configured manually in the DNS panel in 10 minutes.
Which SMTP port should I choose: 465 or 587?
Port 587 with TLS encryption is the modern IETF standard. Port 465 with SSL is outdated but widely supported. If your provider accepts both, choose 587/TLS. If it does not work, try 465/SSL. In practice, most shared hosts in 2026 work with both ports; VPS more often requires 587/TLS. If you get a connection error after setup, the first thing to try is switching the port and encryption.
Can I use free Gmail to send emails from my site?
Yes, but with a limitation: 500 emails per day for personal accounts and up to 2,000 for Google Workspace. For stores and membership sites, transactional services are more reliable: Brevo (300 emails/day free), SendGrid (100/day), Mailgun, or Amazon SES. The easiest way to connect Gmail is through Easy WP SMTP: select the "Gmail" mailer and complete OAuth authorization in a couple of clicks.
Do I need an SMTP plugin if my hosting has already configured email?
The hosting mail server and sending from WordPress are two different links. Hosting receives email for the domain, but WordPress continues to send through PHP
mail()without authentication. The result is the same: spam or lost emails. An SMTP plugin makes WordPress use the mail server correctly. A simple test: open the "original" of an email from your site and findX-Mailer. If it showsPHPMailerwithout SMTP, you need a plugin.
The plugin shows the error "SMTP Error: Could not authenticate," what should I do?
Three common causes. First: the password contains special characters (hash, dollar sign, ampersand) that the plugin escapes incorrectly: change to alphanumeric. Second: the host requires a different port: switch 587↔465 and TLS↔SSL. Third: the provider blocks outgoing SMTP traffic on the shared plan: check with support. If nothing helps, switch to API integration: for example, Gmail API through OAuth is more reliable than password authentication.
Which SMTP setup method to choose for your site
The answer depends on three factors: email volume, technical comfort level, and budget.
If your site sends up to 100 emails per day, install Easy WP SMTP, connect any mailbox, and close the matter in 5 minutes. The free Brevo tier through the API integration of this same plugin gives you 300 emails per day without any SMTP port configuration at all: you just register, get an API key, paste it into the plugin, and you are done.
If your site is a WooCommerce store with 500+ orders per month, connect a transactional service: Mailgun, SendGrid, or Amazon SES. They are designed for mass transactional email sending and provide detailed analytics for each email (delivered / opened / clicked). Easy WP SMTP supports all three through API without fussing with ports.
If you are a developer and do not want extra plugins, the manual method through wp-config.php works, but remember: without logging you are blind. Add at least a simple log file through the wp_mail_failed hook or install FluentSMTP, which is practically weightless and provides a full email log.
The main thing is not to leave WordPress on the standard PHP mail. Five minutes to install an SMTP plugin will save you from lost orders, missed support requests, and reputation problems with a domain that mail services have flagged as a spam source.

A professional team of writers and editors specializing in creating quality content.