














📧 WordPress Gmail SMTP: setting up email sending from your site via Google
Contact forms fail to send submissions. Password reset emails never reach users. WooCommerce new order notifications vanish silently. Sound familiar?
The root of the problem is the standard wp_mail() function in WordPress. By default, it calls the PHP mail function on your hosting, which is often misconfigured or blocked by mail providers. Even worse, when the server sends an email from your domain but from a foreign IP, Google and Microsoft see it as spoofed and send it to spam or don't deliver it at all.
SMTP (Simple Mail Transfer Protocol) solves this at the root. Instead of relying on hosting, emails go through a full-fledged Gmail mail server with proper authentication. Deliverability increases dramatically.
Below is a step-by-step guide to configuring WP Mail SMTP with Gmail via OAuth 2.0. This method works in 2026, without app passwords or outdated workarounds.
💡 Quick overview:
- Install WP Mail SMTP by WPForms and select Google / Gmail as the mail service
- Create a project in Google Cloud Console, enable the Gmail API, and obtain OAuth credentials
- Enter the Client ID and Client Secret in the plugin, save the settings, and authorize your Google account
- Send a test email and verify that all notifications are delivered
Why WP Mail SMTP and not another plugin
WP Mail SMTP from the WPForms team is the most popular SMTP plugin in the WordPress repository: 300,000+ active installations and a 4.5 rating on WordPress.org. Its main advantage specifically for Gmail is full OAuth 2.0 authentication. No app passwords, no "allow less secure apps" (Google disabled that option back in 2022).
The plugin doesn't store your Gmail password in the WordPress database. Authorization happens through a secure token on Google's side. Even if your site has other administrators, access to your mailbox remains yours alone.
It works with both regular @gmail.com accounts and Google Workspace (formerly G Suite). The free version is sufficient for the vast majority of sites.
Step 1: Installation and initial settings access
Install WP Mail SMTP the standard way: Plugins → Add New → type "WP Mail SMTP" in the search. The plugin is by WPForms, the one with 300,000+ installations.

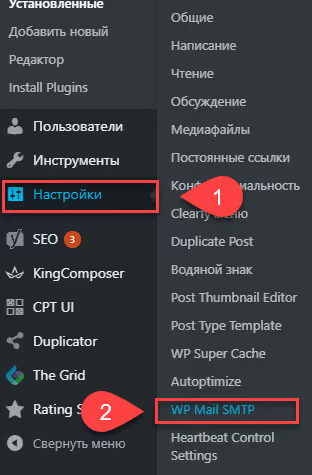
After activation, go to Settings → WP Mail SMTP:
First, choose the mail service. Scroll down to the "Mailer" section and select Google / Gmail from the options. This method uses OAuth and doesn't require a password.

Right below the mailer selection, here's the plugin's interface:
And a link to the official documentation. I recommend opening it in a separate tab, How to Securely Send WordPress Emails Using Gmail SMTP:

Now fill in the From Email and From Name fields (the sender address and name that recipients will see). Use the same Gmail address that will be used for sending:
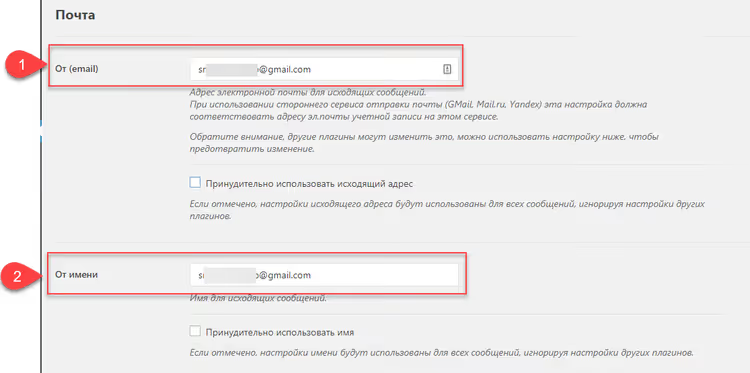
That completes the first part of the plugin settings. The Client ID and Client Secret fields are still empty; we'll return to them after setting up Google Cloud Console.
Before the next step, here's a tip: open Chrome in incognito mode (Ctrl+Shift+N). In one tab, your site's admin panel; in another, the Gmail account for sending. This way you won't get confused between Google sessions.
Step 2: Creating a project in Google Cloud Console
Go to Google Cloud Console and sign in with the Gmail account you plan to use for sending site emails.
If this is your first time here, click Create Project (or select an existing one). Name the project something like "MyWebSiteName Mail"; this is an internal name, site users won't see it.
Now you need to enable the Gmail API. Go to APIs & Services → Library, search for "Gmail API," and click Enable. Alternatively, open Google Cloud Console and type "Gmail API" in the API library search.
On the page that opens, confirm your country, uncheck the promotional newsletter, and accept the terms of use:
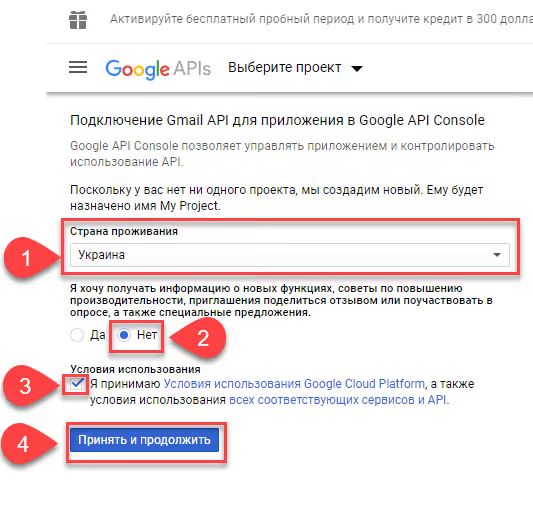
Click "Agree and continue" and be patient for 2-5 minutes. Don't close or refresh the page. The API activation process is running; it's just not visually apparent.
After the API is activated, click Create Credentials:
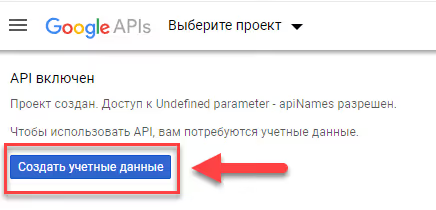
Step 3: Creating OAuth 2.0 credentials
The credentials creation wizard will ask several questions:
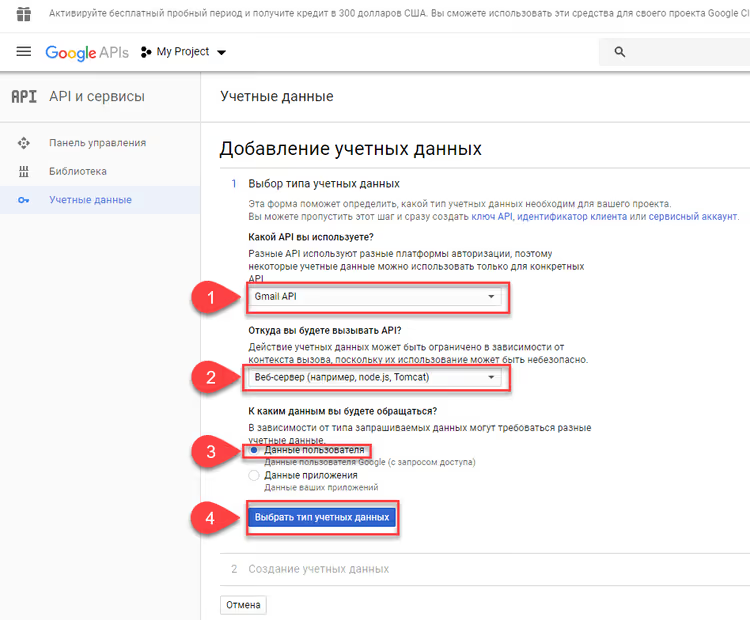
Fill them out as follows:
- Which API are you using? → Gmail API
- Where will you be calling the API from? → Web server (e.g., node.js, Tomcat)
- What data will you be accessing? → User data
Click What credentials do I need?, and the OAuth consent screen setup page will open.
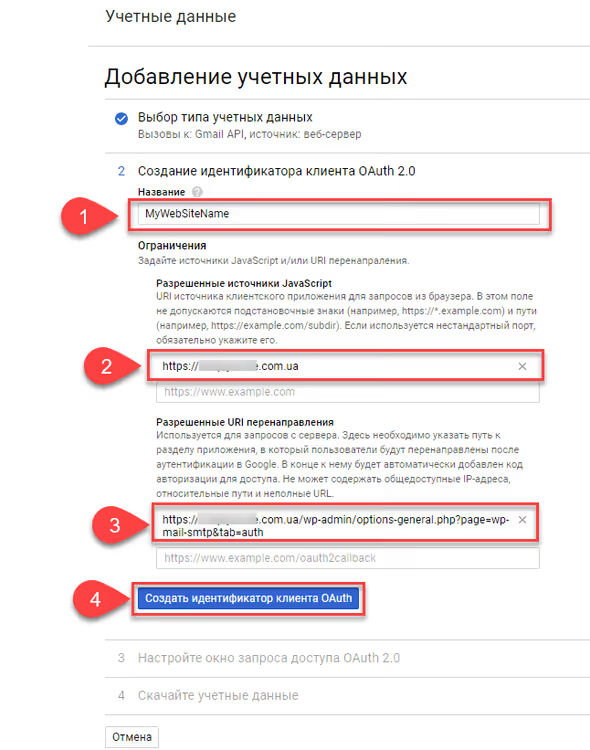
The most important part here is the Authorized redirect URIs field. This is where most people run into problems. Here's what to enter:
- Application name: your site or project name (e.g., "MyWebSiteName")
- Authorized JavaScript origins: your site's domain (https://your-site.com)
- Authorized redirect URIs: the link provided by the WP Mail SMTP plugin on its settings page:
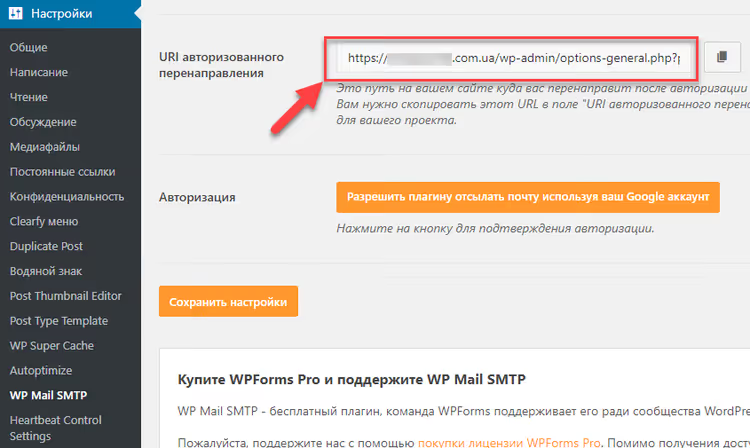
The link looks like: https://YOUR-DOMAIN/wp-admin/options-general.php?page=wp-mail-smtp&tab=auth; copy it from the plugin and paste it into Google Cloud Console. The domain must be your actual domain, not "YOUR-DOMAIN."
Click Create OAuth client ID.
Next is the credentials addition page:
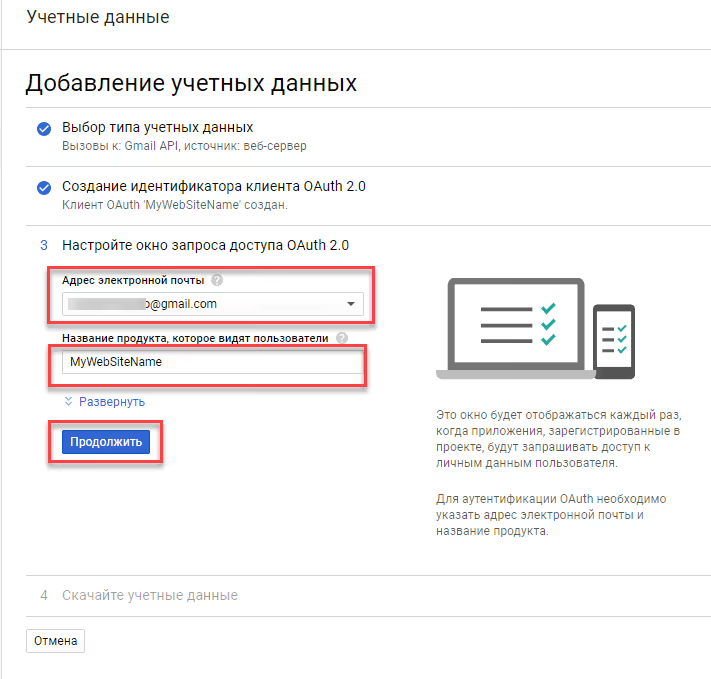
- Email address: select the Gmail address for sending
- Product name shown to users: any name, e.g., "MyWebSiteName"
Click Continue. After processing:
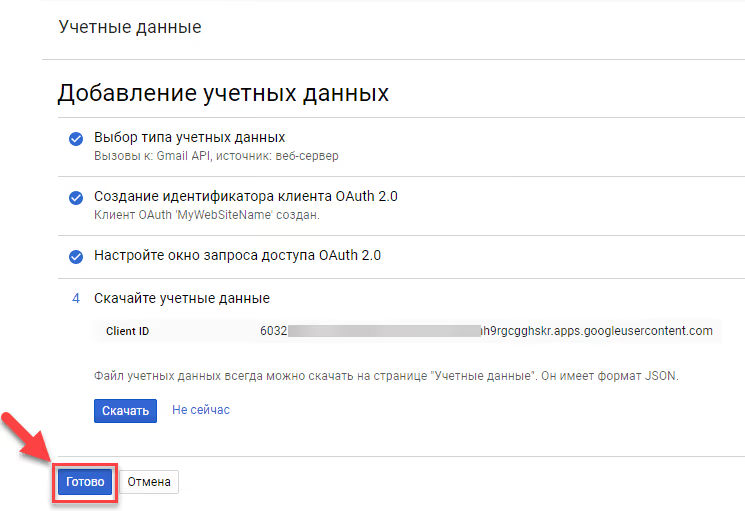
Click Done. You'll return to the Credentials page. Find the OAuth 2.0 Client ID you just created in the list:
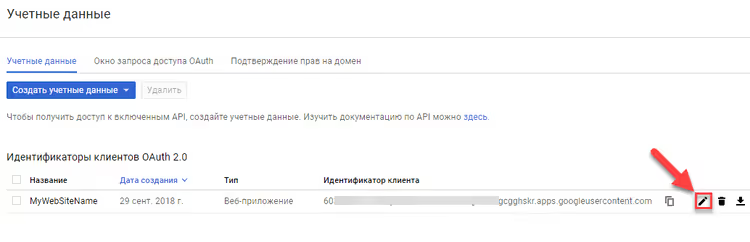
Click the pencil icon to the right of the name, and a page with the Client ID and Client Secret will open:
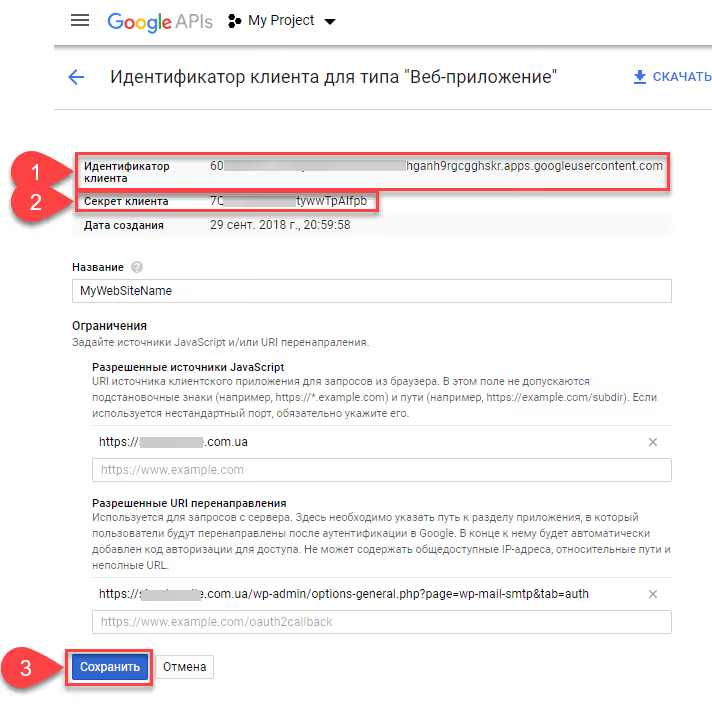
Copy both values. That's it; the most tedious part is behind you.
Step 4: Entering credentials in the plugin and authorization
Return to your WordPress admin panel, to the Settings → WP Mail SMTP page. Paste the copied data:
- In the Client ID field, the value from "Client ID"
- In the Client Secret field, the value from "Client secret"
Click Save Settings.
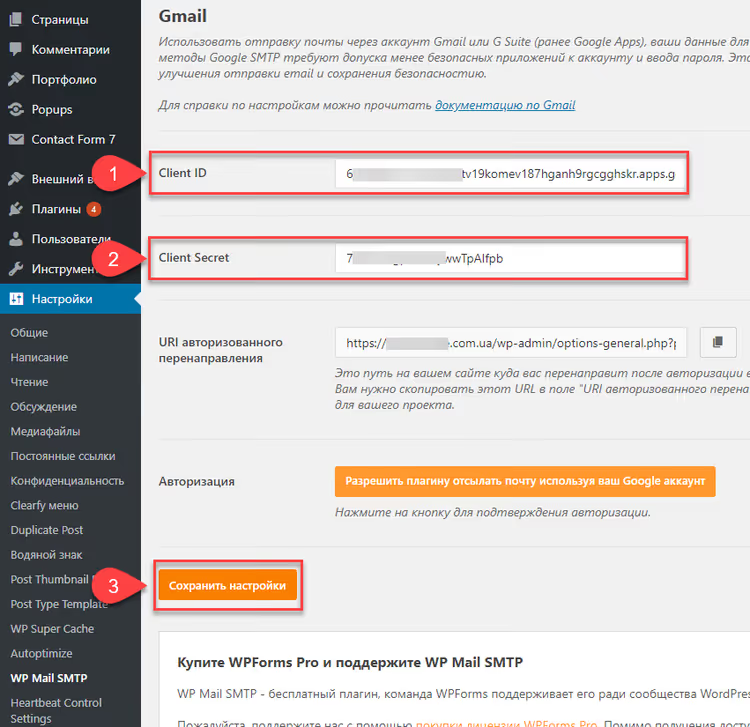
Now for the most interesting part: allowing the plugin to send mail through your Google account. Click the Allow plugin to send emails using your Google account button:

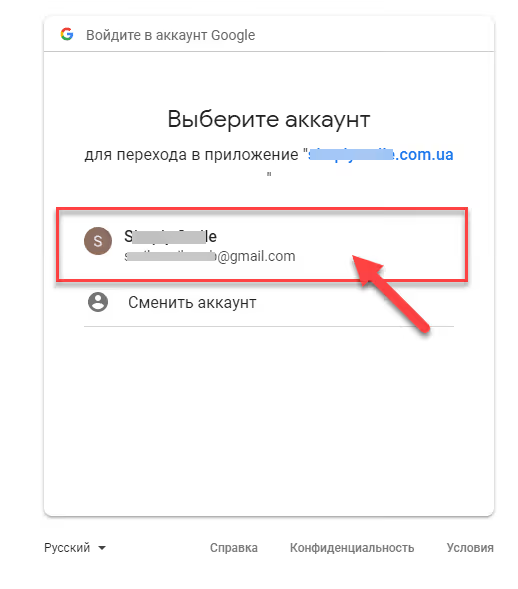
A Google authentication window will open. Select the account for sending:
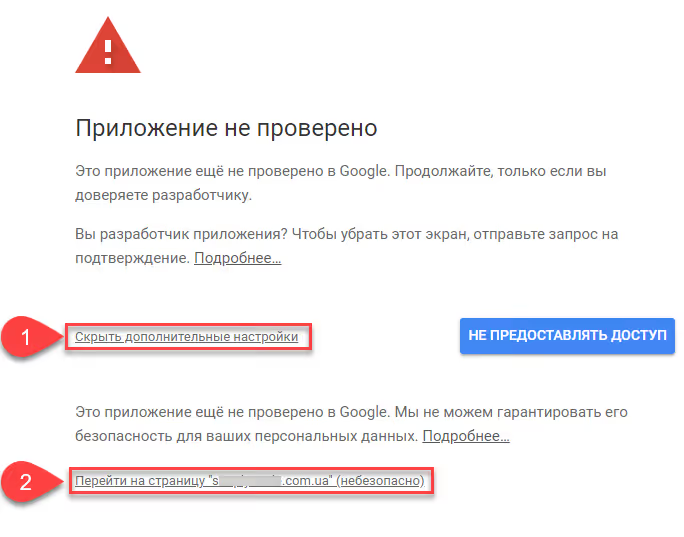
Google will most likely show a warning "Google hasn't verified this app"; this is normal for manually created applications. Click Show details and follow the link to the application page:
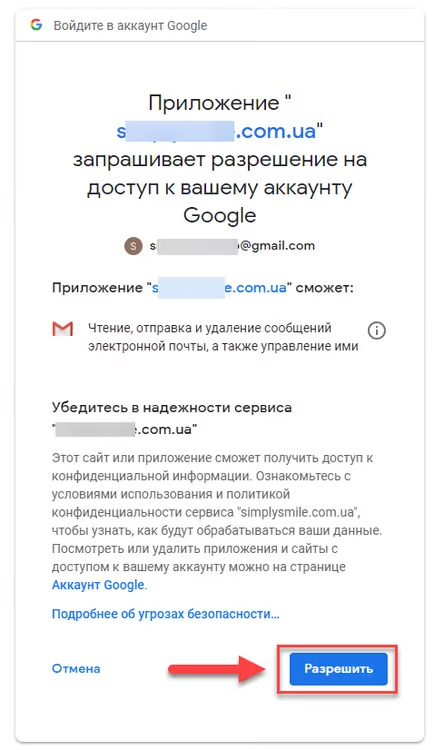
On your application's sign-in page, click Allow:
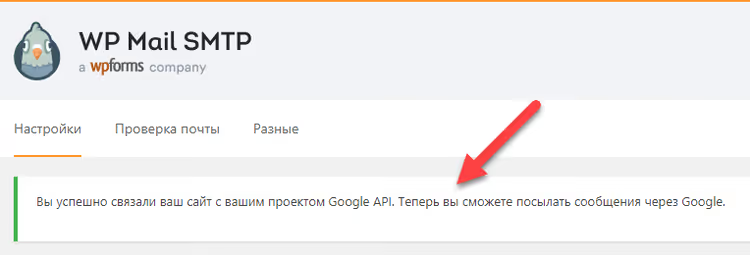
After clicking, you'll be redirected back to the admin panel. If everything was done correctly, you'll see a green notification: "You have successfully linked your site with your Google API project. You can now send emails via Google."
Step 5: Testing email delivery
Go to the Email Test tab:
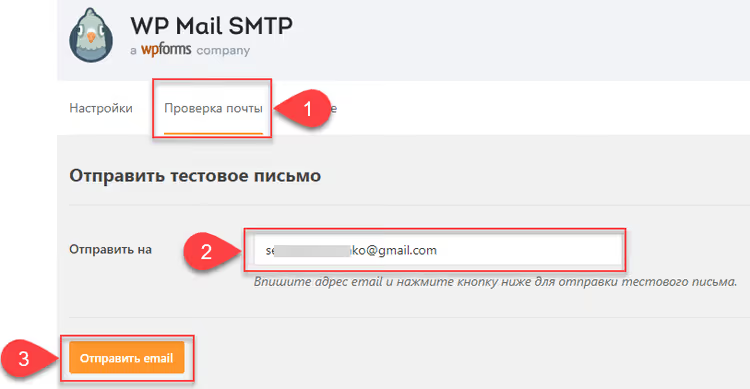
Enter the email address to send a test message to, and click Send Email.
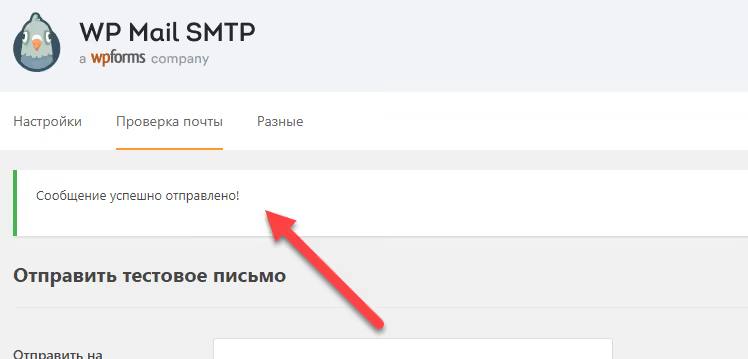
If the send is successful, you'll see the message "Test email was sent successfully!":
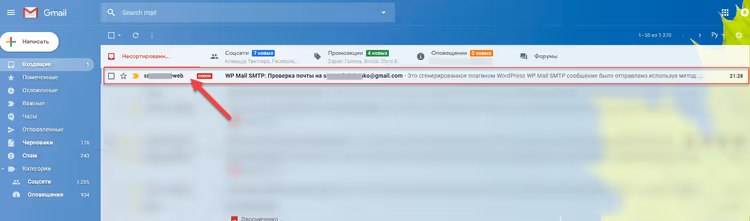
Check your inbox; the email should arrive within a minute:
The test email body looks something like this:
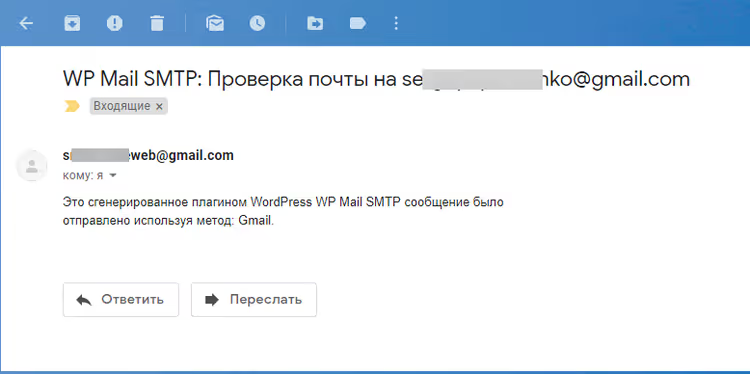
If the test email arrived, everything is working. All WordPress notifications, contact forms, WooCommerce orders, and password reset emails now go through Gmail and reach their recipients.
Have questions? Watch the video tutorial
If you ran into difficulties at any step, here's a visual video tutorial on setting up WP Mail SMTP with Gmail in 2026:
Troubleshooting
In practice, 90% of post-setup problems are solved by one action: wait 15 minutes. Google needs time to propagate the created OAuth application to all its servers.
Unverified app warning: should I worry?
The "Google hasn't verified this app" warning during authorization is completely normal for manually created OAuth applications. Google verification is only required for applications used by dozens or hundreds of accounts. For one or two sites, your own unverified application works without restrictions.
Error: "invalid_request, Missing required parameter: client_id"
This occurs when the plugin generates an incomplete authorization link. The cause is an empty Client ID field in the plugin settings when you click the authorization button.
Solution: verify that you saved the settings (Save Settings button) AFTER pasting the Client ID and Client Secret, but BEFORE clicking the Google authorization button. Order matters: first Save Settings, then Allow plugin.
Emails still aren't delivered
Check three things:
- SPF/DKIM for your domain. If the From Email field contains your domain rather than @gmail.com, DNS records must allow Gmail to send on behalf of your domain. For a regular @gmail.com in the From Email field, this check isn't needed.
- Plugin is active. Obvious, but it happens: go to Settings → WP Mail SMTP and make sure Google/Gmail is selected, not "Default" or PHP mail.
- Gmail API status. Go to Google Cloud Console → APIs & Services → Enabled APIs; Gmail API should be in Enabled status.
⁉️🤔 Frequently asked questions
Do I need a separate Gmail account for my site?
In practice, it's highly recommended. Sending from a personal address works, but: a) your personal inbox gets cluttered with system notifications, b) if there are problems with the site, Google might temporarily block your personal email too. A separate account solves both problems and takes 5 minutes to set up. Create a new @gmail.com specifically for the site. Verify it with a mobile phone; this reduces the chance of being blocked for "suspicious activity." Name the mailbox meaningfully: site-name.notifications@gmail.com. This way you'll immediately distinguish site system emails from other mail.
Is the free version of WP Mail SMTP enough?
For sending through Gmail, yes, it's completely sufficient. The Pro version adds other mail services (SendGrid, Amazon SES, Microsoft 365), extended logging, notification management, and white labeling. But if your task is simply to get emails delivered via Gmail, the free version covers it entirely. The only limitation of the free version is that you can't connect multiple different mail services simultaneously. For most sites, this isn't a problem: you choose Gmail and work with it.
What changed after "less secure apps" was disabled?
Google completely disabled the "Allow less secure apps" option in 2022 for personal accounts and in 2025 for Workspace. OAuth 2.0, which WP Mail SMTP uses, is the replacement. Moreover, OAuth is more secure: instead of a password that can be intercepted, a temporary token is used. If you come across links to
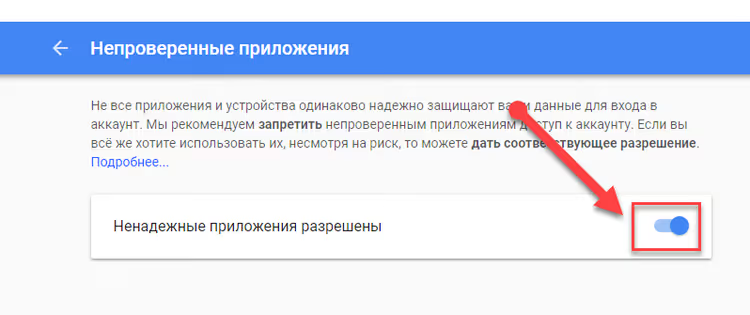
myaccount.google.com/lesssecureappsin old tutorials, ignore them. That page no longer exists. The OAuth method in this article is the only working way to send through Gmail as of 2026. Here's what the "Allow less secure apps" page looked like in Google settings; it no longer exists:
Can I use one Google Cloud project for multiple sites?
Technically yes, but it's not recommended. Each site must have its own unique redirect URI in the OAuth client settings. You can add multiple URIs to one project, but if there are problems with one site, you risk affecting the others. It's easier to create a separate project for each site; it's free, and there are no limits on the number of projects. The exception is a WordPress multisite installation on subdomains. In this case, one project with multiple redirect URIs is justified because all sites are under unified management.
Why did site load increase after SMTP setup?
A slight increase is normal: now each email goes through not an instant local PHP function but a full exchange with the Gmail server (TLS handshake, sending, confirmation). The difference is fractions of a second per email. If the load increased noticeably, check your email logging plugin: some competing SMTP plugins write a full log of each email to the database, which creates noticeable load with intensive sending.
WP Mail SMTP + Gmail: set it and forget it
Configured, tested, email arrived. From here, the system works on its own. Forget about deliverability problems: order notifications go out, passwords reset, forms submit.
If your site grows and email volume exceeds 500 per day (the free Gmail limit), consider Google Workspace ($6/month) with a limit of 2000 emails per day. For 90% of sites, free Gmail is more than enough.
Test it right now: request a password reset on a test account on your site. Did the email arrive? Great, everything is set up correctly.

A professional team of writers and editors specializing in creating quality content.