













 AIIllustrative image: AI-generated
🍏 Installing WordPress on Mac locally with MAMP
WordPress theme development starts not in a code editor but with a local server. Without one, every change means editing a live site and risking downtime while visitors are browsing.
A local WordPress installation on Mac via MAMP solves this problem in 15 minutes. You get a complete development environment: Apache, MySQL, PHP, and multisite for testing multiple themes at once. No external hosting, no internet required. Everything runs on your MacBook, even on a plane.
💡 Quick overview:
- Download and configure MAMP, choose ports and PHP version
- Create a MySQL database via phpMyAdmin
- Download WordPress from wordpress.org and copy files to htdocs
- Edit the hosts file and configure wp-config.php
- Run the WordPress installation through your browser
- Enable multisite and add test sites
Downloading and configuring MAMP
MAMP (Mac Apache MySQL PHP) is a free tool that spins up a full web server on macOS with a single click. Download it from the official website; version 7.4 (2026) is available, compatible with Apple Silicon and the latest macOS releases. Installation is standard: drag the folder to Applications.
Port and PHP settings
After launching MAMP, open Preferences. The first screen shows general server status; the second shows settings.
Go to the Ports tab. By default, Apache runs on port 8888 and MySQL on 8889. Change them to 80 and 3306 respectively. This removes the port number from your localhost URL: instead of http://localhost:8888, you get a clean http://localhost.
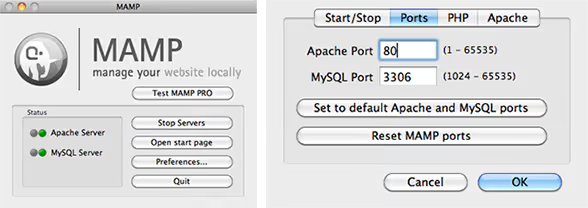
Port 80 requires entering your administrator password each time you start the servers. This is a plus: no one can start your local server without your knowledge. On the PHP tab, select the latest available version. On the Server tab, specify the Apache document root folder. Creating a separate folder in Documents is convenient to avoid mixing projects with system files.
Creating a database
Start the servers by clicking Start Servers. The MAMP start page will open. Click phpMyAdmin to access the MySQL web management interface.
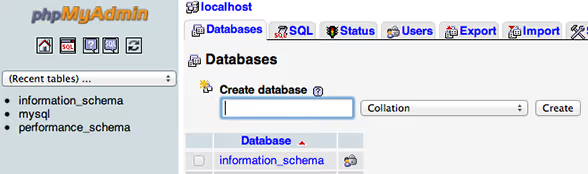
In phpMyAdmin, click "Create database". Choose any name: wordpress, wpdev, or test. Remember it; you will need it when configuring wp-config.php. Click "Create". The database is ready, the servers are running, and you can install WordPress.
Downloading WordPress
Download the latest version of WordPress from wordpress.org/download. At the time of writing, this is version 6.7, an archive of about 25 MB.
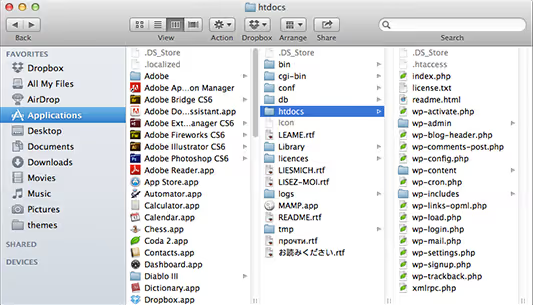
Unpack the archive with a double-click. Open the resulting wordpress folder and copy all its contents to the Applications/MAMP/htdocs folder. This is where Apache looks when you access localhost.
Step 1. Editing the hosts file
This step is critical for multisite; without it, WordPress cannot work with clean URLs without port numbers.

Open Terminal and run:
1 sudo nano /private/etc/hosts
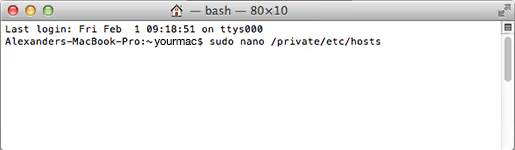
The system will ask for your administrator password; enter it. In the editor that opens, use the down arrow to scroll to the end of the file and add a line (replace test with your database name):
1 127.0.0.1 test
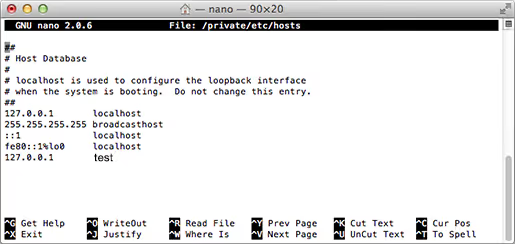
Press Control+X to exit, then Y to save changes, and Enter to confirm the filename.
Step 2. Configuring wp-config.php
Go to MAMP/htdocs, find the file wp-config-sample.php, and rename it to wp-config.php. Open it in any text editor.
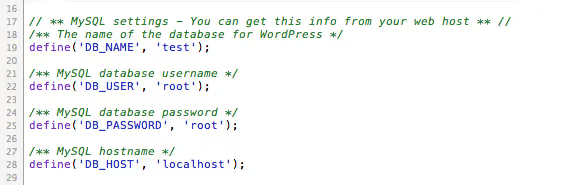
Find the database settings block and replace the values:
1 define('DB_NAME', 'test'); // your database name 2 define('DB_USER', 'root'); // MySQL user in MAMP 3 define('DB_PASSWORD', 'root'); // MySQL password in MAMP 4 define('DB_HOST', 'localhost');
Save the file. WordPress now knows where to connect.
Step 3. Final WordPress installation
In your browser, go to http://test/ (or whatever name you added to the hosts file). The WordPress installation screen will appear:
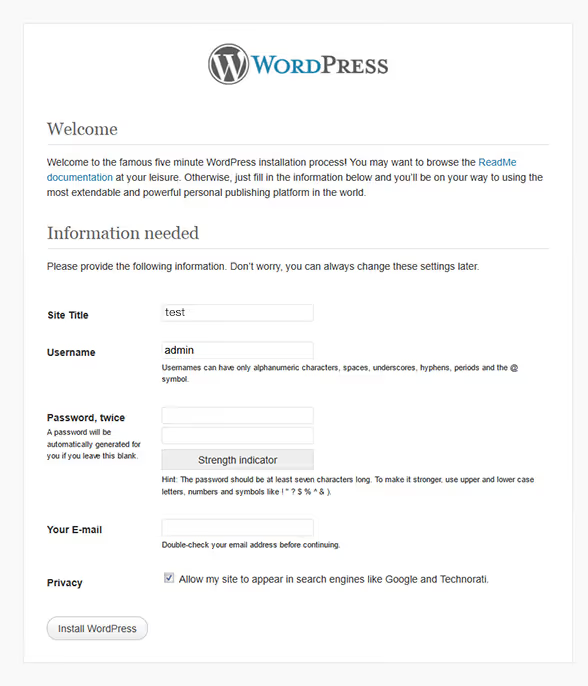
Fill in the fields: site title, username, password, and administrator email. Click "Install WordPress". After a few seconds, you will see the success screen:
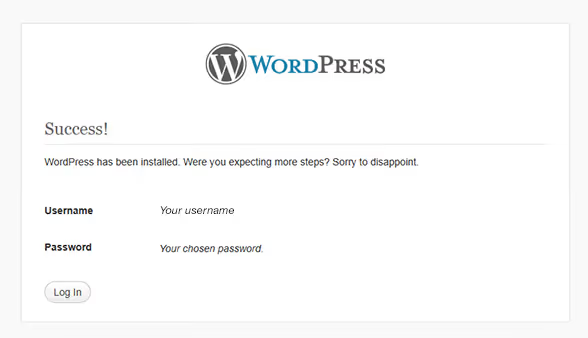
Your local WordPress is installed and ready to use. But for theme development, this is not enough; you need multisite.
Configuring WordPress multisite
Multisite allows you to create multiple test sites within a single WordPress installation. For theme developers, this is invaluable: you can maintain five site versions with different themes and see changes instantly without switching between installations.
Showing hidden files
Multisite requires editing the .htaccess file, which macOS hides by default. Open Terminal and run two commands:
1 defaults write com.apple.Finder AppleShowAllFiles true 2 killall Finder
Finder will restart, and hidden files will become visible. After completing multisite configuration, you can revert this by replacing true with false.
Enabling multisite in wp-config.php
Open wp-config.php again. Before the line /* That's all, stop editing! Happy publishing. */, add:

1 define('WP_ALLOW_MULTISITE', true);
Save the file. A "Network Setup" section will now appear in the WordPress admin.
WordPress network settings
Make sure MAMP servers are running. Log in to the WordPress admin at http://test/wp-admin/. In the "Tools" menu, you will find a new item: "Network Setup".
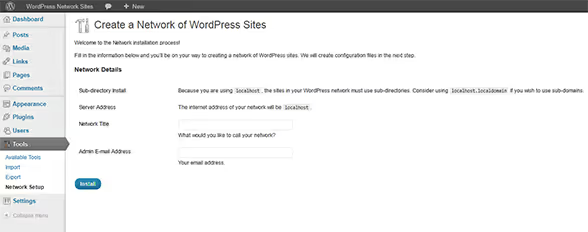
Choose the network type: subdirectories (/site1, /site2) or subdomains (site1.test). For local development, subdirectories are simpler and do not require additional hosts file edits. Enter the network name and administrator email, then click "Install".
Editing.htaccess and wp-config.php
After installation, WordPress will display two code blocks: one for wp-config.php and one for .htaccess.
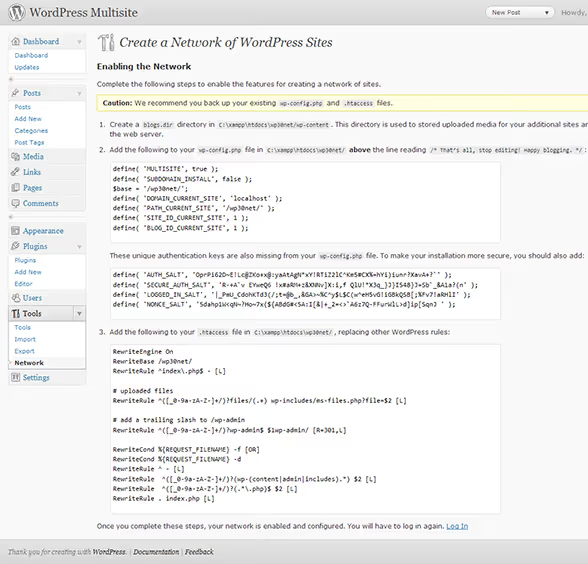
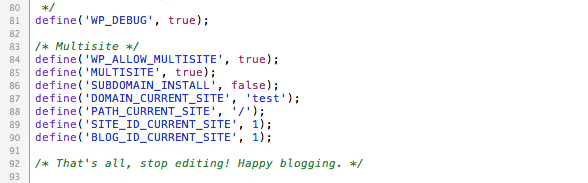
Copy the first block into wp-config.php right after the line define('WP_ALLOW_MULTISITE', true);:
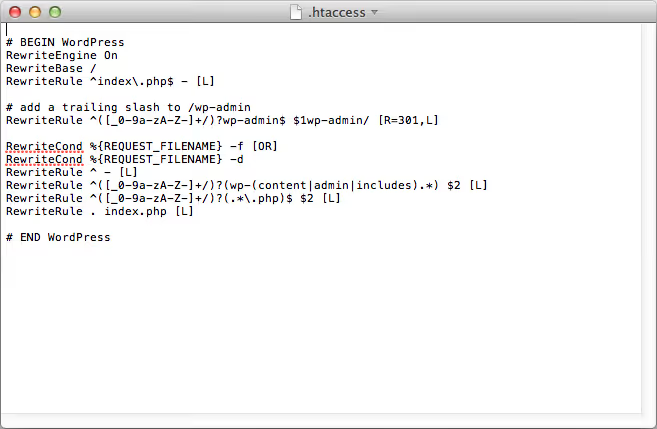
Now copy the second block into the .htaccess file located at the root of htdocs, which is now visible thanks to the previous step. Replace the entire contents of .htaccess with the code from the second block:
Log back in to the WordPress admin. Multisite is now activated.
Adding test sites
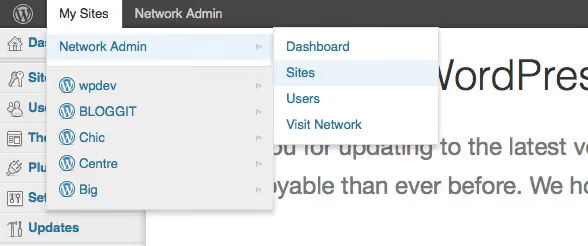
A new item appears in the admin bar: "My Sites" → "Network Admin" → "Sites" → "Add New".
Enter the new site address (subdirectory), title, and administrator email:
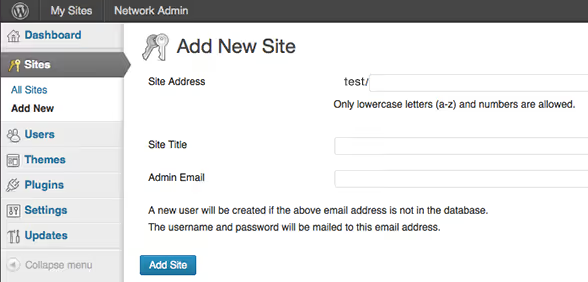
Click "Add Site". Repeat for each test environment. You can now activate different themes on different sites within the multisite network and test them in parallel, without a single live domain.
Video tutorial
If you prefer a visual format, here is a complete video guide for installing WordPress on macOS via MAMP. The author walks through all the steps from downloading to the first admin login, including common errors and how to fix them.
⁉️🤔 Frequently asked questions
Do I need to install MAMP PRO, or is the free version enough?
The free version of MAMP is sufficient for WordPress theme development. MAMP PRO adds virtual hosts with automatic hosts file editing, a built-in mail server for testing emails, and site migration. For local theme development, these features are not essential. The free version covers all the needs of a theme developer.
MAMP or Local WP: which should I choose for Mac?
Local WP is simpler for initial setup: the installation wizard creates a site in three clicks. But MAMP gives you full control over PHP versions (you can switch on the fly), direct access to Apache and MySQL, and native multisite support without workarounds. If you are developing themes, MAMP is more flexible. If you are simply testing content before publishing, Local WP is faster.
Why can't WordPress find the database during installation?
Three common causes: (1) Apache or MySQL ports do not match those in
wp-config.php; open the MAMP start page and compare the MySQL port withDB_HOST; (2) the default MySQL password in MAMP isroot, not empty; (3) the database name inwp-config.phpcontains a typo or extra space. Check these three points, and the connection will work.
Is multisite setup mandatory for theme development?
Not mandatory, but highly recommended. Without multisite, testing each theme requires either switching themes on a single site (losing the previous theme's settings) or installing separate WordPress instances in different htdocs folders. Multisite solves this elegantly: one WordPress, one database, but five sites with five different themes.
Can I later move the local site to a live hosting?
Yes. Free migration plugins handle this: All-in-One WP Migration, Duplicator, or WP Migrate. They package the site into an archive with automatic URL replacement. Alternatively, use the manual method: export the database via phpMyAdmin, copy files via FTP, and replace
http://testwith your live domain using find-and-replace in the database dump (Better Search Replace plugin).
What's next: from local installation to your first theme
A local WordPress with multisite on Mac is your launchpad. The logical next step after reading this guide: create a minimal theme from scratch, understand the template hierarchy, and connect your first style.css. The multisite you just configured lets you test your theme across multiple test sites immediately, without fear of breaking production.
If you encounter an error at any step, double-check the MAMP ports (80 and 3306) and the 127.0.0.1 line in the hosts file. Nine out of ten local installation problems come down to exactly this.

A professional team of writers and editors specializing in creating quality content.