














🛠 Complete guide to WordPress multisite
Ten websites on WordPress, each with its own login, its own admin panel, its own updates. After a month, administration becomes a full-time job.
WordPress Multisite solves this problem at the root: one installation, one login, and as many sites as you need. This mode has been built into the WordPress core since version 3.0 and requires no third-party plugins. Below is a step-by-step multisite setup from enabling it in wp-config.php to managing a ready network.
💡 Quick overview:
- Prepare WordPress: install a site on your own hosting and get access to files via FTP or through a file manager. WordPress.com plans are not suitable for multisite.
- Enable multisite: add
define('WP_ALLOW_MULTISITE', true);to wp-config.php. After refreshing the admin panel, a "Network Setup" option will appear. - Configure the network structure: choose subdomains or subdirectories and fill in the basic parameters. This decision determines the URL format for all sites in the network.
- Activate the network: copy the code provided by WordPress into wp-config.php and .htaccess, save the files, and log into the admin panel again. The network is launched.
Step 1: Preparing the WordPress installation
Multisite can be enabled on an existing site or on a fresh WordPress installation; there is no fundamental difference. The main requirement: WordPress must be installed on your own hosting (self-hosted). WordPress.com plans do not support multisite.
If the site is already running, temporarily deactivate all plugins before setup. This is insurance against conflicts during the network activation stage. After multisite is working, you can enable the plugins again; they will be picked up correctly.
Verify that you have access to the site files via FTP or through the hosting file manager. You will need to edit wp-config.php and.htaccess manually; there is no way around needing access to the file system.
Step 2: Enabling multisite in wp-config.php
Open the wp-config.php file in the root of your WordPress installation. Find the line:
1 /* That's all, stop editing! Happy publishing. */
Right above it, add:
1 /* Multisite */ 2 define( 'WP_ALL_MULTISITE', true );
Save the file. This single line activates the hidden multisite functionality in the WordPress core. At this stage, the network has not been created yet; you have only enabled the tool for setting it up.
Refresh the admin page (or log in again if the system logged you out). A new item will appear in the Tools menu: Network Setup.
Step 3: Network setup, subdomains or subdirectories
Go to Tools → Network Setup. The "Create a Network of WordPress Sites" page will open:

Here you make a key architectural decision: the address structure for sites in the network:
Subdomains: addresses like
site1.yourdomain.com,site2.yourdomain.com. They look like independent sites and are better for SEO. They require a wildcard DNS record on the server.Subdirectories: addresses like
yourdomain.com/site1,yourdomain.com/site2. Easier to set up, no additional DNS configuration required. Works on any hosting.
If the site is older than a month, WordPress will not let you choose subdomains for an existing installation, only subdirectories. This is not a limitation but protection against broken links (old URLs of permanent pages would conflict with addresses of new sites in the network).
Fill in the fields: network name and network administrator email. The super admin email does not have to match the current site administrator's email, but notifications about new registrations and network issues will go to this address.
Click Install.
Step 4: Activating the network, wp-config.php and.htaccess
After clicking "Install," WordPress will show a page with instructions and two code blocks:

Before making changes, create a backup of wp-config.php and.htaccess. If you make a typo in either file, the site will go down; a backup will let you roll back in seconds.
Add to wp-config.php (right after the define('WP_ALLOW_MULTISITE', true); line you already added in step 2):
1 define( 'MULTISITE', true ); 2 define( 'SUBDOMAIN_INSTALL', false ); 3 define( 'DOMAIN_CURRENT_SITE', 'yourdomain.com' ); 4 define( 'PATH_CURRENT_SITE', '/' ); 5 define( 'SITE_ID_CURRENT_SITE', 1 ); 6 define( 'BLOG_ID_CURRENT_SITE', 1 );
Take the SUBDOMAIN_INSTALL value from the setup screen: true for subdomains, false for subdirectories. DOMAIN_CURRENT_SITE is your domain without https:// and without a trailing slash.
Replace the contents of.htaccess. If there is no.htaccess file, create it in the site root next to wp-config.php. If the file exists, completely replace its contents with the code from the network setup screen. Example for subdirectories:
1 RewriteEngine On 2 RewriteRule .* - [E=HTTP_AUTHORIZATION:%{HTTP:Authorization}] 3 RewriteBase / 4 RewriteRule ^index\.php$ - [L] 5 6 #Rewrite rule: trailing slash for wp-admin 7 RewriteRule ^([_0-9a-zA-Z-]+/)?wp-admin$ $1wp-admin/ [R=301,L] 8 9 RewriteCond %{REQUEST_FILENAME} -f [OR] 10 RewriteCond %{REQUEST_FILENAME} -d 11 RewriteRule ^ - [L] 12 RewriteRule ^([_0-9a-zA-Z-]+/)?(wp-(content|admin|includes).*) $2 [L] 13 RewriteRule ^([_0-9a-zA-Z-]+/)?(.*\.php)$ $2 [L] 14 RewriteRule . index.php [L]
Note: the code on your WordPress screen may differ slightly from the example above. Copy exactly the code your installation provided; it was generated for your specific server configuration.
After saving both files, log out of the admin panel and log in again. WordPress will re-read the configuration and activate the network.
Step 5: Network admin panel
After logging back into the admin panel, a new menu item appears: My Sites → Network Admin:
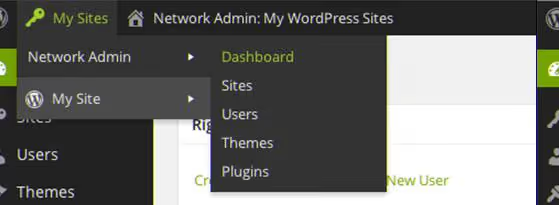
The network admin panel is a separate section where all network sites are managed. Here you can access:
- Sites: list, add, edit, and delete sites in the network.
- Users: manage users, assign administrators to individual sites.
- Themes: install and activate themes for the entire network. A theme becomes available to sites only after network activation.
- Plugins: network activation of plugins (connected to all sites at once) or permission to activate selectively.
- Settings: global parameters: site and user registration, welcome emails, upload limits.
To return to administering a specific site, select it from the My Sites dropdown menu and click Dashboard:
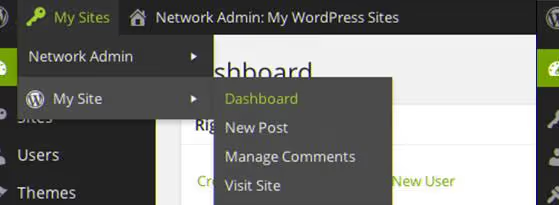
The "Dashboard" button takes you to the regular admin panel of the selected site, the same panel as in a single WordPress installation. Switching between sites is instant, without logging in again.
Step 6: Adding the first site and administration
The network is created. Let's add the first child site.
In the network admin panel, go to Sites → Add New. Fill in the fields:
- Site Address: the URL part, either the subdomain name or the subdirectory name (Latin letters and hyphens only).
- Site Title: the display name that the site owner sees in the admin panel.
- Admin Email: the user with this email will become the administrator of the new site. If a user with this email does not yet exist in the network, WordPress will create an account automatically.
Click Add Site, and you are done. WordPress will create a new site with the default theme, a clean database, and the assigned administrator. The site owner gets the standard WordPress admin panel without access to network settings. If needed, the super admin can enter the dashboard of any network site at any time through the admin panel.
Several important administration points:
- Updates for the core, themes, and plugins are applied once for the entire network. Time savings compared to N separate installations grow linearly with each new site.
- A user can be registered on one site in the network or on several. Permissions on each site are assigned separately.
- Themes and plugins are installed by the super admin. Individual sites see only what the super admin has allowed at the network level.
- Backups are made at the installation level: one database, one file system. Recovery is also one for all.
- Upload limits are set globally in Network Settings: maximum file size and allowed file types. By default, WordPress multisite limits uploads to 1500 KB per site; this value should be increased for specific needs.
- Domain mapping (the WordPress MU Domain Mapping plugin or the built-in functionality in modern versions) allows you to bind a separate domain to any site in the network. A site with the address
network.com/site5can open at its own domainsite5.comwhile maintaining management within the multisite.
When deleting a site from the network, its content (pages, posts, media files) is deleted permanently. WordPress shows a warning but does not create an automatic backup. Before deleting any site, export its data using the standard export tool; it takes a minute but saves content for possible recovery.
Also note that wp-cron works differently in multisite: scheduled tasks run when any site in the network is visited, not each one separately. If one of the sites in the network has low traffic, its cron tasks will still run when someone visits an active site.

⁉️🤔 Frequently asked questions
Can I convert an existing site with content to multisite?
Yes, that is exactly the scenario described in the steps above. Deactivate plugins, add
WP_ALLOW_MULTISITEto wp-config.php, and go through the network setup. The existing content will become the main site of the network with ID 1. There is no going back: disabling multisite and returning to regular mode is harder than enabling it. Make a full backup of the database and files before starting.
Subdomains or subdirectories: which is actually better?
Subdomains look like separate sites and do not have the problem of "what if a plugin creates a page with the same slug as a child site." But subdomains require wildcard DNS and hosting provider support. Subdirectories are simpler: they work right away, without DNS. The downside of subdirectories is slug conflict. If a plugin on the main site creates a
/contactpage and you have a child site atyourdomain.com/contact, the child site will stop opening. Start with subdirectories, and when the network grows, migrate to subdomains by changing the configuration.
How many sites can a single multisite actually handle?
There are no technical limitations; installations with thousands of sites are known. The bottleneck is not WordPress but the server: each site in the network is served by a single PHP process and a single database. On a typical VPS with 2 GB of RAM, 20-50 medium sites work comfortably. As load grows, add RAM, set up object caching (Redis), and move to a dedicated database server.
Can I give different sites different themes and plugins?
Yes, that is exactly how multisite works. The super admin installs themes and plugins at the network level, and the administrator of each site activates the ones they need from the list of allowed options. You can set up forced plugin activation for all sites in the network; this is convenient for security and backup tools.
What will happen to SEO when switching to multisite?
The addresses of the existing content on the main site do not change; SEO is preserved. For new sites in the network, subdomains are perceived by search engines as separate domains (with separate authority), while subdirectories inherit the authority of the main domain. The choice between them depends on whether you want to grow the authority of one domain or develop independent platforms.
What to choose: a ready action plan
WordPress Multisite is not needed by a single-site owner. It becomes justified when there are more than three sites and administering each one separately consumes time that is better spent on content. Make the implementation decision not by the number of sites but by the total cost of supporting them: if the combined time for updates, backups, and monitoring exceeds two to three hours per week, multisite pays for itself in the first month of operation.
- One to two sites: leave separate installations. The overhead of multisite (shared database, shared file system, inability to disable the mode) does not pay off.
- Three to ten sites: go with multisite on subdirectories. Simple setup, fewer moving parts.
- Ten or more, especially for clients or different brands: subdomains with object caching and regular monitoring.
Before launching a production network, practice on a local installation; MAMP or Local by Flywheel will give you a sandbox in about 15 minutes where you can go through all the steps without risking taking down a working site. Make it a rule: if you are changing anything in wp-config.php or.htaccess, backup first, then edit. Once you have set up the network, you can launch new sites in a couple of minutes without repeating the installation and setup routine from scratch.

A professional team of writers and editors specializing in creating quality content.