













🚀 Step by step guide to creating a WordPress blog in 2026
Site crashed after a plugin update? Every WordPress owner has a story like that.
But let's be honest: when you're just starting out, plugins and crashes aren't the main problem. The main problem is where to even begin. Hosting, installation, settings, themes, plugins, your first post. Dozens of forum tabs with advice, half of it outdated, half of it contradictory.
Below is a step-by-step guide that will help you launch a WordPress blog in an hour to an hour and a half, even if you've never administered a site before. No fluff, with specific settings and tested recommendations for 2026.
💡 Quick overview:
- Choose a host with WordPress auto-installation (Bluehost, SiteGround, or Hostinger, any of them will handle a new blog).
- Install WordPress in one click and configure basic settings: site title, permalinks, comments.
- Pick a theme; a free one is enough to start, you can change the design later when traffic picks up.
- Install 4-5 essential plugins: spam protection, SEO, analytics, backup.
- Publish your first post and delete the test content that WordPress creates during installation.
Step 1. Choose a WordPress host
Before you write anything, your site needs somewhere to live. There are hundreds of options, but the rule is simple: free hosting is never quality hosting. A decent plan costs a few dollars a month, and that's more than enough for a new blog.
Three proven options you can start with right now:
Bluehost, budget entry point. The Basic plan includes a free domain, SSL certificate, and one-click WordPress auto-installation. For a blog from scratch, more than enough. In practice, most beginners don't outgrow the starter plan in the first year.
SiteGround, the sweet spot. StartUp is faster than Bluehost on WordPress benchmarks and includes daily backups. Support responds within a couple of minutes in chat. If your budget allows, go with this one.
Hostinger, lowest price. Premium with a free domain and SSL. Decent speed, modern control panel. The downside is that support is only in English, there's no Russian-language chat.
If you're willing to pay more for managed hosting, look at WP Engine. The server updates automatically, backups and security scanning are built in, and support knows WordPress at the developer level. But for starting out, that's overkill; come back to this option when your blog grows.
Note: all three budget hosts support WordPress auto-installation. That means the next step will take you exactly 5 minutes.
Step 2. Install WordPress and configure basic settings
Installing WordPress in 2026 isn't what it was ten years ago. No FTP clients, no manual file uploads, no editing wp-config.php. The host does everything for you.
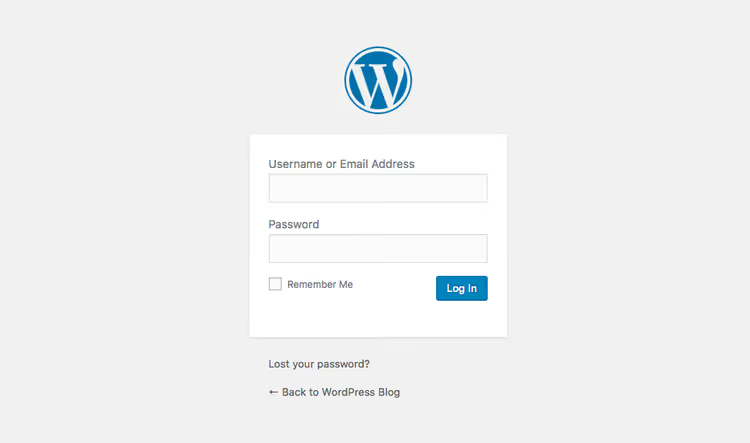
On Bluehost: after signing up, click "Install WordPress" in the control panel. Follow the prompts to select your domain and create an admin username and password. Done.
On SiteGround: WordPress is pre-installed. In the setup wizard, enter your site title, email, and password; the site will be live as soon as the wizard finishes.
On Hostinger: in the hPanel, click "Auto Installer" → WordPress → fill in the fields. In a minute, your site is live.
Other host: any decent host supports WordPress. If there's no auto-installer, download the archive from wordpress.org, upload it via the host's file manager, and follow the installer instructions.
After installation, log in to the admin area: usually this is your-site.com/wp-admin. Use the username and password you created during installation. Now, settings.
General settings
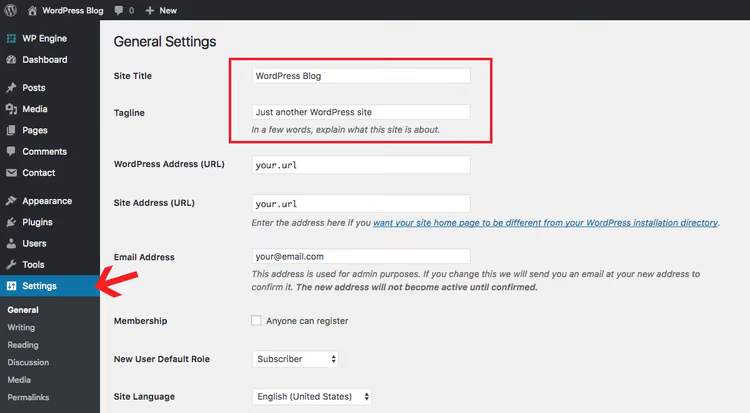
Settings → General. Two fields matter here: Site Title and Tagline. The title is your brand, the tagline is one sentence about what the blog is about. You can change both later, but it's better to set something meaningful right away since they appear in search results. The date and time format is on the same page; set it however you prefer.
Reading settings
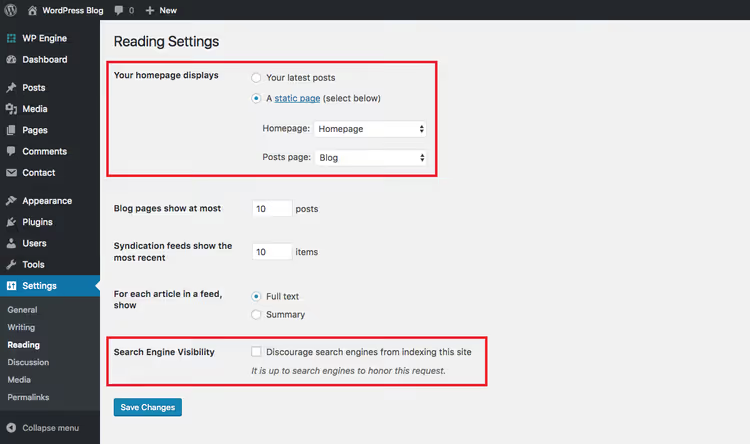
Settings → Reading. Decide what to show on the front page: your latest blog posts or a static page. For a blog, "Your latest posts" makes more sense. A static page is chosen when you need a corporate site with a separate blog page.
Discussion settings
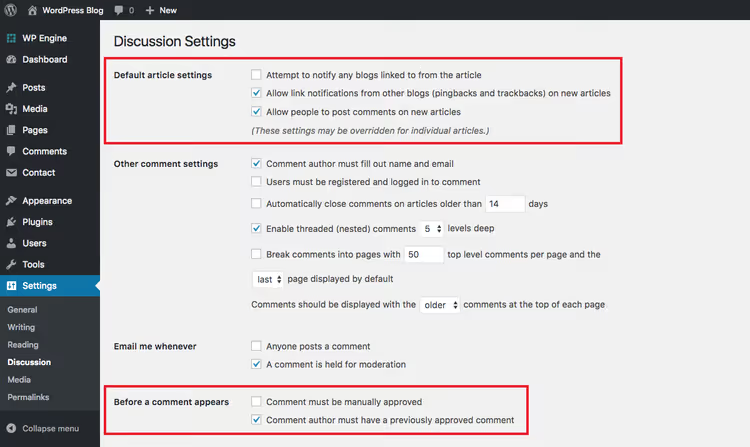
Settings → Discussion. Two key decisions here: whether to allow comments at all and whether to approve them manually. For a new blog, this makes sense: comments are allowed, but the first comment from any author requires manual approval. This blocks spammers without creating barriers for real readers. The rest of the default settings work fine.
Permalink settings
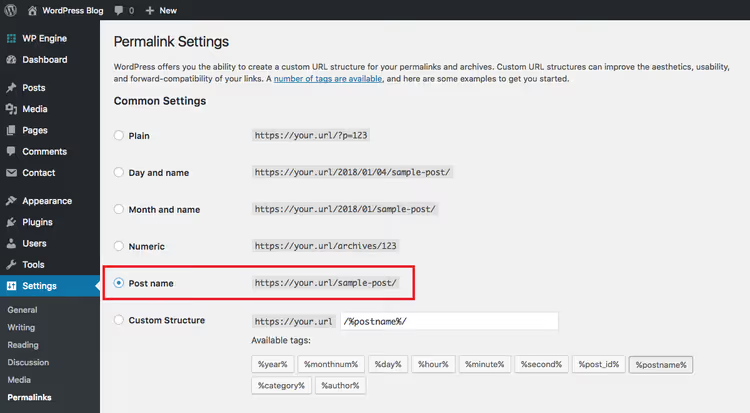
Settings → Permalinks. This is a critical setting that's often skipped. The permalink is what appears in the browser's address bar. By default, WordPress uses a format with a post ID (?p=123), which is ugly and bad for SEO.
Choose "Post name", and the URL will look like your-site.com/post-title/. This is a clean, readable format that both search engines and people love.
Important: don't change the permalink structure after you've started publishing posts. Without proper redirect configuration, old URLs will break and you'll get 404 errors across your entire site. Choose the format now and forget about this setting.
Bonus: user profile
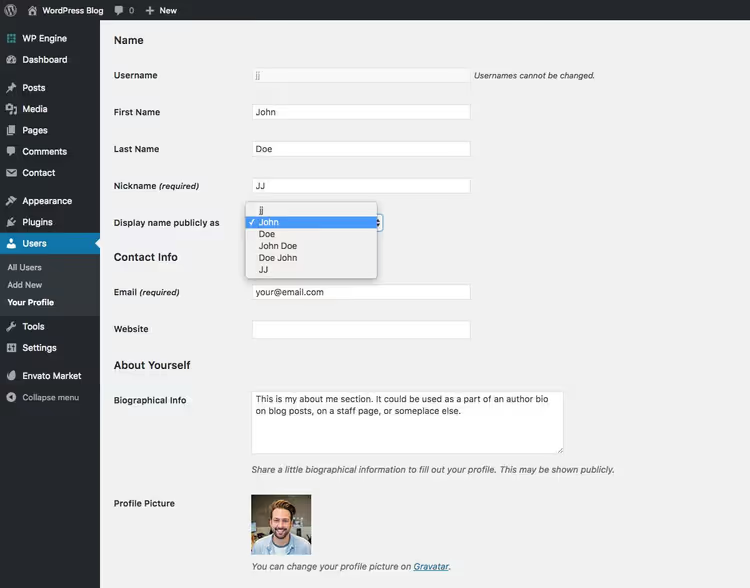
Users → Your Profile. Fill in the display name; this is what readers will see as the author under each post. Choose an option in the "Display name publicly as" dropdown: first name, last name, or nickname. This is also where you set up your Gravatar; upload a photo to en.gravatar.com using the same email you use to log in to WordPress. A good portrait builds trust in the author.
Step 3. Choose a WordPress theme
This is where most beginners get stuck for days: scrolling through hundreds of themes, comparing demos, unable to decide. Take this burden off yourself: when you're just starting out, the theme doesn't matter. At all. Your task is to create content and show it to people. You'll work on design when you have an audience that can tell you whether they like it or not.
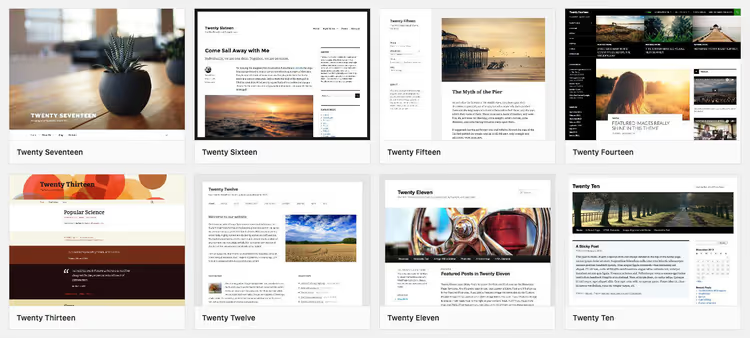
WordPress ships with an annual default theme. In 2026, this is Twenty Twenty-Six, a clean, minimalist design with full support for the block editor and patterns. It's more than enough for starting out, as it's specifically designed for blogs.
When you want more options, installing a new theme is easy: Appearance → Themes → Add New. Upload the theme's zip file, install, activate. Done.
A few themes tested on real projects:
Chic, an elegant blog theme with WooCommerce
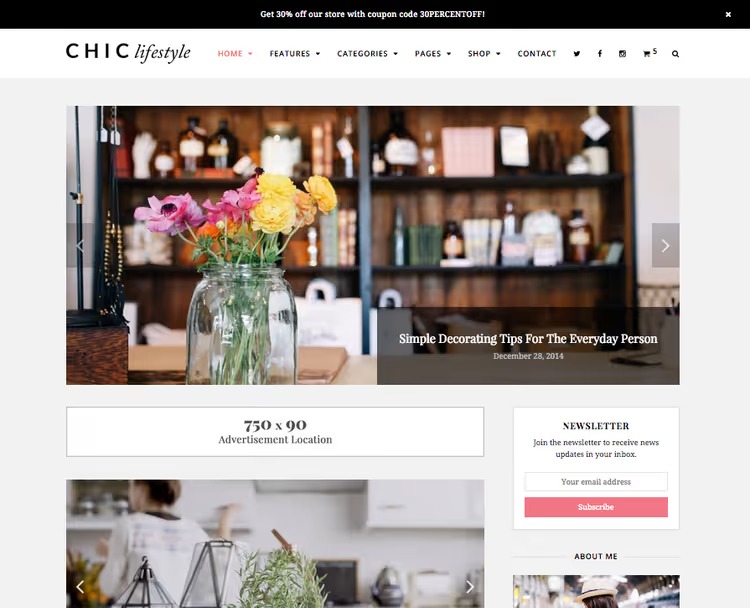
Chic is a theme for lifestyle blogs with full WooCommerce support. Write about your favorite topics while selling your own products. Responsive, clean typography. A good choice if you plan to monetize the blog with products from day one.
Zero, a free minimalist theme
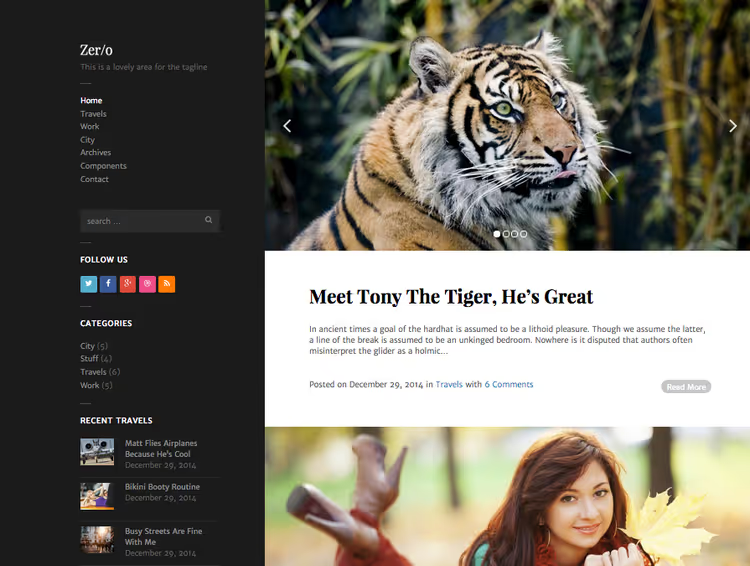
Zero is a simple, lightweight option with navigation on the left sidebar. Minimal settings, nothing extra. Ideal for a personal or photo blog. Free.
Mesa, a stylish theme for personal blogs

Mesa is a free theme with support for post formats (galleries, videos, quotes). It has built-in color scheme and font settings. For a personal or professional blog, it's an excellent base with no cost.
Total, a universal builder

Total is a premium theme with a visual page builder. Unlimited colors, custom fonts, portfolio, galleries, sliders, video and audio post formats. It's not really a theme but a platform for creating any type of site, from a personal blog to a corporate portal.
If none of these work for you, check out Astra (free, the most popular theme on WordPress.org with 1M+ installs) or Kadence (fast, with an excellent header and footer builder). Both are free in their basic versions and work with any page builder.
Step 4. Install essential plugins
If themes are the first stumbling block for beginners, plugins are the second. It's easy to spend an evening installing 20 plugins before you've written your first post. Don't do that.
In reality, you don't need any plugins at all to start a WordPress blog. WordPress "out of the box" already does everything necessary. But 4-5 plugins will make your blog noticeably better without adding complexity.
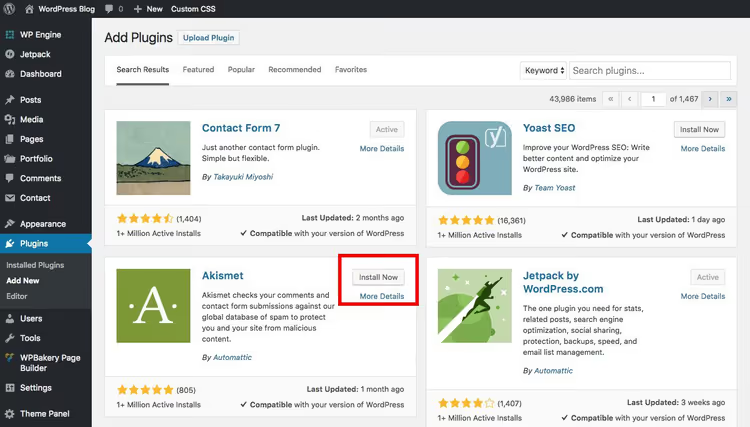
Installing any of them is the same: Plugins → Add New, search by name, "Install Now", then "Activate". That's it.
Akismet, comment spam protection
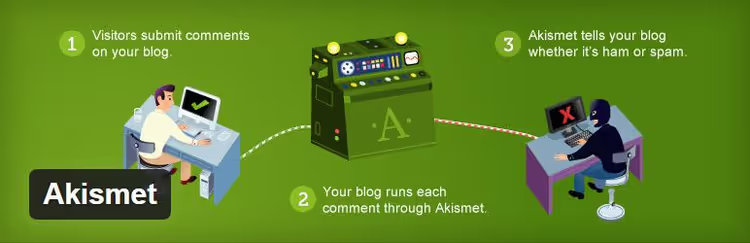
Comment spam shows up from day one; bots don't wait for you to build an audience. Akismet is WordPress's own plugin that filters spam automatically. Install, activate, choose the strictness level, and forget about the problem. Periodically check the spam folder: sometimes real comments end up there. Akismet on WordPress.org
Yoast SEO, search optimization without expertise

SEO is a discipline that takes years to learn. Yoast SEO handles the critical minimum for you: breadcrumbs, meta tags, XML sitemap, text readability analysis. The free version is more than enough for a blog. Yoast SEO on WordPress.org
MonsterInsights, Google Analytics in your admin panel

You can connect Google Analytics to your site manually by inserting the tracking code in the header. But MonsterInsights does it in 2 clicks and displays key metrics right in the WordPress admin: visits, popular pages, traffic sources. No need to log into Google Analytics separately every day. MonsterInsights on WordPress.org
Jetpack VaultPress Backup, backup solution

A Plan B in case your site goes down. VaultPress (now part of Jetpack) creates complete site backups: files, database, settings. One-click restoration. Plans start at a few dollars a month, cheap for the peace of mind that your content won't be lost. Jetpack VaultPress Backup
Don't want to pay for backups? There are free alternatives. UpdraftPlus (free version on WordPress.org) saves copies to Google Drive, Dropbox, or your server on a schedule. Manual method: export the database and files through your hosting panel.
Step 5. Start blogging
Your blog is almost ready to launch. Three things remain: delete the test content, write your first post, and publish it.
Delete the sample page and post
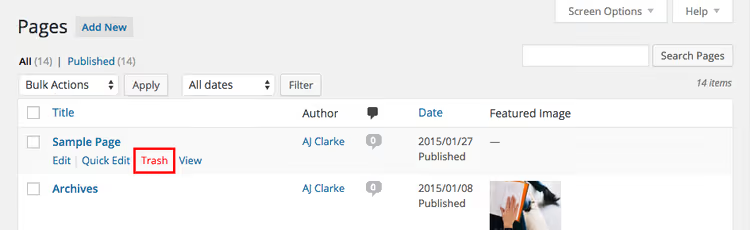
During installation, WordPress creates a demo post called "Hello World!" and a sample page. Delete them: Posts → All Posts → hover over "Hello World!" → Trash. Then Pages → All Pages → do the same with the sample page. And delete the test comment from the "Comments" section. Takes 20 seconds.
Write your first post
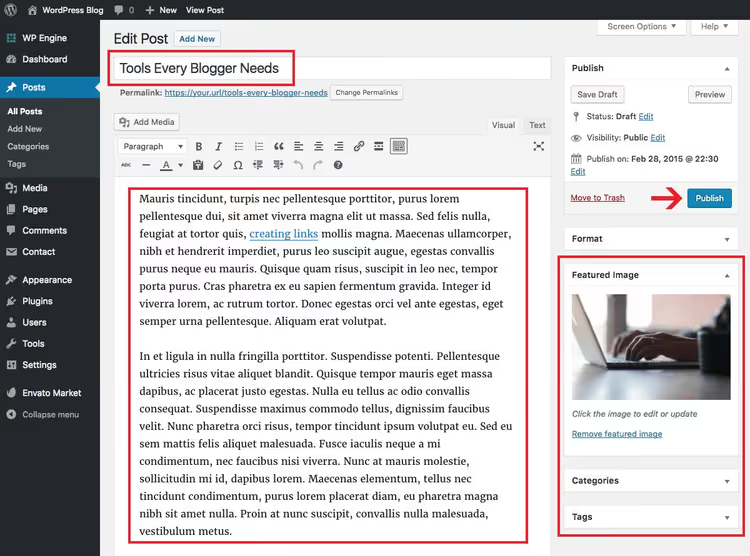
Posts → Add New. The Gutenberg block editor will open. Enter your title and start writing text; each paragraph automatically becomes a block. Add headings, images, lists, and quotes using the "+" button.
Three things to pay attention to before publishing:
Category: assign a category to your post in the sidebar. Categories structure your blog, helping readers find all posts on a topic in one place. Think through 3-5 categories in advance so you don't have to redo them later.
Featured image: in the sidebar there's a "Featured Image" block. Upload an image that will appear in the blog feed and when sharing on social media. Without it, the post looks bare.
Permalink: WordPress will generate a URL from the title. Check that the slug retains the keywords and remove stop words like "and", "in", "on"; a short URL is better than a long one.
Click "Publish". Your first post is on the internet.
⁉️🤔 Frequently asked questions
How much does it cost to launch a WordPress blog?
WordPress itself is free. Expenses: domain (around ten to fifteen dollars a year), hosting (budget plans from a few dollars a month, managed hosting costs more). Minimum budget for the first year is around fifty dollars. You can add a premium theme (one-time purchase, optional) and plugins (most useful ones are free). It's realistic to launch for a minimal amount and buy tools as you grow.
In practice, most bloggers spend their first year on the cheapest hosting plan with a free theme and free plugins. When traffic exceeds 10,000 visitors a month, that's when it makes sense to move to more powerful hosting.
Is it necessary to buy a premium theme?
No. Free themes like the default Twenty Twenty-Six or Astra are fully functional for a blog. Premium themes offer more: additional design settings, built-in page builders, priority support. When your blog grows to a stable 500+ visitors per day, then think about a premium theme.
Can I start a blog on WordPress.com instead of my own hosting?
You can, but the free WordPress.com plan is a stripped-down version: ads you don't control, a third-level domain, restrictions on plugins and themes. For a serious blog, get the Business plan or (cheaper and more flexible) regular hosting with WordPress.org. Understanding the difference between WordPress.com and WordPress.org is worth doing before you invest time in content.
Which page builder should I choose for WordPress?
If the theme doesn't suit you and you want to build pages visually, the standard Gutenberg block editor covers 80% of tasks. For everything else, Elementor (free version on WordPress.org, 5M+ installs). Heavier than Kadence Blocks or Spectra, but more capable. Start with Gutenberg; you probably won't need a page builder.
What should I do if the site crashes after installing a plugin?
Enable recovery mode: add
?wp_die_enable_debug=trueto the URL or check your email, as WordPress automatically sends a message with a link to enter safe mode when it detects a fatal error. In safe mode, deactivate the problematic plugin. If that doesn't help, rename the plugin folder via your host's file manager (wp-content/plugins/plugin-name→plugin-name-off). This will force-disable it.
What's next: your plan for the first month
The blog is launched. Here's the minimum program to keep you from abandoning it after a week:
Week 1: Write and publish 3 posts. Don't polish each one, just start. You'll rewrite your first posts in six months anyway.
Week 2: Connect Google Search Console and submit your sitemap (Yoast SEO generates it automatically at
your-site.com/sitemap_index.xml). This will speed up indexing.Weeks 3-4: Write 4-5 more posts. Check Search Console for what queries are generating impressions and write content targeting them.
Your first visitors will arrive 2-4 weeks after indexing. Your first 100 visitors per day will come in 3-6 months of regular publishing. WordPress provides the platform, but growth depends entirely on the content you create. Get started.

A professional team of writers and editors specializing in creating quality content.