














🔒 How to add Google reCAPTCHA to a WordPress site: a step by step guide
Comment spam, fake registrations, and brute-force attacks: three things every WordPress site owner faces. Bots never sleep, and one morning you might discover hundreds of "users" with bogus email addresses in your database.
Google reCAPTCHA closes this gap completely. This free service filters bots before they even reach a form, without annoying puzzles or "select all traffic lights." Real visitors don't notice the check at all.
Below is a step-by-step guide to setting up reCAPTCHA on WordPress: from obtaining API keys to hiding the badge. With minimal hassle and a couple of well-maintained plugins.
💡 Quick overview:
- Register your site with Google reCAPTCHA and get API keys
- Choose a plugin for your needs: free or with WooCommerce support
- Set up protection for login, registration, comment, and password reset forms
- If needed, hide the reCAPTCHA logo via CSS
What is Google reCAPTCHA and why do you need it
CAPTCHA stands for "Completely Automated Public Turing test to tell Computers and Humans Apart." It's a simple task that a human solves in a second but a bot cannot.

Google reCAPTCHA is an evolution of classic CAPTCHA. Instead of distorted text that annoys real visitors, modern versions analyze behavior: mouse movement, IP address, browser history. If the system recognizes a human, it lets them through silently. If it detects suspicious activity, it shows an additional challenge.
The service is completely free. It runs on Google's infrastructure, doesn't burden your hosting, and works with any WordPress theme.
Three versions of Google reCAPTCHA:
Version | How it works | When to use |
|---|---|---|
reCAPTCHA v2 (Checkbox) | "I'm not a robot" checkbox + possible puzzle | Basic protection for any forms |
reCAPTCHA v2 (Invisible) | Completely invisible, background verification | Minimal UX interference |
reCAPTCHA v3 | Score 0.0-1.0 without user interaction | Advanced filtering with score threshold |
In practice, the Invisible version is enough for most sites: real visitors don't notice it, and bots get blocked.
Step 1: Register your site with Google reCAPTCHA
The first step is to get API keys. No reCAPTCHA plugin will work without them.
- Open the reCAPTCHA admin page and sign in to your Google account.
- In the Label field, enter your site name (this is just for you; visitors won't see it).
- Choose the reCAPTCHA type: for starters, go with v2 (Invisible) for protection without extra clicks.
- In the Domains field, enter your site domain without
https://, for example:techblog.sdstudio.top. - Accept the terms of service and click Submit.
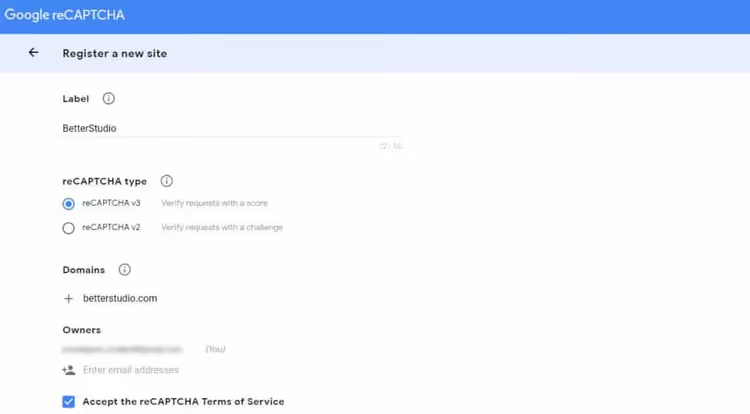
After submitting, you'll receive two keys: Site Key (public) and Secret Key (private). Copy both; you'll need them in the next step. Never share your Secret Key with anyone; it's your "password" for communicating with Google's servers.
Step 2: Choose and install a reCAPTCHA plugin
With keys in hand, all that's left is to install a plugin that adds reCAPTCHA to WordPress forms. There are several options; your choice depends on which forms you need to protect.
Three current plugins for 2026:
- Advanced Google reCAPTCHA: 200,000+ active installations, available on WordPress.org. Supports v2, v2 Invisible, v3, and Math CAPTCHA. Protects login, registration, comments, and WooCommerce out of the box. The best choice for most sites.
- reCaptcha by BestWebSoft: 100,000+ installations, plugin page. v2, v3, Invisible; fine-tuned role and IP exclusion settings. WooCommerce and Contact Form 7 support requires the Pro version.
- CAPTCHA 4WP: 100,000+ installations, available in the directory. v2, v2 Invisible, v3; auto-detects user language, configurable score threshold for v3.
Installation is standard for any of them: Plugins → Add New → type the name → Install → Activate. After activation, a settings section appears in the sidebar (usually under Settings or as a separate menu item).
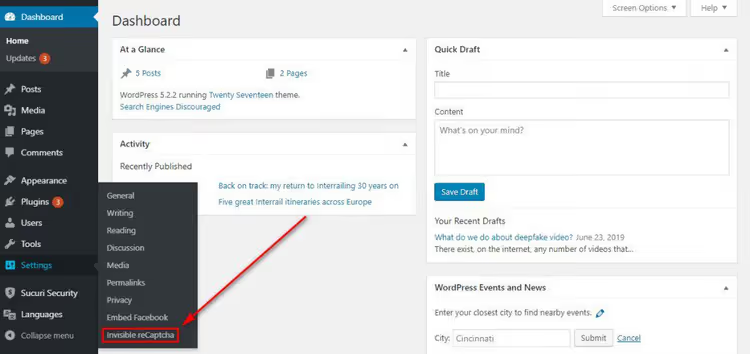
Go to the plugin settings and paste the Site Key and Secret Key you obtained in step 1. Check the boxes for the forms you want to protect: login page, registration, comments, and password reset. Save your changes.
Verify it works: open the login form in incognito mode. A reCAPTCHA badge should appear in the bottom right corner. The plugin is working.
Step 3: Protect WooCommerce forms and third-party plugins
If your site has WooCommerce, BuddyPress, Contact Form 7, or Gravity Forms, you need to enable protection for each group of forms separately.
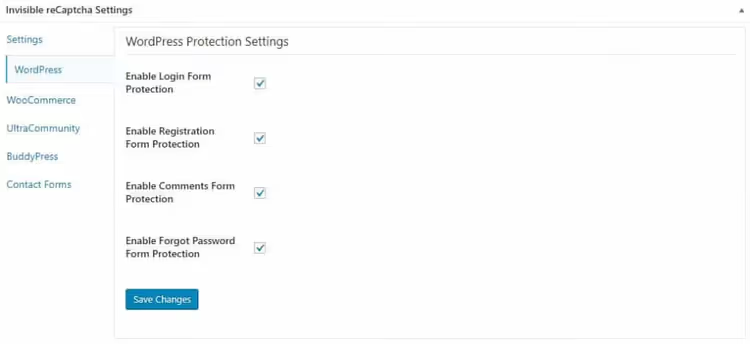
Open the tabs in your plugin that correspond to these extensions and activate protection for the forms you need:
- WooCommerce: login, registration, product reviews, password recovery, checkout page.
- Contact Form 7 / Gravity Forms: integration is usually automatic. The plugin adds reCAPTCHA to all forms from these extensions after you activate the tab.
- BuddyPress / Ultra Community: protection for community registration and login.
Note: if you run a WooCommerce store, choose a plugin with WooCommerce support in the free version (Advanced Google reCAPTCHA), otherwise protecting checkout forms will require a paid upgrade.
Step 4: Change badge position and hide the logo
By default, the reCAPTCHA badge sits in the bottom right corner on all pages where protection is enabled. This isn't always appropriate. On a landing page or checkout page, for example, the Google badge can be distracting.
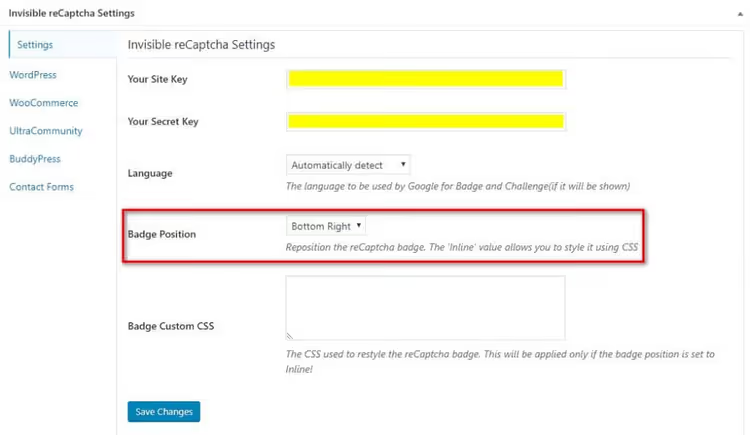
Most plugins let you choose the badge position in settings:
- Bottom right: bottom right corner (default)
- Bottom left: bottom left corner
- Inline: badge appears only next to the form
If you want to hide the badge completely, add this CSS in Appearance → Customize → Additional CSS (or in your child theme's stylesheet):
1 .grecaptcha-badge { 2 visibility: hidden; 3 }
There's a catch, though: according to Google's rules, when hiding the badge you must add text attribution next to the protected form. For example:
1 This site is protected by reCAPTCHA and the Google 2 <a href="https://policies.google.com/privacy">Privacy Policy</a> and 3 <a href="https://policies.google.com/terms">Terms of Service</a> apply.
Place this text below each form where the badge is hidden. Without attribution, Google may block verification, and the form will stop submitting.
Video: visual reCAPTCHA setup in 7 minutes
If you prefer watching to reading, here's a visual tutorial on installing Google reCAPTCHA on WordPress:
⁉️🤔 Frequently asked questions
Does reCAPTCHA slow down my site?
reCAPTCHA scripts load from Google's servers, not from your hosting. For most sites, the increase in load time is unnoticeable. If speed is critical, use v3: its script is lighter than v2, and verification happens asynchronously in the background. On a test site with the Astra theme and WP Rocket caching, the PageSpeed difference was less than 2 points.
Can reCAPTCHA be bypassed?
No CAPTCHA system can completely prevent bypasses. However, Google constantly updates its algorithms, and the cost of bypassing reCAPTCHA v3 is higher for spammers than finding an unprotected site. After installing reCAPTCHA, the flood of spam comments and fake registrations typically drops to zero. If spam continues, verify that reCAPTCHA is active on the problematic form: a common mistake is an unchecked box in the settings.
reCAPTCHA, hCaptcha, or Cloudflare Turnstile: which should I choose?
For a WordPress site, the easiest starting point is Google reCAPTCHA: keys are issued in a minute, plugins have been refined over years, and the service is free with no request limits. hCaptcha and Cloudflare Turnstile are worthy alternatives, but there are fewer WordPress plugins for them, and documentation in languages other than English is scarce. If you fundamentally want to avoid Google services, use Cloudflare Turnstile via the Simple Cloudflare Turnstile plugin.
What should I do if my site stops working after installing the plugin?
Disable the plugin via FTP: rename the plugin folder in
/wp-content/plugins/, and WordPress will deactivate it automatically. Check system requirements: most reCAPTCHA plugins require PHP 7.4 or higher and WordPress 5.6 or above. Before installing any security plugin, make a full backup. If your site is on Managed WordPress hosting, create a staging copy and test there.
Does reCAPTCHA protect against brute-force attacks on wp-login.php?
Yes, if the plugin is activated for the login form. A bot attempting to guess passwords via
wp-login.phpencounters reCAPTCHA and cannot proceed without solving it. Combined with login attempt limiting (a plugin like Limit Login Attempts Reloaded), this completely stops brute-force attacks.
To protect or not to protect: the verdict on reCAPTCHA
Google reCAPTCHA won't make your site invulnerable, but it will close the three messiest holes: comment spam, fake registrations, and automated password guessing. Free, without interfering with user experience, and set up in 10 minutes.
If your site is just a blog with comments disabled and no user registration, you don't need reCAPTCHA. In all other cases, install it without hesitation.
The main recommendation: use Advanced Google reCAPTCHA or reCaptcha by BestWebSoft. Both plugins receive updates, are compatible with the current WordPress version, and don't break your site after updates.
Is spam a problem not just in forms but also in comments? Check out our guide on all 18 ways to stop spam comments in WordPress, from built-in settings to advanced plugins.
If you need reCAPTCHA specifically for the comments section, there's a separate guide on adding reCAPTCHA to the comment form.

A professional team of writers and editors specializing in creating quality content.