














🔄 How to regenerate thumbnails in WooCommerce (5 steps)
Changed your WooCommerce theme and product images went haywire? Been there. After switching templates, old thumbnails remain cropped to the previous theme's dimensions while the new theme requires completely different proportions. The result: cropping in some places, stretching in others, and blank spaces where featured images should be.
Manually editing every product is a dead end when your catalog has hundreds of items. Fortunately, WordPress offers three working methods to regenerate thumbnails automatically: a plugin, the built-in WooCommerce mechanism, and WP-CLI. Each suits different situations.
Let's walk through all five steps, from the simplest to the most advanced.
💡 Quick overview:
- Install the free plugin Regenerate Thumbnails from the WordPress.org repository: it handles the vast majority of regeneration tasks.
- Run a full regeneration via Tools → Regenerate Thumbnails: the plugin processes all images in one pass.
- For a single image, use regeneration from the media library: quick and without mass rebuilding.
- If you have a recent WooCommerce version (3.3+), enable the built-in background regeneration: it triggers automatically when dimensions change.
- For large stores with shell access, use WP-CLI
wp media regenerate: faster than the plugin and without HTTP overhead.
Step 1: Install the Regenerate Thumbnails plugin
This is a free plugin with one million active installations on WordPress.org, maintained by the Automattic team. It does exactly what the name promises, without unnecessary interface or settings.
Go to Plugins → Add New, search for "Regenerate Thumbnails", click Install Now, then Activate. The plugin requires no configuration: after activation, the Tools → Regenerate Thumbnails menu item immediately appears in the admin panel.
Note that the plugin works with original uploaded files. It doesn't recompress source images but creates new thumbnails using the current dimensions defined in the theme settings and Settings → Media. Old thumbnails are optionally deleted (check "Delete old, unused thumbnails").
Step 2: Run a full regeneration of all thumbnails
Open Tools → Regenerate Thumbnails. The interface is minimalist: one button and three options.
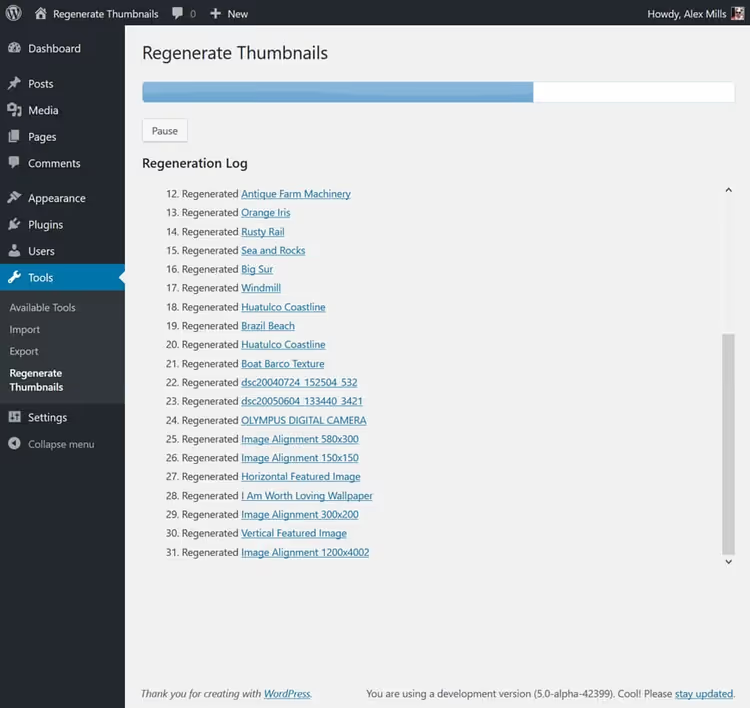
Before starting, make sure Skip regenerating existing correctly sized thumbnails is selected: this saves time by skipping thumbnails that already match the required dimensions.
Click Regenerate All Thumbnails. The plugin will process each image in the media library one by one. For a hundred images, the process takes 2-3 minutes. For several thousand, up to 15-20 minutes.
Don't close the browser tab while regeneration is running. If the page refreshes on its own, no problem: already processed images stay rebuilt, and the plugin simply continues from where it left off.
After completion, you'll see a summary showing how many thumbnails were successfully recreated and how many had errors. Errors usually relate to corrupted files (damaged JPEG or non-standard format), which are visible in the log.
The result is irreversible. You cannot roll back rebuilt thumbnails to previous versions, so back up your site before mass regeneration.
Step 3: Restore one specific image
Mass regeneration isn't always necessary. If you replaced a single product card and want to rebuild only its thumbnails, the plugin lets you do this selectively.
Go to Media → Library and switch to List View. Next to each image in the row, you'll see a Regenerate Thumbnails link.
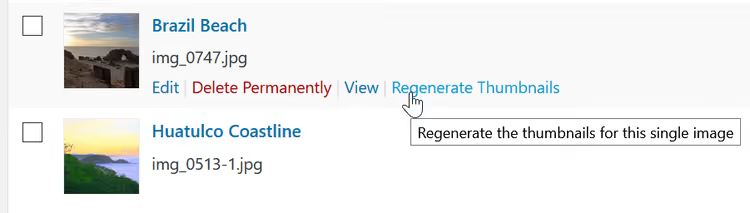
Click it, and the plugin will rebuild thumbnails only for that file. Processing time for a single image is 1-2 seconds.
This same method works for batch regeneration: check the boxes next to the images you need, select Regenerate Thumbnails from the bulk actions dropdown, and click Apply. Convenient when edits affected several dozen images rather than the entire catalog.
By the way, the same option is available on the individual attachment edit page: click an image in the media library, and a regeneration button appears in the sidebar.
Step 4: Enable WooCommerce's built-in regeneration
Starting with WooCommerce 3.3, background thumbnail regeneration is built into the core. It triggers automatically in two cases: when you change image dimensions through the customizer and publish them, or when you switch themes.
Here's how it works: WooCommerce detects a mismatch between current thumbnail sizes and defined sizes, queues a background task, and gradually rebuilds everything needed. The customizer provides live preview, so changes are visible immediately, even before publishing.
You can check whether the queue is running in WooCommerce → Status → Logs: select the wc-background-regeneration log. If the process is active, a notice with a cancel button appears in the admin panel.
When the built-in mechanism doesn't work (for example, the site is behind BasicAuth and the background queue can't make HTTP requests to itself), disable it with a filter:
1 add_filter( 'woocommerce_background_image_regeneration', '__return_false' );
After that, run regeneration manually via the plugin or WP-CLI.
For most stores on recent WooCommerce versions, this built-in mechanism is sufficient. The Regenerate Thumbnails plugin is needed when you want manual control over the process or want to clean up old unused thumbnails.
Step 5: Regenerate via WP-CLI (for large stores)
The command line is the fastest method because there's no overhead from HTTP requests and browser interface. Suitable if you have SSH access and WP-CLI installed.
Basic command to regenerate all thumbnails:
1 wp media regenerate --yes
The --yes flag skips confirmation. Without it, WP-CLI prompts for confirmation on each attachment, which is pointless with thousands of images.
For a single attachment, specify its ID:
1 wp media regenerate 123
The useful --image_size option specifies a particular size for regeneration. For example, if the theme added a new shop_catalog size and the others don't need touching:
1 wp media regenerate --image_size=shop_catalog
For very large stores (tens of thousands of products), run the command inside screen or tmux so the process doesn't break if the SSH session disconnects. And definitely back up before running: WP-CLI, like the plugin, irreversibly overwrites thumbnails.
⁉️🤔 Frequently asked questions
Do I need to regenerate thumbnails after updating WooCommerce?
Updating WooCommerce by itself doesn't change image dimensions, so regeneration isn't required. But if the update includes a customizer settings reset or you updated the theme at the same time, check thumbnail dimensions and run regeneration if there's a mismatch.
What should I do if regeneration gets stuck?
Refresh the Tools → Regenerate Thumbnails page. The plugin will continue from the same point: it processes images one by one and doesn't lose progress. If it keeps getting stuck on the same file, the source image is probably corrupted. Download it from the media library, resave it in an image editor, and upload it again.
Can I regenerate thumbnails on a test site and then transfer them to production?
Technically yes: copy the
/wp-content/uploads/folder after regeneration. But this is risky: thumbnails are tightly bound to dimensions defined in the theme and Settings → Media. If the production site has different settings, thumbnails won't match again. It's more reliable to run regeneration directly on the production server after backing up.
Why is WP-CLI better than the plugin?
Speed. The plugin makes an HTTP request to itself via AJAX: each file means one request. WP-CLI works directly with the file system and database, without the web server layer. On a thousand images, the difference is minutes versus half an hour. But WP-CLI requires shell access, which not all hosts provide.
Will regeneration delete original images?
No. Both the plugin and WP-CLI and WooCommerce's built-in mechanism only work with thumbnails: copies generated from the original at specific dimensions. The original uploaded file remains untouched. That's why you can run regeneration as many times as you want.
Should I delete old unused thumbnails?
Yes, if your hosting is running out of disk space. The "Delete old, unused thumbnails" checkbox in the Regenerate Thumbnails plugin finds and removes thumbnails whose sizes are no longer registered in either the theme or Settings → Media. Definitely back up before doing this: deleted files can only be restored from a backup.
What to do if images still aren't right after regeneration?
Go through a short checklist. First: open Settings → Media and Appearance → Customize → WooCommerce → Product Images, compare the dimensions. If they don't match what's defined in the theme, regeneration produces different thumbnails than the template expects. Second: check whether a caching plugin or CDN is caching old thumbnails, and clear the cache. Third: open the source file from the media library: if the original itself is low resolution, no regeneration will improve the quality.
For most situations, the free Regenerate Thumbnails is enough. If your store is large and you need regeneration regularly, learn WP-CLI: one command saves dozens of minutes. And on recent WooCommerce versions, the background mechanism often triggers on its own: just publish the new dimensions in the customizer.

A professional team of writers and editors specializing in creating quality content.