













 AIIllustrative image: AI-generated
🖼 How to serve WebP images in WordPress: 3 methods
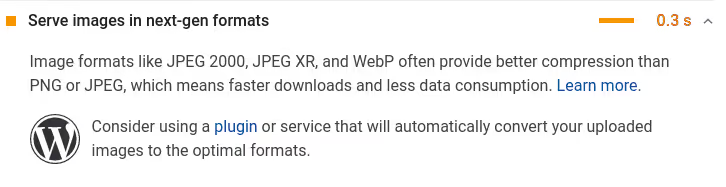
PageSpeed Insights shows the "Serve images in next-gen formats" recommendation, yet images on your site are still in JPEG. Converting everything to WebP is straightforward. The challenge is different: a small percentage of visitors with older browsers will see broken images if you simply replace the format on the server.
The task isn't about conversion, it's about selective delivery: WebP to those who support it, and the original to everyone else. In WordPress this is solved in three different ways, each for a specific stack and budget.
💡 Quick overview:
- Understand what WebP is and why it's better than JPEG
- Learn the two approaches to serving WebP
- Choose one of three methods for your stack and budget
- Configure the plugin and verify the result in Chrome DevTools
What WebP is and why you need it
WebP is an image format from Google that compresses better than JPEG and PNG at the same visual quality. An image weighing 100 KB in WebP weighs 55-75 KB. No magic: just a more efficient compression algorithm.
The format isn't new. The specification was published by Google in 2010. Since then WebP has gone from experiment to standard: lossy and lossless compression, transparency, animation. Essentially it combines the capabilities of JPEG, PNG and GIF in one container.
Quick comparison with traditional formats:
| JPEG | GIF | PNG | SVG | WebP |
|---|---|---|---|---|---|
Vector | ❌ | ❌ | ❌ | ✅ | ❌ |
Raster | ✅ | ✅ | ✅ | ❌ | ✅ |
Transparency | ❌ | ✅ | ✅ | ✅ | ✅ |
Animation | ❌ | ✅ | ✅ | ✅ | ✅ |
Lossy compression | ✅ | ❌ | ❌ | ❌ | ✅ |
Lossless compression | ❌ | ❌ | ✅ | ❌ | ✅ |
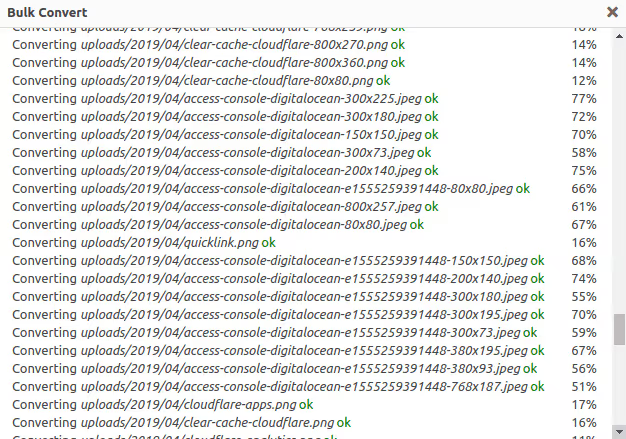
The size difference is noticeable. For a site with fifty images per page, switching to WebP reduces total weight by multiples. The impact on Core Web Vitals and search rankings is direct.
Why you can't just enable WebP everywhere
The answer comes down to compatibility. Today WebP is supported by over 96% of browsers: Chrome, Firefox, Safari (from iOS 14), Edge. But there remains a small percentage of old devices that don't understand the format.
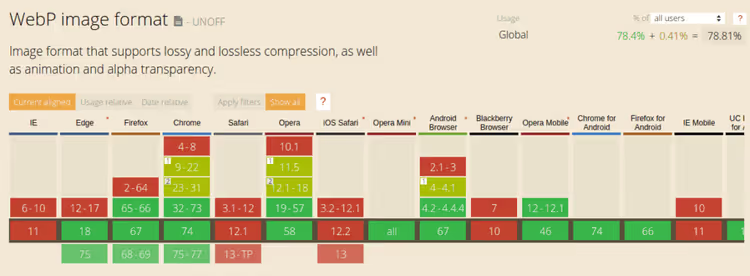
If you simply replace all JPEGs with WebP on the server, those few percent of visitors will see broken images. For a commercial site or online store, this loss of users is unacceptable.
So the task comes down not to "convert images," but to "serve WebP to those who support it, and the original to everyone else."
Two basic approaches to serving WebP
Before moving on to methods for WordPress, it's worth understanding how the browser and server negotiate format. There are only two mechanisms.
Approach 1: tag
The browser is offered a choice between WebP and the original directly in HTML markup:
1 <picture> 2 <source srcset="img.webp" type="image/webp"> 3 <source srcset="img.jpg" type="image/jpeg"> 4 <img src="img.jpg" alt="Image description"> 5 </picture>
A browser with WebP support will take the first <source>. The rest will ignore the WebP source and load JPEG from <img>.
Plus: works without server configuration and with any CDN. Minus: doesn't work with background images in CSS and changes HTML structure. Some cache and lazy loading plugins stumble over <picture>.
Approach 2: varied response
In HTML there remains a regular <img src="img.jpg">, but the server returns different content for the same URL: a WebP file to browsers with WebP support, the original to everyone else.
The key to the mechanism is the HTTP header Accept. The browser sends it with every request, the server or CDN decides what to return.
Plus: works everywhere, including background images in CSS. HTML doesn't change. Minus: requires server configuration, and not every CDN correctly considers Accept in the cache key.
Let's compare:
|
| Varied Response |
|---|---|---|
Background images | ❌ | ✅ |
Works with any CDN | ✅ | Only with |
Server configuration | ❌ not needed | ✅ needed |
Lazy loading | ✅ | ✅ |
Compatibility with cache plugins | May conflict | ✅ |
Now let's see how these approaches are applied in WordPress.
Method 1: CDN with on-the-fly WebP conversion
The simplest path. You connect a CDN that optimizes images on the fly and serves WebP to supporting browsers. Converted copies aren't stored on your server, saving disk space.
Several working options:
- BunnyCDN with Bunny Optimizer, compresses and converts images on the fly, supports WebP in cache key. From $0.01/GB.
- Cloudflare with Polish (Pro tier, $20/month), automatic compression and conversion to WebP.
- Cloudinary, a specialized service for working with images, WebP out of the box.
- ShortPixel Adaptive Images, a WordPress plugin using bunny.net CDN. Converts and serves WebP automatically. Free tier: 500 MB traffic per month.
- WP Compress, a hybrid service: image optimization plus delivery through their own CDN.
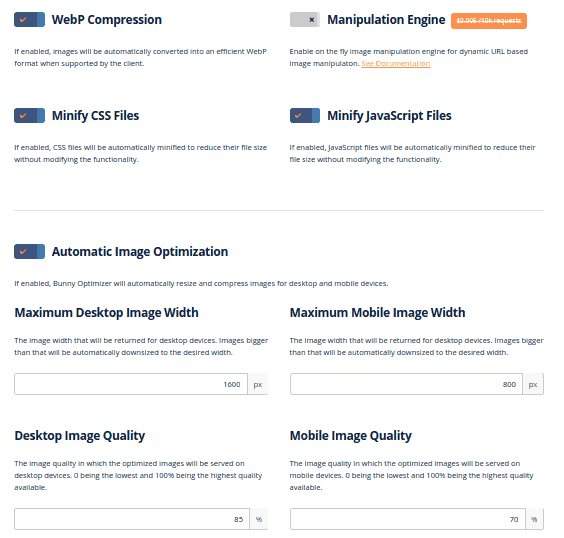
When to choose method 1: if you're ready to pay for CDN and don't want to mess with server configuration. Connected, enabled optimization, it worked.
Method 2: varied response + CDN
A method for those who prefer to solve the task at the server level without changing HTML markup.
The essence: you configure the server so that at a single URL it returns WebP or JPEG/PNG depending on the Accept header. All image URLs in the code remain the same.
Setup via WebP Express
The easiest way to implement varied response in WordPress is the WebP Express plugin. The plugin has 400,000+ active installations, regular updates, active author support. It does three things:
- Converts uploaded images to WebP.
- Writes redirect rules (
.htaccessfor Apache/LiteSpeed or Nginx rules). - When requesting an image, checks the
Acceptheader and returns the needed format.
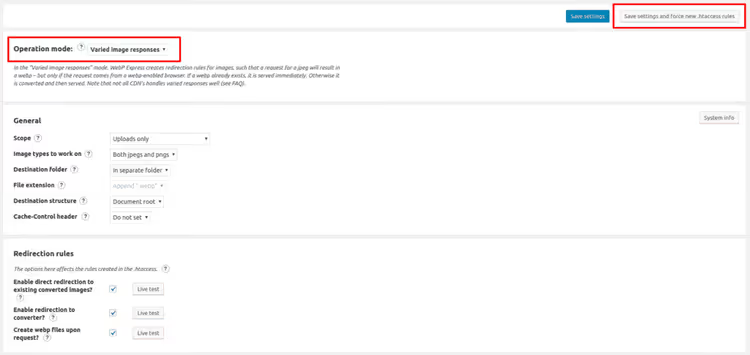
After installation, it's enough to click "Save settings and force new.htaccess rules." The plugin will configure the converter and rules itself.
For Nginx servers
WebP Express generates rules for .htaccess (Apache/LiteSpeed/OpenLiteSpeed). If you have Nginx, you need to manually write the rules in the configuration:
1 ## --- Nginx rules: try WebP first, fallback to converter 2 location ~* ^/?wp-content/.*\.(png|jpe?g)$ { 3 add_header Vary Accept; 4 expires 365d; 5 if ($http_accept !~* "webp") { 6 break; 7 } 8 try_files 9 /wp-content/webp-express/webp-images/doc-root/$uri.webp 10 $uri.webp 11 /wp-content/plugins/webp-express/wod/webp-on-demand.php?xsource=$request_filename&wp-content=wp-content 12 ; 13 } 14 15 ## --- Route missing .webp requests to the realizer 16 location ~* ^/?wp-content/.*\.(png|jpe?g)\.webp$ { 17 try_files 18 $uri 19 /wp-content/plugins/webp-express/wod/webp-realizer.php?wp-content=wp-content 20 ; 21 } 22 ## --- End WebP Express rules
What the rules do: add the Vary: Accept header (so CDN doesn't cache WebP for everyone), try to serve the ready .webp, and if it's not there, send the request to the converter.
Critical: choosing CDN for method 2
The mistake that breaks the whole method: CDN caches WebP and serves it to browsers without format support. This happens when the CDN doesn't consider the Accept header in the cache key.
Providers that work correctly with Vary: Accept:
Bunny CDN, varied response support is enabled in zone settings.

- KeyCDN, also supports WebP as part of the cache key. Enabled in zone settings, Cache section.

- Google CDN, considers
Vary: Acceptby default.
On Cloudflare's free tier there is no full consideration of Accept in the cache key. Result: WebP can go where it's not supported. Two ways out: switch to the Pro tier ($20/month) or use a CDN that can work with Vary: Accept out of the box (BunnyCDN or KeyCDN).
WebP Express + CDN combination at popular hosts
The scheme is the same for everyone: install WebP Express, then act according to server environment circumstances:
- Kinsta / WP Engine, contact support. Engineers will add Nginx configuration for WebP Express and enable the correct WebP cache key in their CDN (KeyCDN at Kinsta).
- Cloudways, an Apache+Nginx hybrid. WebP Express with saving
.htaccessis usually enough. Rules are picked up automatically. - SiteGround, ask support to add Nginx rules and use a compatible CDN.
- LiteSpeed / OpenLiteSpeed / Apache, only WebP Express and
.htaccessrules. Choose a CDN withVary: Acceptsupport. - Own VPS with Nginx (LEMP), manually add the Nginx rules above and connect a CDN with
Vary: Acceptsupport.
When to choose method 2: if you fundamentally don't want to change HTML markup, have background images in CSS and you're ready to configure the server once.
Method 3: via tag
A fallback option when the first two don't fit. Doesn't require server configuration, works with any CDN. The plugin replaces standard <img> tags with a <picture> construct, and the browser chooses the format itself.
Method disadvantages:
- Doesn't work with background images.
- May conflict with themes and cache plugins that modify
<img>output. - Changes HTML structure, which sometimes breaks lazy loading plugins.
Setup via WebP Express
The same WebP Express can work in <picture> mode. In settings select "CDN friendly" mode and enable the "Alter HTML" option. The plugin will on the fly wrap all <img> in <picture> with a WebP source.
When to choose method 3: if there's no access to server configuration and the CDN doesn't support Vary: Accept. For example, cheap hosting with strict limitations or free Cloudflare.
Video: WebP in WordPress in 10 minutes
If you prefer to watch rather than read, here's a visual tutorial on setting up WebP via WebP Express:
The video shows full WebP Express setup from installation to verification in Chrome DevTools. Conversion to AVIF is also touched on, as the next step after WebP.
⁉️🤔 Frequently asked questions
Is WebP always a size reduction?
Not always, but in most cases. For photos and screenshots the savings are 25-50%, according to Google developers. For images with text or flat colors, WebP can even be heavier than PNG-8. For content images, WebP almost always gives a win. For icons and simple graphics, SVG or optimized PNG is more optimal. Plugins like WebP Express convert everything, the result depends on the source format.
Can you use WebP without plugins in WordPress?
Starting with WordPress 5.8, yes. The core accepts
.webpfiles when uploading to the media library. But there's no automatic conversion of old images, nor substitution of format for the browser. If you only upload new images in WebP and you're okay with the absence of fallback for a small percentage of old browsers, plugins aren't mandatory. For full implementation on an existing site you can't do without a plugin: you need batch conversion and a format substitution mechanism.
How to check that WebP is served correctly?
Open the site in Chrome, press F12, Network tab, filter by
Img. In the Type column there should bewebp. Alternatively: in the server response look for theX-WebP-Expressheader (if using WebP Express) orcontent-type: image/webp. Chrome DevTools is the most reliable way: filter by images and look at the Type column. If it sayswebp, everything works.
What to do if CDN caches WebP incorrectly?
Symptom: some users see broken images, although everything is enabled in settings. Treatment: make sure the CDN considers
AcceptandVaryheaders in the cache key. In BunnyCDN and KeyCDN panels there are explicit switches for this. If there's noAcceptin the cache key, the first request from Chrome will create a WebP copy, and all subsequent users, including Safari without WebP, will get exactly this copy. On Cloudflare there's no free solution, either Pro or change CDN.
WebP or AVIF, what to choose in 2026?
AVIF gives even better compression (20-30% smaller than WebP at the same quality), but browser support is still lagging: around 92% versus 96% for WebP. In 2026, WebP remains the de facto standard for the web. AVIF is catching up, but the gap in browser support is still critical for commercial projects. A practical strategy: WebP now, AVIF when support passes 95%.
Which method to choose for your task: final breakdown
The choice of method depends not on which is "better in general," but on your specific stack and readiness to spend time or money:
- Ready to pay for CDN and not touch the server, method 1 with BunnyCDN (from $0.01/GB) or Cloudflare Pro ($20/month). Set it up in five minutes and forget it.
- Have server access and want to solve it once, method 2 with WebP Express and a CDN supporting
Vary: Accept. Works with background images, doesn't touch HTML. - No server access and limited budget, method 3 with WebP Express in
<picture>mode. Not ideal, but better than no WebP at all.
Test the chosen method on staging. Check response headers and the Type column in Chrome DevTools. Make sure old browsers get JPEG, not broken links. And only then deploy to production.
Try WebP Express, the plugin covers both server methods out of the box and is free. Write in the comments which approach you chose and what pitfalls you encountered.

A professional team of writers and editors specializing in creating quality content.