













 AIIllustrative image: AI-generated
🛠 Remote WordPress development with VS Code on Amazon EC2
Have you ever wasted a day trying to spin up a local WordPress stack that still behaves differently from your production server? XAMPP, Docker, virtual machines: each option breaks at the worst possible moment. The PHP version is wrong, an extension is missing, or the client opens a page and sees a white screen that you never encountered locally.
Visual Studio Code can connect to a remote server via SSH just as easily as you open a folder on your laptop. No magic involved: your code goes straight to an Amazon EC2 instance where a full web server with WordPress is already running.
Below is a step-by-step guide for setting up VS Code + AWS EC2 for WordPress plugin and theme development. From creating a Linux user to saving your workspace, with no gaps and an explanation of every step.
💡 Quick overview:
- Create a sudo user on an Ubuntu server and configure SSH keys
- Prepare your Windows client: OpenSSH, configuration file, and private key
- Connect VS Code to the server via Remote-SSH and open your WordPress folder
- Save the workspace for quick access to your project
Prerequisites
Before setting up remote development, make sure the server side is ready. I am assuming you are on Windows 10 or later and just starting to learn about cloud infrastructure. Skip the steps you have already completed.
Amazon EC2 instance with Ubuntu and OpenLiteSpeed
We use an Amazon Machine Image based on Ubuntu with the OpenLiteSpeed web server and a full LAMP stack optimized for WordPress. If you have not set up the server yet, the minimum requirements are Ubuntu 20.04 or 22.04 LTS and at least 2 GB of RAM. With less than 2 GB, composer and wp-cli will crash with out of memory errors on medium-sized projects.
Linux user with sudo
Root access is unnecessary and dangerous for everyday work. Create a regular user with sudo privileges. DigitalOcean explains the process in their guide. In short, two commands from root or with the sudo prefix:
1 adduser example
Enter the password twice; for the remaining prompts, you can just press Enter. Then add the user to the sudo group:
1 usermod -aG sudo example
SSH key pair
SSH access is built on a key pair. The private key (a file with no extension or .pem) is stored on your Windows machine. The public key (a .pub file) is placed on the server in the list of authorized keys. Let us generate a pair directly on the server:
1 su - example 2 mkdir .ssh 3 chmod 700 .ssh 4 touch .ssh/authorized_keys 5 chmod 600 .ssh/authorized_keys 6 ssh-keygen
When ssh-keygen prompts you, press Enter three times (leave the passphrase empty; in our scenario, it is not needed). Now add the public key to the authorized list and display the private key on the screen:
1 cat .ssh/id_rsa.pub >> .ssh/authorized_keys 2 cat .ssh/id_rsa
You will see a block like this:
1 -----BEGIN RSA PRIVATE KEY----- 2 ... 3 -----END RSA PRIVATE KEY-----
Copy the entire contents (including the delimiter lines) and save it to a text file on your computer. The path might look like this:
1 C:\Users\Example\.ssh\aws-example-user.pem
The file name is arbitrary. Create the .ssh folder inside your Windows profile, in the same location as the configuration file from the next step.
SSH configuration file for Visual Studio Code
VS Code reads connection settings from the standard SSH config. Create a text file named config with no extension in the C:\Users\Example\.ssh\ folder with the following content (for more details on the format, see man ssh_config):
1 Host aws-ec2 2 HostName your-server-ip-or-domain.com 3 User example 4 IdentityFile C:\Users\Example\.ssh\aws-example-user.pem
Explanation of directives:
- Host: an arbitrary name displayed in VS Code (window title and connection indicator in the lower-left corner);
- HostName: the IP address or domain of your EC2 instance;
- User: the Ubuntu username created above;
- IdentityFile: the absolute path to the private key on your Windows machine.
OpenSSH client on Windows
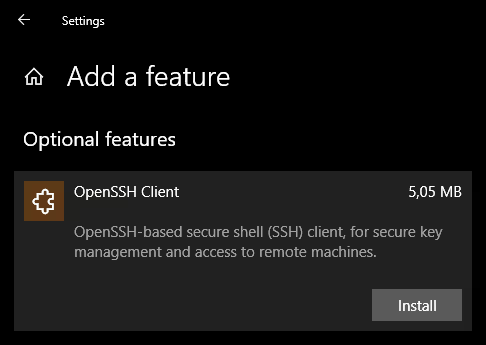
Windows 10 and 11 include a built-in SSH client, but it may be disabled by default. Open Settings → Apps → Optional features → Add a feature. Find OpenSSH Client in the list and click Install.
Visual Studio Code and the Remote Development extension
Download VS Code: either the stable version (blue icon) or the Insiders edition (green icon, more frequent updates). There is no difference for remote development.
Immediately after installation, add the Remote Development extension pack from Microsoft. The pack includes three extensions. Two of them (Remote, Containers and WSL) can be disabled; they are not needed for our task. Keep only Remote, SSH.
Configuring remote development
Connecting to the server
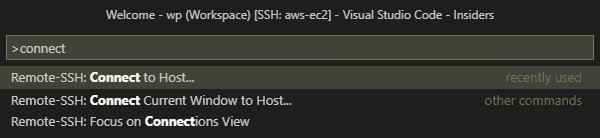
- Press
F1or click the dark-orange button in the lower-left corner of the window. - Start typing
Remote-SSH; the autocomplete suggestion Remote-SSH: Connect to Host… will appear. Select it and press Enter. - From the dropdown list, choose the name specified in the
Hostdirective of your configuration file, for example,SSH: aws-ec2. VS Code retrieves the list of hosts directly from yourconfig. - Done, you are connected. A new window will open; you can close the old one.
The connection is fast and the editor feels responsive because only file diffs are sent over the network, not the entire UI.

Creating a workspace
- Open File → Open Folder… (or press
Ctrl+K, thenCtrl+O; press them sequentially, not simultaneously). - In the file browser that appears, navigate to the WordPress root, for example,
/var/www/example.com/. You can paste the path manually and click OK.
All WordPress files will appear in the Explorer panel on the left. To add other server folders to the workspace (for example, the directory of another plugin or theme), use File → Add Folder to Workspace….
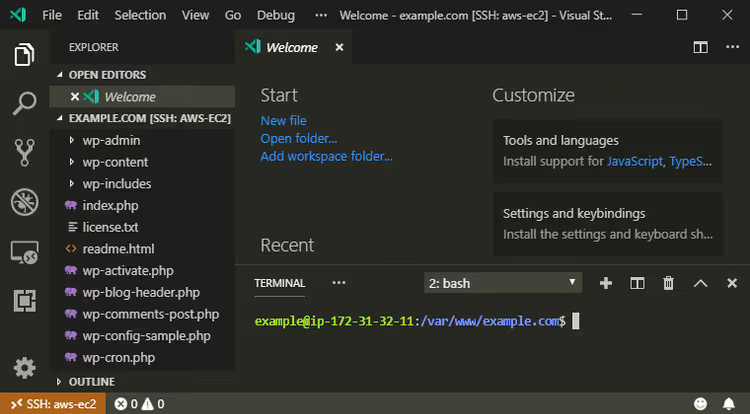
Now save this view as a workspace so you can return to the project with a single click:
- Press
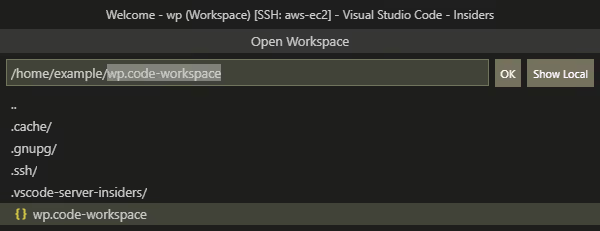
F1, start typingsave work, and select Workspaces: Save Workspace As…. - Save the file with the name
wp.code-workspacein a convenient location on the server (the.code-workspaceextension will be added automatically). - Close and reopen VS Code; the workspace will appear in File → Recent or will load automatically if it was the last one open.
To switch between multiple workspaces, use F1 → open work → select from the list.
Symbolic link (optional)
If you are developing a specific plugin, it is convenient to place its source files in the user's home directory and symlink them into WordPress:
1 ln -s /home/example/wp /var/www/dev.example.com/wp-content/plugins/my-plugin
The left path is the actual project folder; the right path is the symbolic link inside wp-content/plugins. This isolates the plugin code from the WordPress core and simplifies version control.
⁉️🤔 Frequently asked questions
Do I have to use Amazon EC2, or will another VPS work?
Any server with Ubuntu and SSH access will work. DigitalOcean, Linode, Vultr, Hetzner: the setup process is identical. The only requirement is at least 2 GB of RAM for comfortable WordPress development with debugging. This approach will not work on shared hosting; you need root access or sudo. VS Code Remote SSH is not tied to a specific cloud provider: you can connect to any machine running sshd, even a Raspberry Pi on your local network. The only difference is latency; the closer the data center, the more responsive the editor.
Do I have to pay for traffic when working through VS Code Remote SSH?
Traffic is minimal. VS Code sends only file changes and terminal commands over SSH; no UI pixels or extension binaries are transmitted back and forth. A typical day of development stays within tens of megabytes. Extensions (including Remote-SSH itself) are installed on the server once during the first connection, which is a few hundred megabytes as a one-time cost. If you have a strict traffic limit, disable auto-updates for extensions on the remote host via
F1 → Preferences: Configure Runtime Argumentsand add"remote.extensionDownloader.enabled": false. But for the vast majority of users, this is unnecessary.
Can I work from a remote server on a tablet or phone?
Technically, yes, through VS Code for the Web in a browser, but with caveats. The browser version does not support Remote SSH directly. A workaround: set up VS Code Server on the instance (a separate product, do not confuse it with Remote SSH) and connect to it from your browser. For a tablet with a keyboard, this is a workable scenario; for a phone, it is more of a novelty. A more practical option is to carry a lightweight laptop or Chromebook with a Linux subsystem: all the computational load stays on the server, and the client uses minimal resources.
What should I do if the connection drops during long periods of inactivity?
Configure keepalive in your SSH config. Add two lines to your host section in the
C:\Users\Example\.ssh\configfile:ServerAliveInterval 60andServerAliveCountMax 5. The client will send a keepalive packet every 60 seconds and maintain the connection through up to five consecutive lost packets, so the connection can survive up to 5 minutes of complete network silence. An alternative: runtmuxorscreenon the server for long-running processes to avoid losing the terminal session if the connection drops.
Is it safe to store a private key in plain text on a Windows machine?
A
.pemfile without a passphrase is, yes, a plain string that anyone with access to your Windows account can read. Protective measures in increasing order of security: (1) set a passphrase when creating the key (ssh-keygenwill ask; do not press Enter, enter a passphrase instead); (2) store the key on an encrypted partition (BitLocker is enabled by default in Windows 11 Pro); (3) for production environments, use an SSH agent with a hardware key (YubiKey). For a dev environment, a compromise option is a key with a passphrase: VS Code will remember it for the session duration, you will only need to enter it once a day, but the key becomes useless without the passphrase, even if the file leaks.
What to choose for everyday work: Remote SSH or a local stack
Remote SSH through VS Code is not a silver bullet. If you are writing a plugin that only needs wp-cli and unit tests, a local Docker setup with wordpress-develop will build in a minute and does not require internet access. But if you are debugging integration with an external API, testing cross-browser compatibility, or showing progress to a client, a remote server with a production environment wins.
For a combined approach, keep a dev EC2 instance running continuously (a reserved t3.small is reasonably priced) and connect to it anytime from anywhere. The code lives on the server, automatic backups are enabled, and you are not tied to a specific machine. Give it a try: after a week of remote development, you will not want to go back to XAMPP.

A professional team of writers and editors specializing in creating quality content.