













 AIIllustrative image: AI-generated
🔒 Setting up HTTPS for WordPress via Cloudflare - step by step guide
You visit a site and the browser screams "Not Secure." The client closes the tab faster than you can explain you simply don't have an SSL certificate. Frustrating? Absolutely. Especially when a free solution exists and takes 20 minutes to set up.
HTTPS isn't an option anymore, it's hygiene. Google officially declared HTTPS a ranking factor back in 2014, and today without the green padlock search engines simply lower your rankings. Browsers mark HTTP sites as insecure, visitors leave, conversion drops. And if your hosting charges for SSL, don't rush to pay.
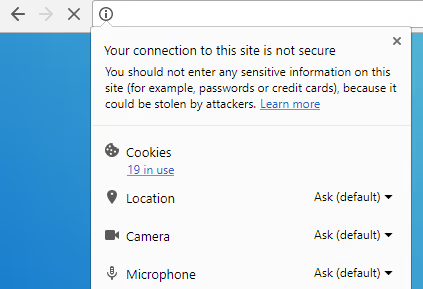
Cloudflare provides a free SSL certificate, CDN and basic attack protection on a forever-free plan. Below is a step-by-step guide: from registration to checking the 301 redirect. Every step has been tested on dozens of sites, including projects on WordPress.
💡 Quick overview:
- Register with Cloudflare and add your site, the system automatically pulls in DNS records.
- Choose SSL Flexible mode in the SSL/TLS section, certificate activates for free within an hour.
- Install the plugins Cloudflare and Cloudflare Flexible SSL, WordPress begins working correctly with HTTPS.
- Replace all
http://links in the database via Better Search Replace, four passes following the templates below. - Create a Page Rule "Always Use HTTPS", configure automatic redirect from HTTP to HTTPS.
- Check the 301 redirect via Redirect Detective and update the site URL in WordPress settings.
Step 1: Registration and adding a site to Cloudflare
Register at cloudflare.com, you only need an email and password. After logging in, click "Add a site," enter your domain (without www) and wait while Cloudflare scans DNS records. The system will find A, CNAME, MX and other records automatically, usually takes 10-30 seconds.
On the next screen, choose the free plan (Free plan) and confirm the DNS records. Cloudflare will offer to replace your domain's nameservers with its own, go to your domain registrar's panel and specify the two Cloudflare NS servers (they'll display on screen). NS change usually takes from a few minutes to 24 hours, but Cloudflare will notify you by email when the domain activates.
Step 2: Choosing SSL mode in Cloudflare panel
After domain activation, go to SSL/TLS → Overview. There are four modes: Off, Flexible, Full and Full (Strict). For WordPress without a configured server certificate, choose Flexible, Cloudflare encrypts traffic between the visitor and its CDN, while the connection between Cloudflare and your hosting remains HTTP. This is enough for the green padlock in the browser.
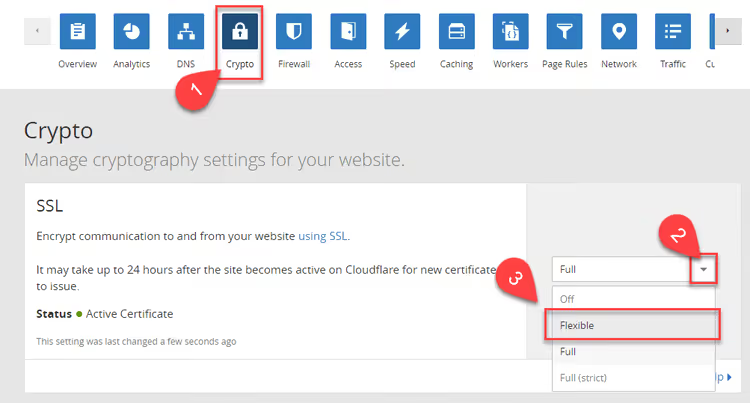
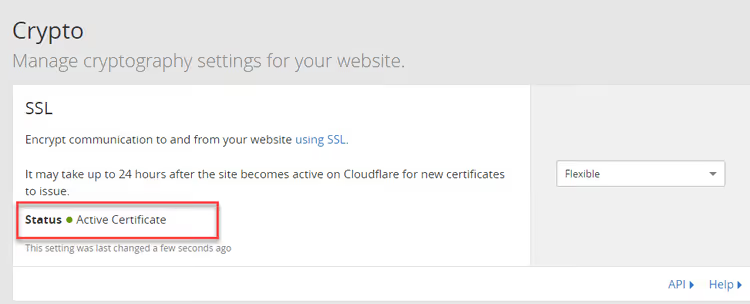
The certificate initializes automatically. In the SSL/TLS → Edge Certificates section, an "Active Certificate" status will appear, usually within an hour, sometimes up to a day.
Don't wait for full activation, immediately check the site at https://your_domain. If the page opened (even with mixed content errors), the certificate works, move on to plugins.
Step 3: Installing Cloudflare plugins for WordPress
Before any edits, backup. Install Duplicator and make a full site copy. Seriously: one wrong database query and the site goes down. Backup will save you.
Now two plugins:
Cloudflare Flexible SSL, fixes the redirect loop that occurs in Flexible mode: WordPress thinks it's working over HTTP, while Cloudflare sends HTTPS requests. The plugin substitutes
$_SERVER['HTTPS']withon, and the site stops going into infinite redirect.Cloudflare, official Cloudflare plugin. Connects Automatic Platform Optimization (APO), caches pages on edge servers and syncs settings with Cloudflare panel. After installation, enter your email and global API key from Dashboard → API Tokens.
Install both, activate and open the site in incognito mode. If pages load without redirect loops, great, moving on.
Step 4: Replacing HTTP links in database via Better Search Replace
The WordPress database stores hundreds of internal links with http://, to images, scripts, styles, other pages. Until they're replaced with https://, the browser will complain about mixed content, and the green padlock will show a warning.
Install Better Search Replace, 1 million active installations and 4.3 star rating. The tool works right in the admin panel and supports dry run.
Make a backup again. This is the fourth mention, and it's not by accident: search-replace across the entire database is irreversible.
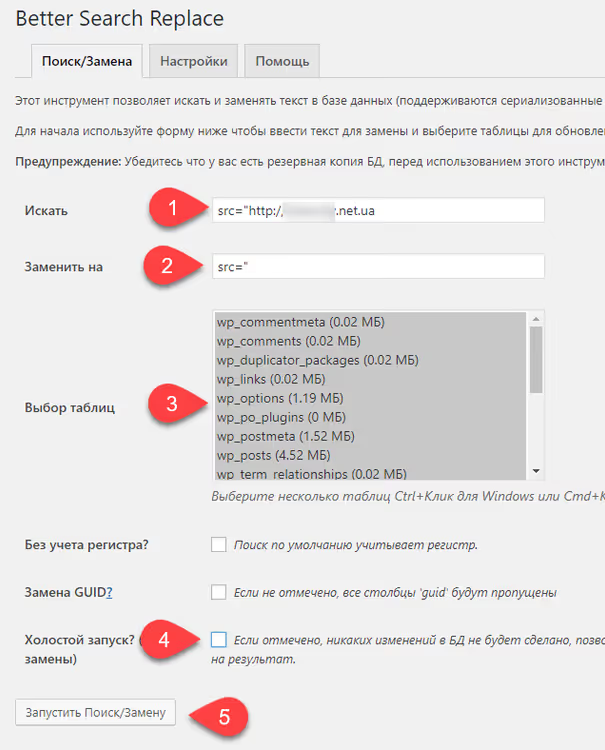
Go to Tools → Better Search Replace. Execute four passes strictly in this order:
Pass 1: Internal image links (src)
In the "Search for" field:
1 src="http://your_domain
In the "Replace with" field:
1 src="
Why: removing the domain from src attributes of internal images, leaving a relative path. The browser will substitute the current page's protocol itself.
Pass 2: External src links
Search for:
1 src="http://
Replace with:
1 src="//
Why: external resources (iframe, fonts, CDN scripts) convert to protocol-independent format //, they'll pick up HTTPS if available.
Pass 3: All domain mentions with http
Search for:
1 http://your_domain/
Replace with:
1 https://your_domain/
Pass 4: Domain root without slash
Search for:
1 http://your_domain
Replace with:
1 https://your_domain
Each pass: select all tables (Ctrl+A), uncheck "Run as dry run," click "Run Search/Replace." After the fourth pass you'll be kicked to the login page, this is normal: WordPress switched to HTTPS. Log in again.
Open the site, browse through pages, check the developer console (F12 → Console). Look for Mixed Content errors. Found some, finish off the remaining http:// links in theme files or custom plugins manually (via code editor or the same Better Search Replace with targeted replacements).
Step 5: Configuring HTTP → HTTPS redirect via Page Rules
Right now your site is accessible via both HTTP and HTTPS. You need to force all visitors (and search engines) to use HTTPS only. For this, Page Rules in Cloudflare.
Go to Rules → Page Rules and click Create Page Rule:
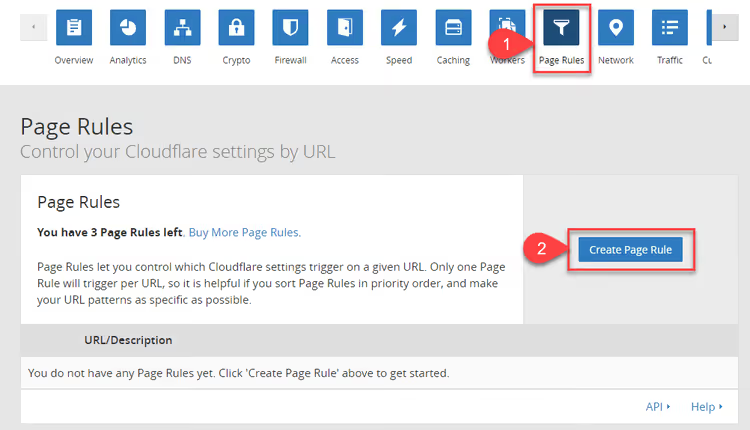
In the URL field enter:
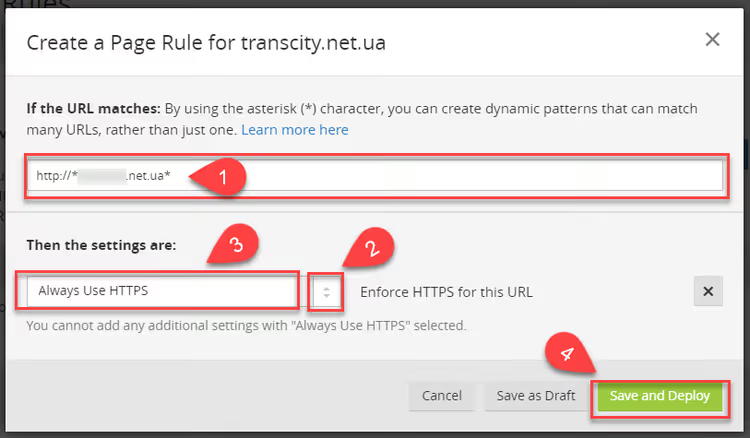
1 http://your_domain/*
In the "Then the settings are" dropdown select Always Use HTTPS. Click Save and Deploy.
Now when visiting http://your_domain the visitor automatically redirects to https://your_domain. Open the site via HTTP in incognito, the redirect should trigger.
Step 6: Updating site URL in WordPress settings
After database replacements, WordPress may store the old URL. Go to Settings → General, check the fields:
- WordPress Address (URL):
https://your_domain - Site Address (URL):
https://your_domain
If there's http:// or //your_domain, replace with https://your_domain and save. Without this step, some plugins and RSS feed may continue using HTTP.
Step 7: Checking 301 redirect
Final check: Redirect Detective service. Paste http://your_domain and run the check. You should see the chain:
1 301 Moved Permanently → https://your_domain/ 2 200 OK
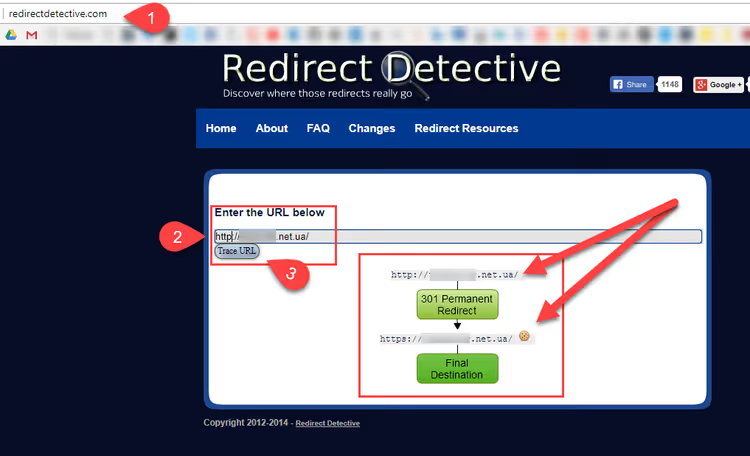
301 is a permanent redirect, exactly what search engines expect. If you see 302 or a chain longer than two steps, recheck Page Rules and WordPress settings.
After successful verification, give the site a couple of days: search engines will reindex pages to HTTPS, and in Search Console add the HTTPS version of the site as a new property.
Clearer in video
If the text steps raise questions, here's a 10-minute video of Cloudflare setup on WordPress with screen demonstration and voice explanation of every click:
The video shows the live process from adding the domain to checking the redirect, helpful if your panel interface differs from the screenshots.
⁉️🤔 Frequently asked questions
How does Flexible SSL differ from Full and Full (Strict)?
Flexible encrypts traffic only between the visitor and Cloudflare. Full, between the visitor and Cloudflare, as well as between Cloudflare and the server (requires a certificate on hosting, even self-signed). Full (Strict), same as Full, but the server certificate must be valid and issued by a trusted authority. For most WordPress sites Flexible is sufficient, but Full (Strict) is the gold standard of security.
Do I need to pay for Cloudflare's SSL certificate?
No. The free plan includes SSL certificate, CDN, basic WAF and DDoS protection. Paid plans (Pro, $20/month, Business, $200/month) add mobile page acceleration, advanced WAF and priority support.
What to do if styles broke after switching to HTTPS?
Open the browser console (F12), most likely there are Mixed Content errors. This means
http://links to CSS and JS remain in the database. Repeat step 4, paying attention to passes 2 and 3, then clear Cloudflare cache (Caching → Purge Everything).
Is it mandatory to install both Cloudflare plugins?
Cloudflare Flexible SSL is mandatory in Flexible mode (without it WordPress will loop redirect). The official Cloudflare plugin is recommended for APO and convenient cache management right from WordPress admin panel, but technically not mandatory for HTTPS operation.
How long does full setup take?
20-30 minutes: 5 minutes for registration and NS change, 5 for SSL mode and plugins, 10 for database search/replace, 5 for Page Rules and verification. Plus NS change waiting time (up to 24 hours, but usually 5-15 minutes).
Can I switch back to HTTP if something goes wrong?
Yes. Disable the Always Use HTTPS Page Rule, remove Cloudflare plugins, execute reverse replacement
https://your_domain→http://your_domainvia Better Search Replace and restore the registrar's nameservers. The entire process is reversible.
Free HTTPS is reality, not a compromise
Cloudflare removed the question "where to get money for SSL" from the agenda. The free plan covers certificate, CDN and attack protection, and all this without a line of code. Seven steps from registration to redirect verification take 20 minutes, and the result, the green padlock, visitor trust and a plus in karma from search engines, stays forever.
If your hosting offers SSL for an extra charge, you now know the alternative. And if Cloudflare is already added but HTTPS still doesn't work, go through the steps again. In 9 cases out of 10 the problem is in a skipped Better Search Replace pass or incorrect SSL mode.
Don't delay. Every day without HTTPS is lost visitors and rankings in search results. Open cloudflare.com and add your site right now.

A professional team of writers and editors specializing in creating quality content.