














🚀 How to add a site to Cloudflare: step-by-step guide using ukraine.com.ua as an example
A slow site loses visitors faster than you think. According to Google, 53% of mobile users abandon a page if it takes longer than three seconds to load. A DDoS attack can bring down even a robust server in minutes. There's a solution that solves both problems at once, for free. It's Cloudflare.
Cloudflare is a global content delivery network (CDN), DNS provider, and DDoS shield all in one. With 330+ points of presence worldwide and clients like Nasdaq, DigitalOcean, and Cisco, the service has long been the standard for those who want to speed up their site and protect it from attacks. The free tier, with unlimited CDN bandwidth, basic DDoS protection, and a free SSL certificate, covers the needs of most site owners on WordPress, Grav, and other CMS platforms.
In this guide, we'll connect a site to Cloudflare step by step, from registration to DNS record configuration. As a live example, we'll use ukraine.com.ua hosting: we'll show how to change NS servers in their panel and migrate DNS records to Cloudflare. If you're using a different host, no problem, the general principle is the same, only the admin interface differs.
💡 Quick overview:
- Sign up for Cloudflare and add your domain: the system automatically scans current DNS records and selects optimal settings.
- Change NS servers at your domain registrar to Cloudflare's and wait for propagation, usually from an hour to a day.
- Transfer DNS records (A, MX, CNAME) from the old panel to Cloudflare, enable proxying, and verify green status.
What Cloudflare is and what problems it solves
Cloudflare works as a reverse proxy: traffic to your site passes through its servers, where requests are filtered from malicious traffic, and static content is cached and served from the data center nearest to the visitor. The result is a 2-3x speedup in loading time and protection from attacks without modifying your site's code.
Key features of the free tier:
- CDN with unlimited bandwidth. Caches static assets (CSS, JS, images) and serves them from the nearest node in Cloudflare's network of 330+ points of presence, a visitor from Australia gets content from Sydney, not Kyiv.
- DDoS protection. Cloudflare deflects Layers 3, 4, and 7 attacks without additional configuration, you simply enable proxying (orange cloud), and the service filters malicious traffic automatically.
- Free SSL certificate. No need to configure a separate certificate, Cloudflare issues a universal certificate and renews it automatically.
- Fast DNS. Cloudflare's authoritative DNS is among the fastest in the world, with response times under 10 ms for most regions.
- Bot protection. The free Bot Fight Mode blocks or challenges suspicious bots on the fly.
Important note: Cloudflare works as a full proxy service, so you can't use it simultaneously with premium DNS from Amazon Route 53, you'll have to choose one.
Registering with Cloudflare and adding a domain
Open cloudflare.com and click Sign Up. Just an email and password are enough, no payment details required for the free tier.
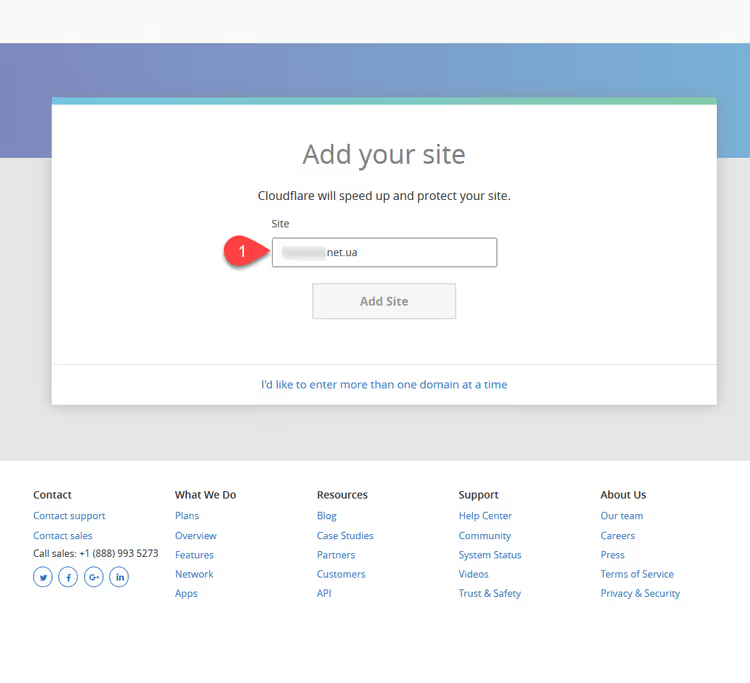
Right after registration, you'll land on the add site screen. Enter your domain (for example, vashsite.com.ua) and click Continue:
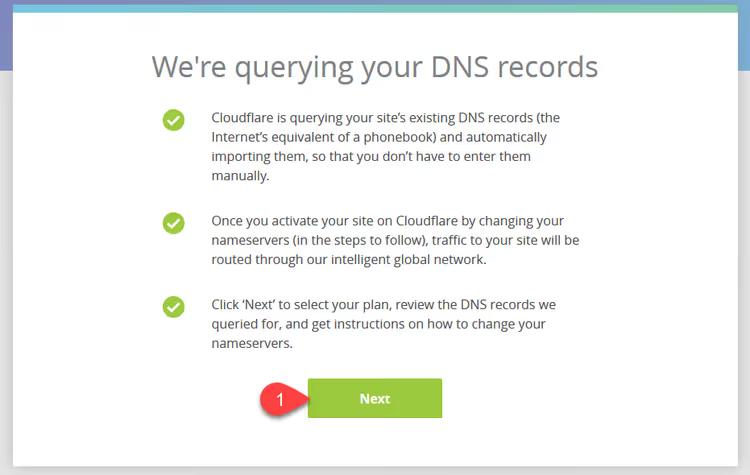
Cloudflare will scan your domain's DNS records, this is an automatic process that takes a few seconds. The system will find A, MX, and CNAME records configured at your current DNS provider.
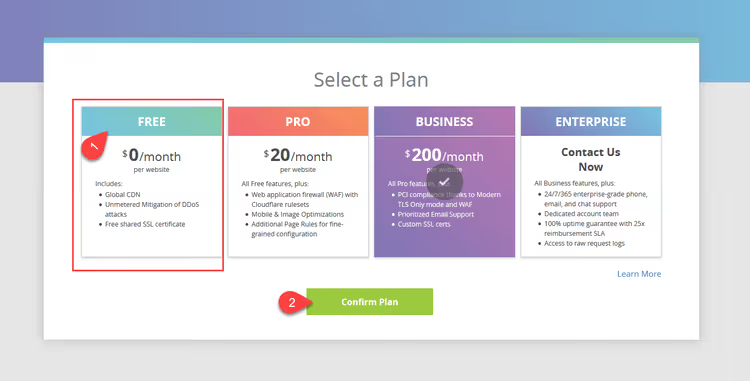
Next, choose a pricing plan. For the vast majority of sites, Free is sufficient, it doesn't require a card, never expires, and includes CDN, DDoS protection, and SSL. Click Confirm Plan:
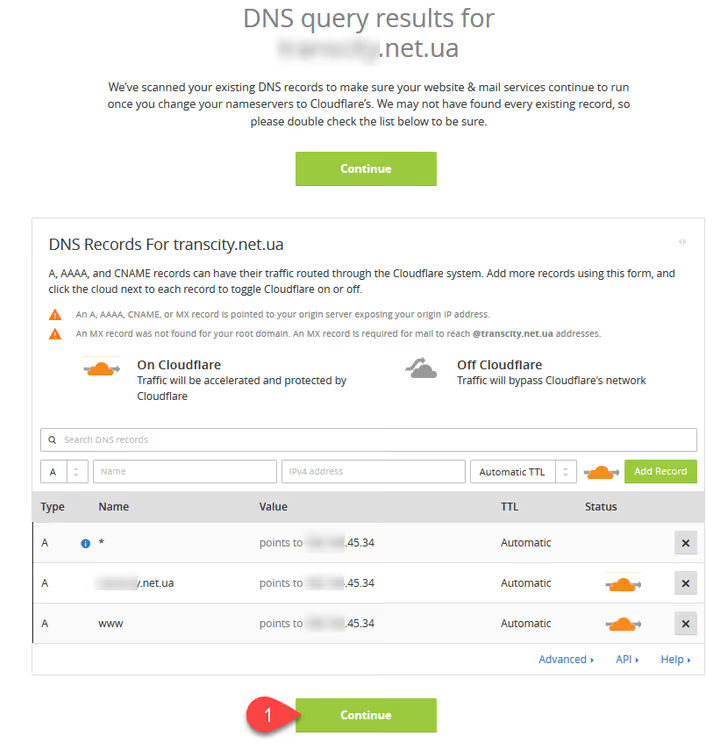
On the next screen, click Continue, and we reach the main step.
Changing NS servers at the domain registrar
Cloudflare shows two columns: on the left, your current NS servers, on the right, Cloudflare servers (usually alec.ns.cloudflare.com and dara.ns.cloudflare.com or similar). Your task is to replace your current NS at the domain registrar with Cloudflare's.
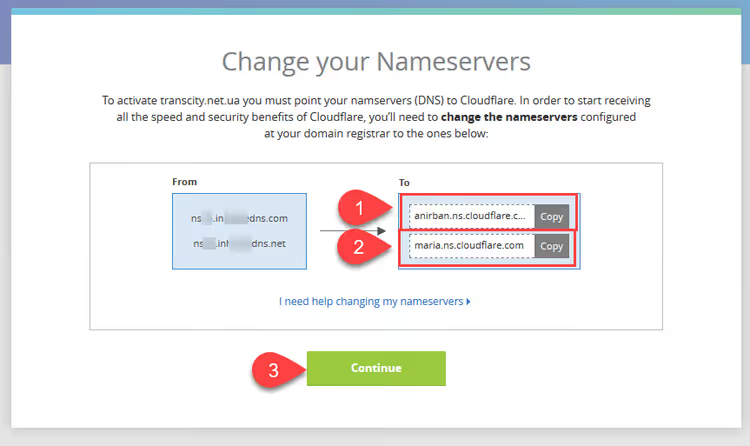
Where exactly to change NS depends on where your domain is registered. It could be your hosting panel, the registrar's site (Namecheap, GoDaddy, NIC.UA), or a separate domain management panel. The logic is the same everywhere: find the NS server management section for the needed domain and enter the two addresses Cloudflare gave you.
Changing NS using ukraine.com.ua hosting as an example
Ukraine.com.ua hosting, one of Ukraine's oldest providers, according to whtop.com holds the #1 position in Ukraine. We'll look at changing NS in their panel, the principle applies to other hosts as well.

Log into your hosting control panel:

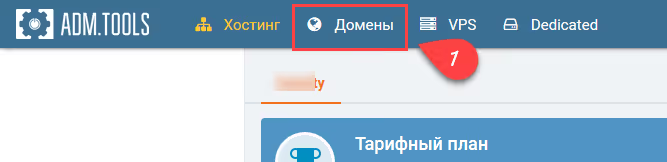
Click "Domains":
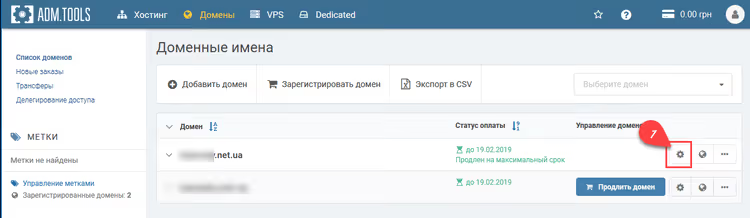
In the domain list, click the gear icon next to the domain you're connecting to Cloudflare:
You'll land on the domain settings page:
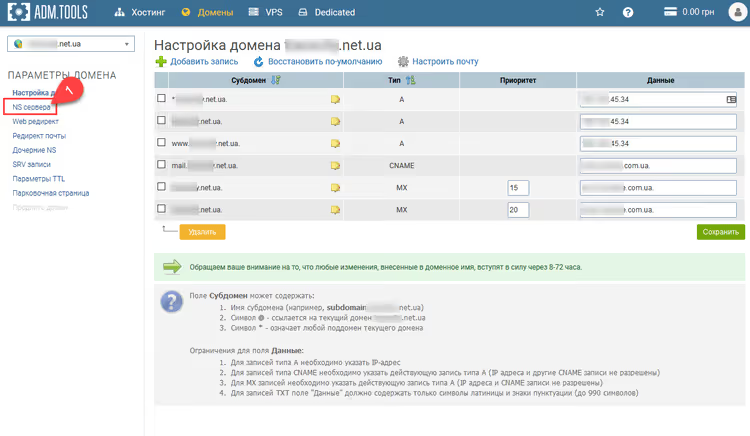
In the left menu, select "NS servers":
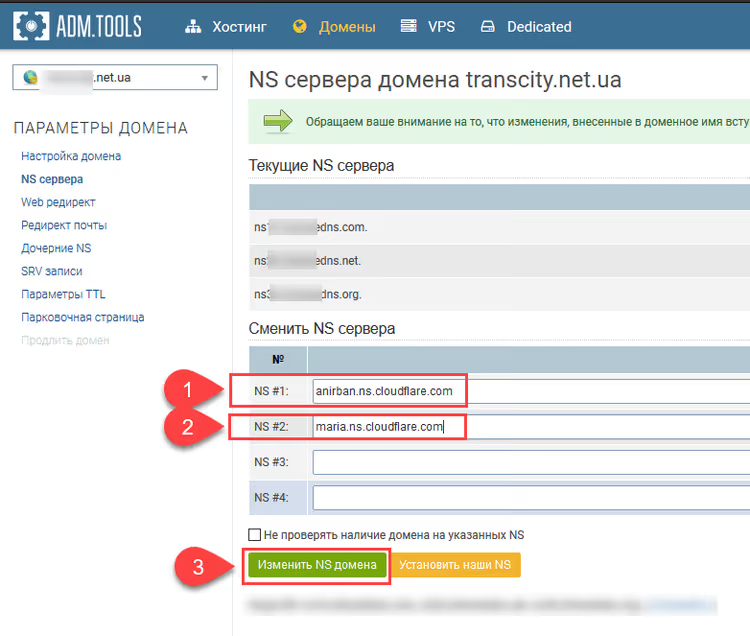
Paste the two Cloudflare NS in the order they're listed in the Cloudflare panel, and click "Change domain NS":
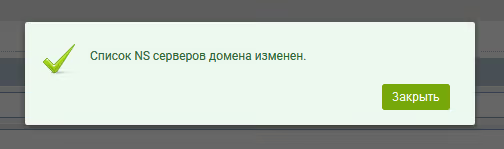
Done, the NS has been changed on the hosting side. Back to Cloudflare.
Waiting for NS propagation and confirming the connection
In Cloudflare, click Continue. A page will open where the domain is displayed on a black bar. The color is a status indicator: black means the new NS hasn't propagated worldwide yet.
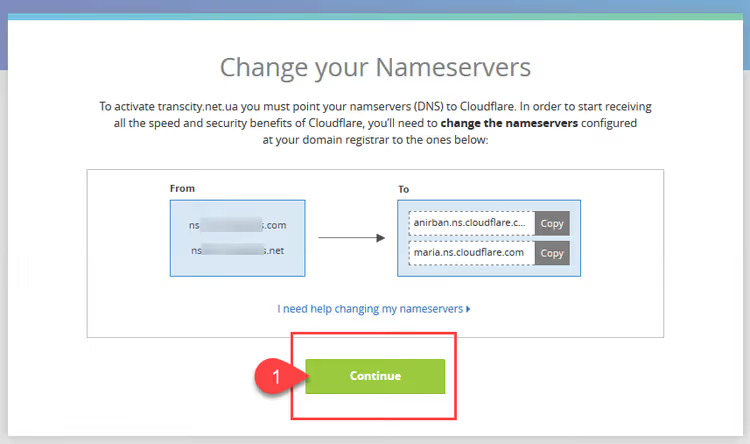
Very important point: save the old NS from the left block, you'll need them later to transfer MX records. Without them, you won't be able to restore mail records unless you go back to the hosting panel.
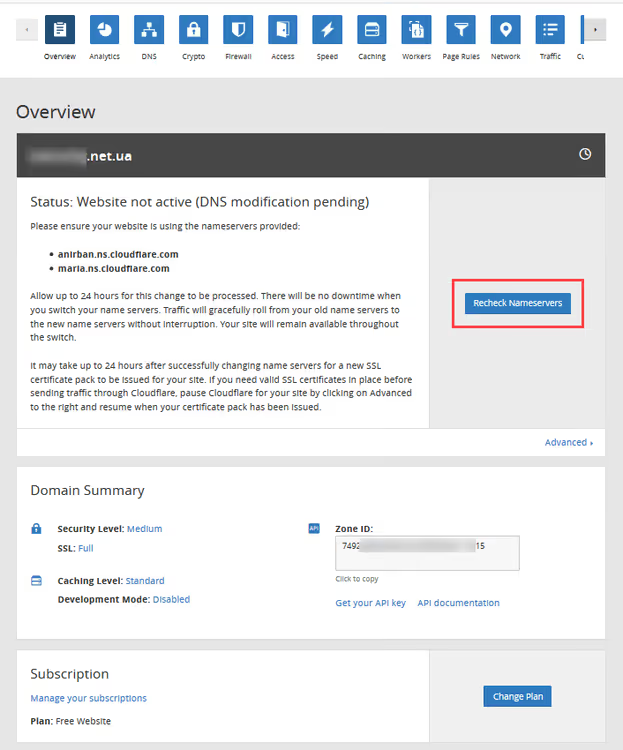
NS propagation takes from an hour to a day, that's how long it takes for the new records to spread across DNS servers worldwide. Check the domain bar from time to time:

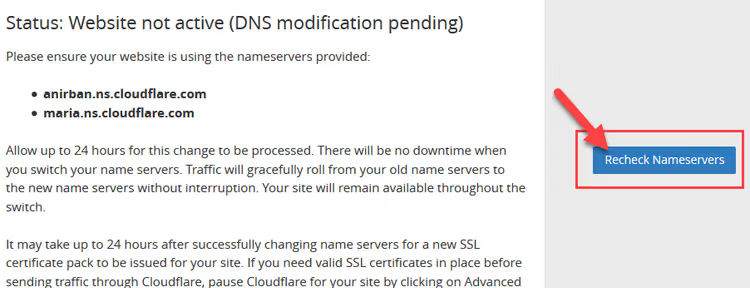
If automatic update doesn't happen, click the Recheck Nameservers button:
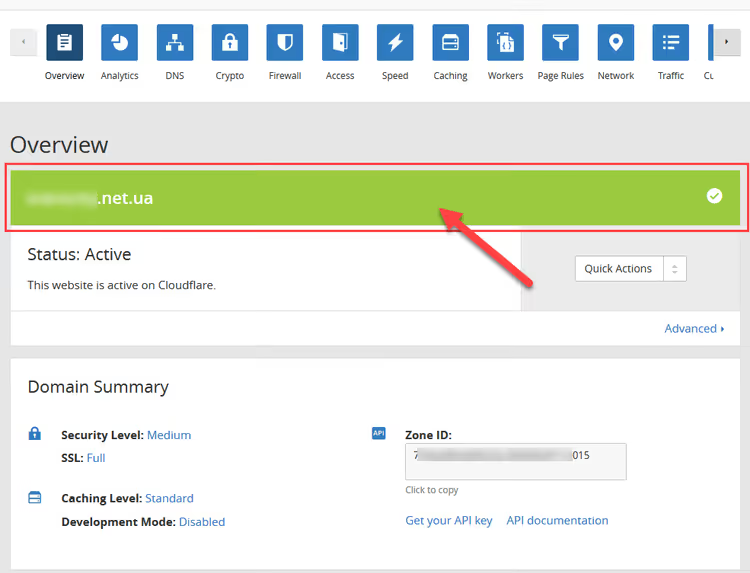
When the bar turns green, the domain is connected, Cloudflare has taken over DNS management.
Migrating DNS records from the hosting panel to Cloudflare
After connecting the domain, you need to transfer all DNS records, A, MX, CNAME, and others, from the old panel to Cloudflare. Without this, your site and email won't work.
Adding MX records
MX records handle email, if you don't configure them, emails to your domain addresses will stop arriving. These are the first ones to set up.
Click the right record type block:
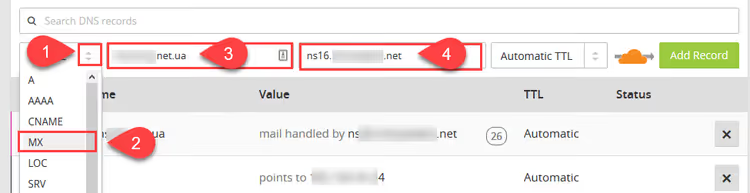
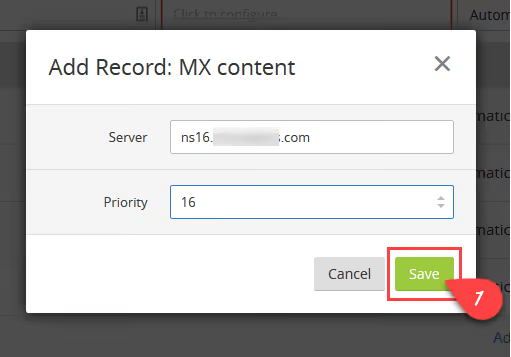
In the Name field, enter your domain, click Click to configure, and enter the old NS you saved earlier. Priority matters, if the old NS contained a number in its name (for example, mx16.ukraine.com.ua), set the priority in the MX field to 16. Click Save:
Transferring other records
After MX, add all other records: A records (server IP address), CNAME (subdomains), TXT (SPF, DKIM for email). Click Add Record one by one and fill in the fields:

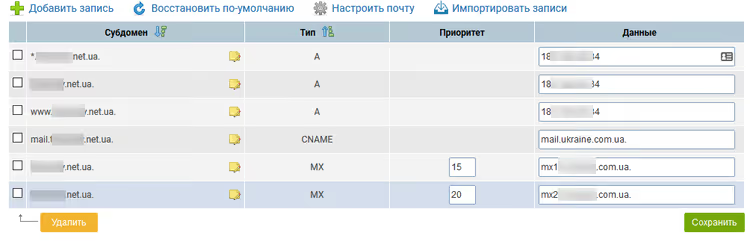
To avoid missing anything, open the DNS records in the hosting ukraine.com.ua panel (Domains → gear → settings page) and transfer each line:
In Cloudflare, it looks like this:
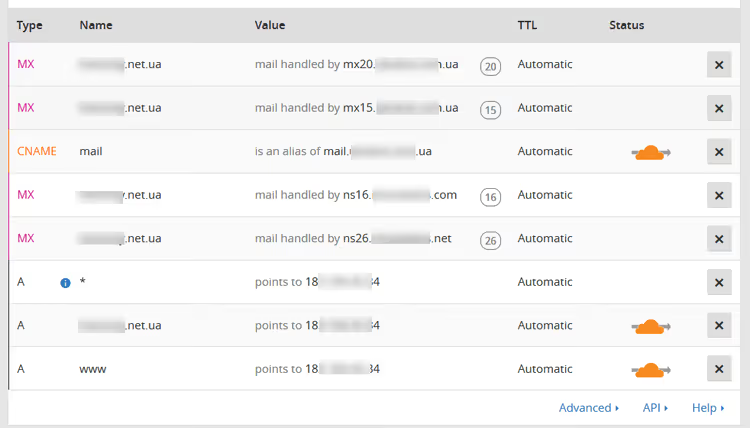
After transferring all records, verify that each one has an orange cloud next to it (proxying enabled), this means traffic goes through Cloudflare's CDN and protection. For A and CNAME records pointing to your server, this is the optimal mode. Leave MX records and TXT with a gray cloud (DNS only), otherwise email will break.
EN video on the topic
Watch a visual demonstration of connecting a site to Cloudflare, from account login to DNS verification:
⁉️🤔 Frequently asked questions
Can I use Cloudflare for free permanently?
Yes, the Free tier has no expiration date and doesn't require payment details. It includes unlimited CDN bandwidth, basic DDoS protection for Layers 3-7, a free SSL certificate, and fast DNS. Limitations include up to 3 Page Rules, no Argo Smart Routing, and no WAF with managed rules. For most sites, this is sufficient.
How long does a complete NS server change take?
From 1 to 24 hours, according to Cloudflare documentation, that's how long it takes for the registrar to pass new NS to the root zone and for DNS servers worldwide to update their cache. In practice, the domain "turns green" within 2-4 hours after changing NS at the registrar.
What should I do if the site stops opening after connecting to Cloudflare?
First, verify that the A record in Cloudflare points to the correct IP address of your server. If the IP is correct, temporarily switch the orange cloud to gray ("DNS only" mode), this removes proxying and shows whether the problem is with Cloudflare or the server. Also make sure SSL/TLS in Cloudflare is set to Flexible or Full mode, Full (Strict) mode requires a valid certificate on the server.
Do I need to pay for an SSL certificate separately?
No, Cloudflare issues a free universal SSL certificate automatically when you add a domain. It covers the main domain and first-level subdomains (
*.vashsite.com.ua), renews automatically, and works with any tier, including Free.
Can I return to the old NS if Cloudflare doesn't work out?
Yes, the process is fully reversible. Go to your domain registrar's panel and replace Cloudflare's NS with the ones you had before (you saved them when you changed them). After DNS propagation (from an hour to a day), traffic will bypass Cloudflare and go directly to your server.
Whether you should connect Cloudflare
If you have a site on WordPress, Grav, or any other CMS, and you want to speed up loading without messing with code optimization, Cloudflare Free solves this task almost instantly. The setup takes at most 15-20 minutes of active work, plus NS propagation wait time. There's no monthly fee, and you get the benefits of acceleration and DDoS protection immediately.
For commercial projects with high security requirements, consider the Pro and Business tiers ($20/month and $200/month respectively): they add a Web Application Firewall with managed rules, priority support, and advanced caching capabilities. But it always makes sense to start with Free, for most sites its features are sufficient, and upgrading to a paid tier takes just a couple of clicks when needed.
Try it right now: registration on the official Cloudflare website is free, and you'll see the first speed results within a few hours of changing NS.

A professional team of writers and editors specializing in creating quality content.