














Checking bulk redirects with Screaming Frog SEO Spider
Moved your site to a new domain, changed the URL structure, or cleaned up duplicates, and now you have no idea which pages return 301, where a 302 got lost, or where a three-step redirect chain is hiding? Manually checking dozens or hundreds of addresses not only eats up your evening but also makes it easy to miss a loop that silently tanks your indexing.
Screaming Frog SEO Spider captures this picture in minutes. You start a crawl (or upload a URL list) and immediately see: status code, redirect type, final destination, link source, and loops. The free version handles up to 500 URLs, which is more than enough for most sites.
Below is a step-by-step breakdown of two scenarios: crawling an entire site and bulk uploading a list. No theory for theory's sake, just clicks, tabs, and exports.
💡 Quick overview:
- Download SEO Spider from the official site, free version up to 500 URLs.
- For site crawling: enter the domain → Response Codes tab → Redirection (3XX) filter.
- To find the redirect source: click the URL → Inlinks tab.
- For bulk export: Bulk Export → Response Codes → Redirection (3XX) Inlinks.
- To check chains: Reports → Redirects → Redirect Chains.
- List mode: Mode → List → paste or upload a file with URLs.
Installation and first launch
Download SEO Spider for your OS from the official download page. Installation is standard: Windows, macOS, and Linux are all fully supported. After launching, you will see the main window with the "Enter URL to spider" field at the top, where you enter the site address or URL list depending on the selected mode.
The Free license removes the 500 URL limit, which is enough for checking redirects on a small or medium-sized site. For large projects (thousands of pages), you will need the paid version at $279 per year, which removes the limit and unlocks advanced features like custom extraction and scheduling.
Method 1: crawling a site to check redirects
Step 1: start the scan
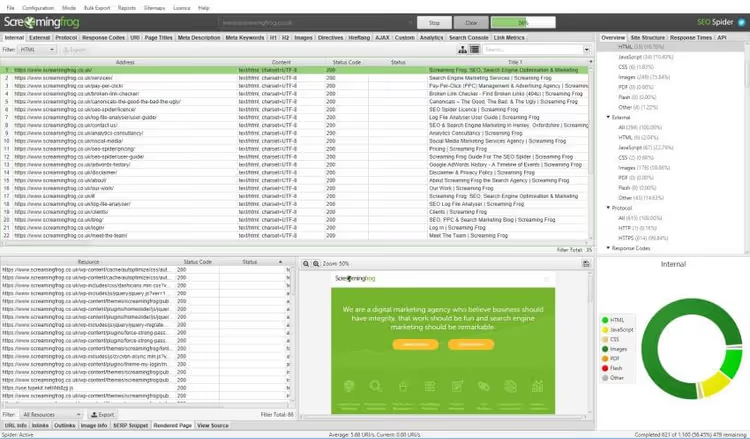
Enter the domain in the "Enter URL to spider" field and click Start. SEO Spider will begin crawling: it follows internal links, collects response codes, and simultaneously analyzes headers, meta tags, and dozens of other SEO parameters. You don't need to wait for the scan to complete; the overview window (right panel) updates in real time.
Step 2: open the Response Codes tab and Redirection (3XX) filter
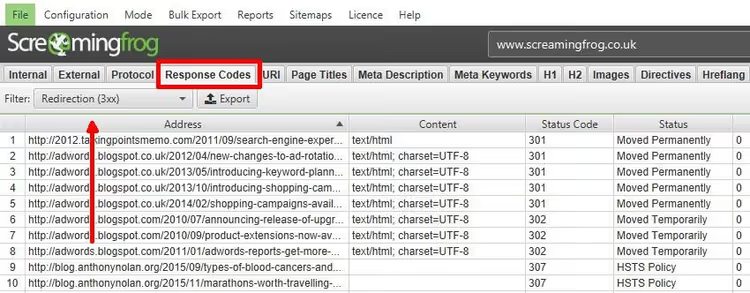
Go to the Response Codes tab in the top panel and select Redirection (3XX) from the dropdown filter. Alternatively, in the right "Crawl Overview" panel, expand the Response Codes folder and click directly on the "Redirection (3XX)" line.
The table will display all URLs with 301, 302, 303, and other 3XX codes. Next to each address you will see the status code, status (permanent or temporary), and the Redirect URI column with the target address. The overview panel shows the proportion of redirects relative to the total number of discovered links, for example, dozens of redirects among a notable share of site links.
Step 3: examine the final redirect destination
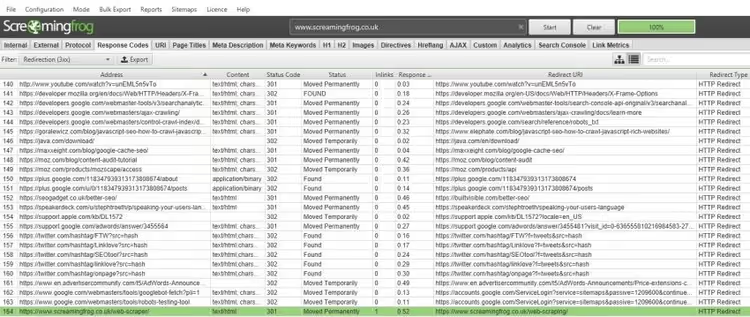
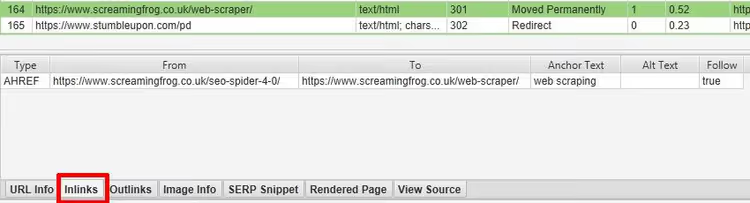
The Redirect URI column shows where the redirect leads. In the screenshot below, you can see: /web-scraper/ returns a 301 to /web-scraping/. This is a classic scenario after changing URL structure: the old address permanently redirects to the new one.
Pay attention to the type: permanent (301) or temporary (302). For SEO, it's critical that migrations use 301; search engines only pass page weight through permanent redirects.
Step 4: find the redirect source via the Inlinks tab
Knowing where a redirect leads is only half the battle. More importantly, you need to understand which pages on the site link to it so you can update those links. Click on the desired URL in the top panel, then go to the Inlinks tab in the bottom panel.
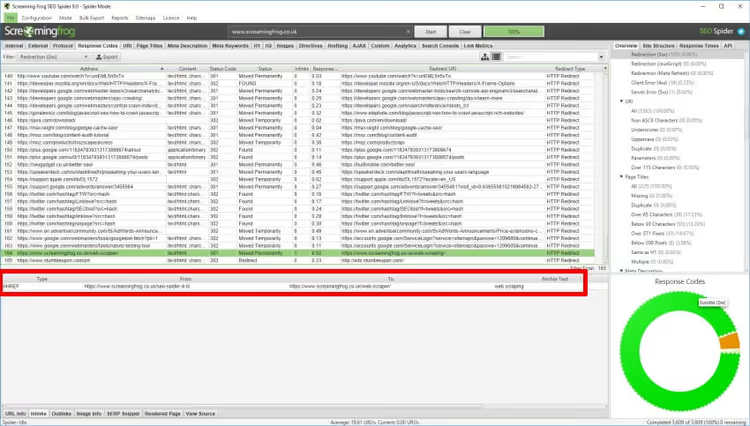
The bottom panel shows details: the From column is the source page (where the link to the redirect was found), To is the redirect URL itself, Anchor Text is the link text, Alt Text is the alt attribute of an image link, and Follow indicates whether it's indexable (true) or nofollow (false).
Step 5: export data via Bulk Export
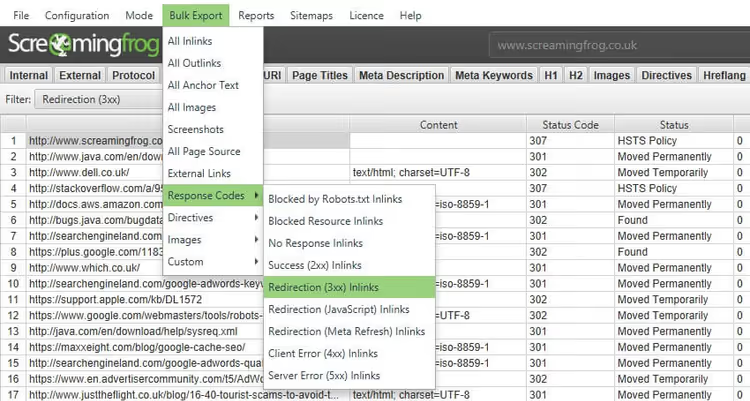
If you prefer working in a spreadsheet, export everything at once. In the top menu, select Bulk Export → Response Codes → Redirection (3XX) Inlinks. The CSV or Excel file will contain both source URLs and redirect addresses in a single export.
For more on export formats and column settings, see the export user guide.
Step 6: check redirect chains and loops
A single redirect A → B is harmless. But a chain A → B → C → D consumes crawl budget and slows down loading for users. A loop A → B → A is even worse: the search engine gets stuck and doesn't index the page at all.
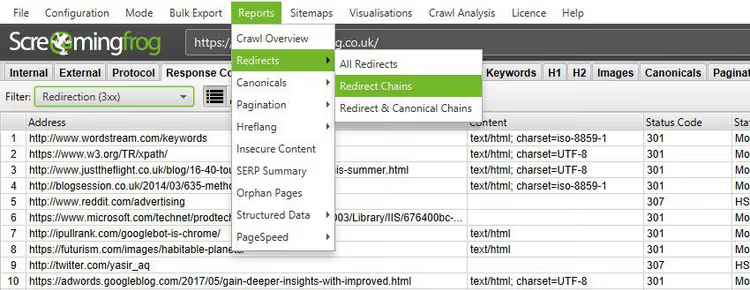
Open Reports → Redirects → Redirect Chains. The report shows the entire chain of transitions, the number of steps, the source, and whether there's a loop. If you find a loop, fix it immediately: this is a direct loss of traffic.
Method 2: uploading a URL list to check redirects
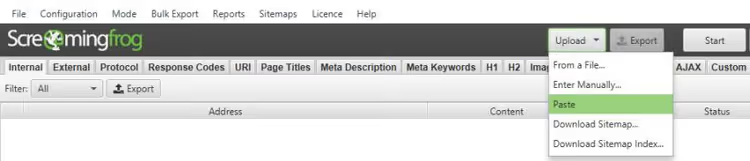
When you need to check not the entire site but a specific set of addresses (for example, a list of old URLs during migration), switch to list mode. In the top menu, click Mode → List. Now instead of a single domain, you can paste a URL list manually, copy from the clipboard, or upload a file.
After uploading the list, click Start. SEO Spider will check each URL and display response codes just like during a crawl. This mode is invaluable during migration: you know for certain that you've checked all old addresses from the redirect map.
An important note: in List Mode, SEO Spider does not follow discovered redirects to the final destination by default. To have it follow the entire chain and show the final destination, configure the follow settings; details are described in the list mode guide.
⁉️🤔 Frequently asked questions
What's the difference between the free and paid versions?
The free version is limited to 500 URLs per scan. For checking redirects on small and medium sites, this is enough. The paid license ($279/year) removes the limit and adds a scheduler, custom data extraction, and integration with Google Analytics and Search Console. If you're an SEO specialist who audits dozens of sites, the paid version pays for itself in the first month.
How do I tell a permanent redirect from a temporary one?
The Status Code column shows the number: 301 is permanent, 302 is temporary (Found), 303 is See Other, and 307 is Temporary Redirect. For SEO, 301 and 302 are critical. If after a site migration you see 302 instead of 301, the redirect doesn't pass page weight and the search engine may not update the index.
Can I check external redirects?
Yes. SEO Spider shows both internal and external redirects. An external redirect is when your URL links to another domain that in turn redirects. Such addresses are marked in the table, and you can trace the entire chain up to the final URL on the external site.
What should I do if a redirect loop is found?
A loop is when URL A → B →... → A. Fix it at the server level: check the rules in
.htaccess(Apache) or Nginx configuration and find conflicting rules. In WordPress, loops often arise from redirect plugins (Redirection, Rank Math); disable the plugin and test again. SEO Spider will show the loop in the Redirect Chains report, so start there.
How often should I check redirects on a live site?
After every major URL structure change, without fail. Otherwise, once a quarter during regular SEO audits. Redirect errors accumulate unnoticed: someone on the team changed a page slug, a plugin added its own rule, or a temporary 302 expired. A quarterly run through SEO Spider catches these problems before they affect indexing.
Is Screaming Frog SEO Spider worth paying for?
If you're checking redirects on your own project as a one-time task or occasionally, the free version is more than enough. 500 URLs cover a typical company website, blog, or small online store.
If SEO is your regular job and you handle dozens of sites of various sizes, the paid license removes artificial limitations and adds tools that save hours: report scheduler, crawl comparison before and after migration, and integration with Google Analytics for cross-analysis of traffic and redirects.
For a first look, download the free version and run through the steps above on your own site. You'll see results within five minutes of starting.
Start with the Redirect Chains report: redirect loops are the most dangerous finding and also the quickest to check. And if you still have questions after the audit, check out the official Screaming Frog FAQ or the complete user guide.

A professional team of writers and editors specializing in creating quality content.