














🎬 Slider Revolution 2026: feature overview and slider creation guide
You bought a premium theme but the slider from the demo didn't work? Or you assembled a slider in a free plugin and it stutters on mobile while adding half a megabyte of bloat? We went through about five sliders before settling on one.
Slider Revolution from ThemePunch is not just "another slider." It's a visual editor for content of any complexity: from a Hero section to a one-page site built on layers. In 2026, the plugin lives in version 7 and can do things free alternatives haven't even thought about: WebGL effects, 3D particle clusters, fluid simulation, and AI translation of layers.
Below is an honest review and step-by-step guide. What version 7 can do, how to install it (as a separate purchase or bundled with a theme), and most importantly, how to launch your first slider in an hour.
💡 Quick overview:
- Buy Slider Revolution at sliderrevolution.com (CodeCanyon is no longer an option since the plugin left the marketplace) or activate the copy bundled with your premium theme
- Activate the license in the WordPress admin and configure global settings: access permissions, grid breakpoints, lazy loading
- Import a ready-made template from the library of 200+ options or create a module from scratch
- Fill in the slides: background, layers (text, buttons, video, shapes, SVG), animations, and transitions
- Set up navigation, progress indicator, scroll effects, and insert the shortcode on your page
What is Slider Revolution and what's new in version 7
A premium WordPress plugin from ThemePunch. According to the directory, it has more than 9 million active installations and over 200 templates in the library. Out of the box: sliders, carousels, Hero blocks, one-page sites, and dynamic modules based on posts or WooCommerce products.
In short: this is not a "slider with pictures." It's an environment where each slide is assembled in layers (text, button, video, SVG shape, row with columns) like in a page builder. The scene is built with the mouse on a canvas, not with sliders in a sidebar, and the result is visible immediately.
Version 7, released after three years of development, brought a completely new visual editor and rendering engine. Old projects migrate automatically when you update. Notable additions: a WebGL engine for advanced transitions, Fluid Dynamics (fluid simulation that reacts to the cursor), The Cluster (3D particle clusters with orbits and attraction), AI Translate (automatic layer translation with WPML support), and 30+ add-ons for any task.
Layouts and responsiveness
The plugin has long outgrown being just a "slider with swiping": carousels, "scenes" (a single slide as a builder row), and fullscreen modules are available. Responsiveness goes beyond image compression: Smart Inherit restructures layers for each device, and elements resize or hide. On mobile, the slider remains readable rather than turning into an anthill of tiny buttons.
Content sources
Nine options for content. By default, your own images and videos. You can pull blog posts (any post types, including specific IDs), WooCommerce products, content from Flickr, Instagram, Twitter, Facebook, YouTube, and Vimeo. The last option is great for live social proof widgets: the slider updates itself when new posts appear.
Layer management
Each slide is a layered cake. You add text, images, buttons (including social presets and hamburger menus), shapes (background, pulse, stroke), audio, video (YouTube, Vimeo, HTML5), icons/SVG, and rows with columns like in a full-fledged builder. Layer grouping simplifies moving related elements. License holders have access to the ThemePunch ready-made layer library and can import layers from other sliders in their installation.
Presets and reuse
Once you've configured fonts, layer animations, and transitions, save them as a preset and apply to subsequent sliders in one click. This saves hours when creating modules in a consistent style.
Installation: two paths
The plugin gets to your site either through direct purchase at sliderrevolution.com or by activating the bundled copy included with a premium theme. Let's cover both options.
Direct purchase at sliderrevolution.com

The plugin used to be sold on CodeCanyon, but with the release of version 7, ThemePunch switched entirely to direct sales through sliderrevolution.com. After purchase, log into your account on the site and download the plugin zip archive.

Now in the WordPress admin: Plugins → Add New.

Click the Upload Plugin button in the top left corner → Choose File → select the downloaded zip → Install Now.

After installation, click Activate Plugin. Done.
You can also use FTP: extract the plugin and upload the folder to wp-content/plugins.
Plugin bundled with a premium theme
Most premium themes include Slider Revolution in their bundle. The exact process is in the specific theme's documentation, but the general logic is the same.

After activating the theme, a notification about recommended plugins appears. Click on it.

You'll get to the associated plugins page; install and activate Slider Revolution.

Some themes (for example, Total) offer to install the plugin during the demo data import process.

Select the "Import Sliders" option when importing demo, and the theme will pull in all custom sliders from the demo set.
First launch: setup and license
After activation, a Slider Revolution item appears in the main admin menu.

From here, you can create and edit modules, import templates, and activate your license key.
License activation
If you purchased the plugin directly at sliderrevolution.com, activate the license in the admin to unlock all features, premium templates, and add-ons.

The key is in your account at sliderrevolution.com. Copy and paste it in the WordPress admin.

In admin: go to the Slider Revolution section → bell icon → license key field.

Important note: if the plugin came bundled with a theme, activation is not needed. The theme developer handles updates, not ThemePunch. The plugin will update along with the theme, sometimes with a delay but with guaranteed compatibility. The downside: the ThemePunch premium template library and add-ons are unavailable.
Global settings
Before your first slider, go to the Global Settings submenu.
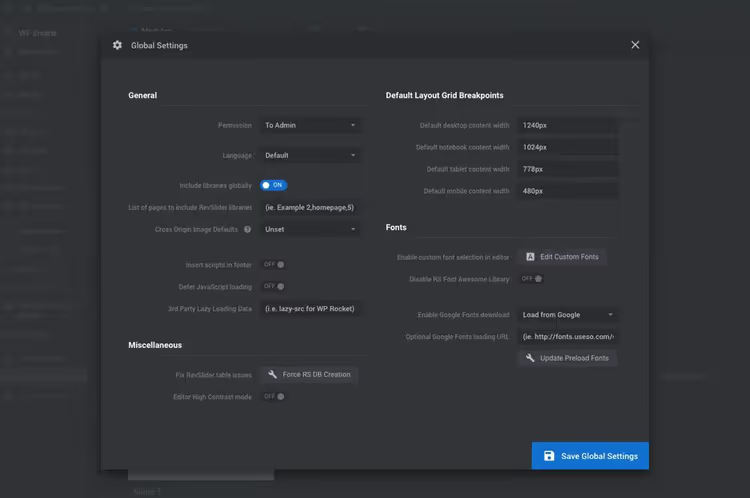
Two parameters matter here.
Permission. Restrict plugin access to administrators only. Useful if you have guest authors on the site so they don't accidentally break sliders.
Grid breakpoints. Width in pixels for responsive layout across devices. The defaults are fine, but if your site grid is non-standard, adjust them.
The rest (custom fonts, lazy loading, forced database creation if there are table issues) can be changed as needed. Save the settings.
Importing a ready-made template
The fastest start is to grab a template from the library.
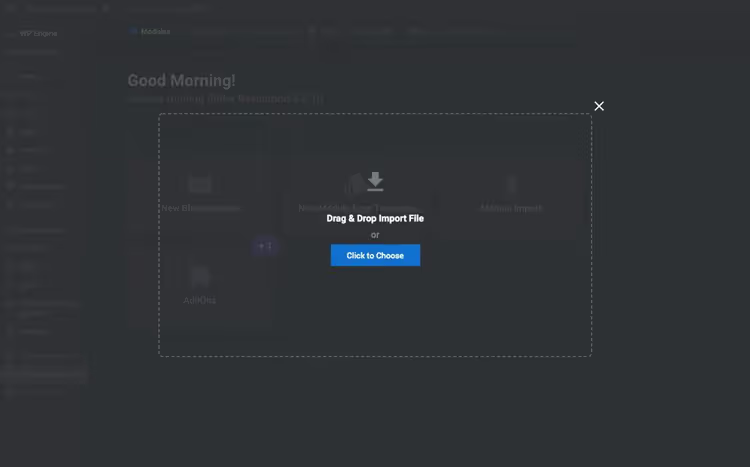
On sliderrevolution.com, download a module file. In admin: Slider Revolution → Import Slider → select the file → import. The module with slides, layers, and settings will appear in your library; edit it to suit your needs.
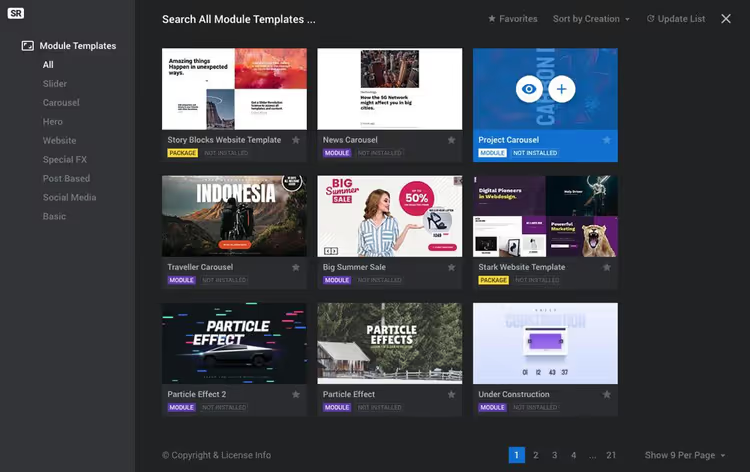
Direct license holders see a library of 200+ ready-made templates. Hover over a layout: eye icon for preview, plus to install. Users with bundled copies (included with a theme) don't see this library, but theme authors often include their own templates in the demo importer.
Creating a slider from scratch
Three starting points: a blank slate, a free export from examples on the Slider Revolution site, and templates built into the theme. Let's go through the from-scratch path, which also applies when editing an imported template.
Select New Blank Module.
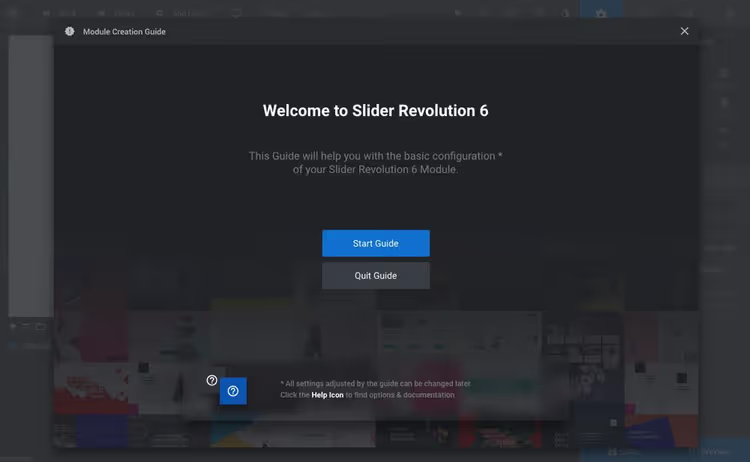
A welcome window with a quick guide appears; click "start" and follow the steps.
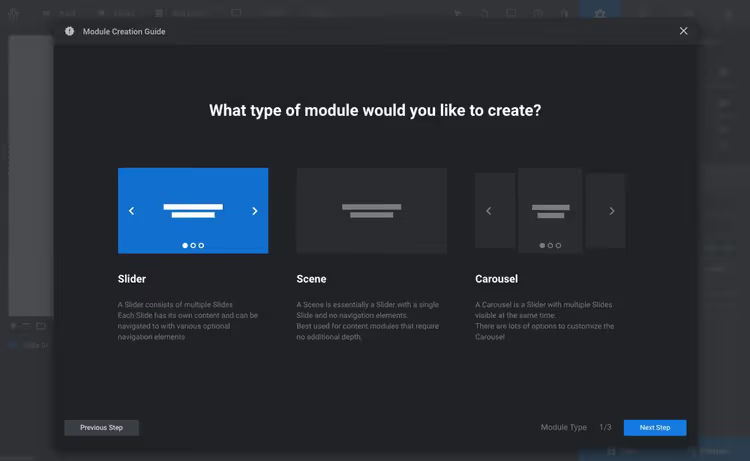
First step: module type. Slider is a classic set of animated slides. Scene is a single slide as a builder row (for Hero sections). Carousel shows several slides at once.
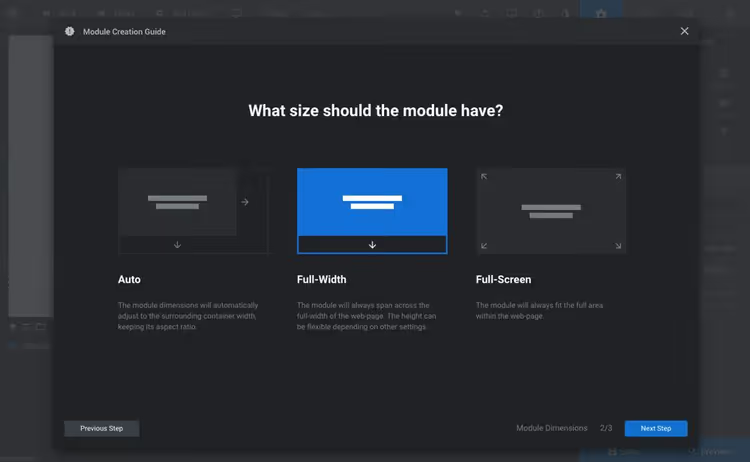
Second step: layout. Auto stretches the module to the width of the theme's content container (you set the height). Full Width spans edge to edge of the screen. Full Screen fills the entire browser regardless of device size.
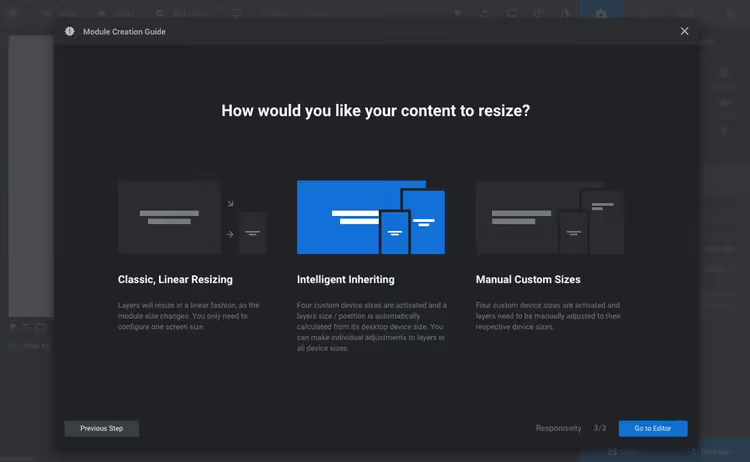
Third step: responsiveness. Classic (Linear) Resizing scales proportionally (width and height decrease along with the container, fonts and images scale in sync). Smart Inherit automatically creates four device sizes based on desktop settings, with the ability to edit each one. Custom (Manual) allows exact pixels for each resolution.
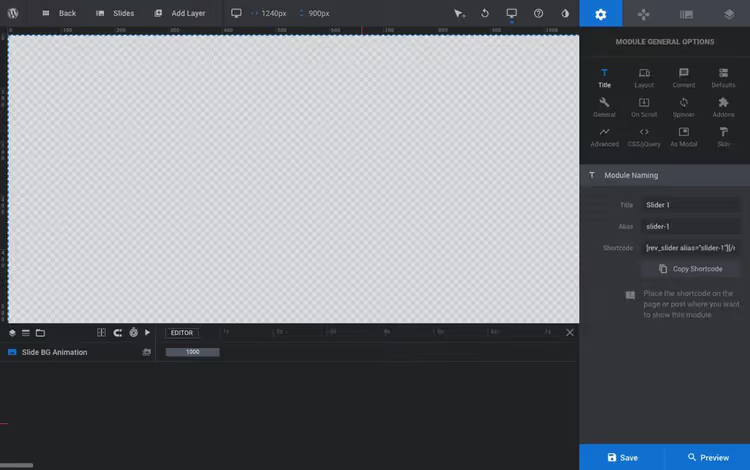
After selecting the basic settings, you enter the builder where slides are assembled.
General module settings
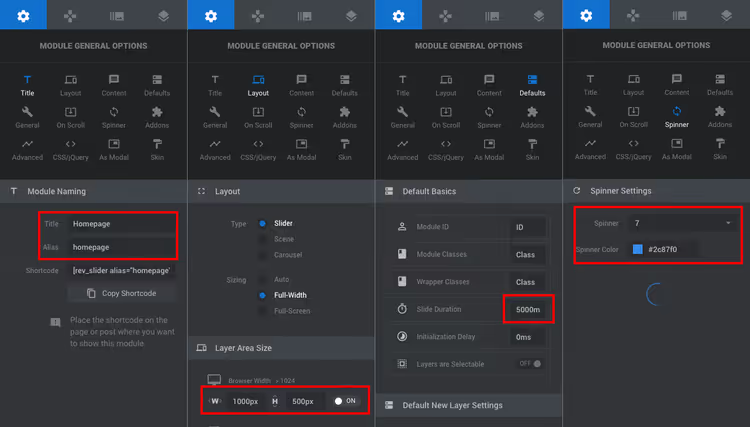
Set four things:
- Title and Alias: the system name of the slider (Alias is needed for the shortcode).
- Layout: width and height of the desktop area. On the test site, we matched it to the content zone width.
- Default duration: how long a slide displays. 5000 ms (5 seconds) to start; then adjust to match your content pace.
- Spinner: preloader (15 options to choose from).
Navigation
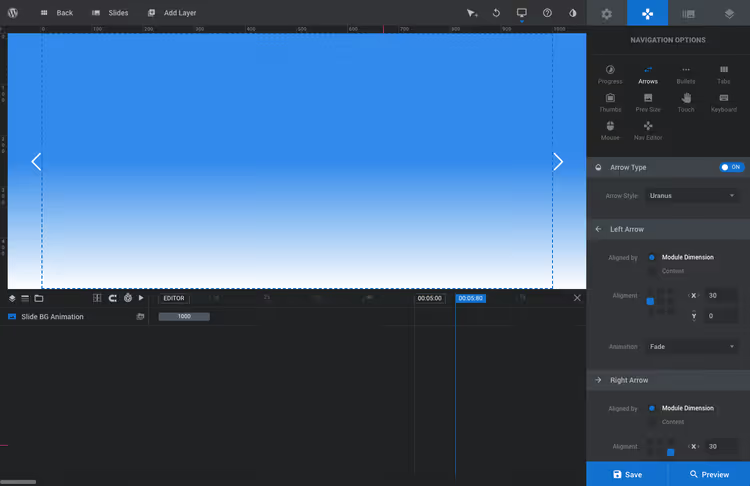
Choose how visitors will navigate the slides. In this example, we took the Uran style with simple arrows. Available options: bullets (dots, 14 styles), tabs (thumbnail and title, for post-based modules), preview thumbnails (5 styles), touch navigation, keyboard, mouse with carousel effect. Any element is customizable: position, size, visibility, style.
Slides and background
Right after creating the module, you're on slide #1 and can start filling it.
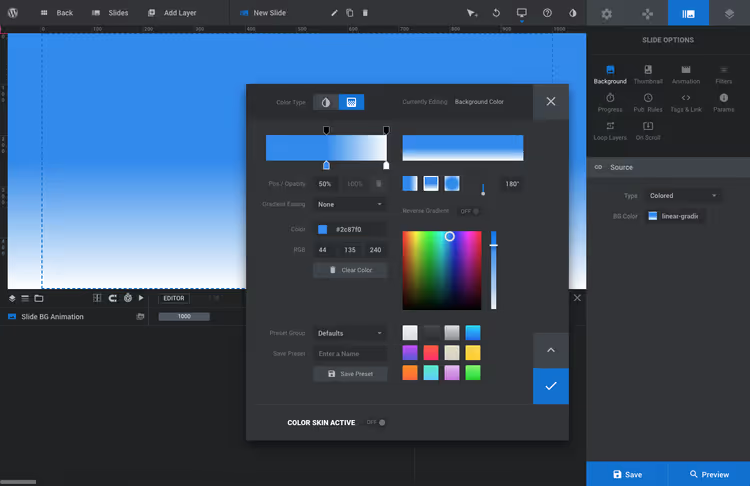
Background: transparent, color (with gradient), image, external image, or video from YouTube, Vimeo, HTML5.
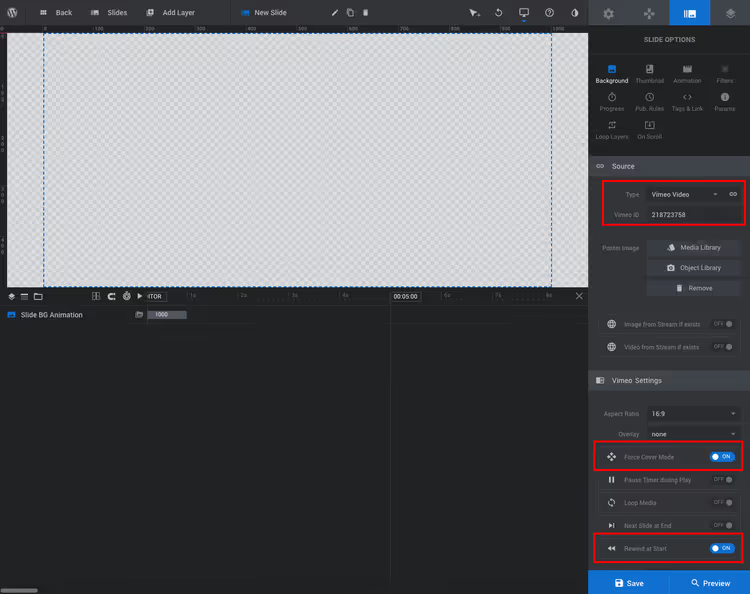
For video: set the source, enable Force Cover Mode (stretch to fill the slider) and Rewind at Start (play from the beginning on each display). Don't forget the thumbnail for navigation and admin.
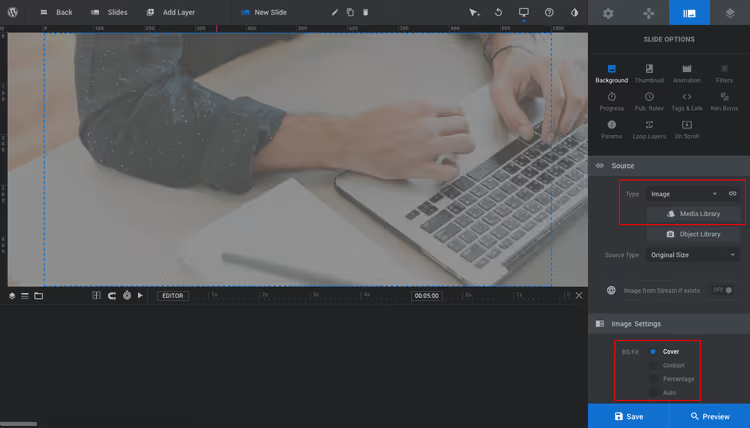
For images, upload from the media library. Cover mode (stretch with cropping to fit boundaries) or Contain (fit without cropping). Cover is standard for most scenarios.
Transition animation can be selected from dozens of options. Filters (22 presets) are more for slides with background images, a matter of taste. Display duration and pause are individually configurable. Publishing rules are convenient for seasonal and promotional slides: set them up in advance and publish on the right day.
Layers: the main mechanism
The + Add Layer button at the top of the screen opens a menu with 8+ layer types.
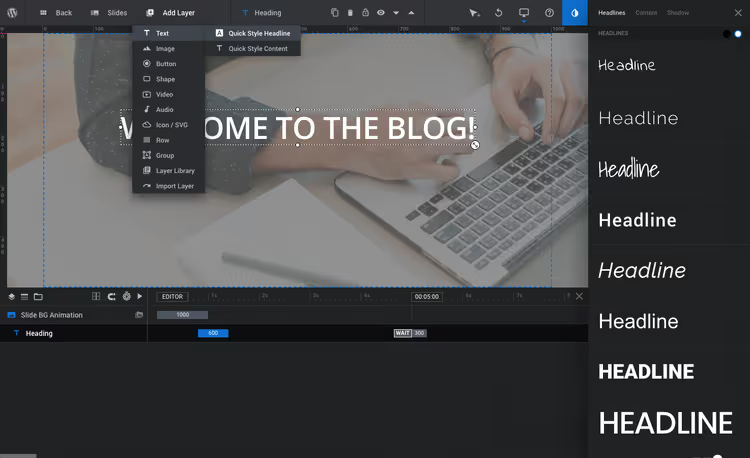
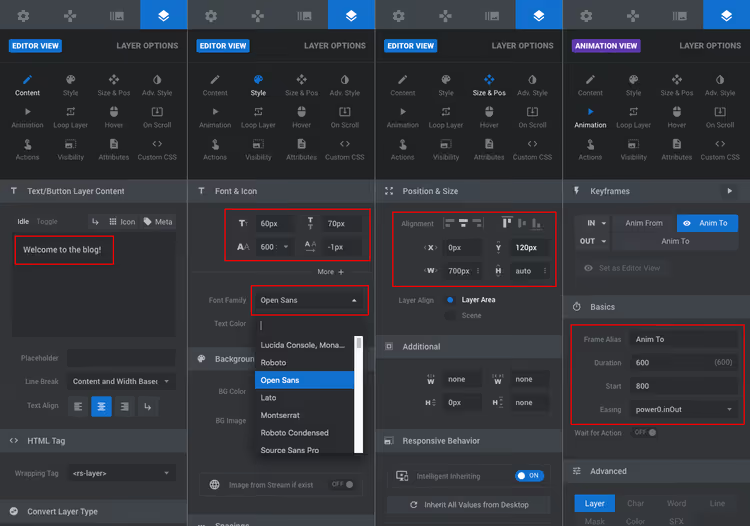
Text. Headlines, descriptions, links. Font, size, color, alignment, everything is edited right on the canvas, not in the sidebar.
Images. Logo, parallax layers for depth, before/after sets, and additional images.
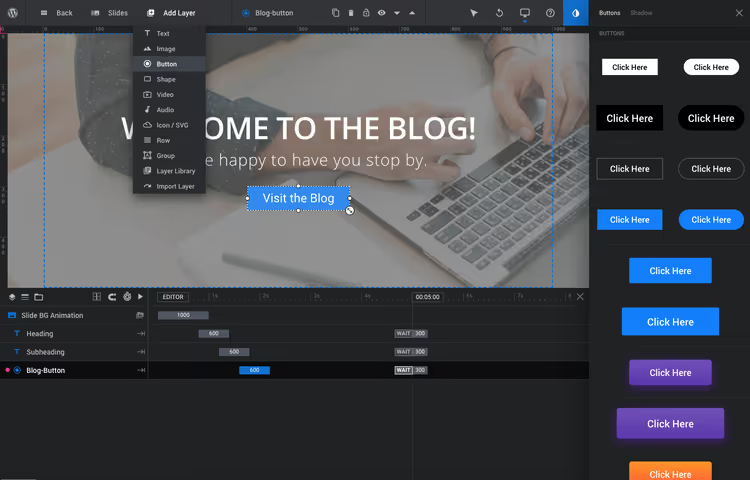
Buttons. Size, border radius, color, background, hover state, everything is customizable. Presets for social networks, animated scroll icons, hamburger menus, Play/Pause buttons.
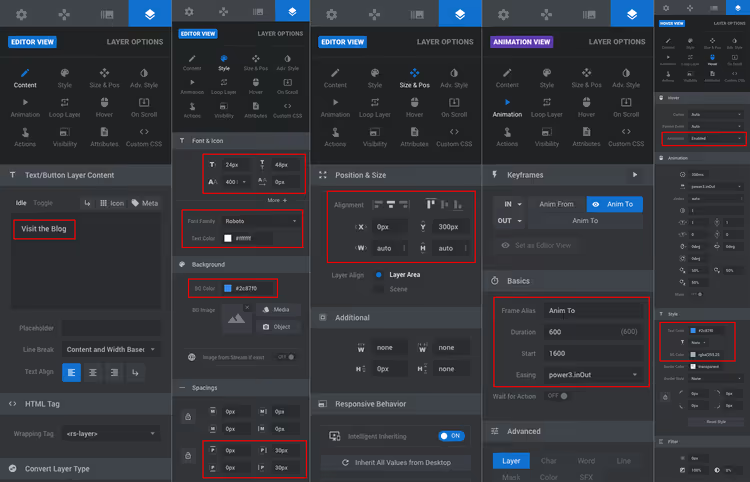
Shapes. Add visual emphasis: a pulse behind a button, highlighting a text fragment, a colored background. Settings: background, stroke color and size, corner radius (0 for square, 100 for circle), padding.
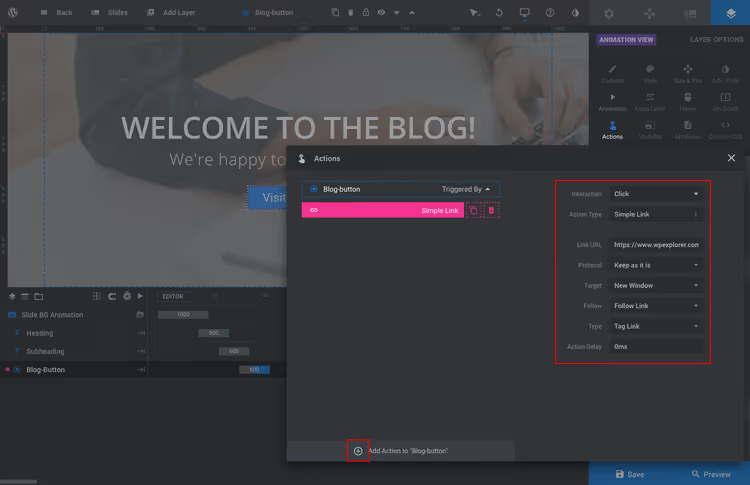
Audio and video. Upload from the media library or paste a link (YouTube, Vimeo, SoundCloud). Options: loop, autoplay, advance to next slide on end, volume, segment (start/end). Great for customer testimonials and intro videos.
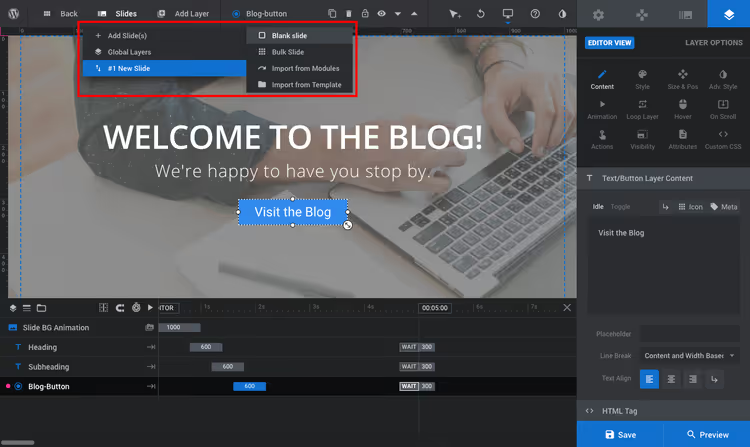
Icons / SVG. Built-in icons or your own SVG, scaling along with the module without quality loss.

Rows. Like in a page builder: columns inside a slide. They organize layers in a grid.
Group. Combines multiple layers so they move and are configured together.
Library and layer import. Ready-made ThemePunch assets (license only) and copying layers from other modules in your library.
Other settings: quick reference
Below are sections that didn't make it into the step-by-step example but will be useful in real work.
General. Auto-rotation, stop on hover, looping, first slide. Also where you hide the module on mobile or at a specified screen width.
On Scroll. Parallax, 3D depth, timeline, fade, blur, grayscale. Speed and offset are configurable. Tip: don't try to cover everything at once. Take a ready-made template with scroll effects and study how it's built; it's faster than reading documentation.
Spinner. 15 preloader options with customizable colors.
Advanced. Lazy loading, fallback image, simplified module for older browsers.
CSS / jQuery. Custom code per module, but best left alone without coding knowledge.
Modal. Slider as a popup or lightbox: position, overlay color, shortcode (different from the main one, adds a usage attribute).
Skin. Styling preset for text layers. Set it up once to match your brand and apply to all layers.
Add-ons. Available only with a direct license, not included in theme-bundled versions.
Navigation, in detail. Progress (indicator or circle along the timeline), arrows (13 styles), bullet dots (14 styles), tabs (for post-based modules, thumbnail and title), previews (5 thumbnail styles), touch navigation, keyboard, mouse (carousel), navigation editor for custom code.
Slide options. Background (transparent, color with gradient, image, video), thumbnail (for admin and navigation), transition animation, filters (22 presets), progress (duration, pause, visibility), publishing rules, tags and link (custom class/id, link on entire slide), parameters (up to 10 custom ones for use in layers and navigation), loop layers, and scroll effects at the individual slide level.
Video: the interface in action
Watch how all this looks in the actual editor in a video from the official Slider Revolution channel:
⁉️🤔 Frequently asked questions
How is Slider Revolution different from free sliders?
Free plugins (MetaSlider, Smart Slider 3 Free) provide basic functionality: upload images, set up arrows, done. Slider Revolution is a visual environment with layers, animations, WebGL effects, and dynamic content sources. Free alternatives cannot build Hero sections, product carousels, and one-page sites with parallax. If your site just needs a "three images, let's go" slider, free is enough. For everything else, Revolution.
Do I need to activate a license if the plugin came with a theme?
No. Bundled copies work without a license key; the theme author handles updates and compatibility. The downside: ThemePunch premium templates and add-ons are unavailable, and updates come with a delay while the theme developer tests them. If you need access to the entire library and instant updates, it's better to buy a separate license.
Does the plugin heavily load the site?
With proper configuration, no. In global settings, enable lazy loading, don't put more than 3-4 slides per module without necessity, and use optimized images (WebP/AVIF). On a test site with three slides and a couple of layers each, it added 250-400 KB, which is within normal range for media content. The main speed killer is fullscreen video on every slide. If video is critical, use lazy loading and disable autoplay on mobile.
Can I use it on multiple sites with one license?
It depends on the plan. The Starter plan covers 1 site (€45/year). Enthusiast covers 3 sites (€89/year). Scale is designed for agencies and freelancers, up to 250 client sites for €209/year, current pricing on the Slider Revolution website. The per-site price on Scale drops below €1 per year, the best option for web developers.
Is it difficult to learn from scratch?
A basic slider with images and captions takes 15-20 minutes. Mastering layers, animations, and scroll effects takes 2-3 evenings of practice. The main barrier is not complexity but the number of settings: when you open the editor for the first time, your eyes go everywhere. Tip: start by importing a template and analyzing how it's built; it's faster than reading documentation.
What happened to the one-time license on CodeCanyon?
ThemePunch removed the plugin from CodeCanyon and abandoned the "buy once, use forever" model. The reason is simple: version 7 was written from scratch over three years, and one-time payments don't cover that kind of development. Old keys continue to work on already activated sites, but new installations and upgrading to version 7 require an annual subscription.
What to choose in 2026: verdict

Slider Revolution is not a plugin for everyone. If you need a simple slider with three images, grab the free MetaSlider and don't overpay. Revolution comes into its own when a site needs a Hero section with parallax, a product carousel, or a single-screen landing page built on layers and WebGL effects.
Practice shows: those who install Revolution "just in case" use a small fraction of its capabilities and waste money on the subscription. Those who actually work with layers and dynamic content don't go back to other sliders. The plugin isn't cheap (annual subscription starting at €45), but for commercial projects and client sites, it pays for itself with the very first slider you're not ashamed to show.
Try the demo on the Slider Revolution website, and you'll immediately know whether this tool is for you.

A professional team of writers and editors specializing in creating quality content.