














⚙️ All In One WP Security: step-by-step WordPress security setup in 16 steps
Every day, an average WordPress site receives 200 to 500 illegitimate requests to wp-login.php. These aren't hackers in hoodies, these are scripts. They comb the internet, find the standard login page, and start brute-forcing: admin/123456, admin/qwerty, admin/password_from_leaked_database. Sooner or later, they crack it.
Hosting doesn't protect against this. The server firewall sees a legitimate POST request to wp-login.php and lets it through, it can't distinguish whether you're entering a password or a bot is. WordPress protection and server protection are two different layers, and you're responsible for the first one.
All-In-One Security (AIOS) from the UpdraftPlus team covers this layer completely. One plugin instead of a bundle: firewall, login protection, file auditing, bot blocking, and backups. One million installations, 4.7 rating on WordPress.org. The free version is enough to protect an average site. Below is a step-by-step setup, from basics to configuration export.
💡 Quick overview:
- We'll hide the login page behind a custom URL and enable two-factor authentication. Brute-force attacks will fail immediately.
- We'll configure three firewall layers: htaccess plus PHP rules plus 6G blacklist. Layered request filtering.
- We'll block access to service files, disable the PHP editor from the admin panel, and check folder permissions.
- We'll enable honeypot and 404 error detection. Bots will be filtered out before they land, without captcha for users.
- We'll save the ready configuration to a file for transferring between sites in one minute.
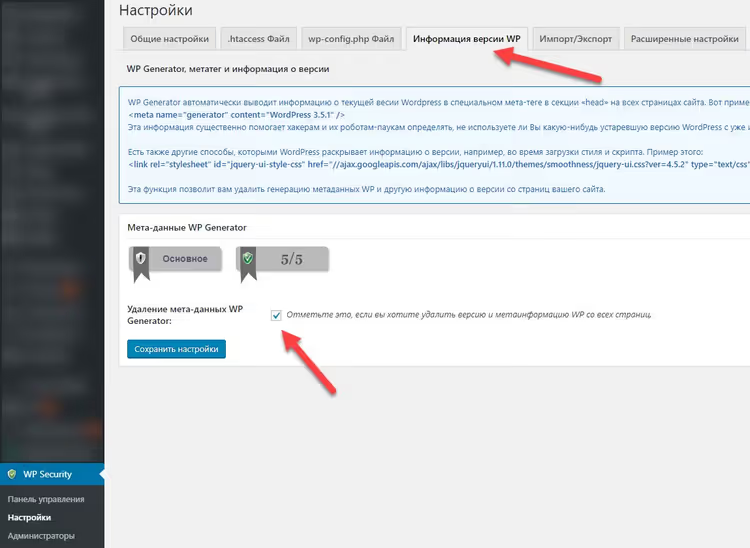
Step 1. Remove WP generator meta data
The first thing that leaks your WordPress version is the <meta name="generator" content="WordPress X.X.X"> tag in the <head> of every page. An attacker gets the exact version number and selects exploits for it in seconds. AIOS removes this tag with one toggle.
Path: WP Security → Settings → General Settings. Enable Remove WP Generator Meta Info and save. Check the source code of your homepage (Ctrl+U), the line with generator should disappear. Also in this same section, disable Enable Info Comments, AIOS by default adds HTML comments with service information, better to remove those too.
Step 2. Block login attempts
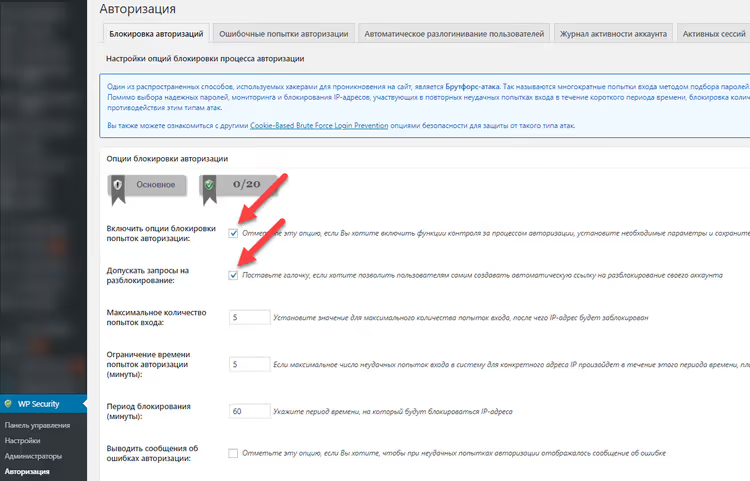
Brute-forcing wp-login.php is attack number one by frequency. Bots try hundreds of passwords per minute, creating load on the server and database. Sooner or later a weak password gets cracked, especially if a user admin or editor uses qwerty123.
Path: WP Security → User Login → Login Lockdown. Enable Enable Login Lockdown and set: maximum 5 attempts, IP block for 60 minutes, counter reset after 24 hours. For sites with multiple administrators, enable Notify by Email, the blocking notification arrives instantly. If you see frequent notifications, change the login page slug (step 14).
Step 3. Manual approval for new registrations
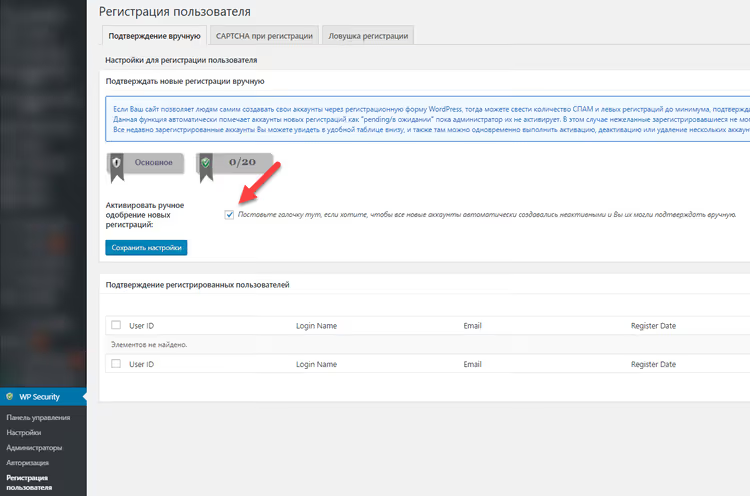
If registration is open on your site, without this setting any bot will create an account in seconds. Spam accounts accumulate by the thousands, clogging the database and creating attack surface through privilege escalation.
Path: WP Security → User Registration → Manual Approval. Enable Enable Manual Approval. Now every new account waits for administrator confirmation before activation. In this same section, configure captcha for registration forms, an additional barrier that bots can't pass.
Step 4. Change database table prefix
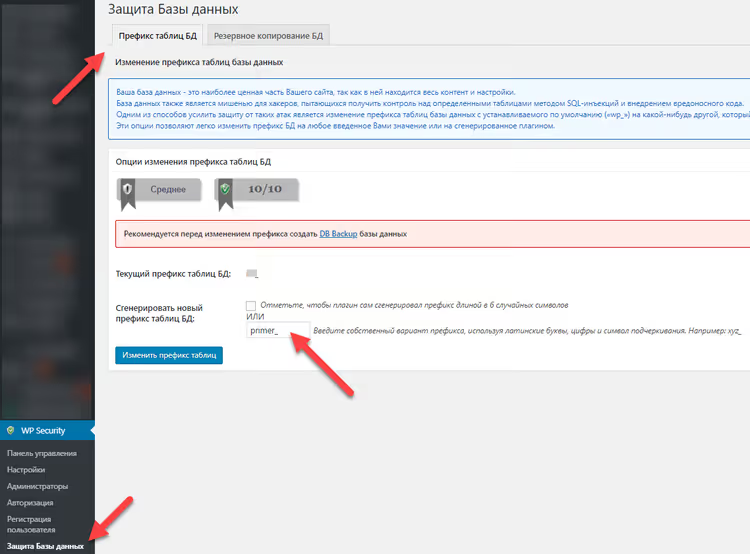
The wp_ prefix is standard for all WordPress installations. SQL injections and mass compromise scripts target it specifically: when an exploit knows table names (wp_users, wp_options), the attack becomes targeted rather than blind.
Path: WP Security → Database → DB Prefix. You see the current prefix. If it's wp_, click Change DB Table Prefix. The plugin will suggest a random string or let you enter your own (4-6 characters, only Latin letters and underscores). Before running, definitely make a database backup (step 5). The process takes 5-10 seconds on an average site, but rollback without backup is impossible.
Step 5. Database backup
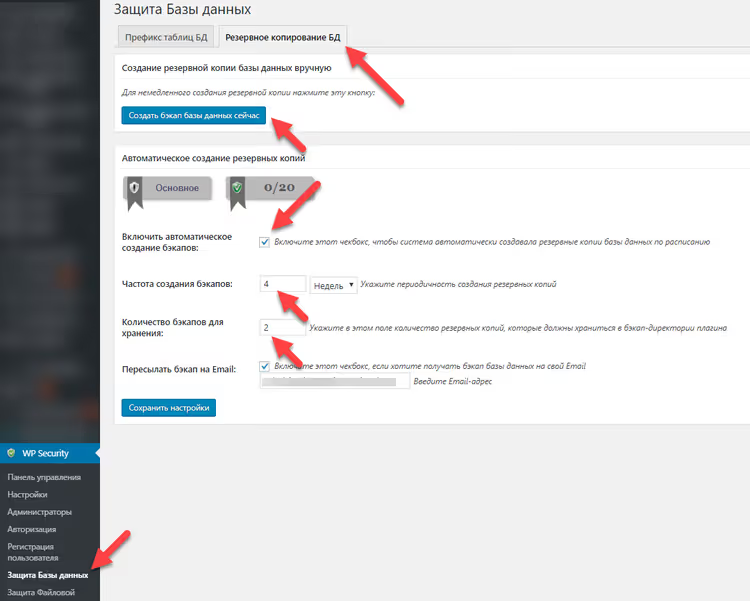
Before any structural changes, prefix change, revision cleanup, core update, backup is mandatory. AIOS is integrated with UpdraftPlus, backup launches from the same interface.
Path: WP Security → Database → Database Backup. Click Create Database Backup, the file is saved locally. Configure automatic cloud upload through UpdraftPlus (Google Drive, Dropbox, S3) and daily scheduling. Restoring a site after compromise without backup is practically impossible, and with AIOS + UpdraftPlus it's one button.
Step 6. Check directory and file permissions
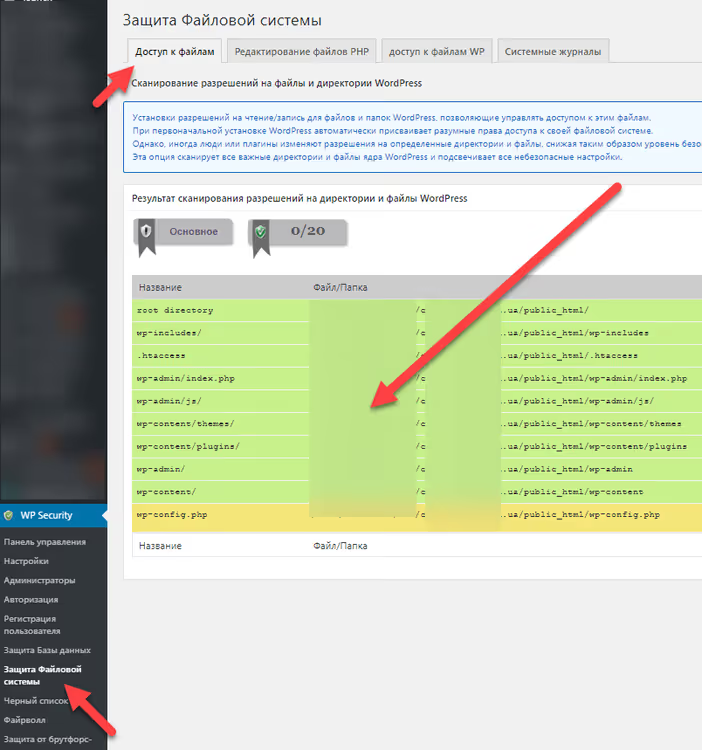
Incorrect access permissions, 777 on wp-config.php, 666 on the uploads folder, open write access to wp-content, open a direct path for writing malicious code. If an attacker gains access to a theme through a vulnerability, incorrect permissions allow them to modify system files.
Path: WP Security → Filesystem Security → File Permissions. Run the scan. All lines should be green. Red or yellow line, click Set Recommended Permissions next to the problematic file or folder. After fixing, restart the scan, it should be clean.
Step 7. Disable PHP editing from admin panel
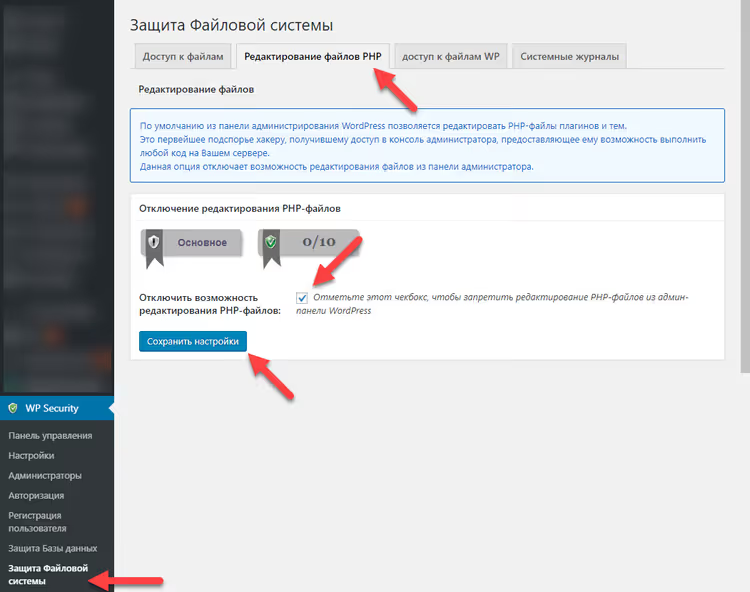
The built-in theme and plugin editor, wp-admin/theme-editor.php and wp-admin/plugin-editor.php, is a direct path to arbitrary code execution. If an attacker gains access to the admin panel, the editor allows adding a PHP shell to functions.php and gaining server control. A legitimate developer doesn't need this editor, edits are made through FTP/SFTP or deployment.
Path: WP Security → Filesystem Security → PHP File Editing. Enable Disable PHP File Editing. After saving, the "Theme Editor" and "Plugin Editor" items will disappear from the "Appearance" and "Plugins" menus. If you need to make edits, only through the hosting file manager or SSH.
Step 8. Block access to WordPress service files
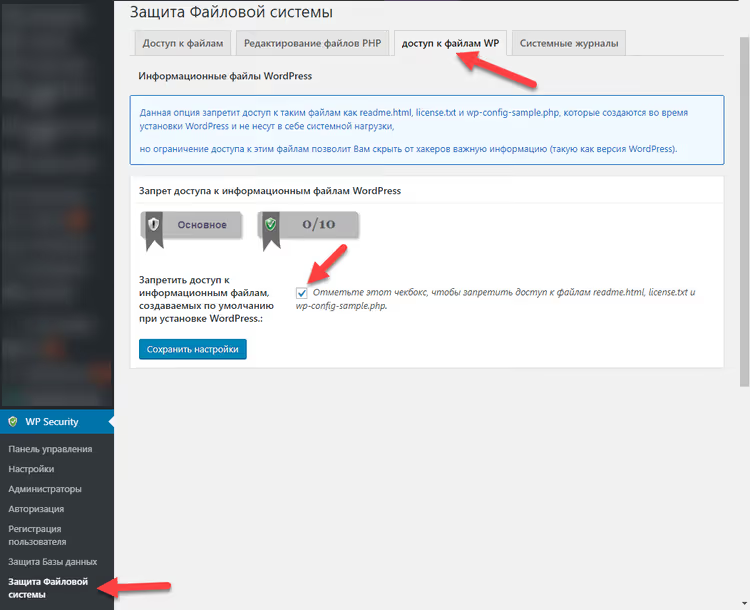
readme.html, license.txt, wp-config-sample.php, and debug.log reveal CMS version, installation structure, and internal paths. debug.log is especially dangerous: in WP_DEBUG mode it writes absolute server paths and error stack traces with plugin names.
Path: WP Security → Filesystem Security → WP Info Files. Check all four items: readme.html, license.txt, wp-config-sample.php, debug.log. Save. Now when directly requesting yoursite.com/readme.html, the server will return 403 Forbidden. These are .htaccess rules, they work at the Apache/Nginx level before PHP starts.
Step 9. Basic firewall functions
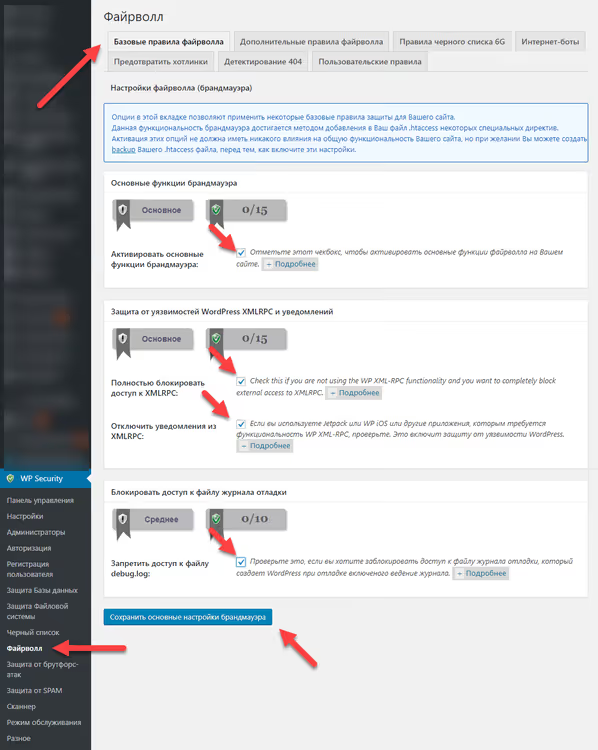
AIOS firewall has three protection levels. .htaccess rules block requests before passing to PHP (the fastest layer). PHP rules filter XSS vectors, disable XML-RPC and RSS feeds. The third layer cuts off fake Google bots by user-agent.
Path: WP Security → Firewall → Basic Firewall. Enable:
- Enable Basic Firewall Protection, general activation;
- Block Fake Googlebots, bots with fake Googlebot
user-agentare filtered; - Disable RSS and Atom Feeds, if the site doesn't use RSS, disable (content parsing);
- Disable Directory Listing, prevent Apache from showing folder contents without
index.php.
Here also disable XML-RPC if you don't use the WordPress mobile app, Jetpack, or trackbacks. For most blog sites in 2026, XML-RPC isn't needed.
Step 10. Additional firewall rules
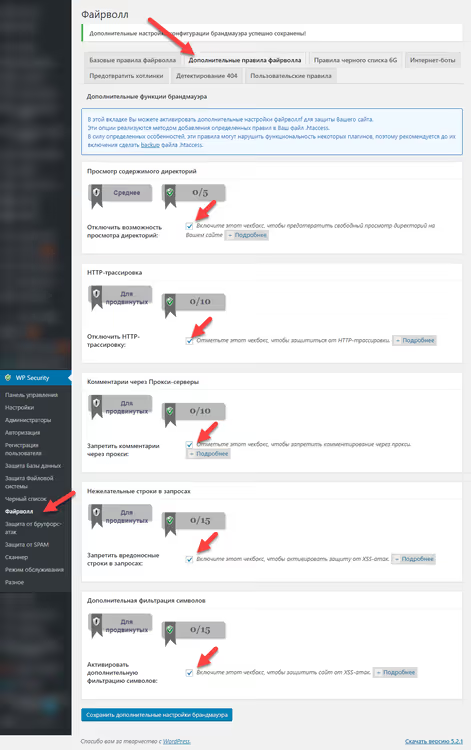
Extended .htaccess rules close several more attack vectors: direct browser access to wp-config.php and .htaccess, uploaded file size limit, server signature disabling.
Path: WP Security → Firewall → Additional Firewall. Enable:
- Deny Access to wp-config.php, key config is unavailable via HTTP;
- Deny Access to.htaccess, server rules file is closed from reading;
- Disable Server Signature, Apache stops reporting version in
Serverheaders; - Limit File Upload Size, set 10 MB (enough for images, not enough for uploading archive with shell).
Rules are written to .htaccess directly. After saving, open the site in an incognito window and make sure everything works.
Step 11. 6G firewall blacklist
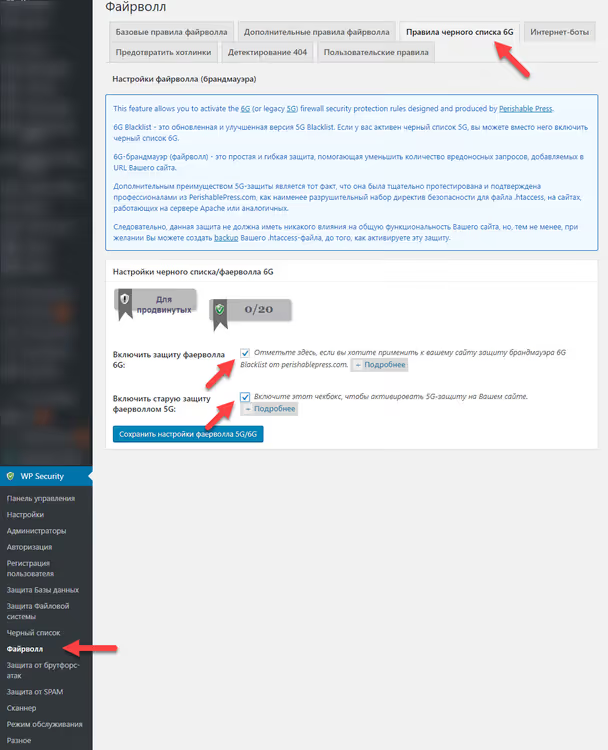
6G Firewall from Perishable Press is a strict set of .htaccess rules blocking malicious patterns in URLs and query strings: SQL injections, file include attempts (../../wp-config.php), XSS vectors, and vulnerability scanner signatures. The rules are static, require no updates, attack patterns haven't changed in years.
Path: WP Security → Firewall → 6G Blacklist. Enable Enable 6G Firewall Protection and save. If after activation a legitimate plugin stops working (rare, but happens with plugins having non-standard URL patterns), add it to the whitelist: Firewall → Whitelist.
Step 12. Prevent image hotlinking
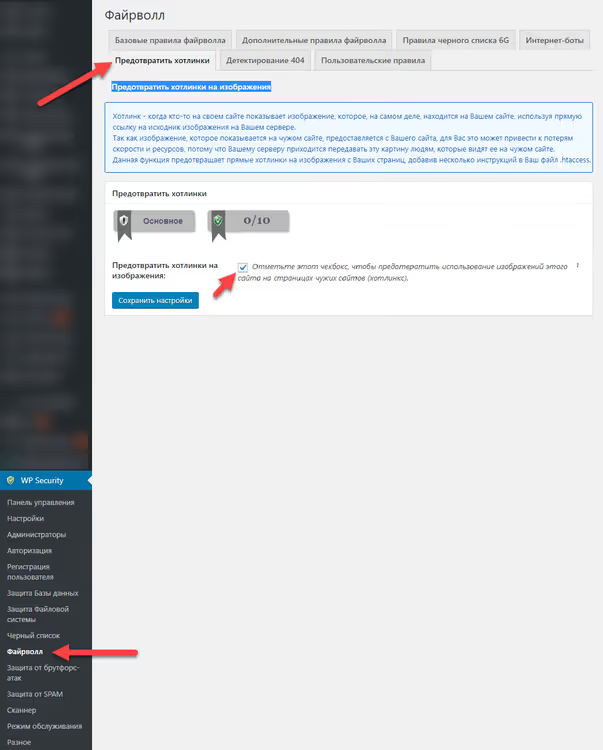
Hotlinking is when another site embeds your image via direct URL (<img src="https://yoursite.com/uploads/photo.jpg">). Your server dutifully serves the image, consuming traffic and CPU resources, while the visitor sees content on someone else's site. For sites with original screenshots and photos, this is noticeable.
Path: WP Security → Firewall → Prevent Hotlinks. Enable Prevent Hotlinking. Add exception domains (google.com, facebook.com, twitter.com) so social media and search previews continue working. AIOS writes rules to .htaccess, forbidding direct image requests with a Referer header from another domain.
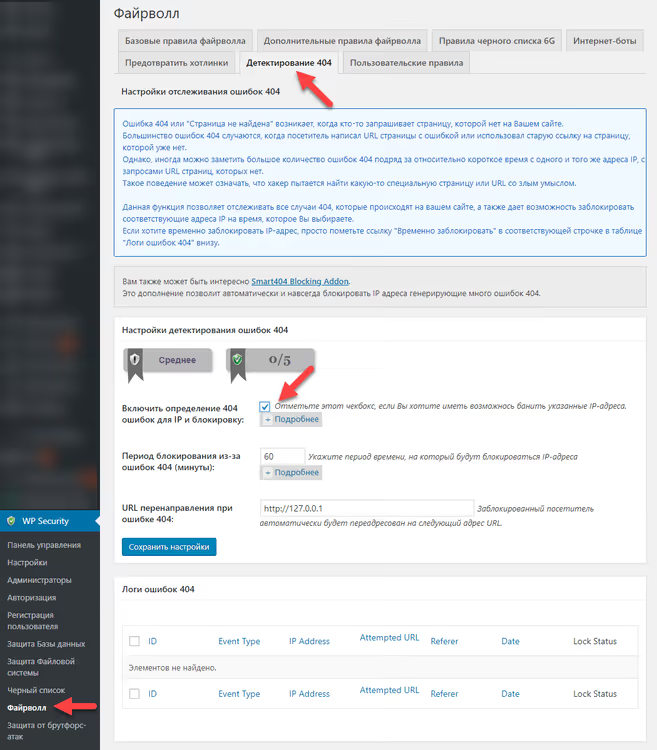
Step 13. 404 error detection
Mass 404s are a sign of vulnerability scanning. A bot tries /wp-admin/, /admin/, /backup.zip, /phpmyadmin/, and hundreds of other typical paths, checking attack surface. AIOS tracks such requests, links them to IPs, and blocks the source.
Path: WP Security → Scanner → 404 Detection. Enable Enable 404 Detection. Threshold: 20 errors in 15 minutes → temporary ban for 30 minutes; 50 errors in 15 minutes → permanent ban. The Logged 404 Events tab will show a live list of suspicious requests, useful for understanding what exactly is being scanned on your site.
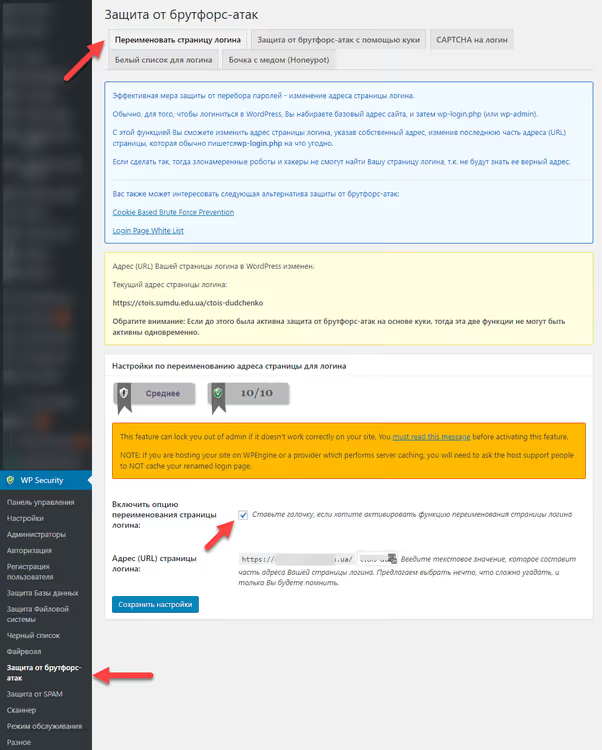
Step 14. Change login page address
/wp-admin and /wp-login.php are standard entry points, known to every bot. Without this step, brute-force protection (step 2) works, but attacks still come by the thousands, bots knock on a known door. Renaming the login page removes the target itself.
Path: WP Security → Brute Force → Rename Login Page. Enter a custom slug: at least 4 characters, not admin, login, or wp-*. Good option: manage- plus 6 random letters, for example manage-xk7qpd. After saving, immediately check the new URL and bookmark it. The standard wp-login.php will be disabled, if you forget the slug, you'll have to restore it via FTP (by deleting or renaming the plugin).
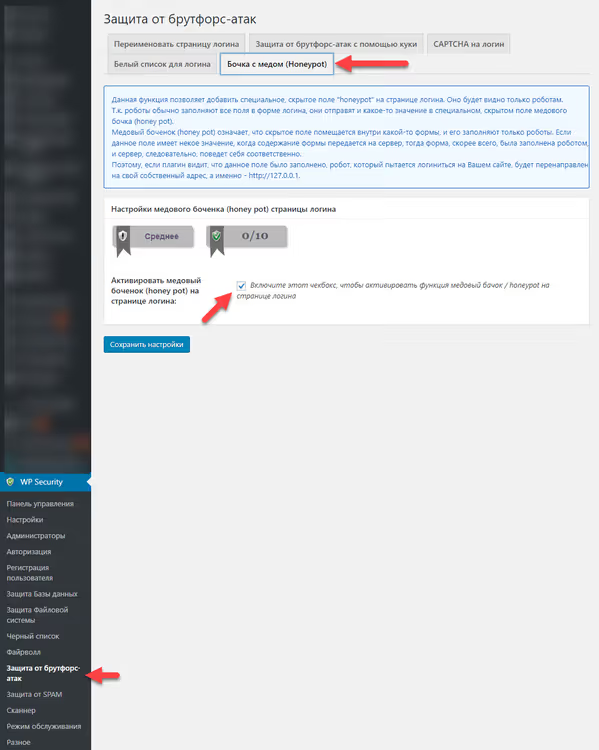
Step 15. Honeypot trap for bots
Honeypot is a hidden field in the login form. A human doesn't see it (CSS rule display:none or positioning off-screen), but a bot finds it through HTML markup parsing and fills it. AIOS sees the filled hidden field and blocks the attempt as non-human. No captcha, the user doesn't even know about the check.
Path: WP Security → Brute Force → Honeypot. Enable Enable Honeypot Protection. The field is added to the wp-login.php form automatically and works quietly in the background. According to Team Updraft, honeypot filters out the overwhelming majority of automated bots, they don't need your admin panel specifically, they just look for the standard form and fill all fields in sequence.
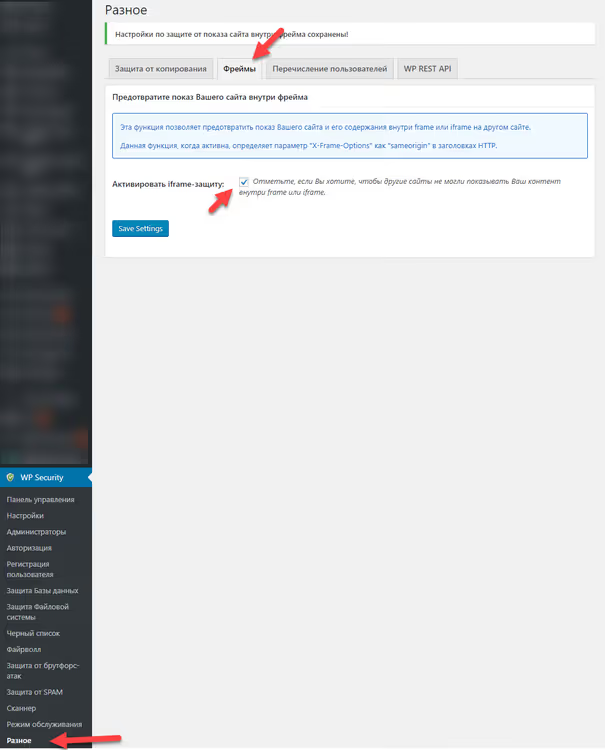
Step 16. Prevent site embedding in frames
Clickjacking is an attack where your site loads in a transparent <iframe> over the attacker's site. The user thinks they're clicking the interface, but actually interacting with another site's form. The X-Frame-Options: SAMEORIGIN header prevents embedding.
Path: WP Security → Firewall → Prevent Framing. Enable Prevent Your Site From Being Displayed in a Frame. AIOS adds the X-Frame-Options: SAMEORIGIN HTTP header to all server responses. Check: curl -I https://yoursite.com, the header should be in the response. For sites with login form, cart, or admin panel, this step is critical.
Export ready configuration for other sites
If you manage multiple sites, import-export saves hours. AIOS saves the entire configuration to a text file that loads on another site with one click.
Path: WP Security → Settings → Import/Export. Click Export Settings, you get a .txt file with all enabled options and their values. The file can be edited before import on another site: replace email for security notifications and login page slug with current ones for the target site.
Import: WP Security → Settings → Import/Export → Import Settings → select file. All 16 steps will apply automatically in a couple of seconds, no need to go through each screen again.
⁉️🤔 Common questions
Is AIOS needed if hosting promises "full protection"?
Hosting protects the server: OS level, network firewalls, DDoS filtering. AIOS protects the WordPress application: admin panel brute-force, plugin injections, outdated theme vulnerabilities. The server firewall doesn't see that a bot is brute-forcing passwords to
wp-login.php, it sees legitimate POST requests. The layers don't overlap, you need both. A site on "protected" hosting without a security plugin is still vulnerable at the CMS level.
Will AIOS conflict with Cloudflare or another WAF?
No, they work at different levels. Cloudflare is Layer 7 (HTTP proxy), filters traffic before it reaches the server. AIOS is application level (PHP,
.htaccess), after the request reaches WordPress. The only nuance: when using Cloudflare, enable Enable IP Detection in AIOS, the plugin should see the visitor's real IP from theX-Forwarded-Forheader, not the proxy IP.
Can I remove AIOS after setup, the rules stay in.htaccess anyway?
No. The
.htaccessrules will physically remain in the file, but without monitoring and updates they'll become outdated. Worse: honeypot, login page renaming, PHP editor blocking, and two-factor authentication only work while the plugin is active, this is PHP logic, not static rules. Remove the plugin, you open the standardwp-login.phpand disable all login protection.
Will the site break if I enable all 16 steps at once?
On the vast majority of sites, no. But the production recommendation: enable in blocks of three to four steps, checking site operation after each block. Be especially careful with 6G Firewall (step 11) and table prefix change (step 4, backup is mandatory). Over the years of the plugin on one million installations, no critical conflicts with popular themes and plugins have been recorded.
What does AIOS premium version offer over the free one?
Three key additions: two-factor authentication with flexible policies (mandatory TFA for admins after N days, configuring re-request frequency), malware scanner with Google blacklist alerts, and country blocker (geo-IP access ban). The free version is enough to protect a blog or corporate site. An online store with confidential customer data should get Premium.
What to do if I forgot the custom login page URL?
Connect to the server via FTP/SFTP, go to
/wp-content/plugins/all-in-one-wp-security-and-firewall/and temporarily rename the plugin folder. This will disable AIOS and return the standardwp-login.php. Log into the admin panel, rename the folder back, activate the plugin, and set a new slug. To avoid forgetting, save the URL in your password manager immediately when creating it.
Is it worth configuring AIOS in 2026 or are there better alternatives?
Years later, AIOS remains the most balanced free WordPress security plugin: one million installations, active development, regular updates for new core versions. Alternatives like Wordfence or Solid Security are also strong, but heavier.
The 16 steps above take 15-20 minutes. Result: hidden login page, three firewall layers, invisible honeypot, and ready config for cloning to the next site.
Minimum set without which protection can't be considered assembled:
- Base: steps 1, 2, 9, 14, version masking, brute-force protection, basic firewall, and hidden login page;
- Server level: steps 7, 8, 10, 11, PHP editor ban, service file blocking, additional rules, and 6G;
- Deep protection: steps 4, 6, 12, 15, table prefix, access permissions, anti-hotlink, honeypot;
- Perimeter: steps 3, 5, 13, 16, registration moderation, backups, 404 detection, clickjacking protection.
Configure one site, export the configuration and import on others in one minute. Once a quarter, check AIOS → Dashboard: the security counter will show if a setting "fell off" after core update.

A professional team of writers and editors specializing in creating quality content.