














🛒 Checking orders in WooCommerce before launch: 3 ways from sandbox to refund
Launched a store on WooCommerce and not sure if the money will reach your account? A missed error in checkout costs more than an hour of testing: the customer leaves, the product sits, your reputation takes a hit.
Checking orders before launch is a duty, not an option. And you don't need real money for it: WooCommerce has payment gateway sandboxes, test plugins, and built-in tools. We ran all three methods on a test site with WooCommerce 9.4 and are sharing what actually works: from a free plugin in a couple of clicks to a real transaction with a refund.
How order testing works in WooCommerce
💡 Quick overview:
- Install the WooCommerce Stripe Payment Gateway plugin, enable test mode, and place an order through Stripe, no money will be charged, and the order will appear in the dashboard
- Enable WC Order Test, a test gateway that requires no API keys and works right after activation
- Set up PayPal Sandbox: create test seller and buyer accounts, a full simulation of a real payment without spending a cent
- If plugins aren't your path, enable check payments from the WooCommerce panel: in a second, with no external services
- For complete confidence, run a real transaction with an instant refund, a last-resort method
Before any test, do a full site backup. And always work on a test site or staging environment, not on a live store with customers. One mixed-up mode, and a real customer gets a test receipt.
Method 1: Test payment plugins
Plugins are the most controlled path. You don't depend on the bank and don't shuffle real money back and forth. Three tools for different scenarios.
Stripe Payment Gateway: test mode

WooCommerce Stripe Payment Gateway, the official plugin from WooCommerce for accepting payments via Stripe. It has a built-in test mode: you place an order with a fake card, and Stripe processes it as real, but without charging any money.
Install the plugin: Plugins → Add New, search for "WooCommerce Stripe Payment Gateway". Click Install and Activate.

Now you need Stripe test API keys. Go to the Stripe Dashboard, open the Developers → API keys section. Copy the Publishable key and Secret key, you'll need them in a minute.

In the WordPress admin, go to WooCommerce → Settings → Payments. Turn on the Stripe - Credit Card toggle and click Set up (or Manage, if Stripe was already added).

On the Stripe settings page, check the Enable Test Mode checkbox and paste the copied keys into the Test Publishable Key and Test Secret Key fields. Save.

Now let's move on to the order. On the store frontend, add any product to the cart and proceed to checkout. Fill in the billing fields, and enter 4242424242424242 as the card number, that's Stripe's universal test number. Use any valid expiration date and CVC. Click Place Order.

Go to your Stripe Dashboard → the Payments tab. The order should appear in the transaction list. If it's there, Stripe is working and you can connect live payments.
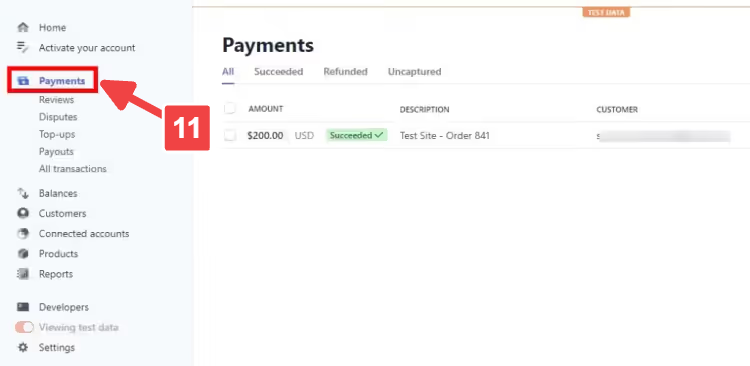
Before launching the store, don't forget to uncheck Enable Test Mode and replace the test keys with live ones.
WC Order Test: no keys, no sandbox

WC Order Test is a free plugin that adds a dummy payment gateway. No API keys, no Stripe or PayPal accounts: install, enable, test. It works only for administrators, regular customers never see the gateway.
Install the plugin via Plugins → Add New, search for "WC Order Test". After activation, go to WooCommerce → Settings → Payments. Order Test - Order Test Gateway will appear in the list, flip the toggle and click Set up.

The only setting is the Enable Order Test Gateway checkbox. Check it and save.

Add a product to the cart, fill in the billing details, and select Order Test Gateway as the payment method. This option is visible only to logged-in administrators. Click Place order.

The order is confirmed, check the details on the order page and in WooCommerce → Orders. Everything there? Your checkout flow is solid.
The advantage of WC Order Test is that it isn't tied to a specific gateway: you're testing the checkout process itself, not the integration with a payment system. For a final check of the actual gateway, supplement it with the Stripe method above.
PayPal Sandbox: full simulation

PayPal Sandbox is PayPal's test environment that emulates real transactions. You need two test accounts: a merchant and a buyer. The merchant receives the payment, the buyer pays.
Go to PayPal Developer and log in with your PayPal account. In the developer dashboard, navigate to Sandbox → Accounts and click Create account.

Select Business (merchant), this is the seller, choose the country, and click Create. Repeat the same steps for Personal (buyer), this is the customer. Important: the country must match your WooCommerce store currency, otherwise orders will end up in pending status.
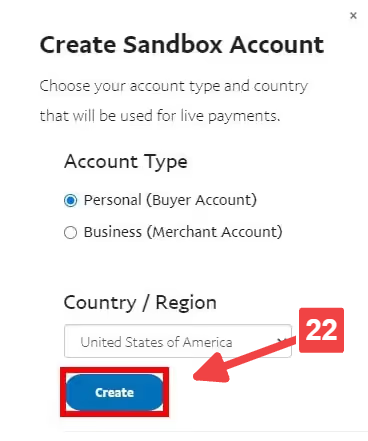
In the Manage Accounts section, click Options → View/edit account for the account you created.

On the Profile tab you will see the sandbox account email and system-generated password. Write them down: the merchant email goes into WooCommerce settings, and the buyer email is for logging in during a test payment.

Now configure PayPal in WooCommerce. Go to WooCommerce → Settings → Payments, enable PayPal Standard, and click Set up (or Manage).
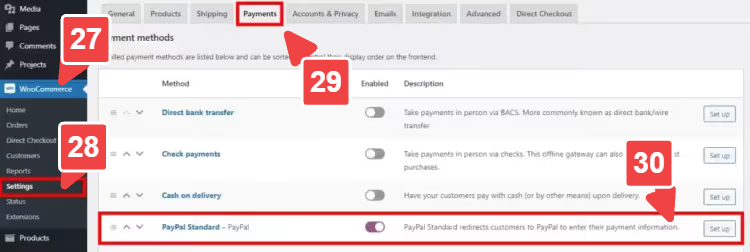
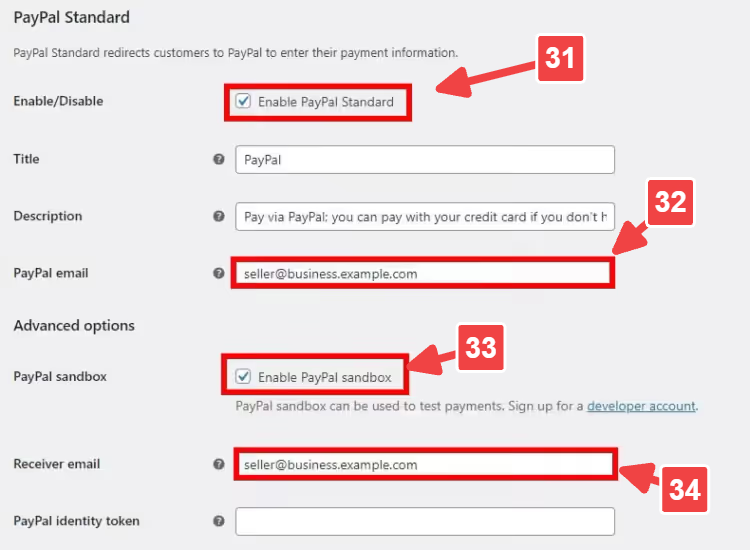
Check Enable PayPal Standard, then paste the merchant email from Sandbox into the PayPal email and Receiver email fields. Make sure to check Enable PayPal sandbox. Save.
Open your store in a browser incognito window (or a different browser). Add a product to the cart, fill in the billing details, select PayPal, and click Proceed to PayPal.

You will land on the PayPal Sandbox page. Log in with the buyer email and the password from Sandbox. Select Pay with a PayPal balance and click Pay Now.

Done: the payment is confirmed and the order is created.

Log into the PayPal Developer Dashboard using the merchant account and check the Recent Activity section; the transaction should appear. If everything is there, PayPal is set up correctly. Before launching the store, uncheck Enable PayPal sandbox and enter your live PayPal account details.
Method 2: Checks from the WooCommerce panel
If you don't want to deal with plugins and sandboxes, enable check payments. No external services: everything lives inside WooCommerce.
Go to WooCommerce → Settings → Payments. Toggle Check payments on and click Set up (or Manage).

Check the Enable Check Payments box, and optionally fill in the title, description, and instructions. Save.

Add a product to the cart and proceed to checkout. Fill in the billing details, select Check payment, and click Place order.

The order is placed. Verify the details: item, amount, address.

The downside of this method: you are testing the order mechanism itself, but not the integration with the payment gateway. To verify actual payment acceptance, supplement the checks with the Stripe method from the first approach. The upside is speed: the whole process takes a minute, with no registrations or API keys.
Method 3: Real transaction + refund
The extreme case, when you need to be sure money travels the full path: from the customer's card to your account and back. You run a real payment and immediately issue a refund.
Important: this method is risky. If there is an error in checkout, the refund can get stuck. So:
- Add a product with a minimal price (or a free test product)
- Run the test ONLY as the store owner
- Make sure the card has enough funds for the test charge
In WooCommerce → Settings → Payments, select the gateway (Stripe, PayPal, or direct bank transfer). Configure it with live keys. Make sure test mode is OFF.

Add the test product to the cart, fill in the billing details, select the gateway, and click Place order.

Order confirmed? Great, checkout works with real money.
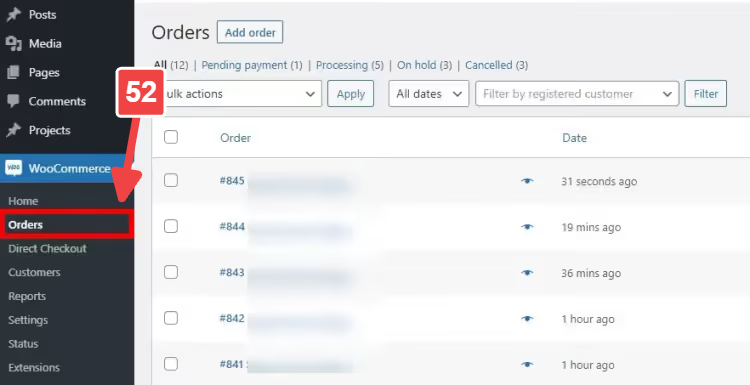
Now the refund. Note the Order ID, go to WooCommerce → Orders, and find the order.
In the Item block, click Refund.
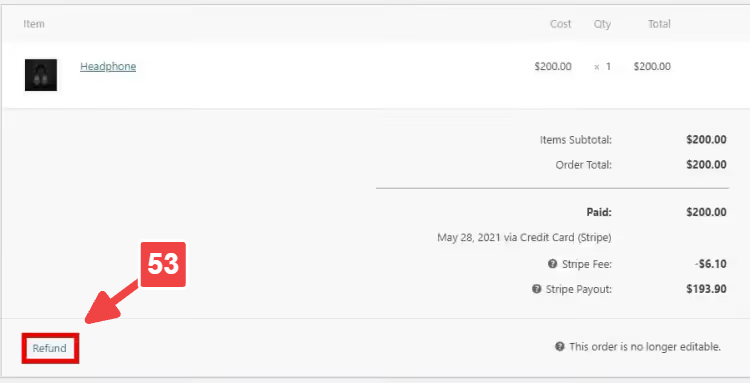
Enter the refund amount (the full cost) and select Refund via Stripe (the button name depends on the gateway: for PayPal, Refund via PayPal). Confirm.

The money will return to the card. Some gateways process refunds in anywhere from a couple of minutes to several days, that is normal.
Bonus: removing extra checkout fields for a quick test
When you are running a dozen test orders in a row, filling in billing fields every time is a waste of time. The WooCommerce Direct Checkout plugin removes unnecessary fields from checkout.

Install the plugin: Plugins → Add New, search for "WooCommerce Direct Checkout". Activate it. Go to WooCommerce → Settings → Direct Checkout → Checkout. In the Remove checkout fields field, select the fields you want to hide and save.

Refresh the checkout page, the selected fields are gone. Testing just got faster.

Once you finish testing, bring the fields back. An empty checkout is convenient for debugging, but on a live store it hurts conversion: the customer needs to see that the checkout process is reliable and structured.
⁉️🤔 Common questions
Can I test orders on a live store with real customers?
No, that is a direct path to confusion. A test order can mix with real ones, and having Stripe or PayPal test mode turned on can leave a real customer unable to pay. Always use a staging site or a site clone.
How is WC Order Test different from the official Test Orders by WooCommerce?
Both add a test payment gateway. WC Order Test is minimalistic: one checkbox, works right away. The official Test Orders by WooCommerce (available from WooCommerce 5.0+) is part of the WooCommerce.com ecosystem, requires an account and downloading a zip archive. For a quick checkout check, WC Order Test is simpler.
Is it mandatory to create two PayPal sandbox accounts?
Yes, if you are testing the full cycle. The business account receives the payment, the personal one pays. PayPal will not let you "buy from yourself" with one account: the system distinguishes seller and buyer only by different emails.
Why does an order in PayPal Sandbox stay in Pending Payment status?
Almost certainly the sandbox account country does not match the WooCommerce store currency. Check: if the store is in dollars (USD), the sandbox account must be US. If in euros, EU, and so on.
How long does a refund take with a real transaction?
Stripe, usually a few minutes. PayPal, from a few hours to 3-5 business days. Direct bank transfer, up to 10 business days. Exact timelines depend on the card-issuing bank, not on WooCommerce.
Summary: which method to choose for your task
If you need to quickly check whether checkout is alive at all, use WC Order Test. One checkbox, 30 seconds, no external services.
If the store accepts Stripe, use Stripe Payment Gateway test mode. As close to production as it gets: same logic, same order statuses, but with a fake card.
If the store is on PayPal, use PayPal Sandbox. Yes, setup takes a little longer (two sandbox accounts), but it is the only way to see the full transaction path from buyer to seller.
Checks are the fallback option when plugins are not an option and external services are unavailable.
A real transaction with a refund is the last resort. We recommend going through Stripe and PayPal test modes first, and only if doubts remain, one real payment with the minimum amount.
After testing, do not forget to turn off test modes, restore hidden checkout fields, and replace sandbox keys with production ones. Better yet, keep a store launch checklist handy so no checkbox ends up in the wrong position.

A professional team of writers and editors specializing in creating quality content.