













🔤 Custom fonts for a WordPress site: a step by step guide 2026
The default font gives away a WordPress site at first glance. A system typeface screams "I didn't configure anything" louder than any free template.
Changing the font takes ten minutes. You don't need to be a front-end developer, and you don't need to pay. The five methods below cover everything: from beginners afraid to touch code to site owners who need full control.
We've compiled working methods as of 2026. From the worst approach still recommended in outdated guides to the canonical "WordPress way."
💡 Quick overview:
- Choose a font: Google Fonts (free, 1500+ typefaces), Adobe Fonts (Creative Cloud subscription), or upload your own WOFF2 to your server.
- Decide whether you need a plugin (simpler, customizer interface) or manual connection via
functions.php(cleaner, faster, no third-party code dependency). - For the manual method: add
wp_enqueue_styletofunctions.phpandfont-familyin CSS. - For the plugin method: install EasyFonts or Use Any Font, select a typeface, and save.
- Test the result in different browsers and on mobile: each additional font adds 50-200 KB to page load.
Why change fonts on your site at all
Font shapes first impressions faster than colors or images. Researchers at the University of Michigan showed back in 2008 that text set in a complex font is subconsciously perceived as "difficult." Readers are less likely to follow instructions and overestimate the time needed to complete a task.
Serif or sans-serif matters too. Serif typefaces (Georgia, Merriweather) increase reading time but boost perceived authority. Sans-serif fonts (Roboto, Inter) speed up reading and work better on mobile screens. This isn't guesswork: a review of typography psychology research confirms the effect in practice.
For a WordPress site, the right font solves three problems:
- Brand recognition. A unique heading font keeps your site from looking like "just another blog on a stock theme."
- Readability. Proper size, line height, and contrast reduce bounce rates.
- Visual hierarchy. Different typefaces for headings and body text guide the visitor's eye.
Now let's get practical.
Where to get fonts for WordPress
There are three sources: Google Fonts, Adobe Fonts, and self-hosting. Let's examine each.
Google Fonts: free and no registration required
The most obvious source. Over 1500 fonts, open license, caching through Google CDN. Suitable for 95% of sites.
Go to fonts.google.com. The interface greets you with a grid of cards showing each font sample.
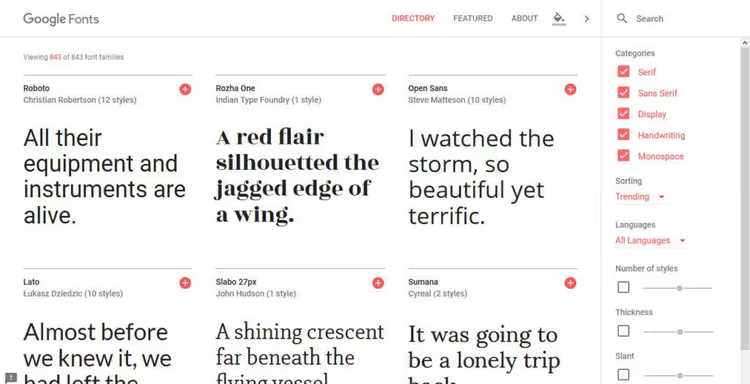
Filters are on the left. You can filter by category (Serif, Sans Serif, Display, Handwriting, Monospace), language, number of styles, and weight. Filters apply instantly, and results update without reloading.
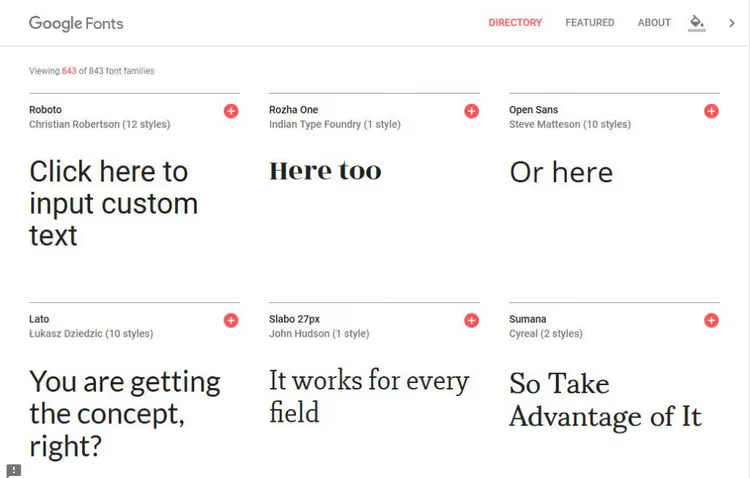
Hover over a font to see a menu for changing the sample text. Enter your own heading or paragraph and see how it looks.
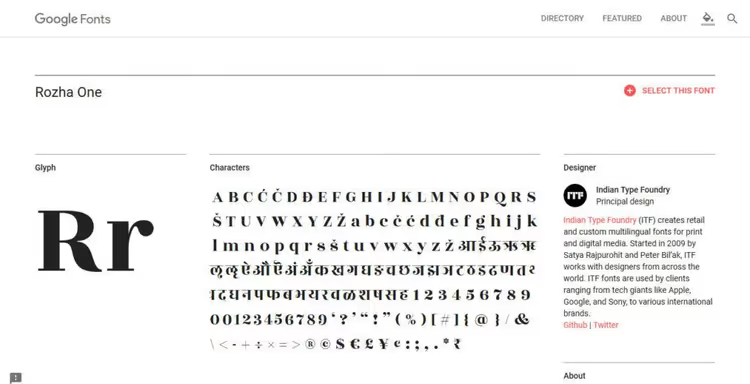
Click "View specimen" to open the font page with all styles, glyph table, and samples in different sizes.
If you like a font, click the red plus in the corner of the card. The font goes into the collection panel at the bottom of the screen. You can add multiple families: one for headings, another for body text.

Expand the collection panel to see "Embed" and "Customize" tabs.
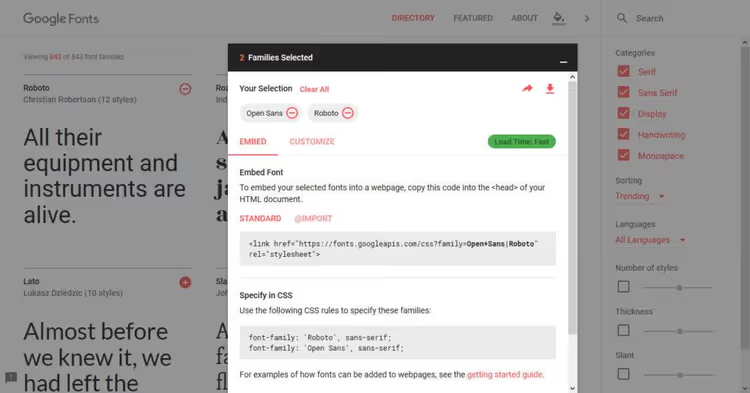
In the "Customize" tab, select the styles you need. Important: don't check everything. Each style is an additional file the browser loads. For a typical site, Regular (400) and Bold (700) are enough, sometimes Italic. The speed indicator in the top right corner shows how much the font will slow down loading.
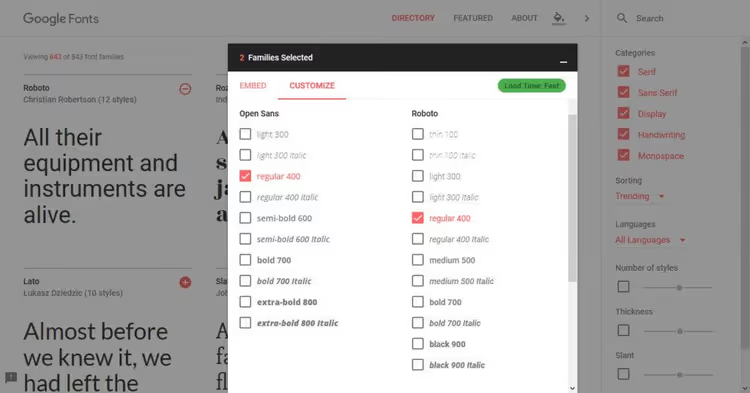
If your site uses a non-Latin alphabet, select the appropriate character set at the bottom of the page. For Cyrillic, that's Cyrillic.
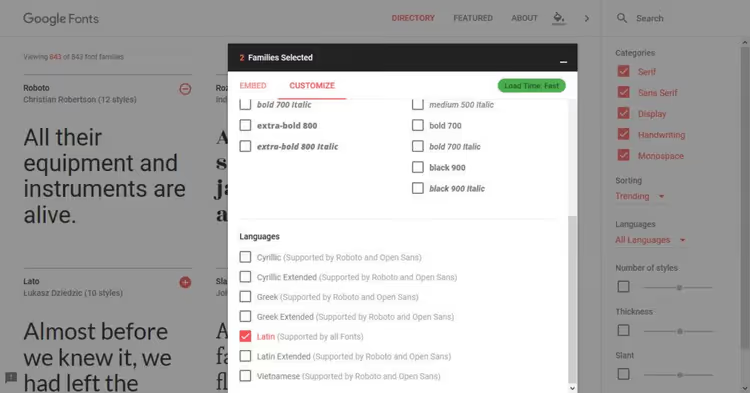
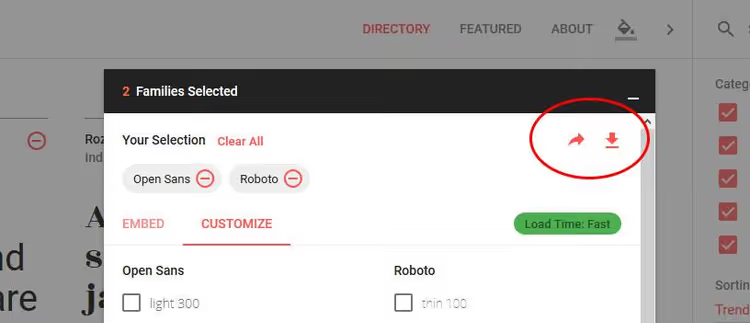
Two arrow buttons at the top: the left one shares the collection, the right one downloads the font files to your computer. Useful for Photoshop or if you decide to host the font yourself.
Adobe Fonts (formerly Typekit)
If you have a Creative Cloud subscription, Adobe Fonts gives access to professional typefaces like Futura, Minion Pro, and Myriad. Fonts connect via CSS, similar to Google Fonts. The free Creative Cloud tier includes a basic set, which is enough for most projects.
Custom fonts in WOFF2
Bought a licensed font or downloaded a free one from Font Squirrel? Convert to WOFF2 (modern web font format, Brotli compression, supported by 97% of browsers) and upload to your server. Advantage: no dependency on third-party CDN and GDPR-compliant. Disadvantage: the font loads from your server, which is inevitably slower than Google CDN.
5 ways to add custom fonts to WordPress
There are exactly five ways. We'll go from "don't do this" to the ideal WordPress method.
Method 1: CSS @import (don't do this)
Google Fonts offers an @import tab with a ready CSS string. It looks convenient: copy, paste, done.
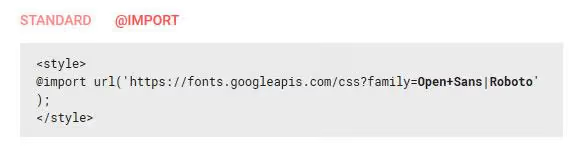
Technically, the code goes at the beginning of your child theme's style.css:
1 /* 2 Theme Name: Twenty Seventeen Child 3 Theme URI: https://wordpress.org/themes/twentyseventeen/ 4 Template: twentyseventeen 5 Author: the WordPress team 6 Author URI: https://wordpress.org/ 7 Version: 1.0 8 */ 9 10 @import url('https://fonts.googleapis.com/css?family=Open+Sans|Roboto'); 11 12 /* additional CSS goes here */
Why is this the worst option? @import prevents the browser from loading multiple stylesheets in parallel. The browser downloads the CSS file, sees the @import inside, and only then fetches the font. Sequential loading instead of parallel means 200-400 ms lost per font. On mobile, this is critical.
Don't use @import for fonts. Ever.
Method 2: inserting a link tag in header.php
Font libraries provide a <link> tag for insertion into <head>. You can place it directly in header.php, the template file that every WordPress theme has.
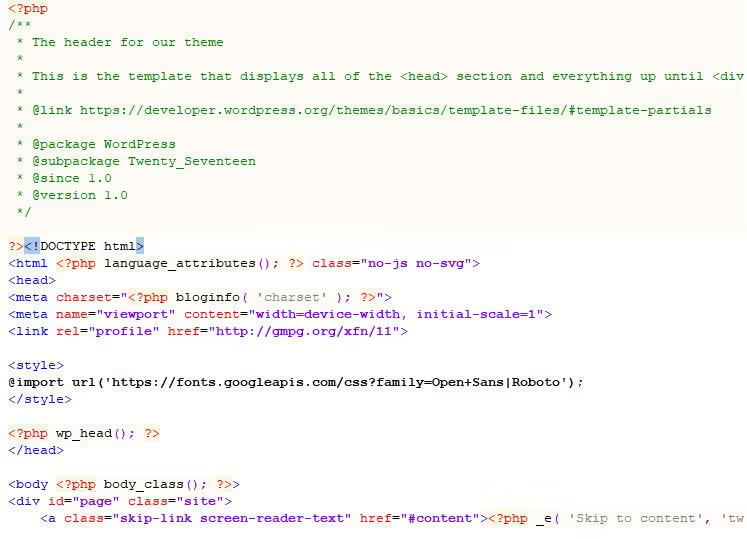
Place the <link> between the <head> and </head> tags. If you're working with a child theme, copy header.php from the parent to the child theme and edit it there.
This method works but is fragile: theme updates will overwrite your changes if you're not using a child theme. Plus, mixing content and code in templates is bad practice. Fine for a one-time experiment, not for permanent use.
Method 3: @font-face and self-hosting fonts
If the font is on your server, you need to declare it using the @font-face directive in your stylesheet. First, upload the font files (WOFF2, WOFF) via FTP to your child theme folder, for example wp-content/themes/yourtheme-child/fonts/.
Then add to style.css:
1 @font-face { 2 font-family: 'Roboto'; 3 src: url('fonts/Roboto-Regular.woff2') format('woff2'), 4 url('fonts/Roboto-Regular.woff') format('woff'); 5 font-weight: normal; 6 font-style: normal; 7 font-display: swap; 8 }
The font-display: swap parameter is important: it tells the browser to show text in a system font first, then swap in the custom font once it loads. Without this, visitors see a blank screen while the font loads.
Don't forget to replace the font name and path. If your source file is TTF or OTF, convert to WOFF2 using the Font Squirrel online converter.
This method gives full control but loses to Google Fonts on speed: your server is almost certainly slower than Google's CDN. For sites with up to 10,000 visitors per month, the difference is unnoticeable. For high-traffic projects, it's critical.
Method 4: functions.php and wp_enqueue_style (the canonical WordPress way)
The most correct method from a WordPress architecture perspective. Instead of inserting code into a template, you "enqueue" the stylesheet with the font via the wp_enqueue_scripts hook.
The code goes in the active theme's or child theme's functions.php. Here's a working example for Google Fonts:
1 function techblog_add_google_fonts() { 2 wp_enqueue_style( 3 'techblog-google-fonts', 4 'https://fonts.googleapis.com/css2?family=Inter:wght@400;700&family=Playfair+Display:wght@700&display=swap', 5 array(), 6 null 7 ); 8 } 9 add_action( 'wp_enqueue_scripts', 'techblog_add_google_fonts' );
The wp_enqueue_style function takes four parameters: a unique name (handle), the stylesheet URL, an array of dependencies (empty here), and version (null, WordPress will substitute its own). The wp_enqueue_scripts hook ensures the code runs at the right moment during page load.
For Adobe fonts, JavaScript and wp_enqueue_script were previously used. Now Adobe Fonts has switched to a CSS approach similar to Google Fonts, so wp_enqueue_style covers both services.
Why this is the best manual method:
- Fonts won't be overwritten during theme updates (if you're in a child theme).
- WordPress manages load order and resolves dependencies.
- Code is isolated in
functions.php, templates stay clean. - Other plugins can disable or modify your call through standard hooks.
Method 5: plugin (if you don't want to touch code)
Not ready to dive into functions.php? A plugin solves the issue without a single line of code.
Easy Google Fonts (visual example, but not for production sites)
The oldest font plugin in the WordPress directory. Provides a customizer interface: select a font, see changes in real time, save.
Installation is standard: Plugins → Add New → search "Easy Google Fonts" → Install → Activate.
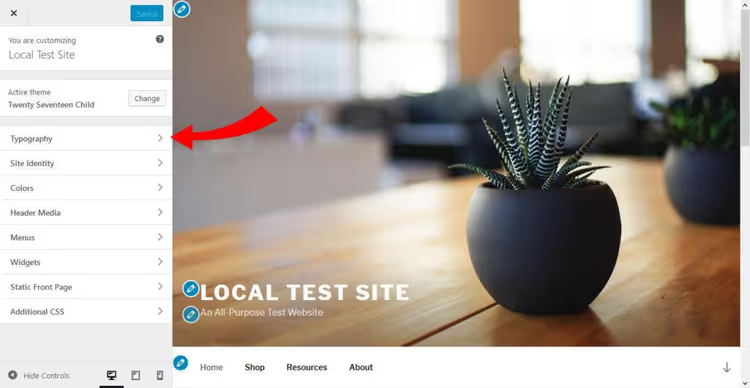
After activation, a new "Typography" item appears in Appearance → Customize. Enter it, select Typography Default, and you'll see font controls for paragraphs and headings.
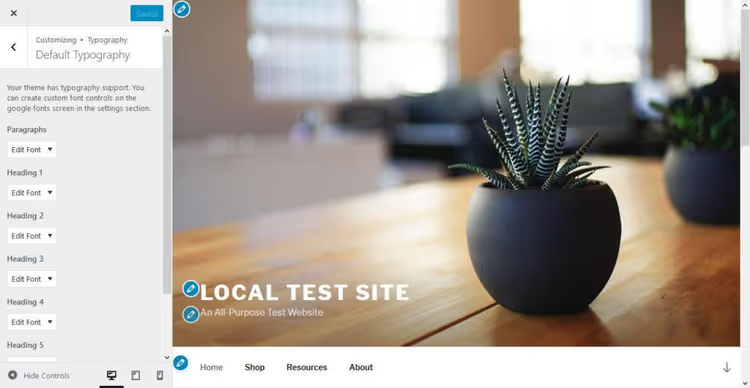
Click the dropdown next to the element you want to change. A menu expands:
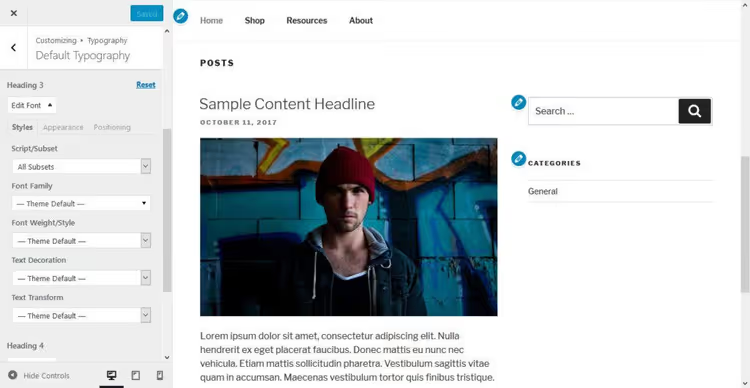
The most important option is Font Family. Here you have access to the entire Google Fonts library (600+ typefaces). Fonts are grouped by category: serif, sans-serif, Display, Handwriting, Monospace. You can search by name.
Click on a font, and changes are immediately visible in the preview on the right.
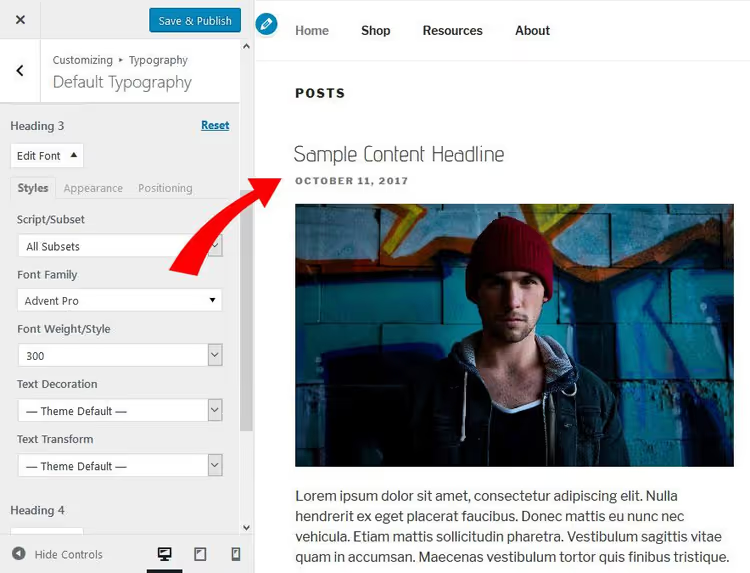
Next comes fine-tuning. The Font Weight/Style tab controls weight. Text Decoration adds underline, strikethrough, or overline. Text Transform switches case: all caps, lowercase, or capitalize.
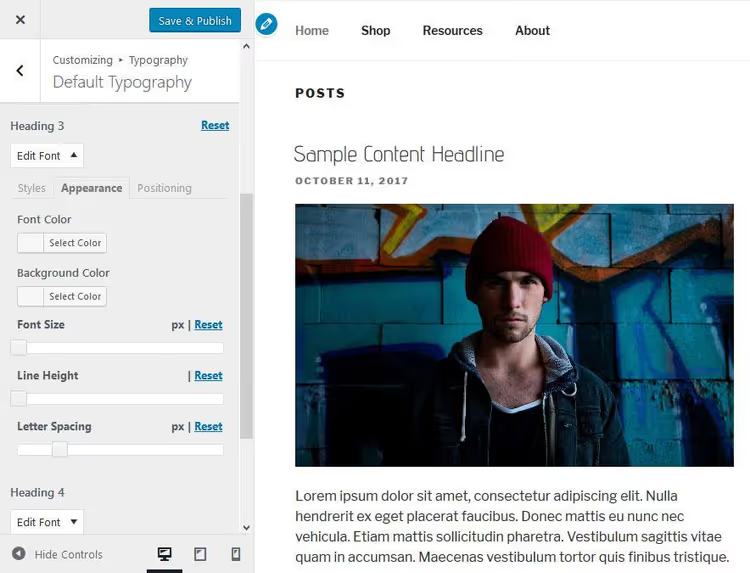
In the Appearance tab: font color, background color, size, line height, and letter spacing.
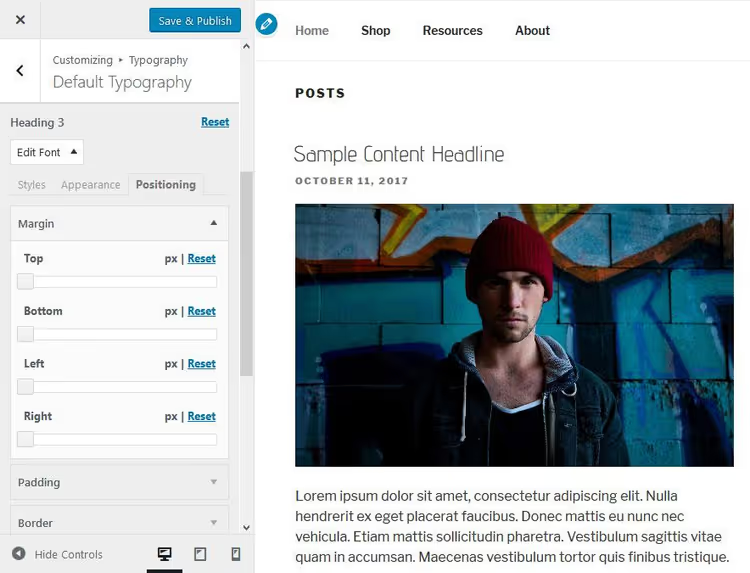
The Positioning tab: margins, padding, borders, border radius, and the display property.
When finished, click Save and Publish at the top.
Honest warning: Easy Google Fonts hasn't been updated since 2020. On WordPress 6.4+, the plugin may not work. Some users complain that the "Typography" option doesn't appear in the customizer. We're showing it as an illustration of the approach: most font plugins work through the same customizer mechanism.
What to do if the font doesn't change
Some themes use non-standard CSS selectors. A heading might not be just <h1> but <h1 class="entry-title">, and the plugin "doesn't see" that element.
Solution: create your own font control in Settings → Google Fonts.
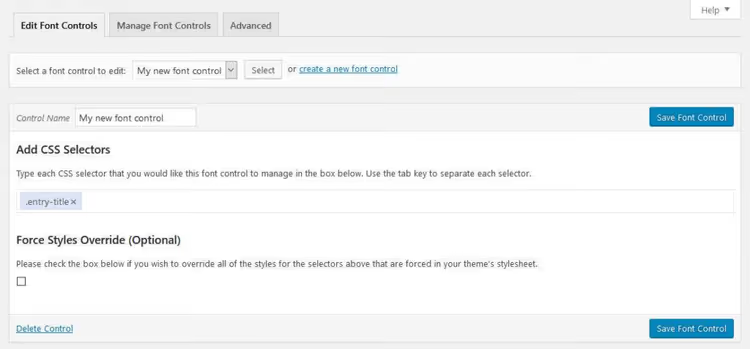
Bind the required CSS selector to the new control and enable force override. After saving, the control will appear in the customizer alongside the standard ones.
Alternative plugins (current in 2026)
Easy Google Fonts isn't the only option. Three live alternatives:
- EasyFonts hosts Google Fonts locally on your server. It automatically detects fonts in use, downloads them, and serves them from your domain. Faster than standard CDN requests, plus full GDPR compliance. The lightest of the three in terms of performance impact.
- Use Any Font lets you upload your own fonts without CSS. The plugin converts TTF/OTF/WOFF to web format and hosts it on your server. Suitable for commercial fonts purchased under license.
- Fonts Plugin is an alternative Google Fonts manager with customizer preview. Unlike the outdated Easy Google Fonts, it's regularly updated and tested with current WordPress versions.
Applying the font to site elements
The font is connected but still "hanging in the air." You need to tell the browser which elements to apply it to.
Here's basic CSS to replace the heading font. Add it via Appearance → Customize → Additional CSS:
1 h1, 2 h2, 3 h3, 4 h4, 5 h5, 6 h6 { 7 font-family: 'Roboto', sans-serif; 8 }
For body text:
1 body, 2 p, 3 li { 4 font-family: 'Inter', sans-serif; 5 }
Important nuance: the font name in font-family must exactly match how the library declares it. Google Fonts uses 'Roboto', while Adobe Fonts might return 'open-sans' (without space and without quotes). Look carefully at the code the service provides, not at the font name on the website.
You can add this CSS in three ways: through the customizer (easiest, survives theme updates), through the child theme's style.css, or through the wp_head hook. We recommend the first.
⁉️🤔 Frequently asked questions
How many fonts can you add to a site without losing speed?
Optimally, two families: one for headings, one for body text. Each additional font adds an HTTP request and 50-200 KB of page weight. Three fonts is already the ceiling. And connect only the styles you need: Regular (400) and Bold (700) weigh half as much as a set of 5-6 styles.
Google Fonts or Adobe Fonts: which should you choose?
For 9 out of 10 sites, Google Fonts. Free, fast (Google CDN), 1500+ fonts, Cyrillic is available in almost all popular typefaces. Adobe Fonts makes sense if you already have a Creative Cloud subscription and need a specific commercial font like Futura or Minion Pro.
Can you use a downloaded TTF file from your computer?
You can, but first convert to WOFF2 (modern compressed format for the web). TTF files are uncompressed and take up significantly more space. WOFF2 with Brotli compression reduces file size several times over. Converter: Font Squirrel Webfont Generator.
Plugin or functions.php: which is more reliable?
functions.phpis more reliable for long-term use: no extra dependency, code is transparent, plugin updates don't affect you. Plugins win on convenience: 5 minutes versus half an hour learning hooks. For a production site, choosewp_enqueue_stylein a child theme. For a quick prototype or a client site that needs a simple interface, use a plugin.
Why does the font look different on mobile than on desktop?
Mobile browsers sometimes substitute system fonts or render antialiasing differently. Plus screen sizes are different: 16px on desktop reads fine, but on a phone it might be too large. Solution: set a relative size using
clamp()(for examplefont-size: clamp(16px, 2.5vw, 20px)) and test on a real device, not an emulator.
Final summary: what to use on your site in 2026
If we summarize everything in five sentences:
- Google Fonts is the default font source. Sufficient for 95% of projects: fast, free, Cyrillic is available everywhere.
- functions.php + wp_enqueue_style is the best manual method. Clean, survives theme updates, code is transparent.
- EasyFonts plugin works if you want local hosting of Google Fonts without code hassle. Faster than standard CDN and GDPR-compliant.
- Two styles per font, no more: Regular and Bold. Each extra style steals 30-50 KB of load.
- WOFF2, not TTF: convert before uploading to your server. Saves half a megabyte per page.
Changing fonts is one of those tasks where an hour of careful setup yields years of visual payoff. Start right now: go to the Google Fonts website, find a couple of typefaces for your project, and try method 4 from the list above.

A professional team of writers and editors specializing in creating quality content.