













 AIIllustrative image: AI-generated
How to stress test a WordPress site: 4 free steps
Visitors expect a site to load in under two seconds. But what happens if a thousand people hit it at once instead of ten? Will it crash? How many visitors can the server handle before the first failure?
A WordPress stress test answers these questions. You don't need expensive enterprise services to run one: free tools and an hour of your time are enough to find your site's breaking point.
💡 Quick overview:
- Check load speed through Pingdom and get a detailed report in seconds.
- Run a load test in k6 (the successor to Load Impact) to find out how many concurrent visitors your server can handle.
- Scan your site through GTmetrix to find problems in configuration, scripts, and caching.
- Profile plugins through AIO Performance Profiler to identify which plugin slows your site down the most.
What is a WordPress stress test
A stress test (or load test) is a method where you send a controlled volume of traffic to your site and observe how the system handles it. You simulate a "rush hour" scenario and measure server response time under pressure.

Unlike a simple speed measurement, a stress test doesn't just show "fast/slow." It reveals the critical point: the number of visitors at which server response time shoots up. This knowledge helps you prepare for real traffic spikes, such as when a post hits the top of search results or a newsletter brings a wave of clicks.
The main rule: model a realistic number. There's no point testing your site for 10,000 concurrent visitors if your daily maximum is 500. The test should reflect real risks, not a hypothetical "what if TechCrunch sends traffic."
Before you start
Two important points to consider before running a test:
If your hosting plan has a bandwidth limit, the test may exhaust it and incur additional charges. Check your plan terms in advance.
During a load test, the site may temporarily fail to respond to some visitors. The server is busy processing test traffic and cannot handle regular requests. Run the test during periods of minimal activity: late at night or early in the morning.
How to stress test WordPress: 4 steps
There are dozens of load testing tools, from enterprise solutions costing hundreds of dollars to open-source frameworks like Apache JMeter. But WordPress site owners need simple, free methods that don't require installing agents on the server or writing scripts. Below are four steps that cover the full stress test cycle using only free online tools.
1. Check load speed
The first and simplest step is measuring baseline speed. Open your site in a private browser window and time the full load. This gives only a general idea, without information about which element is slowing down the page.
For detailed analysis, use Pingdom. Enter your site URL, choose a test location, and click Start Test.

Within seconds, Pingdom delivers a detailed report: total load time, page size, number of HTTP requests, and a breakdown of each element by response time. Tip: choose a location geographically close to your actual audience. If your main audience is in Europe, test from Frankfurt or London, not San Francisco.
2. Run load testing
The next step is checking how your site behaves under pressure. The Load Impact service used to be the go-to tool, but in 2021 Grafana acquired it and relaunched it as k6, an open-source load testing tool.
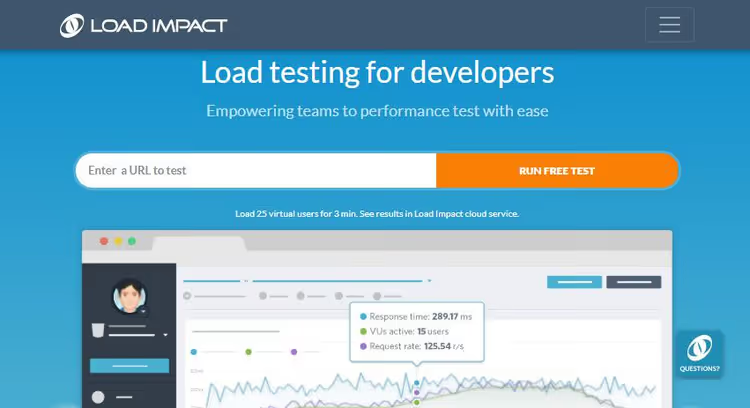
k6 lets you simulate a specified number of virtual users hitting your site simultaneously. The free Grafana Cloud tier includes up to 500 virtual users per month, which is enough for regular testing of a small or medium site. The test takes up to five minutes.
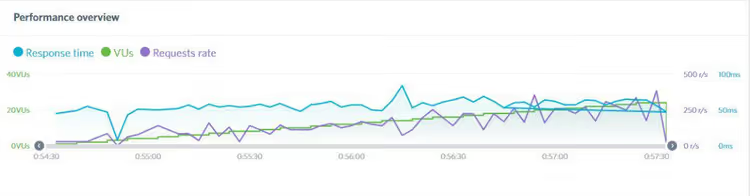
The result appears as a chart with three lines. The green line shows the number of virtual users (VU), gradually increasing. The blue line shows server response time: if it bends sharply upward, that's the critical point where your site starts lagging. The purple line shows the number of requests to the server. If requests are high but response time stays stable, your site is well configured. A sharp spike in the blue line signals a need for optimization.
3. Check site configuration quality
The third step is auditing the technical side: scripts, styles, caching, and redirects. For this, use GTmetrix, a tool that runs your site through dozens of checks and gives an overall score.
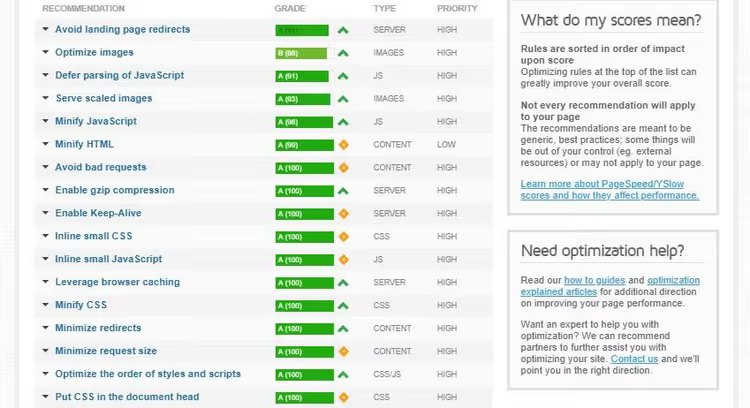
The process is the same: enter the URL and run the test. Within a minute or two, you get a breakdown by item: image optimization, JavaScript, CSS, browser caching, HTTP requests, redirects, and more. Each item comes with specific recommendations, for example, "image header-bg.png weighs 1.2 MB, compress to 200 KB."
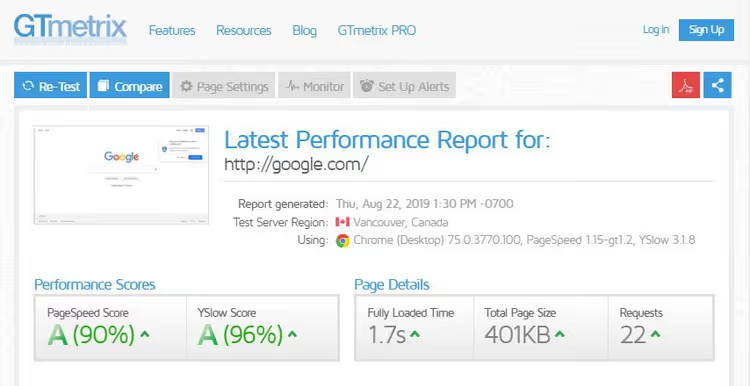
The final letter grade, from A to F, gives a quick snapshot of your site's health. B or A is excellent. C means there's room for improvement. D or lower means it's time to seriously address performance. GTmetrix provides 25 free tests per month from one account, which is enough for regular monitoring.
4. Profile WordPress plugins
The last piece of the puzzle is understanding which plugin consumes the most resources. The classic tool for this, P3 Plugin Performance Profiler, hasn't been updated since 2019 and runs unstably on modern PHP versions.

The modern replacement is AIO Performance Profiler (formerly All-In-One Performance Accelerator). The principle is the same: install and activate the plugin, then run auto-scanning through the "Tools" section.

After scanning, you get a chart where each plugin appears as a separate block, making it immediately clear which one consumes the most CPU time.
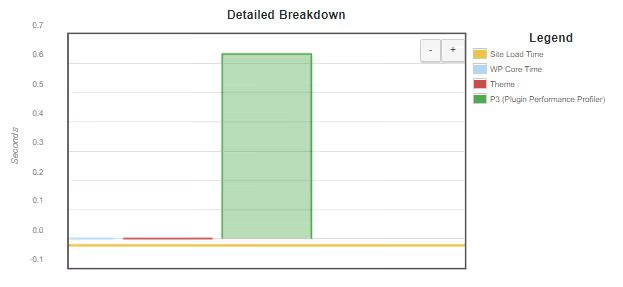
Be ruthless: if a plugin consumes a disproportionate amount of load time while only displaying a "related posts" widget in the sidebar, replace it with a lighter alternative or remove it entirely. As a bonus, AIO Performance Profiler can not only profile but also compress scripts and styles, clean the database, and enable caching on the fly.
How to fix performance problems
After running the stress test and identifying bottlenecks, it's time to fix the problems. Here are four areas that yield the greatest speed gains on WordPress.
Use a CDN
A CDN (Content Delivery Network) is a geographically distributed network of servers that delivers content to users from the nearest node.
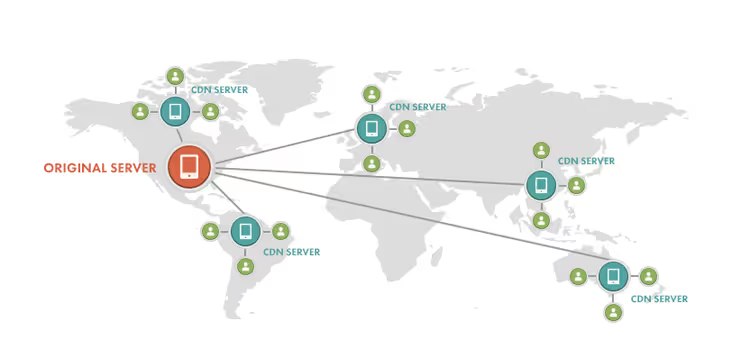
When a visitor from Berlin opens a site hosted on a server in Dallas, without a CDN every request travels across the Atlantic. With a CDN, static files (images, CSS, scripts) are served from a European node, reducing latency dramatically. Popular options for WordPress are Cloudflare (the free tier covers basic needs) and BunnyCDN (paid, but cheap and fast).
Optimize images
Images are usually the heaviest element on a page. On an average site, they can account for more than half of the total weight, according to HTTP Archive research.
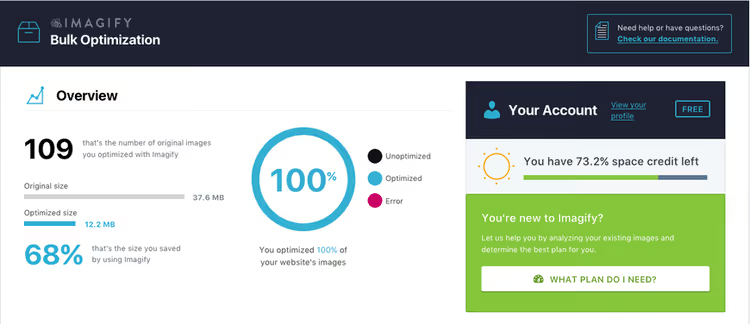
Compress images without visible quality loss. For desktop tools, consider ImageOptim (macOS) and JPEGmini (Windows/macOS). For automatic optimization directly in WordPress, install the Imagify plugin, which compresses images on upload and converts them to AVIF or WebP, modern formats that are 30-50% lighter than JPEG at the same visual quality.
Enable caching
A caching plugin saves a ready HTML copy of the page and serves it to subsequent visitors without reassembling it through PHP and the database. If your site has a hundred visitors per hour, without caching the engine assembles the same page from scratch a hundred times. With caching, it assembles once and instantly serves the copy 99 times.
Among free solutions, the leaders are W3 Total Cache and WP Super Cache. W3 Total Cache offers finer control: page caching, database caching, object caching, browser caching, and CDN integration in one interface. WP Super Cache is simpler and suits those who don't want to deal with dozens of settings (just enable and it works). If your hosting runs on a LiteSpeed server, install LiteSpeed Cache, which is tuned for this architecture and shows the best results in this pairing.
Enable Brotli compression
Brotli is a modern compression algorithm that replaced Gzip. On text files (HTML, CSS, JavaScript), it consistently outperforms Gzip in compression ratio at comparable speed. The exact numbers depend on content structure, but the gains are noticeable on any site. Most modern browsers support Brotli, and you can enable it through hosting settings or a caching plugin. W3 Total Cache and LiteSpeed Cache support it out of the box.
Video: WordPress load testing in practice
Theory is great, but a live demonstration gives the full picture. This video walks through setting up a WordPress load test and interpreting the results, from launch to graph analysis.
⁉️🤔 Frequently asked questions
Can a stress test damage my site?
The test itself doesn't break anything. But if the server is already running at capacity, the extra load may temporarily make it unavailable. In practice, crashes are rare: 25-50 virtual users is a routine situation for modern hosting. To be safe, run the test late at night when there are almost no real visitors.
Do I need a stress test if my site has 200 visitors a day?
Yes, but scale accordingly. Don't test hypothetical 10,000 users; test a realistic peak of, say, 50 concurrent. Even on modest traffic, a stress test catches bottlenecks that are invisible under normal conditions but will appear at the slightest spike, for example, when a search engine suddenly pushes a post to the top.
How does k6 differ from JMeter?
JMeter is a heavy Java framework with a graphical interface that requires installation and configuration. k6 is a lightweight open-source tool written in Go that runs from the command line. For WordPress sites, k6 is more convenient: you write a scenario in JavaScript, run it with a single command, and get results in the terminal. JMeter is justified in enterprise environments with complex scenarios, while k6 is for quick tests with minimal effort.
Which caching plugin should I choose?
If your hosting uses LiteSpeed, install LiteSpeed Cache, which delivers the best performance in this pairing. For Apache/Nginx: if you need flexible configuration, use W3 Total Cache; if you prefer a "set it and forget it" approach, use WP Super Cache. All three are free and actively updated in 2026.
Should I repeat stress tests regularly?
Yes, after every major change: theme switch, installation of a new heavy plugin, migration to different hosting. For a stable site, once a quarter is enough (by then, enough minor changes accumulate that the picture may have shifted).
Can your site handle the load?
A WordPress stress test is not a one-time event but a habit. The four steps described above take an hour and use only free tools. Pingdom shows speed, k6 pushes the server to its limit, GTmetrix finds configuration problems, and AIO Performance Profiler identifies plugin bottlenecks. Together, they give a complete picture of how your site will behave when traffic spikes.
Take these four steps today, record the results as a baseline, and repeat in a month. If response time under load hasn't increased, your site is in good shape. If it has, you know where to look: CDN, image compression, caching, and Brotli solve the vast majority of WordPress performance problems.

A professional team of writers and editors specializing in creating quality content.