














🚀 How to add Meta Pixel to WordPress: a step-by-step guide
Running Facebook ads but cannot tell if they are working? This is a familiar situation for WordPress site owners: money goes into campaigns, but who clicks and what happens next remains a mystery.
Without a tracking pixel you are shooting blind. With it, you see every visitor: they arrived, browsed, abandoned a cart, or purchased. Most importantly, you can show ads specifically to people who have already shown interest.
This guide covers three ways to install Meta Pixel on WordPress: from adding code manually to a plugin that does everything for you. No fluff, just concrete steps and screenshots.
💡 Quick overview:
- Create a Meta Pixel in Facebook Ads Manager, copy the ID and the embed code.
- Add the code to your site: manually via WPCode or automatically via PixelYourSite with WooCommerce support.
- Verify the installation using the Meta Pixel Helper extension and confirm that data is flowing.
What is Meta Pixel and why does your WordPress site need it
Meta Pixel (formerly called Facebook Pixel) is a JavaScript code you add to your site. It tracks actions taken by visitors who came from Facebook and Instagram ads and sends the data back to Ads Manager.
Unlike Google Analytics, which analyzes all traffic, Meta Pixel is designed specifically for Meta ad campaigns. It shows not abstract "sessions" but concrete events: how many people added a product to cart after clicking an ad, how many completed an order, how many simply left.
In practice this gives you three things:
Accurate conversion measurement. You see which campaign brings sales and which one is just burning budget.
Retargeting. You show ads to people who have already visited your site: abandoned a cart, viewed a specific product, or started checkout.
Lookalike audiences. Meta finds people similar to your buyers and shows ads to them.
Installing the pixel makes sense only if you run ads through Facebook or Instagram. For a site without Meta ad campaigns it is useless.
Step 1: Create a Meta Pixel in Ads Manager
Before adding code to your site, you need to create the pixel. This is done in Events Manager within your Facebook Ads Manager.
Go to Events Manager and click "Create a Pixel."
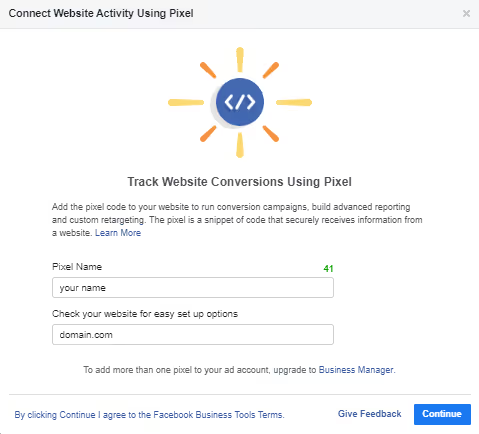
Enter a pixel name (usually your site name or domain) and click Create.
The system will ask how you want to connect the pixel. Select "Add pixel code manually" for manual code installation.
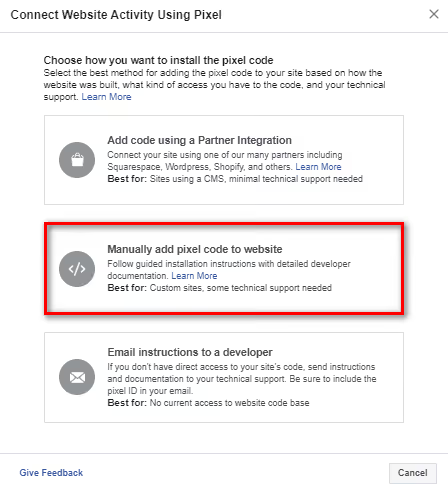
After selecting this option, a page with ready-to-use JavaScript code will open. Copy it and save it in a text file; you will need it for the next steps.
Step 2: Add the code manually via WPCode
The manual method offers the most control. You insert the Meta Pixel code into your site's <head>, and it starts working on all pages.
You do not need to edit theme files for this. The WPCode plugin (formerly called Insert Headers and Footers) lets you add any script to the header or footer through the WordPress admin panel, and the code will not disappear when you change themes.
Install and activate WPCode from the WordPress repository.
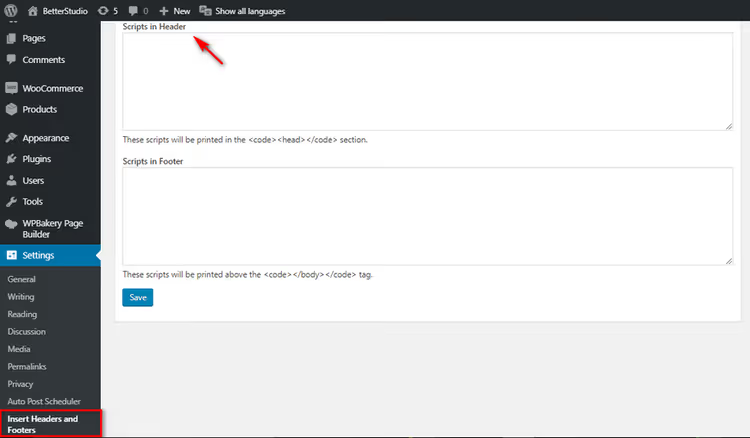
After activation, go to Code Snippets** → Header & Footer**. In the Scripts in Header field, paste the copied Meta Pixel code and click Save Changes.
Done. The code will now appear in the <head> on all pages. You can verify the installation with the Meta Pixel Helper extension for Chrome.
Step 3: Install Meta Pixel via PixelYourSite
The PixelYourSite plugin is a full-featured tracking manager. It does not just insert the Meta Pixel code; it automatically configures all standard events, Conversion API, and WooCommerce integration.
Pixel Caffeine used to be a common recommendation for this task, but the plugin was discontinued by its author in 2021. The best free alternative now is PixelYourSite: 400,000+ active installations, a 4.8 rating on WordPress.org, and regular updates.
Install PixelYourSite via Plugins → Add New.

After activation, go to PixelYourSite in the left admin menu. In the Facebook Pixel ID field, paste your pixel ID (the string of numbers from Events Manager, not the entire code). Click Save.
What PixelYourSite provides beyond manual code insertion:
Automatically tracks events: page view, search, link click, form submission, registration, file download.
For WooCommerce, it captures ViewContent, AddToCart, InitiateCheckout, and Purchase out of the box. Dynamic remarketing works without manual configuration.
Supports Conversion API for server-side event sending to Meta, bypassing ad blockers. This improves data accuracy compared to the browser pixel alone, as browser restrictions cut off a significant portion of events.
Can simultaneously install Google Analytics 4 and Google Tag Manager: three tracking systems in one plugin.
In practice the free version is sufficient for a medium-sized online store. The Pro version adds support for TikTok, Pinterest, Bing, and advanced event triggers.
What events can Meta Pixel track
Meta Pixel comes with a set of 17 standard events. You can use their codes as-is; the plugin or manual insertion will populate the necessary parameters automatically.
Here are the key events most often configured on WordPress sites:
Purchase: product purchase, the most important event for an online store.
Add to Cart: adding to cart, critical for abandoned cart retargeting.
Initiate Checkout: beginning the checkout process.
Lead: newsletter subscription, contact form submission.
Complete Registration: user registration on the site.
Search: using site search.
View Content: viewing a product page or article.
Add to Wishlist: adding to a wishlist.
Contact: reaching out through a contact form.
Schedule: booking an appointment or consultation.
Start Trial: beginning a trial period.
Subscribe: purchasing a paid subscription.
In addition to standard events, Meta Pixel allows you to create custom events. For example, you can track video views, clicks on a specific button, or scrolling to a certain depth on a page.
The principle of retargeting with the pixel is simple:
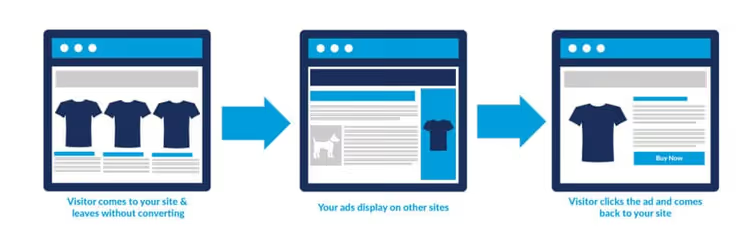
A visitor clicks an ad → lands on your site → the pixel "remembers" them → later you show them another ad featuring the product they viewed. The number of touchpoints before purchase grows, and so does conversion.
Watch a visual guide on installing and verifying Meta Pixel on WordPress in 8 minutes:
⁉️🤔 Frequently asked questions
Do I need Meta Pixel if I am not running Facebook ads?
No. The pixel only collects data about visitors who came from Meta ads. If you are not paying for ads on Facebook or Instagram, installing the pixel is pointless because there will be no data to analyze.
How is Meta Pixel different from Google Analytics 4?
GA4 analyzes all traffic and focuses on user behavior across the site as a whole. Meta Pixel is designed to track the performance of specific ad campaigns: which ad led to a purchase, which audience converts better. These tools do not replace each other; they complement one another.
Can I use Meta Pixel without a plugin?
Yes. You just need to insert the pixel's JavaScript code into your site's
<head>via WPCode (Step 2 of this guide). Without a plugin you will not get automatic WooCommerce events and Conversion API, but basic page view tracking will work.
Is setting up Conversion API mandatory?
Technically no, but in practice yes. Ad blockers and browser restrictions (ITP in Safari, ETP in Firefox) cut off a significant portion of browser pixel events. Conversion API sends data directly from your server to Meta, resulting in noticeably higher accuracy. PixelYourSite includes basic CAPI support in the free version.
What should I do if the pixel is not transmitting data?
Check three things. First: install the Meta Pixel Helper extension and open your site in the same browser; it will show whether the pixel is loading. Second: check Events Manager → Test Events, where you can see which events are arriving in real time. Third: if you use a caching plugin, clear the cache after installing the code.
Is it worth installing Meta Pixel: final recommendation
If you run ads on Facebook or Instagram, the pixel is essential. Without it you do not know which campaign brings sales, you cannot set up retargeting, and you are not building lookalike audiences. Essentially, you are paying for impressions and clicks but not getting the data to improve them.
If your budget is modest, start with manual installation via WPCode: 5 minutes and a Save button. If you have WooCommerce or plan to work actively with ads, install PixelYourSite: it will cover Conversion API, store events, and GA4 in one interface.
Confirmed that the pixel is collecting data? The next step is setting up audiences for retargeting and lookalike campaigns. That is a topic for a separate guide, but the foundation (a correctly installed pixel) is already in place.

A professional team of writers and editors specializing in creating quality content.