













 AIIllustrative image: AI-generated
📧 How to create a Gmail email alias
Every time a website asks for your email to register, subscribe to a newsletter, or download a "free" guide, you hesitate. You do not want to expose your primary address, because spam, data breaches, and retargeting will follow. Setting up a dozen separate mailboxes means juggling passwords and constantly switching tabs.
Gmail solves this problem with built-in tools, no third-party services required. You stay in a single mailbox, but the address senders see is different. This is not a trick or an extra account: the feature is called an "alias" and it works out of the box.
Below are two methods, from the simplest to the most comprehensive. The first works instantly and requires no verification. The second connects any existing address as a sender from your primary Gmail.
💡 Quick overview:
- Enable plus addressing for instant disposable aliases like
username+tag@gmail.com - Add another address in Gmail via "Accounts and Import" → "Add another email address"
- Complete verification; Gmail will send a code to the address you are adding
- Switch between aliases when sending emails directly in the compose window
- Set up filters to auto-sort incoming mail for each alias
What is a Gmail alias and why do you need one
An alias is an alternative address whose messages arrive in your primary inbox. You do not create a new Google account, you do not memorize a separate password, and you do not switch between tabs. All messages, both to your primary address and to the alias, are collected in one interface.
Three typical scenarios:
- Newsletters and sign-ups. You give an alias to a store or service. If spam starts, you immediately see the source and disable the address without affecting your main correspondence.
- Freelance** and projects.** A separate contact address for each client, but all correspondence in one window.
- Separating roles. Personal mail, work correspondence, administrative notifications: different "faces," one login.
Gmail supports two mechanisms: plus addressing (instant) and connecting an external address as an alias (with verification). Neither requires a paid Google Workspace subscription.
Method 1: Plus addressing, an instant alias with no setup
The quickest way to create an alias is to add +tag to your username before @gmail.com. If your address is ivan@gmail.com, then ivan+shop@gmail.com, ivan+news@gmail.com, and ivan+freelance@gmail.com are ready-made aliases that work immediately. You do not need to enable them anywhere.
Gmail ignores everything after the plus sign during delivery. An email sent to ivan+anystring@gmail.com will land in the ivan@gmail.com inbox. At the same time, the To header preserves the full alias, so you see exactly which address the message was sent to.
How to use this in practice:
- When signing up on a website, enter
username+sitename@gmail.com. If the database leaks or your address is sold to spammers, you instantly identify the source. - For newsletters, create a filter: all emails to
username+news@gmail.com→ label "Newsletters" and skip Inbox. Your primary mailbox stays clean. - For testing registrations on your own site, use
username+test@gmail.com.
Limitation: plus addressing only works with @gmail.com addresses. For @googlemail.com or Google Workspace domains, the behavior is identical. Third-party domains (Yahoo, Outlook) do not support plus addressing. Additionally, some web forms block the + character in the email field; in such cases, proceed to the second method.
Method 2: Connecting another address as an alias
This method lets you send emails from any address you own, not just Gmail but also Yahoo, Outlook, or a corporate domain. The alias address goes through verification, after which it appears in the sender dropdown in the compose window.
Step-by-step setup
1. Open Gmail in a browser and sign in to your account.
2. Click the gear icon in the upper right corner and select "See all settings."
3. Go to the "Accounts and Import" tab (in Google Workspace accounts, simply "Accounts").
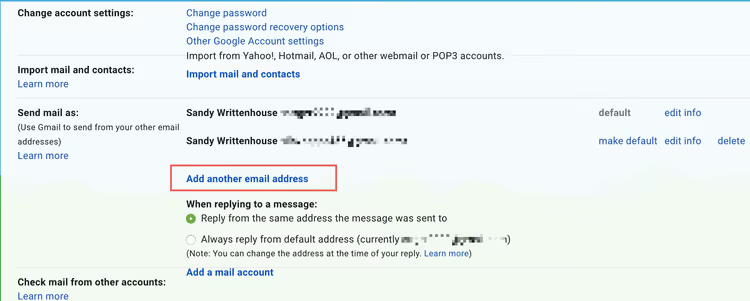
4. In the "Send mail as" section, click "Add another email address."
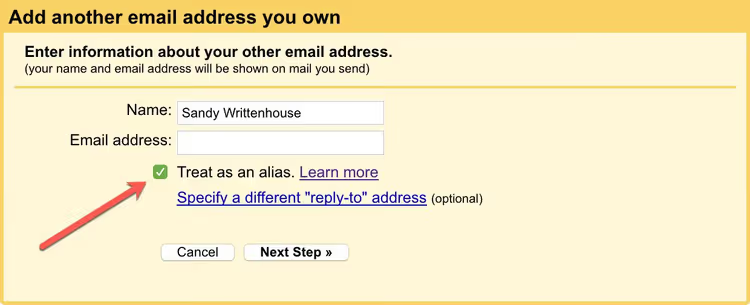
5. In the popup window, enter the sender name (as recipients will see it) and the address that will become the alias. Keep the "Treat as an alias" checkbox selected; this is essential.
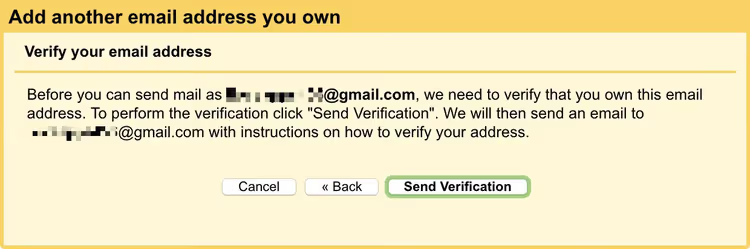
6. Click "Next Step," then "Send Verification." Gmail will send a six-digit code to the address you are adding.
7. Open the mailbox of the address you are adding in another tab, find the email from Gmail with the subject "Confirmation," and copy the code. Paste it into the confirmation field in Gmail and click "Verify."
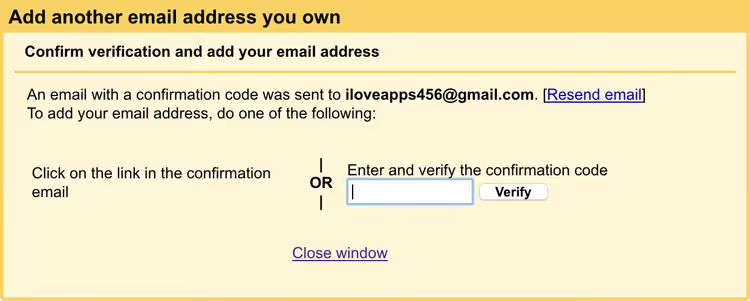
8. Done. Close the window; the added address will appear in the "Send mail as" list.
Now when creating a new email, a dropdown appears in the "From" field. Select the alias, and the recipient will see that address instead of your primary Gmail.
Important setting after connecting
Immediately after adding the alias, go to the same "Accounts and Import" section and find the "When replying to a message" block. Select the option "Reply from the same address the message was sent to." Without this, a reply to an email sent to your alias will go out from your primary address by default, defeating the purpose of the alias.
Pros and cons of Gmail aliases
A brief comparison of both methods to help you choose:
Criterion | Plus addressing | Connecting an external address |
|---|---|---|
Creation speed | Instant | 2-3 minutes (verification) |
Is a second mailbox needed | No | Yes, any address |
Reply to sender | From primary address | From alias address |
Works on all forms | Not always (+ is blocked) | Yes |
Mail filtering | By To header | By To header |
Limitations | None | Up to 99 addresses for sending |
For one-time registrations and spam filtering, plus addressing is the ideal tool: it is free and requires zero clicks in settings. For business correspondence and situations where the recipient should see a "serious" address (not +tag), use a full alias via the second method.
⁉️🤔 Frequently asked questions
Can I create a Gmail alias without a second mailbox?
Yes, use plus addressing. Add
+anywordbefore@gmail.comin your primary address. No additional mailboxes or confirmations are required. Limitation: you cannot reply directly from such an alias; the recipient will see your primary address.
How many aliases can I add to Gmail?
With plus addressing, an unlimited number (any string after
+). When connecting an external address, the limit is sending from 99 different addresses for free Gmail accounts. In Google Workspace, the limit is set by the domain administrator.
Does the recipient see my primary Gmail when I use an alias?
When sending through a connected external address (method 2), no; the recipient sees only the alias address. With plus addressing (method 1), emails arrive at the alias, but replies go out from your primary address. A technically savvy recipient can examine the email headers and see the connection via
Return-Path, but in normal correspondence the primary address is not displayed.
Does a Gmail alias work with email clients?
Yes. A connected external address is available for sending via the Gmail API and any client that works with Gmail (Apple Mail, Thunderbird, Outlook). Plus addressing only works for receiving; to send from an alias through a third-party client, configure the SMTP of the added mailbox separately.
Can I delete an alias if it is compromised?
For plus addressing: create a filter that automatically deletes emails to a specific
+alias. For a connected external address: go to "Accounts and Import" → "Send mail as" → click "delete" next to the address. The external mailbox itself is not affected.
Is it worth setting up an alias right now
A Gmail alias takes five minutes to set up and saves hours of cleaning spam from your inbox in the future. Plus addressing is enabled by default, without a single click in the interface; just start adding +tag the next time you register on a website. Connecting an external address takes no more than three minutes and is useful for anyone who corresponds from multiple mailboxes or wants to hide their primary address from recipients.
If you still expose your primary Gmail on every website with a registration form, make it a habit to use ivan+sitename@gmail.com. A month of this practice, and you will stop wondering where the latest flood of spam came from.

A professional team of writers and editors specializing in creating quality content.