













 AIIllustrative image: AI-generated
🔒 How to prevent image copying from your website: 6 protection methods in 2026
Copying someone else's image from a website takes three seconds. Right-click, "Save as…", and your photo is already living in someone else's presentation, commercial blog, or landing page without a single link back to you.
For photographers, designers, or content site owners, this means direct losses. Every stolen image is potentially missed licensing revenue. When dozens get stolen, the damage runs into thousands.
Protecting images on WordPress is absolutely possible, and you can do it with several layers at once. Disabling right-click, watermarks, hiding image URLs, blocking hotlinking, and legal barriers: each layer cuts off its own category of "borrowers." Below is a complete step-by-step guide for 2026: from simple plugins to editing .htaccess and clearing EXIF data.
💡 Quick overview:
- disable right-click and keyboard shortcuts via WP Content Copy Protection, a basic barrier in two minutes
- apply watermarks to all uploaded images via Easy Watermark, automatically and in bulk
- hide direct image URLs via WP Hide & Security Enhancer, so file paths cannot be guessed
- place a DMCA badge on your site, a legal barrier and ready-made complaint channel
- block hotlinking via
.htaccessand Cloudflare, server-level protection - clear EXIF data before uploading, removing geotags, camera model, and serial number
Universal solution: Content Protector Pack
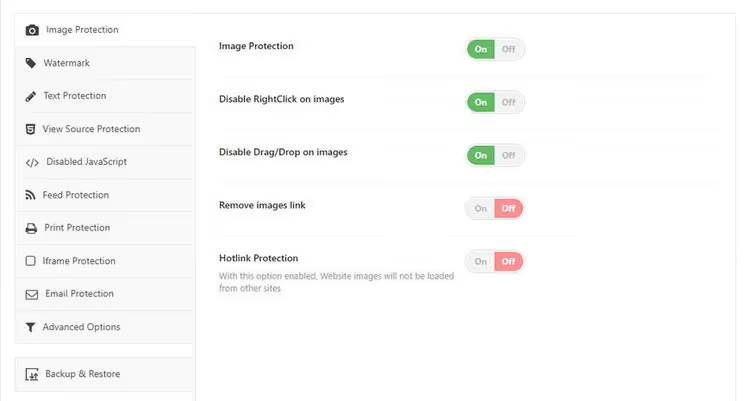
The fastest way to close all loopholes at once is to install Content Protector Pack. This is a commercial plugin that combines several protection techniques in one interface: no need to install 4-5 separate extensions.
Out-of-the-box features:
- Image protection. Saving images is disabled, URL is hidden. Even if someone finds the direct link to a file, embedding it on another site will not work.
- Watermarks. Upload your logo or text, position it, and the plugin automatically applies it to all new uploads.
- Source code protection. Access to the page's HTML code is restricted. Without this measure, an experienced user finds the image URL through DevTools in half a minute.
- Print blocking. The print function is disabled. Attempting to print the page produces a blank sheet.
- Iframe protection. The plugin blocks embedding your pages in third-party iframes and redirects the attacker to your site.
If your budget allows you to avoid assembling protection piece by piece, Content Protector Pack covers the entire question.
In the video above, there is a visual demonstration of how multi-layered protection works on a real WordPress site.
6 methods for free image protection
If a commercial solution is not suitable, assemble protection step by step from free plugins and manual settings. Each subsequent step closes a new loophole.
1. Disable right-click and keyboard shortcuts

Basic barrier: deprive visitors of the most convenient way to download an image. WP Content Copy Protection is a free plugin with more than 100,000 active installations and a 4.8 rating. It injects JavaScript and CSS methods into your site that block right-click on images, as well as copy keyboard shortcuts: Ctrl+A (select all), Ctrl+C (copy), Ctrl+X (cut), Ctrl+S (save), and Ctrl+V (paste).
Setup is minimal. After activating the plugin, go to "WP Content Copy Protection"; basic functions are already enabled by default.

On the "Main Settings" tab, you can selectively enable or disable protection for posts, the homepage, and static pages. Here you can also configure the message visitors will see when attempting to right-click or print.
The premium version has broader functionality: text selection protection, adaptive blocking on mobile, automatic watermarks. But for basic protection, the free version is more than enough.
2. Add a watermark to images
A watermark is semi-transparent text or a logo overlaid on an image. This is exactly how stock photo sites like Shutterstock and iStock protect content: the client sees a preview with a watermark, and after payment receives a clean file.

Easy Watermark is one of the best free plugins for automatic watermarking in WordPress. After installation, go to "Tools" → "Easy Watermark".

Two types of watermarks are available. Text: set the content, font, color, size, angle, transparency, and position. On the "Text" tab, everything is configured in a couple of minutes.
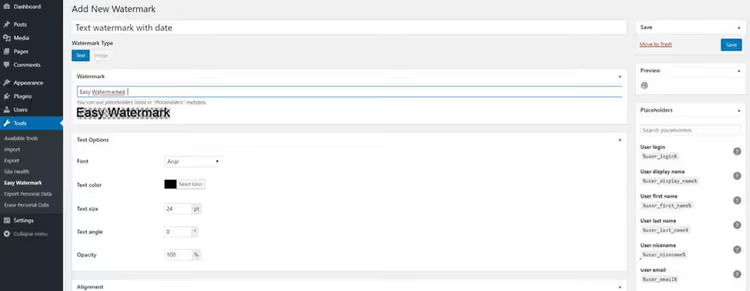
Image: upload a logo or any graphic file in JPG, PNG, or GIF. Positioning is equally flexible.
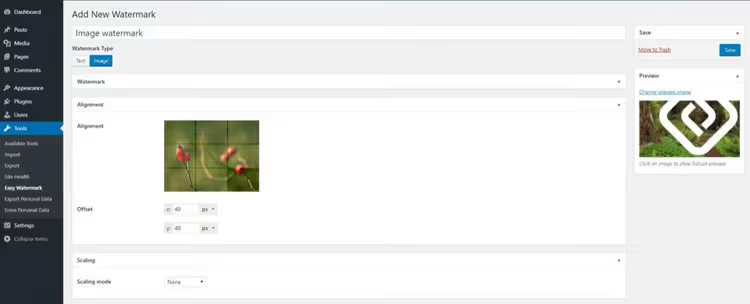
Configure transparency and exact position of the watermark on the image:

After setting up the template, Easy Watermark can bulk-apply the watermark to your entire media library, and can also bulk-restore originals if needed. Additionally, the plugin automatically applies the watermark with every new file upload.
3. Hide image URLs
By default, WordPress generates direct links to every uploaded file. An attacker who knows the /wp-content/uploads/ structure can enumerate URLs and download originals, bypassing all right-click protections.
WP Hide & Security Enhancer solves this problem and more. The plugin hides standard WordPress paths: theme names, /wp-content/ contents, plugin list, login page. This simultaneously provides copy protection and improves overall site security. By the way, this same plugin does an excellent job of hiding the WordPress theme name.

The plugin has more than 50,000 active installations. After activation, it appears in the admin panel sidebar.

For image protection, go to the "Uploads" tab.

Enter the new path in the corresponding field:

In the "New Upload Path" field, enter an arbitrary string. The plugin will replace the standard /wp-content/uploads/ with your specified path in the source code. Direct file links will still work for your site, but guessing the new URL from outside will not be possible.
4. Add a DMCA badge and copyright notice
DMCA (Digital Millennium Copyright Act) is an American copyright law for the digital age. It gives site owners a mechanism to file complaints against violators and requires hosting providers to remove illegal content upon request.
The DMCA Badge plugin places an official protection badge on your site. This serves as both: a) a warning to casual copiers, b) a ready-made tool for tracking copies of your content through the DMCA service.

Choose a badge that fits your site's design:

After activation, register an account on the DMCA Badge tab. Then choose a badge that matches your design and configure its display: before or after posts, in widgets, or manually via shortcode. The premium version additionally blocks copying.
5. Disable hotlinking
Hotlinking is when someone embeds your image on their site via a direct link to your server. The image displays on their site, but your resources (bandwidth, CPU time) are consumed. For a site with traffic, hotlinking of a dozen images can result in extra gigabytes of bandwidth per month.
You can detect hotlinking through Google Images. Enter in the search bar:
inurl:yourwebsite.com -site:yourwebsite.com
Replace yourwebsite.com with your domain. Google will show all images from your site found on third-party resources.
The most reliable way to block hotlinking is editing the .htaccess file in your site's root folder. Before editing, be sure to make a backup. Then find .htaccess in public_html, download it, open it in a text editor, and add the code:
1 RewriteCond %{HTTP_REFERER} !^$ 2 RewriteCond %{HTTP_REFERER} !^http(s)?://(www.)?yourwebsite.com [NC] 3 RewriteCond %{HTTP_REFERER} !^http(s)?://(www.)?google.com [NC] 4 RewriteCond %{HTTP_REFERER} !^http(s)?://(www.)?facebook.com [NC] 5 RewriteCond %{HTTP_REFERER} !^http(s)?://(www.)?twitter.com [NC] 6 RewriteCond %{HTTP_REFERER} !^http(s)?://(www.)?other-websites-go-here.com [NC] 7 RewriteRule .(jpg|jpeg|png|gif|webp|avif)$ - [F]
Replace yourwebsite.com with your domain, add services that are allowed to link to your images (Google, social networks) to the whitelist. The last line specifies file formats protected from hotlinking; we added webp and avif to the standard set because in 2026 these are the main image formats in WordPress.
An alternative for those who do not want to touch server files is Cloudflare. The free tier has built-in hotlink protection: enable it in the "Scrape Shield" section with one click.
6. Edit EXIF data
EXIF (Exchangeable Image File Format) is metadata that the camera records in every shot: shutter speed, aperture, ISO, white balance, focal length, camera model, and sometimes GPS coordinates. On one hand, this is useful for the photographer. On the other hand, an attacker gets technical data about your shooting, and from geotags can determine the location.

A convenient free tool for removing and editing EXIF is Xifer. It works through the browser and supports drag-and-drop: drag images into the gray area in the center of the screen and click "eXif.me".

Remove all metadata before uploading images to the site, especially geotags and camera serial number. This is the final touch: even if an attacker bypasses all previous protection levels and downloads the file, they will not get technical information about the shot.
What to do if images have already been stolen?
First, find the violator. The same Google Images search (inurl:yoursite.com -site:yoursite.com) will show where your images are being used. Next, contact the site owner directly. In most cases, people do not even realize they are using someone else's content.
Write politely, without legal threats. State that the image is protected by copyright and ask for removal. If the request is ignored, contact the violator's hosting provider with a DMCA complaint. Hosts take such complaints seriously: by law they are required to respond.
For systematic protection, keep an up-to-date DMCA badge on your site; this serves as both a warning and a ready-made complaint channel.
⁉️🤔 Frequently asked questions
Can images be fully protected?
Unfortunately, no. If an image is visible in a browser, it can be copied. A screenshot bypasses any protection plugin. The goal of the methods in this article is not to make copying impossible, but to make it inconvenient enough that the vast majority of casual copiers will go looking for easier prey.
Which plugin should I install first?
Start with WP Content Copy Protection; it blocks the most common channel (right-click) in a couple of minutes, with no configuration. Then add Easy Watermark so that even an image saved via screenshot carries your signature. The third layer is WP Hide & Security Enhancer for hiding direct URLs.
Do these plugins interfere with SEO?
No. Search robots do not right-click and do not save images. A watermark, if it does not cover key details of the image, also does not affect ranking in Google Images. Do not place an opaque watermark across the entire area; this degrades user experience and may increase bounce rate.
Does the protection work on mobile?
WP Content Copy Protection and similar plugins use JavaScript that works in mobile browsers. On touchscreens, instead of right-click, the long press is blocked; this is what opens the image save menu in mobile Safari and Chrome.
What is better: plugins or editing .htaccess?
They solve different problems.
.htaccessblocks hotlinking at the server level; this is faster and more reliable than a plugin. Plugins block user-side copying channels: clicks, keys, DevTools. The ideal option is a combination:.htaccessfor hotlinking and two or three plugins for frontend protection.
Do I need to update the .htaccess code for modern image formats?
Yes. If you use WebP or AVIF (and in 2026 this is standard for WordPress), add
webpandavifto the last line of theRewriteRulerule. Without this, hotlink protection will not work for files in these formats, and they make up the bulk of images on a modern site.
What to install for your task?
There is no universal solution. Select a set of methods based on your content:
- Photographer selling shots: watermark (Easy Watermark) as priority, plus EXIF cleanup before uploading. Disabling right-click is optional; the client needs to see the product clearly.
- Blog with original illustrations: WP Content Copy Protection + DMCA Badge. Fast, free, covers most typical theft scenarios.
- News site with unique photos: full stack: right-click blocking, watermark, URL hiding, hotlink protection via Cloudflare.
- Online store: focus on watermarks and DMCA. Product images are copied most often; let each one carry your logo.
Start with one plugin today. Add a second in a week, when the first has proven itself. A full stack of 4-5 tools is the goal you will reach in a month, but even the first step will cut off most casual copiers.

A professional team of writers and editors specializing in creating quality content.