













 AIIllustrative image: AI-generated
🔗 How to remove broken links from a WordPress site
A link leads to a page that no longer exists. The visitor sees a 404, gets frustrated, and leaves for your competitors. Search engines notice too: if a site has broken links, it must be neglected.
The problem scales invisibly. Today you link to a live source, six months later the author deletes the page, and a year after that you have dozens of these "dead" URLs. Checking each one manually means wasting hours for nothing.
The free plugin Broken Link Checker from WPMU DEV solves this automatically: it scans your entire site, finds broken links, and provides tools for instant fixes right from your dashboard. Below is a step-by-step guide from installation to complete site cleanup.
💡 Quick overview:
- Install Broken Link Checker from the WordPress directory and activate it
- Choose a scanning mode: cloud (faster) or local (on your server)
- Wait for the first scan to complete, the plugin will find all problematic URLs
- Fix, remove, or dismiss broken links in a couple of clicks from a single panel
- Set up email notifications to learn about new issues automatically
What is Broken Link Checker and why do you need it

Broken Link Checker is a free WordPress plugin that checks every link on your site in the background. If a URL leads to a nonexistent page, returns a server error, or creates a redirect chain, the plugin records it and displays everything in a convenient list.
The plugin is developed by the WPMU DEV team and has 500,000+ active installations with a 3.8 out of 5 rating on WordPress.org. Every day, all plugin installations combined find over 50,000 broken links; the scale speaks for itself.
What exactly the plugin scans:
- Posts and pages
- Comments
- Custom post types and fields
- Embedded media files and images
- Menus and widgets
The plugin operates in two modes. Cloud (Cloud Engine) performs scanning on WPMU DEV servers, 20 times faster than local and does not burden your hosting. Requires a free WPMU DEV Hub account. Local (Local Engine) runs directly on your server, requires no external connections. You can switch between modes without losing settings.
Step 1: Installation and setup
Installation is standard:
- In the WordPress admin, go to Plugins → Add New.
- In the search bar, type "Broken Link Checker".
- Click Install, then Activate.
After activation, the plugin adds a menu item under **Tools → **Broken Links and a widget on the admin dashboard. Immediately after installation, open Settings → Link Checker and choose a mode:
- Cloud Engine, for most sites. Fast, accurate, creates no load.
- Local Engine, if you prefer not to connect to a third-party service or your site is small.
On the same screen, configure scanning frequency (default is every 72 hours) and enable email notifications for new broken links. We recommend not skipping this step: you only receive an email when there is a real problem, and you are not logging into your admin panel every day.
Step 2: Finding broken links
The plugin starts its first scan automatically. Depending on site size and chosen engine, the process takes from a couple of minutes to half an hour.
You can learn about results in two ways:
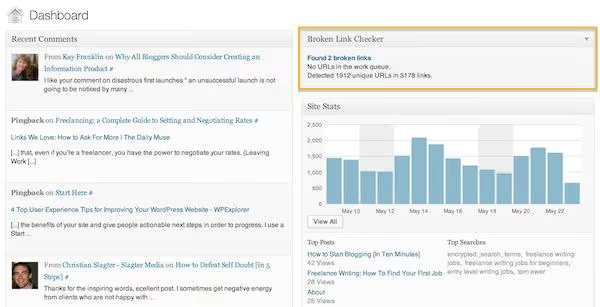
Through the widget on the WordPress admin dashboard, which shows the number of issues found right after login.
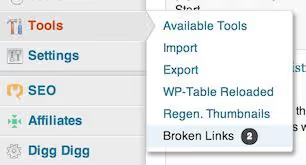
Or through the sidebar menu, the Broken Links item under Tools changes color when problems are detected.
Click the notification to open the full list of broken URLs:
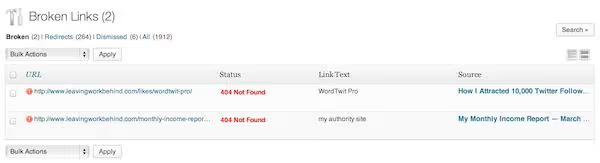
Each row shows: the problematic URL, error code (404, server timeout, redirect), anchor text, and the source page where the link is placed. The plugin catches more than just 404s; it records any URLs that fail to open or return an incorrect response.
Step 3: Fixing broken links
The plugin's main convenience is that you can fix links directly from this list without opening the editor for each page. Hover over a broken URL and an action panel appears:
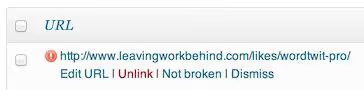
Available actions:
- Edit URL, replace the broken link with a working one. Anchor text is preserved.
- Unlink, remove the hyperlink while keeping the text on the page.
- Mark as not broken, if the error was temporary (server was down and recovered).
- Dismiss, remove the URL from the problem list without changes.
When editing, a simple dialog box opens:
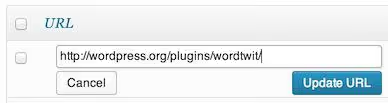
Enter the new URL and click Update. Done, the link is fixed on all pages where it appeared. No additional actions required.
For bulk cleanup, use the checkboxes to the left of URLs and the Actions dropdown above the list. This is convenient when dozens of similar broken links accumulate after a site migration or domain change.
Step 4: Dismissed links and additional filters
Not every "broken" link is a real problem. Temporary server failure, IP blocking by hosting, timeout under high load: the plugin honestly records everything. Dismissed links are not deleted but moved to a separate tab:

Review this tab periodically, a link you dismissed due to a temporary failure might have actually "died" later.
Filters at the top of the page let you sort links by status (404, redirect, timeout), type (external/internal), and detection date. For large sites with hundreds of pages, this saves hours.
Sometimes you need context: where exactly the link is placed and why. The View button next to the source URL opens the page with the problematic link highlighted:
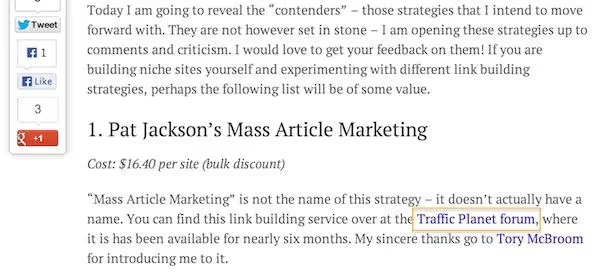
This helps you make the right decision: replace the URL with a current alternative, remove the link entirely, or add a note for readers that the linked material is no longer available.
What to do if the plugin conflicts with others
There are occasional complaints about Broken Link Checker conflicting with certain plugins or themes. In practice, the problem is almost always solved by switching to Cloud Engine: it runs on WPMU DEV's side and does not interact with your site's code directly.
If the conflict persists in local mode, try:
- Temporarily disable other plugins and check; the culprit will be found.
- Contact WPMU DEV support; the team actively responds on the WordPress.org forum.
- Use an alternative: **Broken Link Checker by **AIOSEO, a separate plugin from the All in One SEO team with similar functionality and 100,000+ installations.
Watch a visual demonstration of installation and finding broken links:
⁉️🤔 Frequently asked questions
Does Broken Link Checker slow down the site?
The local engine can create load when scanning very large sites (5,000+ pages). Solution: switch to Cloud Engine, where scanning runs on WPMU DEV servers and does not affect your hosting. For small and medium sites, the difference is unnoticeable. An average site with 200-500 pages scans in 5-15 minutes without affecting loading speed for visitors. If your site is on weak hosting, simply enable Cloud Engine and forget about load.
Is the plugin completely free?
Yes, all core functionality is free. Cloud Engine requires a free WPMU DEV Hub account, which you can create in a minute directly from the plugin interface. Premium WPMU DEV plans unlock access to other ecosystem plugins (Smush Pro, Hummingbird Pro, Defender Pro), but this is not needed for link checking. The free version includes: both scanning engines, email notifications, search and filters, bulk actions, batch URL editing. This is enough for a site of any size.
What does the plugin NOT check?
Links in PDF files uploaded to the media library and URLs in third-party widgets (such as Twitter feeds) inserted via iframe. The plugin also does not check links added via JavaScript: they are generated dynamically and are absent from the page HTML at the time of scanning. One nuance: external sites may block your server's IP with frequent requests. Cloud Engine solves this problem, as requests come from distributed WPMU DEV IPs.
Can scanning be set up for new posts only?
Yes, in Local Engine settings there are filters by post types: you can exclude pages, comments, or custom post types. Cloud Engine scans everything but is significantly faster. For both modes, domain exclusions are available. If you do not want to check links to a specific site, add it to the exclusion list. Useful scenario: exclude your own domain from external link checking, since internal broken URLs are easier to find through Google Search Console (Coverage report).
How often should you run a check?
For an actively updated blog, once every 3 days (the default setting). For a static business card site, once a week. The plugin does not check links continuously: between scans it "sleeps," so there is no constant load. After the first scan, it makes sense to manually fix all found issues and run a recheck immediately to make sure nothing was missed. After that, automation takes over.
Bottom line: keep links alive or ignore them?
Broken links are more than just an annoyed visitor. Google considers user experience a ranking factor, and a 404 on a clickable link within content is a direct signal that "this site is abandoned." A month or two without monitoring, and your rankings drop.
Broken Link Checker closes this task completely for free. Install it, set up notifications, check the list once a week: 10 minutes instead of hours of manual checking. If your site generates revenue or clients, those 10 minutes pay off many times over.
For small sites, use Local Engine (no registration required). For everything else, Cloud Engine: faster, more accurate, does not burden your hosting. Both options are free.

A professional team of writers and editors specializing in creating quality content.