














🚀 Installing Laragon and WordPress on Windows: complete 2026 guide
Setting up a local WordPress on Windows should take five minutes. In practice, beginners spend an entire evening on it: XAMPP conflicts with Skype over ports, Local by Flywheel crashes unexpectedly with a Router error, and Docker on Windows consumes half your RAM before launching the first container.
Laragon solves this problem radically. One installer, two minutes, and you have Apache, MySQL, and PHP running, with your site accessible at myproject.test without editing hosts or config files. The project has been active since 2015 and continues to evolve: version 8.6.1 (March 2026) ships with PHP 8.5, MySQL 9.6, Node.js 25, and Apache 2.4.66 out of the box, while the environment uses only 4-10 MB of RAM.
Below is a step-by-step guide from download to a working WordPress with virtual host and SSL. No PATH dancing or reboots required.
💡 Quick overview:
- Download Laragon WAMP from the official website and run the installer
- Configure auto virtual hosts, SSL, and ports in three Preferences tabs
- Launch WordPress with one Quick Create button, faster than the classic "five-minute install"
- Learn to switch PHP versions, edit php.ini, and view logs
Why Laragon: comparison with XAMPP, Local, and Docker
There are four main options for local development environments on Windows. Here is how they compare:
Environment | Startup | Memory (RAM) | Virtual hosts | WordPress auto | Portability |
|---|---|---|---|---|---|
Laragon 8.6 | 2-3 sec | 4-10 MB | Auto (.test) | Quick Create | Yes (folder copy) |
XAMPP | 10-15 sec | 150+ MB | Manual editing | No | No (services) |
Local by Flywheel | 15-30 sec | 200+ MB | Auto (.local) | Built-in | No |
Docker (WSL2) | 30-60 sec | 1-2 GB | Manual | docker-compose | Via images |
XAMPP installs Windows services and requires editing httpd-vhosts.conf and the hosts file for each new site. Local by Flywheel works well for single sites but breaks when switching PHP versions on legacy projects. Docker on Windows is the most flexible but also the most resource-hungry: WSL2 reserves 1-2 GB of RAM by default, and cold starts take up to a minute.
Laragon is built differently: an event-driven process manager without Windows services, compiled binaries instead of virtualization, and auto-mapping of folders to domains. The result is a 2-3 second startup and memory consumption lower than a single Chrome tab.
The project author, Leo Khoa (former head of DevOps at a SaaS company), wrote Laragon in 2015 after getting tired of slow and unstable environments for Laravel. Today the project is open source, with builds and releases published on GitHub. As of June 2026, the latest stable release is Laragon 8.6.1 Full (227 MB).
Step 1: download and install
Go to laragon.org/download and download Laragon Full (64-bit). This package includes Apache 2.4.66, Nginx, MySQL 9.6, PHP 8.5, Node.js 25, Python 3.13, Redis, Memcached, PostgreSQL 18, npm, Git, Composer, and HeidiSQL. An impressive list, but you do not have to use everything: unused services sit quietly in the background.
The Laragon-wamp.exe installer weighs about 130 MB. After extraction, the folder takes up approximately 750 MB on disk before creating any sites. It launches instantly: the laragon.exe core is under 6 MB and holds only a few megabytes in RAM.
Run the installer with a double-click. At this stage, you can safely accept the defaults; any option can be changed later. The only caveat: if your system drive is low on space, specify a different partition during installation. Thanks to its portable architecture, Laragon does not touch the Windows registry, and you can copy the entire environment folder to a flash drive.
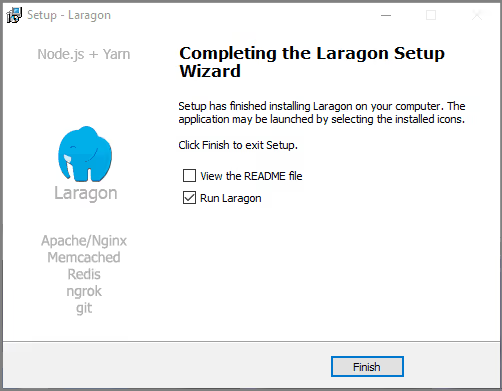
After launch, the control panel minimizes to the system tray in the bottom-right corner near the volume control. Clicking the blue Laragon icon opens the panel. From here you will start and stop servers, create sites, and change settings.
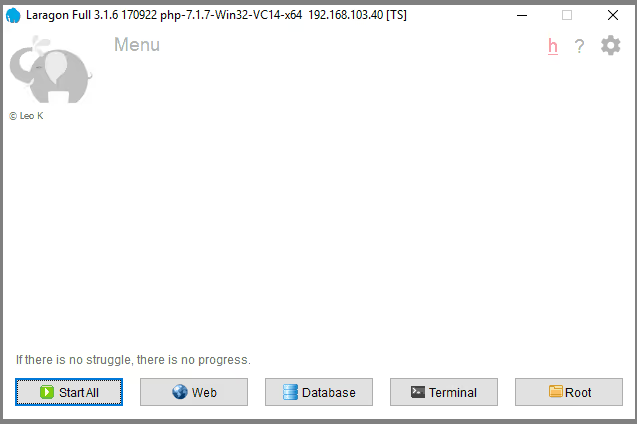
Panel buttons at a glance:
- Start All launches Apache and MySQL. When servers are running, the button changes to "Stop."
- Web is a placeholder with a link to the Laragon website.
- Database opens HeidiSQL (if you prefer phpMyAdmin, it is also available: Menu → MySQL → phpMyAdmin).
- Terminal launches the Cmder command line with Git, Composer, and npm pre-configured.
- Root opens the Laragon folder in File Explorer.
- The gear icon in the upper-right corner provides access to settings.
Step 2: configure the environment
Click the gear icon to open Preferences. I will cover the three most important tabs.
General tab
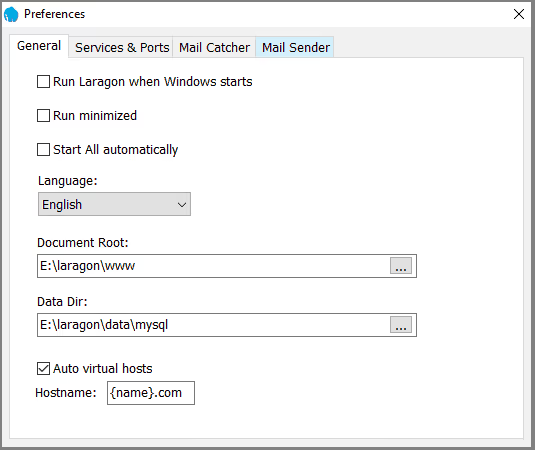
Auto-start. If you work on projects every day, enable "Run Laragon When Windows Starts." The environment starts instantly and barely consumes resources. I prefer to start manually since my computer is not used exclusively for development.
File locations. The "Document Root" and "Data Directory" options come in handy if you need to move the Laragon folder elsewhere or copy the environment to another computer. Move the folder, specify the new path, and it works without reinstallation.
Auto Virtual Hosts. This is the key option. When enabled, Laragon automatically creates a virtual host. Create a folder called test in www, and the site opens at test.test. The default suffix is test, which is the accepted standard for local development (older versions used dev, now it is test). No manual editing of hosts or Apache configs required.
Services and Ports tab
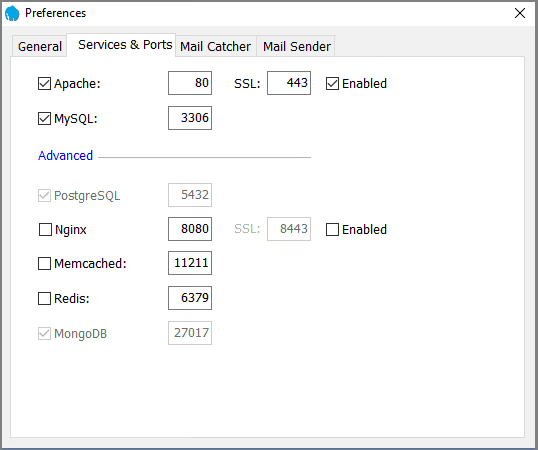
Leave the Apache (80) and MySQL (3306) ports alone unless you have a clear reason to change them. The only exception is SSL. If you are developing a copy of a production site that runs on HTTPS, check the "Enabled" box next to SSL. With the Auto Virtual Hosts option active, Laragon will generate a self-signed certificate automatically. Browsers will complain about the certificate (it is not issued by a recognized authority), but for local development this is sufficient; just skip the warning.
Version 8.6 introduced the Auto SSL feature: one click enables HTTPS for a local domain without manual certificate hassle.
Mail Catcher and Mail Sender tabs
A useful pair for testing email sending from your site. Mail Catcher intercepts all outgoing emails and displays them in a web interface: you see exactly what would have been sent to the user but without the risk of accidental mass emails. Mail Sender does the opposite: emails actually go out to the specified SMTP server. Details on how these features work are described in the Laragon documentation.
Step 3: launch WordPress via Quick Create
Return to the control panel. Click "Start All" to launch Apache and MySQL. Now right-click the Laragon icon in the tray and select "Quick Create."
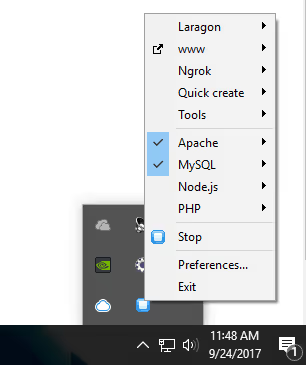
The list includes WordPress, Laravel, Drupal, Joomla, PrestaShop, Symfony, Magento, Moodle, and a dozen other CMSs. We are interested in WordPress. Click it.
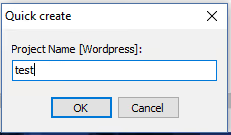
Enter a project name, for example test. Remember the virtual host suffix from the settings? If you enter test in the "Hostname" field, the site will open at test.test. Important note: do not enter the exact domain name of your production site. If your live site is called mysite.com and you enter mysite, the virtual host will intercept traffic, and the browser will open the local version instead of the live site.
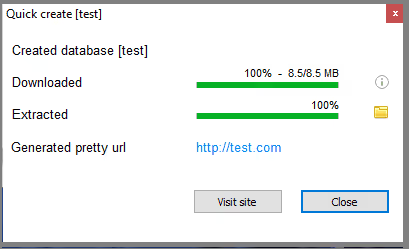
Laragon downloads the latest version of WordPress, extracts it to c:\laragon\www\test, and creates a database. If the Auto Virtual Hosts option is enabled, a Windows security prompt may appear; confirm the virtual host creation. When finished, click "Visit site."
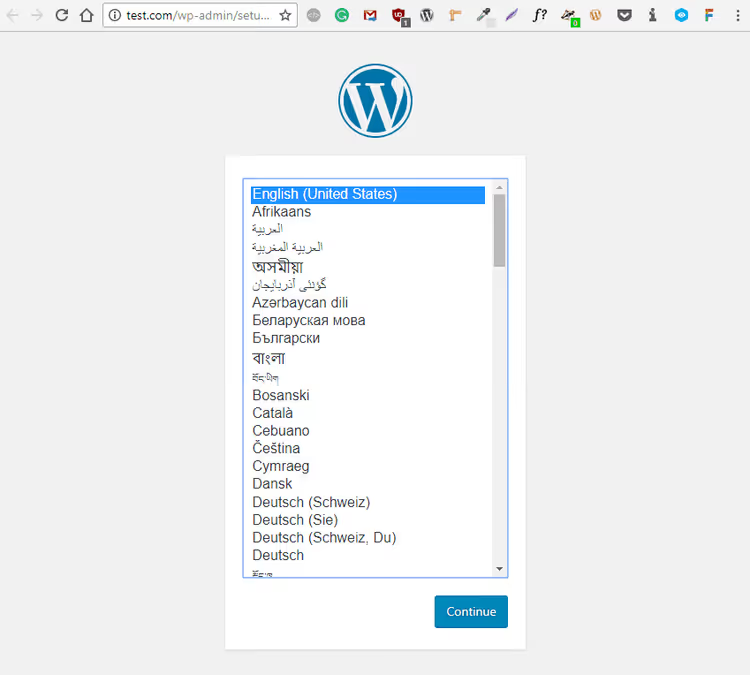
From here, it is the standard WordPress installation process. Select your language and click "Continue."
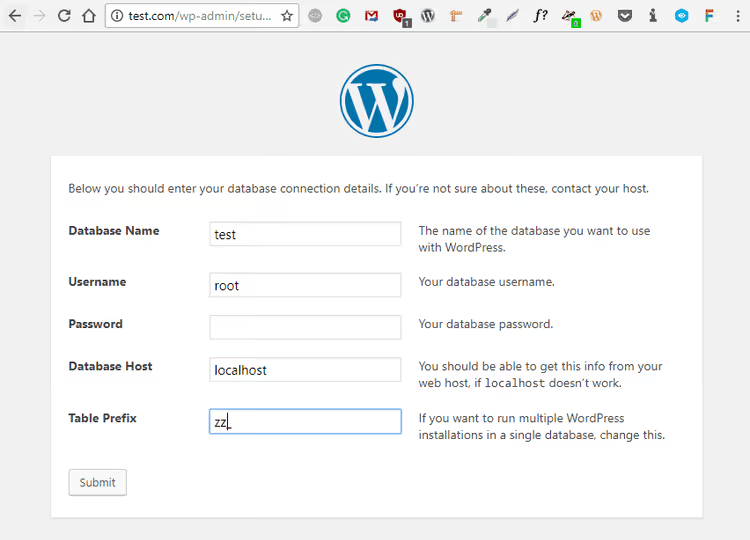
On this screen, Laragon has already prepared everything: the database name matches the project name (test), the user is root, and the password is blank. For a local machine this is fine, but for a production site always use a unique username and strong password. I recommend changing the table prefix from wp_: if the site later goes to production, a non-standard prefix will make automated database attacks more difficult. Click "Submit."
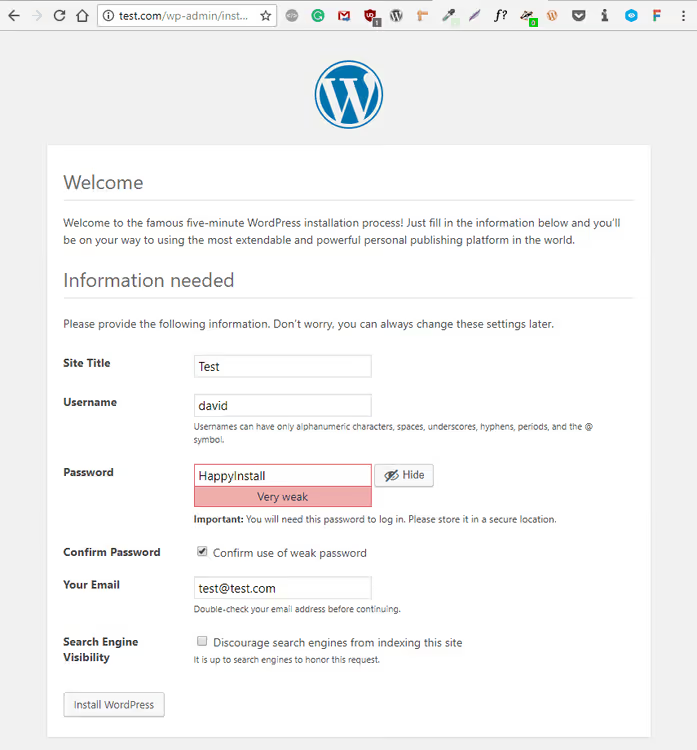
Enter the site title, username, and password. For local development, a simple password works, but if you plan to deploy this site to the internet, set a strong one from the start. Click "Install WordPress." Done. WordPress is famous for its "five-minute installation"; with Laragon's Quick Create, you finish in three minutes.
Additional features
Right-clicking the Laragon icon in the tray opens a menu with four submenus worth knowing.
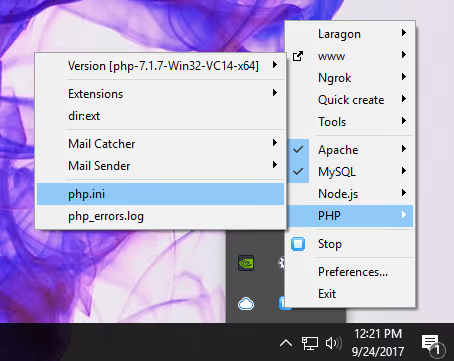
PHP. Here you can switch between PHP versions 7.4, 8.1, 8.2, 8.3, 8.4, and 8.5, edit php.ini, view error_log, and enable or disable extensions. For WordPress developers, the most commonly needed tasks are enabling php_openssl, php_mbstring, and configuring upload_max_filesize when a theme or plugin requires large file uploads.
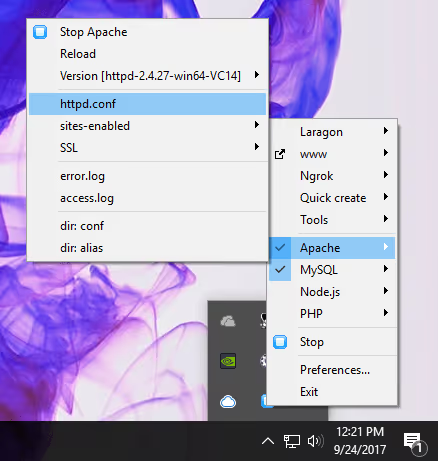
Apache. Quick access to httpd.conf, httpd-vhosts.conf, and error.log. Useful when you need to increase upload size limits or manually reconfigure virtual hosts.
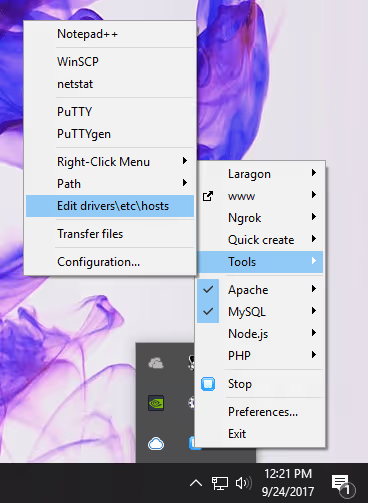
Tools. Launch PuTTY, edit the Windows hosts file, or change the terminal. If you prefer Windows Terminal over Cmder, configure it here. Starting with version 8.6, Tools includes a "Quick Add" option: Redis, Memcached, MongoDB, and other services can be added in a couple of clicks.
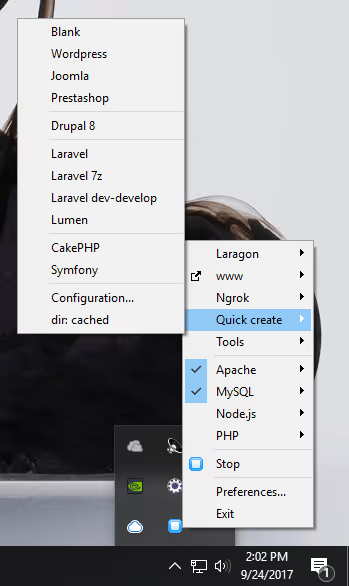
Quick Create. The full list of CMSs and frameworks that Laragon can deploy automatically: Laravel, Symfony, Drupal, Joomla, Magento, PrestaShop, Moodle, and others. Each pulls the current version, so you do not download distributions manually or extract archives. Version 8.6 added support for Node.js applications and customizable project templates.
Another powerful feature in Laragon 8.6 is Profiles. These are isolated configurations for different projects or clients: each profile can be assigned its own PHP, MySQL, Node.js, and Apache versions, and you can switch between them with one click. A legacy project on PHP 7.4 and a new one on PHP 8.5 can coexist on the same machine without conflicts.
⁉️🤔 Frequently asked questions
Can I migrate an existing site from XAMPP to Laragon?
Yes. Laragon supports migration from XAMPP, WAMP, and other environments. The process: copy your site folder to
c:\laragon\www\<project-name>, export the database from phpMyAdmin in the old environment, and import it into HeidiSQL or phpMyAdmin in Laragon. Then update the connection parameters inwp-config.php: userroot, blank password (or whatever you set during configuration). The virtual host will be created automatically if the Auto Virtual Hosts option is enabled.
Why does my site not open at project.test after Quick Create?
Three likely causes. First: Apache is not running; check the Laragon panel, which should show "Stop" rather than "Start All." Second: another process is using port 80 (Skype, IIS, or an old XAMPP installation). Stop them or change the Apache port in the Services and Ports tab. Third: your antivirus is blocking virtual hosts; add Laragon to the exceptions list.
How is Laragon better than XAMPP for WordPress developers?
XAMPP was designed as a general-purpose PHP stack and is not optimized for CMSs. Laragon provides three things XAMPP lacks: auto virtual hosts (create a folder and the site is accessible), Quick Create with automatic WordPress deployment, and two-click PHP version switching. Plus portability: XAMPP installs Windows services and requires registry permissions, while Laragon can be copied to a flash drive and run on any computer.
Can I use Laragon for commercial development?
Yes. Laragon is distributed under an open license and is free for any purpose: personal, commercial, or educational. A separate Laragon Pro with extended support and additional features also exists (details at laragon.org/pricing), but the free version is more than sufficient for WordPress development.
What should I do if MySQL stops starting after a Laragon update?
The most common cause is that port 3306 is occupied by a previous MySQL instance that did not shut down properly. Open Task Manager, find the
mysqld.exeprocess, and terminate it. Then click "Stop" and "Start All" in the Laragon panel. If that does not help, check the logs: Menu → MySQL → error log. In severe cases, reinstalling the MySQL service via Tools → Quick Add → MySQL will resolve the issue.
Is switching to Laragon worth it in 2026?
If you are still working in XAMPP or running WordPress through Docker on Windows, switching to Laragon will save you hours of configuration and gigabytes of RAM. The environment starts in 2-3 seconds, consumes 4-10 MB in the background, and does not conflict with other programs.
For those starting out in WordPress development, Laragon is the fastest way to get a working site on your local machine: installer plus three clicks, and WordPress is ready to go. For experienced developers, the value lies in Profiles, multi-version PHP support, and Auto SSL (tools that require manual configuration and editing dozens of config files in XAMPP).
Start with the free version at the Laragon website. Installation takes two minutes, and your first WordPress via Quick Create takes three. Share your migration experience in the comments: what environment did you use before Laragon, and what surprised you the most?

A professional team of writers and editors specializing in creating quality content.