














🔧 Jetpack for WordPress: feature overview, setup and honest pricing breakdown
You installed WordPress, picked a theme, wrote your first pages, and then the zoo begins. You need backups, then brute-force protection, then a contact form, then CDN for images, then share buttons, then analytics... And a separate plugin for each task. A month later, you have twenty plugins in the admin panel, three conflict, two slow things down, and your site takes four seconds to load.
Jetpack solves this problem with one package. It's made by the same people who built WordPress itself, the Automattic team. This isn't just "another plugin," it's a bridge between your standalone WordPress.org site and the WordPress.com cloud infrastructure. You get backups, protection, acceleration, analytics and growth tools without the zoo.
In this guide, we'll examine Jetpack without marketing fluff: how it works under the hood, which features are actually useful in 2026, what it costs and, most importantly, whether it's worth paying for.
💡 Quick overview:
- Connect your site to WordPress.com: Automattic's cloud handles analytics, image CDN and brute-force protection
- Enable only the modules you need: the free tier is enough to start, paid backups or scanner are purchased individually
- Complete four steps: plugin installation, activation, WordPress.com authorization and module configuration
What is Jetpack and how it's built
Jetpack is a modular plugin from Automattic with 5+ million active installations. Key difference from most plugins: it doesn't run entirely on your server. After connecting to a WordPress.com account, Jetpack moves heavy operations to Automattic's cloud.
How this works in practice. The stats module doesn't burden your database with every page view, data is collected via REST API and processed on the WordPress.com side, and you see a ready dashboard in your admin panel. Image CDN (formerly Photon) serves your images through Automattic's global network, not from your hosting. VaultPress backups are written incrementally to cloud storage, every post edit is captured in real time.
The flip side of this architecture is connection dependency. If hosting blocks XML-RPC or REST API (and many high-security hosts do this), Jetpack simply won't connect. You'll need to manually unblock protocols or whitelist Automattic's IP addresses in .htaccess. For regular shared hosting this is rare, but on VPS with strict firewall, it happens.

Architecturally, Jetpack is a collection of modules, each of which can be enabled or disabled independently. This approach lets you avoid dragging the whole combine: enable only CDN, contact form and stats, and leave backups and social networks disabled. Modules don't conflict with each other because they're written by one team and tested in a unified cycle.
What Jetpack can do: breakdown by category
There are dozens of features, so let's sort them by groups, it's clearer this way what to take and what to skip.
Security and backups
With the free tier, you get brute-force protection. Jetpack analyzes password-guessing attempts across all connected sites and blocks attackers' IP addresses proactively: if a bot attacks a site in Berlin, your site in Kyiv also closes for that IP. This is "collective immunity" of a network of millions of sites.
The paid Jetpack Scan module checks core, themes and plugins for known vulnerabilities and malicious code. When a problem is found, you get a notification with the specific file and line. Automatic fix with one click if the problem is in core or plugin; for deeply embedded backdoors, manual restoration from backup may be required.
VaultPress Backup (included in Security plan or purchased separately) provides incremental real-time backups. Every change is captured: updated post, new comment, changed setting, save point ready. Restoration to a specific minute, not to yesterday. Storage limit is 10 GB in basic plan, for a site with video this is too little, for a text blog with images it's plenty. Akismet anti-spam filter is included.
Speed and performance
Main acceleration tool is free CDN for images and static files. Images from pages are automatically picked up, compressed and served through Automattic servers worldwide. A user from Tokyo gets images from the Asian node, not from your server somewhere in the Netherlands. Bandwidth savings on hosting are noticeable for a busy blog.
Site search (Jetpack Search, paid) is a full-text engine without MySQL load. For WooCommerce stores this is especially important: product filtering, instant results, sorting by relevance. VideoPress video hosting provides a terabyte of cloud storage and ad-free player, videos don't load your server and don't show other people's recommendations.
Growth and marketing
Stats module (free) shows traffic, top posts, traffic sources, countries and referrers right in WordPress admin, without going to Google Analytics. For a small blog this is enough to understand what people read and where they come from.
Jetpack Social (formerly Publicize) automatically publishes announcements of new posts to Facebook, LinkedIn, Bluesky, Threads, Mastodon and Tumblr right after hitting the "Publish" button. Related Posts are selected on the cloud side without loading the database.
New in 2026, AI Assistant right in the block editor: generates drafts, fixes grammar, changes text tone, translates to a dozen languages. Works inside Gutenberg, doesn't require API keys or third-party services.
Design and content
Galleries (tiled, carousel, slideshow), contact form with spam protection via Akismet, media embedding from Facebook and Instagram via oEmbed, subscriptions to new posts and comments, all this is free and enabled with a couple clicks. Payment block with Stripe and PayPal support lets you accept donations or sell digital goods without installing WooCommerce.
Installation and setup: step by step
Installing Jetpack is no more difficult than any other plugin from the WordPress catalog. Four steps with screenshots so you don't make mistakes.
Step 1: WordPress.com account
If you already have a WordPress.com account, skip this step. If not, go to wordpress.com and click the orange "Get Started" button. On the registration page, enter your email, username and password. You don't have to create a WordPress.com blog, you can register just with a username.

Fill in the details and click "Sign Up" (if registering without a blog) or "Create Blog" (if you want to create a WordPress.com blog at the same time).

Step 2: plugin installation and activation
In WordPress admin, go to "Plugins" → "Add New". In the search box, type "Jetpack", the plugin will be first in results. Click "Install Now".

After installation completes, click "Activate".

Step 3: connecting to WordPress.com
Right after activation, a blue banner with green "Connect to WordPress.com" button appears at the top of the page.

Click the button, you'll be redirected to the authorization page. Enter the username and password from WordPress.com (the ones you created in step 1). If you don't have an account yet, the "Need an account?" link on the same screen lets you create one.
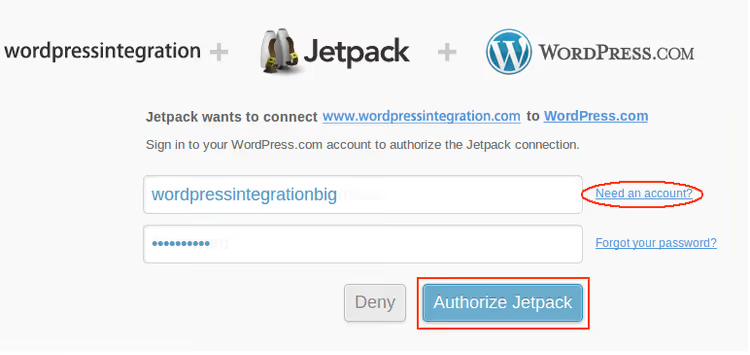
Enter login and password, click "Authorize Jetpack".
Step 4: module configuration
After successful authorization, you'll land on the Jetpack settings page. Each "card" on this page is a separate module. Most modules activate automatically, but some (usually paid ones, backups, scanner) require manual activation.
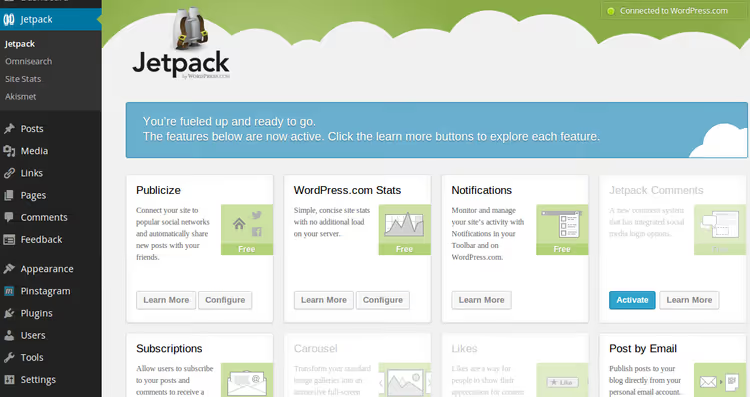
Click "Learn more" on any card to read what the module does. For activated modules, a "Configure" button appears, through it you configure parameters for each tool.
Is it worth paying: plan breakdown
Jetpack can be used completely free, and for a small blog or business card site this is enough. You get: brute-force protection, image CDN, basic stats, contact form, share buttons, subscriptions, Related Posts and galleries.
Paid plans are for when free isn't enough:
Plan | Key modules | Who it suits |
|---|---|---|
Security (basic paid) | VaultPress Backup (10 GB), Scan, Anti-spam | Blogs and small stores, real-time backups and hack protection |
Complete | Everything from Security + VideoPress (1 TB), Search, AI Assistant, Social, Stats Pro | Commercial sites and active blogs, full toolkit |
Individual modules | Any module individually | Those who need one specific feature, not a package |
"Take only what you need" strategy works like this: take free Jetpack, use the basics, and when you realize you need backups, buy VaultPress Backup separately. Need only fast search for WooCommerce, buy Jetpack Search. This is more transparent than the Complete package if you don't use all modules.
When not to pay: if you already have backups set up through hosting or a third-party plugin and it works. If your site is on fast VPS and images load instantly, Jetpack CDN won't give noticeable improvement. If you use Google Analytics and aren't ready to abandon it, Jetpack stats will be a duplicate, not a replacement.
⁉️🤔 Frequently asked questions
Is a WordPress.com account required for Jetpack to work?
Yes, connecting to WordPress.com is mandatory. Through this account, Automattic's cloud services are authorized: backups, CDN, stats, vulnerability scanner. Without it, the plugin will install but no modules will work. Exception is development mode on local server: some features are available without connection.
Does Jetpack slow down the site?
By itself, no, if you don't enable all modules indiscriminately. Image CDN speeds up page loading. Problems arise when you activate a dozen modules simultaneously on weak hosting: REST API requests to the cloud multiply, response time grows. Recipe: enable 5-7 needed modules, leave the rest disabled, and the site doesn't slow down.
Does Jetpack work without XML-RPC?
No. Jetpack requires active XML-RPC and REST API to communicate with Automattic servers. Some hosts block these protocols for security. Solution: unblock in hosting settings or add Automattic IP addresses to firewall whitelist.
Can Jetpack be used together with other security plugins?
Yes, but carefully. Two firewalls or two backup plugins running simultaneously conflict: duplicate requests, consume resources, interfere with each other. Simple rule: exactly one tool is responsible for each function (backup, firewall, caching). Chose backup from Jetpack, disable third-party backup plugin.
What happens if I cancel paid subscription?
Paid modules stop working. Backups made earlier are deleted some time after subscription ends. Vulnerability scanner is disabled. Free features (stats, CDN, contact forms, subscriptions) continue working.
Jetpack in 2026: take it or leave it
If you have a regular blog, landing page or small online store on shared hosting, Jetpack covers a bunch of tasks with one plugin. You get backups, brute-force protection, CDN and stats without dancing with settings for each tool separately. Time savings on administration are real, not marketing hype.
If your site is already on good VPS with manual management, hosting handles backups, and a separate CDN watches speed, Jetpack won't give magical improvement. Take individual modules for specific tasks (Search for WooCommerce, VideoPress for video), not the entire kit.
Main Jetpack rule: enable only what you actually need. Then it's a powerful tool. Enable all modules at once, you get slowdowns and mess in admin panel.
If you haven't tried it yet, start with the free tier. Five minutes to install, a couple days to test. During this time it will become clear which specific modules you need and which aren't worth paying for.

A professional team of writers and editors specializing in creating quality content.