














WordPress media library: how to upload, edit and manage images
You uploaded an image, but it doesn't display. Or you inserted a photo into a post, and it stretched across the entire screen. Or you simply cannot find where WordPress saved the uploaded file.
Sound familiar? The WordPress media library seems simple until you start working with it extensively. And extensively means every day: images for posts, galleries, thumbnails for social media, featured images for your theme. After six months of active blogging, your library accumulates thousands of files, and without understanding how it works, chaos sets in.
Below is a complete breakdown of the WordPress media library: from your first upload to advanced editing. No fluff, just concrete steps.
💡 Quick overview:
- Where the media library is located and what it stores
- How to upload files directly and from within the post editor
- How to change alt, title and caption for images (and why it matters)
- Built-in editor: cropping, rotating and scaling
- How galleries, featured images and attachment pages work
What is the WordPress media library
The media library is the central storage for all files you upload to your site: images, videos, audio, PDFs and other documents. WordPress stores them in the /wp-content/uploads/ folder, organized by year and month, and you can manage files through the admin panel: Media → Library.
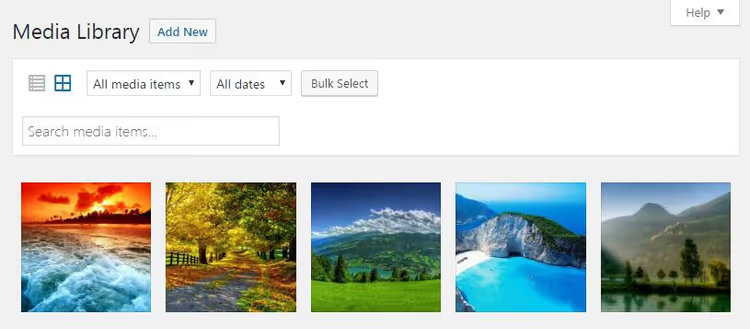
The library displays files in two modes: grid (thumbnails) and list (with columns: author, parent post, date). The interface is described in the official WordPress documentation: a grid with search on the right and filters at the top. Filters let you sort files by type (images, video, audio) and by upload month.
The "Unattached" feature finds files that are not linked to any post or page. This is useful when you uploaded an image through the media library but forgot to insert it somewhere. Bulk deletion works through the "Bulk Select" button: check everything you don't need and delete in one operation.
The search on the right looks for file names. When your library contains hundreds of images, you cannot do without it.
How to upload images to the media library
There are two ways. The first is uploading directly through the menu Media → Add New:
- Drag files into the rectangular area or click "Select Files."
- Choose images from your computer.
- WordPress starts uploading, with each file showing its own progress indicator.
Upload speed depends on your hosting and file sizes. On good hosting, a dozen optimized JPGs at 200 KB each upload in seconds. Multi-upload (several files at once) works by default. If it fails, WordPress offers a browser uploader that takes one file at a time but works even on older computers.
The second way is uploading directly from the post editor. In the block editor (Gutenberg), you add an Image block and choose "Upload" or "Media Library" to insert an already uploaded file. In the classic editor, use the "Add Media" button above the text field.
Both paths lead to the same media library. A file uploaded through the editor will appear in the general Media → Library list, and vice versa.
How to insert an image into a post
In the block editor, you add an Image block and select a file from the library or upload a new one. A settings panel appears on the right: size, alignment, click link and the alt text field.
In the classic editor, the process is as follows:
- Place your cursor where you want the image.
- Click "Add Media."
- Select the "Media Library" tab and click on the image.
- An Attachment Details panel appears on the right, where you can fill in the title, caption, alt text and description.
- Choose the insert size from the dropdown list.
- Click "Insert into post."
When inserting, WordPress offers several sizes. By default these are thumbnail (150×150 pixels), medium (300×300 max), large (1024×1024 max) and full size. All default values are described on the WordPress media settings page. You can change the size options in Settings → Media, and your theme or plugins may add their own, such as medium_large (768 pixels wide).
An important point: WordPress does not crop the original. It creates copies for each size. An HD photo of 5 MB, inserted as "medium size," weighs 30-50 KB on the page, while the original remains in the library for other needs.
How to edit image details
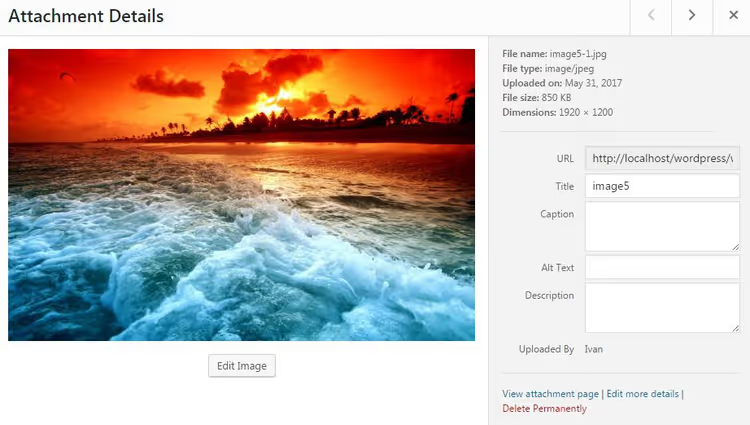
Each uploaded image gets its own panel with metadata. To open it, click on the file in the media library. Fields worth filling in:
- Title usually matches the file name. Change it to something readable, because some themes and plugins display it in lightbox viewers.
- Alt text is the most important field. This is what search engines and screen reader users will see. Describe the image content in 4-8 words in your language, without keyword stuffing. Do not confuse alt (alternative text for an unavailable image) with title (a tooltip that appears on hover).
- Caption is text that displays below the image directly in the content. Visible to all visitors.
- Description remains on the attachment page (see section below). Not critical for most sites.
On the right, service information is displayed: file name, type (JPEG/PNG/WebP/AVIF), upload date, file size and resolution in pixels. There is also a direct link to the file (the "File URL" field), which you can copy for external use.
The "Edit more details" link at the very bottom opens fields that WordPress fills from the photo's EXIF data (if available): author, source, capture date and more.
How to edit an image: cropping, rotating, scaling
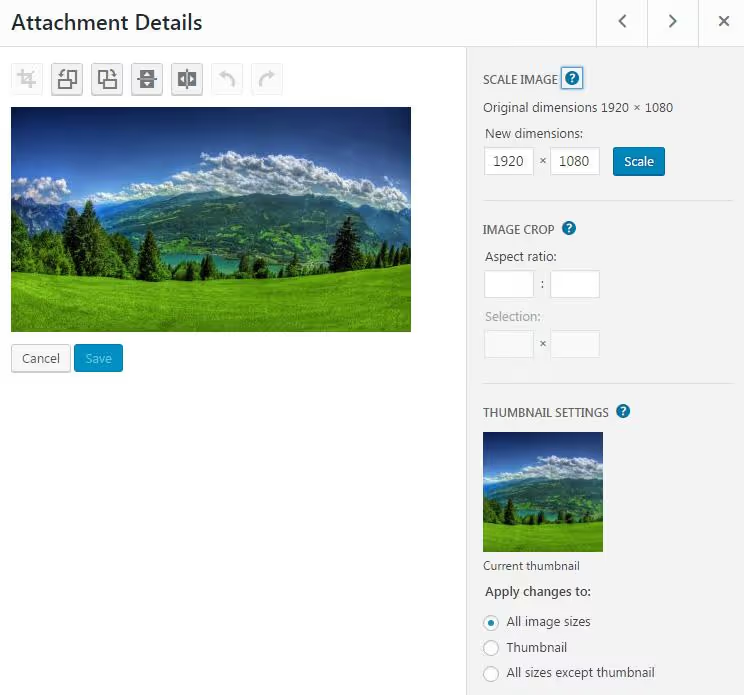
WordPress includes a built-in image editor. Not Photoshop, but sufficient for quick fixes before publishing. It opens through the "Edit Image" button below the file in the media library.
Rotation. Buttons for rotating left and right. Useful when a photo uploads sideways, as WordPress does not always correctly read orientation from EXIF.
Scaling. Enter a new width or height, and WordPress recalculates the other value while maintaining proportions. You cannot enlarge an image (a red exclamation mark will appear). Only reduce. A working tool for properly resizing large photos.
Cropping. Select an area with your mouse and click the crop button. Hold Shift while selecting to maintain proportions. In the right panel, you can set an exact aspect ratio: 1:1 (square for social media), 4:3, 16:9 or custom. The minimum crop size is the thumbnail size from media settings.
The "Apply changes to" button determines which copies the edit affects: all sizes, thumbnail only, or everything except the thumbnail. Convenient when the square thumbnail should show only a fragment, while the post displays the full image.
Undo and redo buttons save you from accidental mouse movements. Results are saved immediately, and the original in the media library is overwritten. Before making significant edits, download a backup copy of the file.
Galleries, featured images and inserting by URL
Gallery
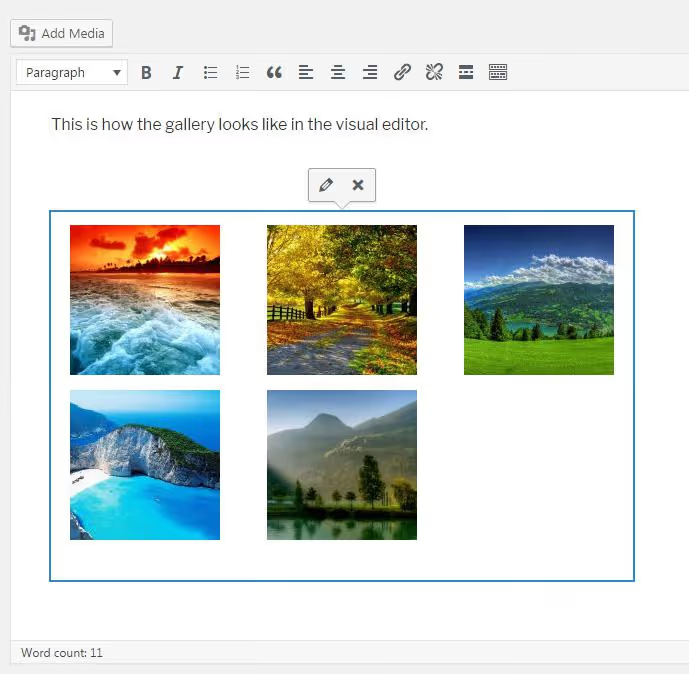
In the block editor, the Gallery block handles galleries: select multiple images, and WordPress assembles them into a grid with settings for column count, size and crop type.
In the classic editor, click "Add Media" → "Create Gallery," select multiple images and click "Create a new gallery." In text mode (Text), the gallery is represented by the [gallery] shortcode. You can extend it with parameters: columns (columns), size (size), link (click link). Details are in the WordPress documentation.
Featured image
The featured image (also called "Post Thumbnail") is the main image for a post or page. It is set in the editor sidebar (the "Featured Image" block in Gutenberg, or a metabox at the bottom right in the classic editor).
How your theme uses the featured image depends on the theme itself: some display it above the title at full width, others only in post lists as a thumbnail, and some ignore it entirely. Check how this works in your theme before publishing a dozen posts with identical images.
Inserting by URL
If an image is hosted on another server and you do not want to duplicate it in your media library, WordPress allows you to insert it via direct link. In the classic editor: "Add Media" → "Insert from URL" → paste the URL → preview → "Insert into post."
In the block editor, use the Image block → "Insert from URL."
The rule is simple: only insert by URL your own images or files with an explicit usage license. Using someone else's photo without permission is a copyright violation.
Attachment pages: what they are and whether you need them
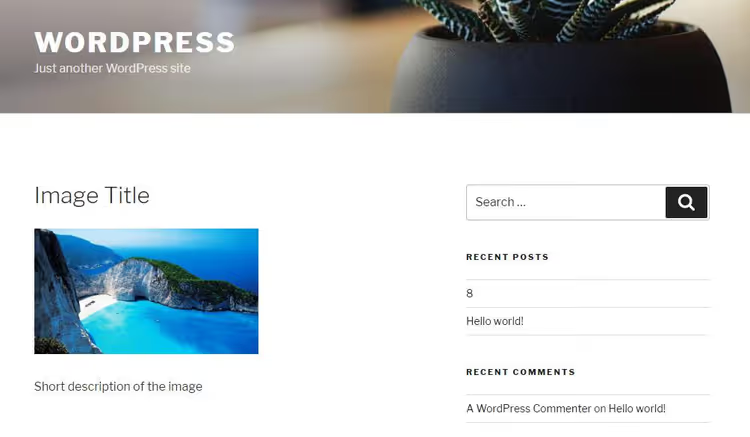
Each uploaded file automatically gets its own page, the attachment page. You can access it through the media library: click on a file → "View attachment page."
This is a full WordPress page with its own URL. It displays the image itself, title, description, caption and alt text. The presentation format depends on the theme: some add EXIF data, others show only the image and title.
For most sites, attachment pages are unnecessary overhead. They get indexed by search engines, create thin pages with zero content and bloat the sitemap. If you are not a photographer maintaining a portfolio, it is better to disable attachment pages. The Yoast SEO plugin does this with a single checkbox in settings. Another approach is to redirect the attachment page to the file itself or to the parent post via code in functions.php.
Note: even if you disable attachment pages, the files themselves and their metadata in the media library remain intact. You can still insert them into posts and edit their details.
Related video
A short but comprehensive tutorial on the WordPress media library, from uploading files to organizing your library:
⁉️🤔 Frequently asked questions
What format should I use for uploading images to a website?
The optimal formats for the web are WebP and AVIF: better compression than JPEG and PNG at the same visual quality. WordPress has supported WebP since version 5.8, and AVIF since version 6.1 (depending on the PHP environment on your hosting). If your hosting does not support modern formats, upload JPEG for photographs and PNG for graphics with transparency. Compress files before uploading: photos to 150-200 KB, graphics to 50-100 KB. Heavy images slow down your site and consume disk space.
Can I restore a deleted image?
No. WordPress deletes the file permanently: both the original and all generated thumbnails. There is no trash bin in the media library. Before bulk cleanup, make a backup through a plugin (UpdraftPlus, BlogVault) or download an archive of
/wp-content/uploads/via FTP. Only a backup copy gives you a second chance.
What is the difference between alt text and image title?
Alt is a text replacement for the image. Search engines read it (to understand content) and screen readers use it (for visually impaired users). Title is a tooltip that appears on mouse hover, and it is secondary. Always fill in alt, and do it properly. You can skip title entirely, as most themes and browsers ignore it.
How many images can I upload to the media library?
There is no formal limit. The practical limit is determined by three factors: hosting disk space, inode limit (number of files in the file system) and PHP resources for processing thumbnails. On cheap shared hosting, problems start after 5000-10000 files. The solution is to organize folders through a plugin like FileBird or Media Library Folders and promptly delete unused files.
How do I find and delete unused images?
WordPress has no built-in tool for this. Plugins like Media Cleaner scan the library and show files that are not inserted in any post or page. Before deleting, check whether the theme (logo, background) or a widget references the file. And definitely make a backup.
What to do with your media library right now
The media library is not the Downloads folder on your computer. The "upload and forget" approach leads to gigabytes of junk, slower backups and chaos when searching for a file six months later.
Here are three actions for today:
- Go to Media → Library, enable list mode and filter for unattached files. Delete everything you do not recognize or use.
- Open media settings (Settings → Media) and adjust thumbnail sizes to match your design. A zero value for height means "do not crop."
- Check your latest post: does every image have alt text filled in? If not, fill it in with two clicks. Proper alt text provides the main SEO benefit from images, as search engines understand an image through its alt text, not through pixels.
And if you want to seriously work on site speed, the next step is image optimization: compression without quality loss and lazy loading. Let us know in the comments how many files you counted in your media library.

A professional team of writers and editors specializing in creating quality content.