














🚀 How to set up Pinterest Rich Pins for a WordPress site
What are Pinterest Rich Pins and why your site needs them
Rich Pins are enhanced pins that automatically pull metadata from your site. Unlike regular pins where information is limited to a user-written description, Rich Pins display the title, author, price, or ingredients directly on the card, regardless of what the user wrote when saving.
For a WordPress site owner, this means three specific benefits:
- More clicks. A pin with a title and description looks more convincing than just an image, so CTR naturally increases.
- Automatic updates. When you change a product price or article title, Pinterest pulls the update within 24 hours without manual pin editing.
- Priority in Pinterest search. Rich Pins rank higher in the smart feed and platform search because Pinterest favors structured content.
💡 Quick overview:
- Create a Pinterest business account (free, takes less than a minute)
- Install Yoast SEO on WordPress and enable Open Graph markup
- Copy the verification meta tag from Pinterest into Yoast settings
- Publish a post with a filled-in meta description, and Rich Pins activate automatically for your entire site
Three types of Rich Pins: which one to choose
As of early 2026, Pinterest officially supports three types of Rich Pins. The fourth type, App Pins for iOS applications, has been discontinued and is no longer mentioned in the platform documentation. Let's examine each of the three current types.
Article Pins for blogs and content sites
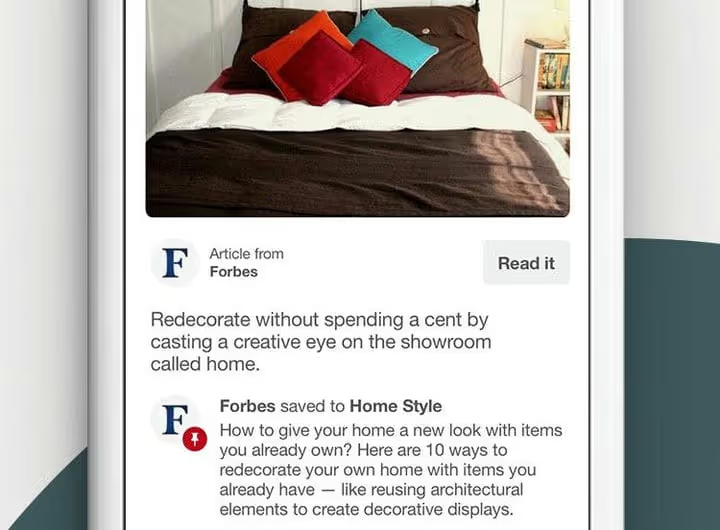
Article Pins are the main type for any site with a blog. When saving a page, Pinterest adds the article title, author name, and meta description to the image. The pinner immediately sees what the content is about before clicking.
Technically, Article Pins rely on Open Graph markup: the og:title, og:description, and og:type tags. These are exactly the tags that SEO plugins like Yoast add automatically, so you don't need to touch the code.
Product Pins for online stores
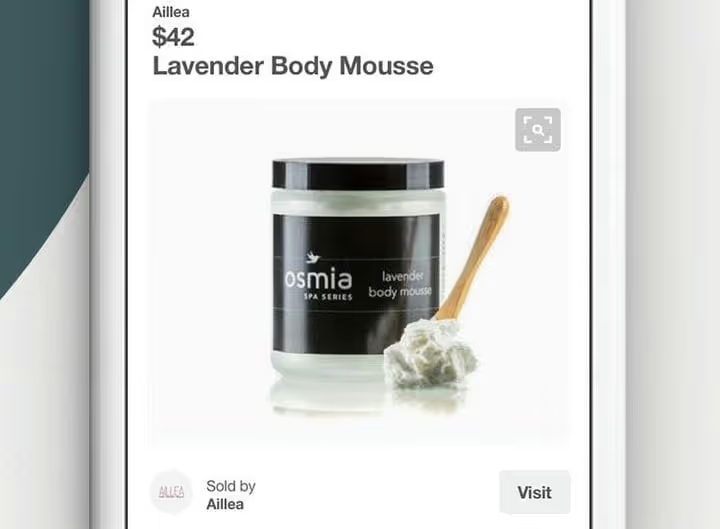
Product Pins display price, availability, and purchase location directly on the pin. Shoppers see the cost and stock status before visiting the store, which filters out uninterested traffic and reduces bounce rate.
For WooCommerce and Shopify, integration works through Pinterest catalogs or Schema.org markup with Product and Offer types. Pinterest also adds "Best seller" and "Popular" badges for high-demand products within a category.
Recipe Pins for food blogs
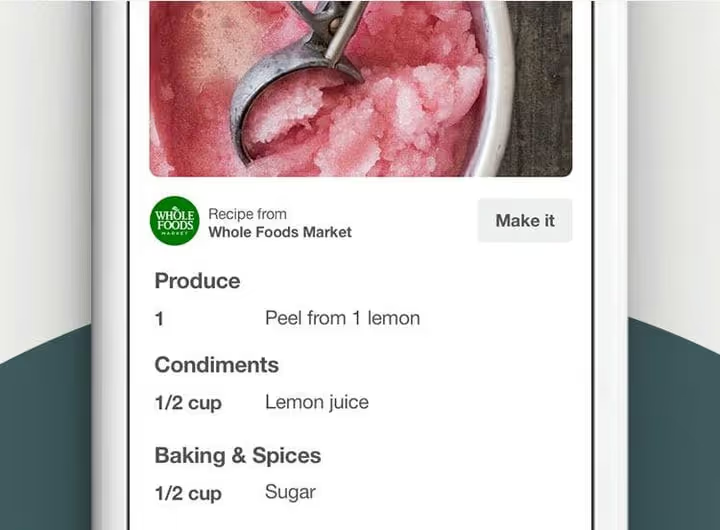
Recipe Pins display the ingredient list, cooking time, serving size, and rating. For food bloggers, this is a must-have: users see the dish composition right in the feed and save the pin consciously rather than just because of a "pretty picture."
On WordPress, setup comes down to installing the WP Recipe Maker plugin, which automatically generates JSON-LD Schema.org markup for every post containing a recipe.
Step 1: Create a Pinterest business account
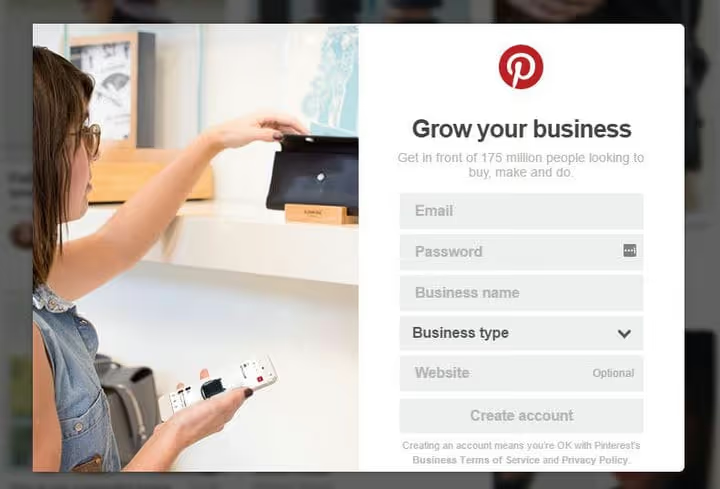
Rich Pins are only available for Pinterest business accounts. A regular personal profile doesn't support site verification and metadata, so you need to convert. It's free and takes less than a minute.
Two scenarios:
- New account. Go to pinterest.com/business/create/ and register with your email, password, and brand name.
- Converting an existing account. In your profile settings, select "Switch to business account." Pinterest will preserve all your boards, pins, and followers.
After switching, an Analytics section appears in the sidebar menu, and your profile settings will include a field for site verification.
Step 2: Connect Pinterest to WordPress through Yoast SEO

The most reliable way to link WordPress and Pinterest is the Yoast SEO plugin. It solves two tasks at once: adds Open Graph markup (needed for Article Rich Pins) and simplifies site verification through Pinterest's HTML tag.
Installing Yoast SEO
If the plugin isn't installed yet:
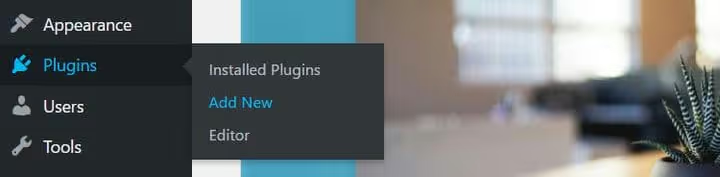
In the WordPress admin, go to Plugins → Add New.
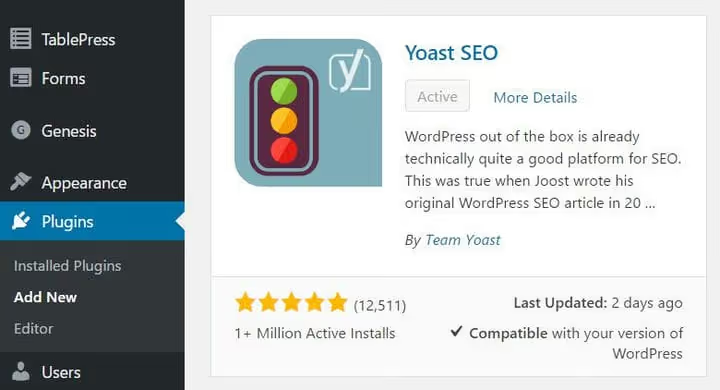
In the search bar, type "Yoast SEO," click Install, then Activate.

An SEO item appears in the sidebar menu. Go to SEO → General.
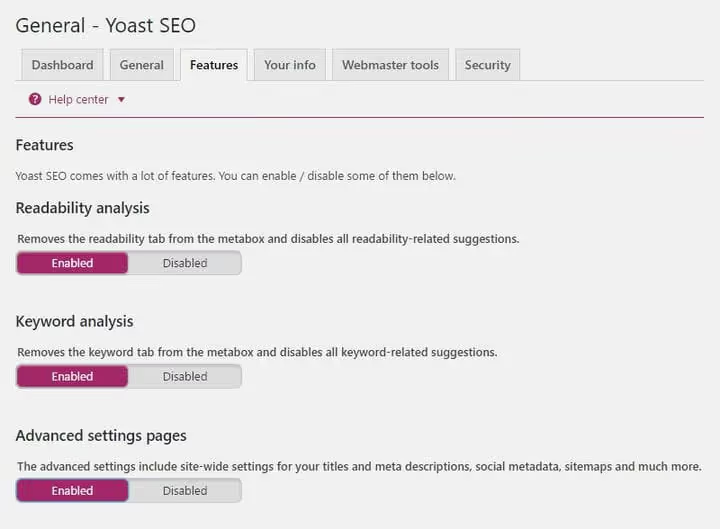
Open the Features tab. In the "Additional settings pages" section, enable the toggle and click Save Changes at the bottom of the page.
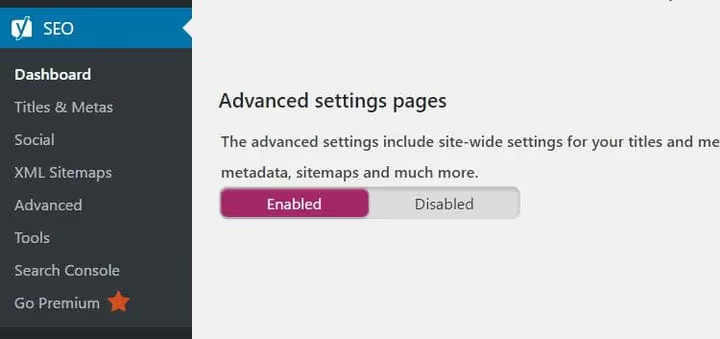
Now the SEO menu displays a Social submenu item, which you'll need for inserting the Pinterest verification meta tag.
Verifying your site in Pinterest
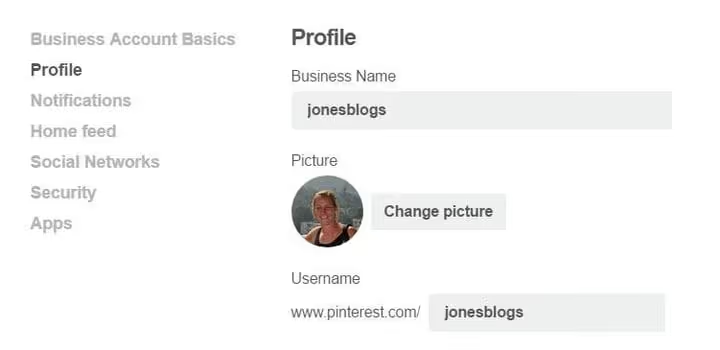
In your Pinterest business account, go to Settings → Profile.

In the "Website" field, enter your site URL and click Claim website.
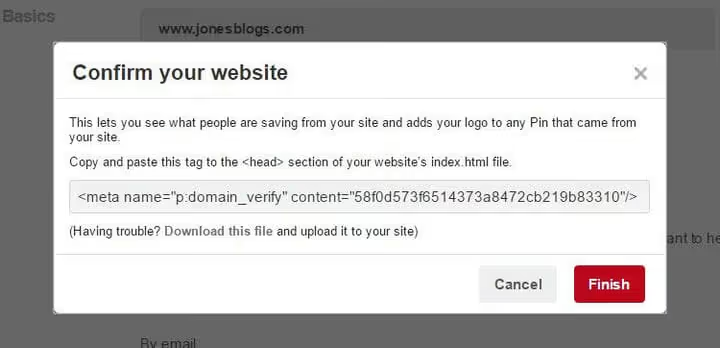
Pinterest will generate an HTML tag like <meta name="p:domain_verify" content="...">. Copy it entirely.
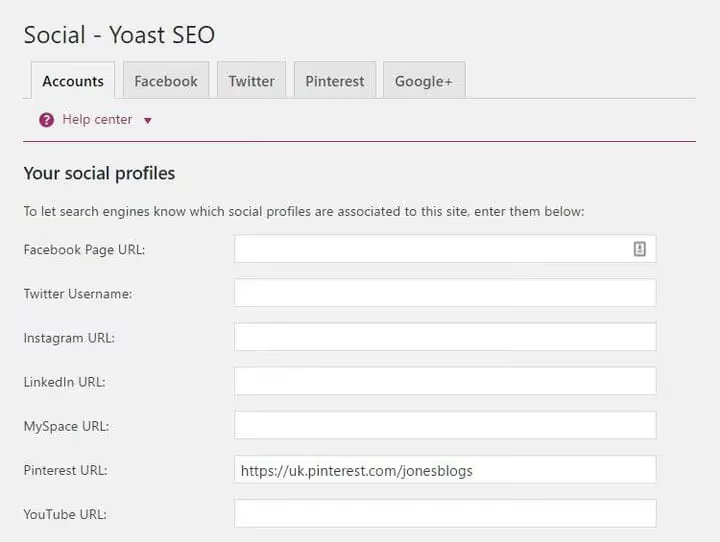
Return to WordPress: SEO → Social. On the Accounts tab, enter your Pinterest profile URL (for example, https://www.pinterest.com/yourusername), then save.
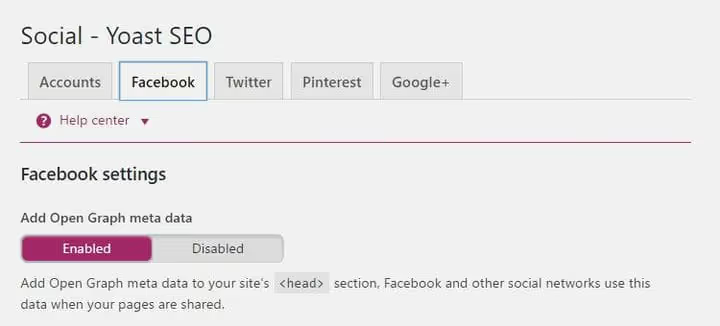
Switch to the Facebook tab and make sure the "Add Open Graph metadata" option is enabled. This option generates og:title and og:description for each post, which creates the foundation for Article Rich Pins.
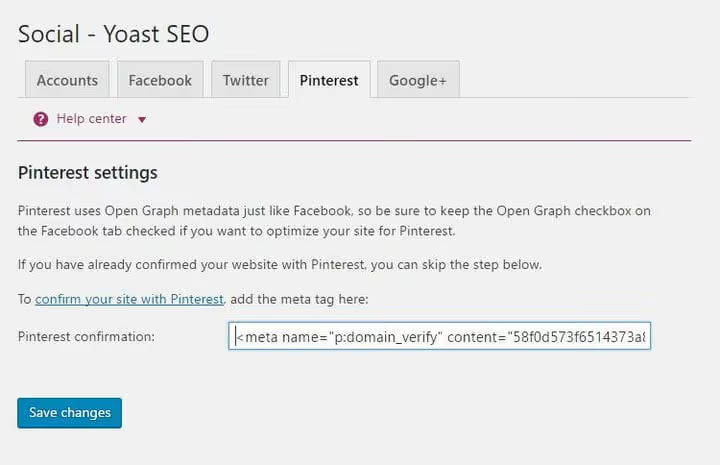
Open the Pinterest tab, paste the copied verification meta tag, and click Save Changes. Return to Pinterest and click Done.
Verification usually works instantly but may take up to an hour. After successful verification, your site and business account are linked, and you can proceed to setting up Rich Pins.
Step 3: Set up Article Pins
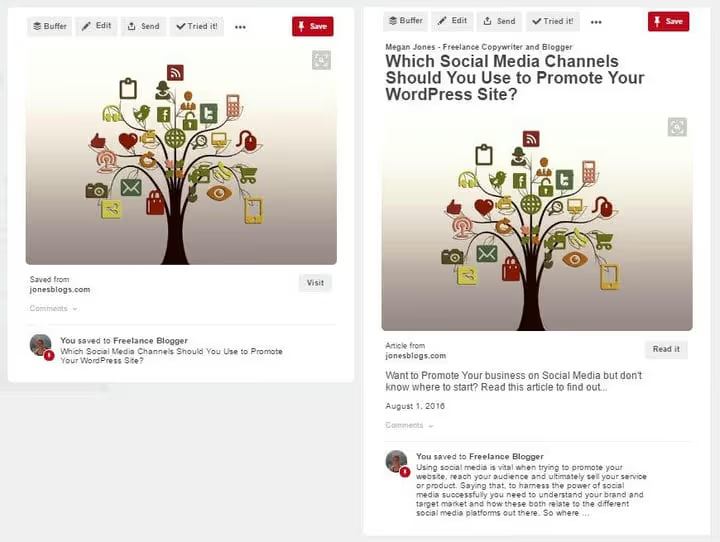
Article Pins are the most popular type of Rich Pins for blogs. The difference from a regular pin is obvious: a Rich Pin carries the article title, author, and description, while a regular pin only shows an image and user-written text.
Metadata: the foundation is already working
If Yoast SEO is installed and Open Graph is enabled (Step 2), Article Pins metadata is already being generated on every post and page. Yoast uses two key fields from below the editor:
- SEO Title →
og:titletag - Meta description →
og:descriptiontag
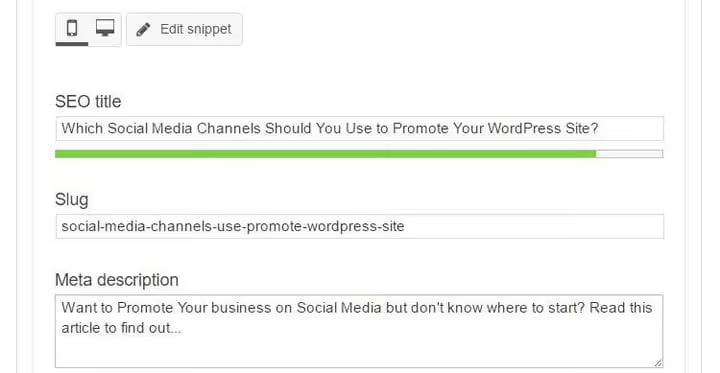
Don't leave the meta description empty. If it's missing, Pinterest will take the first two sentences of the post text, and those rarely make a good pin preview. A meta description of 140-160 characters with a clear reason to click delivers maximum conversion from the Pinterest feed to site visits.
Activation: automatic for the entire site

Since 2024, Pinterest has simplified the process: manual validation through a special tool is no longer required. When Open Graph markup is enabled on your site, Pinterest automatically recognizes the metadata when a pin is first saved. Simply publish a post with a filled-in meta description, and all subsequent pins from it become Article Rich Pins.

Activation happens for the entire domain at once. One post with metadata, and any page on the site with Open Graph or Schema.org markup automatically generates Rich Pins. New posts and products are picked up automatically without additional action.
Before publishing, clear your WordPress cache (especially if you use WP Rocket or W3 Total Cache) so Pinterest sees the current markup rather than a cached version of the page.
Step 4: Set up Recipe Pins for a food blog

If you publish recipes, install WP Recipe Maker, a free plugin that embeds JSON-LD Schema.org markup of type Recipe in every post containing a recipe.
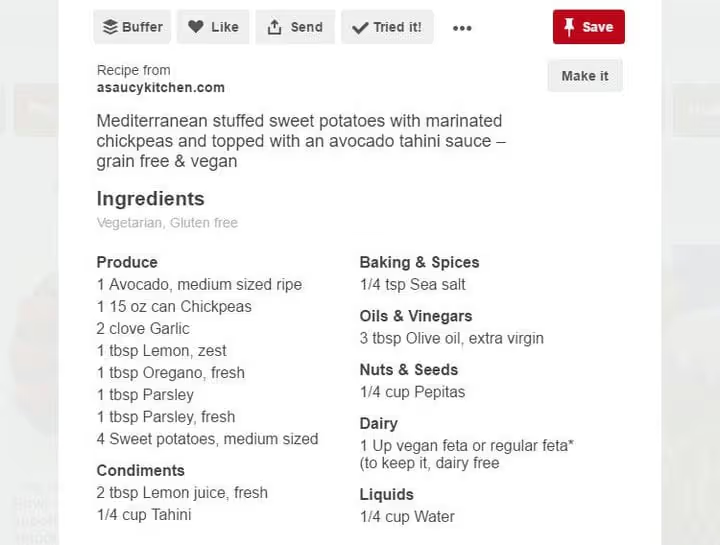
Steps after installing the plugin:
- Create or edit a post; the WP Recipe Maker block will appear in the editor.
- Fill in the recipe fields: name, ingredients, cooking time, serving size.
- Publish the post.
- Publish the post; Pinterest will automatically recognize the Schema.org markup the next time a pin is saved.
The plugin automatically generates markup for ingredients, cooking time, and servings. Additionally supported: ratings (aggregateRating), dietary labels (vegan, gluten-free, paleo, vegetarian), and reviews. The more completely you fill out the recipe card, the more informative your Recipe Pin looks in the feed.
Step 5: Set up Product Pins for an online store

For Shopify, Pinterest integration works natively: install the Pinterest app in the Shopify admin, connect the catalog, and products sync automatically.
For WooCommerce and other platforms, the process is slightly longer:
- Make sure product pages contain Schema.org markup with
ProductandOffertypes. Most SEO plugins (Yoast WooCommerce SEO, Rank Math) do this automatically. - Alternatively, upload a catalog via Pinterest Catalogs, a CSV or XML feed with prices, availability, and descriptions. The catalog also lets you run Shopping Ads.
- Pinterest automatically recognizes the markup when a pin with a product is first saved; no additional validation is required.
Important note: Pinterest only shows the price and availability badge if the product is in stock, the price is current, and the store complies with the merchant guidelines. Product Pins may not work for made-to-order items or products with variable pricing.
Video tutorial: complete Rich Pins setup
The text instructions cover all steps, but a visual walkthrough helps reinforce the process. Below is a step-by-step video on setting up Rich Pins on WordPress with a demonstration of each screen:
⁉️🤔 Frequently asked questions
Do I have to pay for Rich Pins?
No, Rich Pins are a free Pinterest feature. The only requirement is a business account (also free; converting a personal profile takes less than a minute). There are no pricing tiers, subscriptions, or hidden fees.
How soon do Rich Pins start working after activation?
Usually metadata is picked up the very first time a pin is saved after publishing a post. Pinterest officially notes that full synchronization can take up to 24 hours. If pins haven't updated after a day, verify that Open Graph markup is active, clear your site cache, and save a new pin from any post.
Can I use a different SEO plugin instead of Yoast?
Yes. Any plugin with Open Graph support works: Rank Math, All in One SEO, SEOPress. The principle stays the same: enable
og:title,og:description, andog:type, add the Pinterest meta tag in the plugin settings, publish a post, and save a pin.
Why doesn't Pinterest see the metadata after publishing?
Three most common causes: (a) Open Graph isn't enabled (check the Facebook or Social tab in your SEO plugin); (b) a caching plugin (WP Rocket, W3 Total Cache) is serving an old version of the page without markup (clear the cache); (c) your WordPress theme doesn't call the
wp_head()function (check header.php). After fixing, save a fresh pin from the updated post and wait up to 24 hours.
Does one post with metadata activate Rich Pins for the entire site?
Yes. Once Pinterest detects Open Graph or Schema.org markup on any page of the domain, all subsequent pins from that site automatically become Rich Pins. New posts and products are picked up automatically without any additional action on your part.
How do I disable Rich Pins for a specific page?
Add the meta tag
<meta name="pinterest-rich-pin" content="false" />to the<head>of the desired page. This blocks Rich Pins only for that page; the rest of your site continues working as usual. To re-enable, simply remove this tag.
Is it worth setting up Rich Pins in 2026
Short answer: yes, and the sooner the better. Pinterest remains one of the few platforms where organic reach is still noticeable. The platform's visual search and "smart" feed depend less on subscriptions than Instagram or Facebook algorithms, and a pin's lifespan is measured in months rather than hours.
Which type of Rich Pins to choose depends on your content:
- Running a blog → Article Pins via Yoast SEO. Setup takes an hour, then it works automatically for every new post.
- Selling products → Product Pins plus a Pinterest catalog. Shoppers see the price before clicking, so conversion is higher.
- Publishing recipes → WP Recipe Maker + Recipe Pins. Ingredients and cooking time appear right in the feed.
All three types are set up following the same scenario: markup on the site, publish a post, save a pin, and Pinterest automatically picks up metadata for the entire domain. Nothing more complex than copying a meta tag and filling in a meta description.

A professional team of writers and editors specializing in creating quality content.